Page 2 - Unpacking and levelling; Connecting the electricity and water; Installation
2 GB ! This instruction manual should be kept in a safe place for future reference. If the washing machine is sold, transferred or moved, make sure that the instruction manual remains with the machine so that the new owner is able to familiari- se himself/herself with its operation and features. ! R...
Page 3 - The first wash cycle
GB 3 Connecting the drain hose Connect the drain hose, without bending it, to a drai- nage duct or a wall drain located at a height between 65 and 100 cm from the floor; alternatively, rest it on the side of a washbasin or bathtub, fastening the duct supplied to the tap ( see figure ). The free end ...
Page 4 - Instructions for the fitter
4 GB Instructions for the fitter Mounting the wooden panel onto the door and inser- ting the machine into cabinets: In the case where the machine must be shipped for final installation after the wooden panel has been mounted, we suggest leaving it in its original packaging. The packaging was designe...
Page 6 - Description of the washing; Control panel
6 GB Detergent dispenser drawer: used to dispense detergents and washing additives ( see “Detergents and laundry” ). ON/OFF button : press this briefly to switch the ma- chine on or off. The START/PAUSE indicator light, which flashes slowly in a green colour shows that the machine is switched on. To...
Page 7 - Display
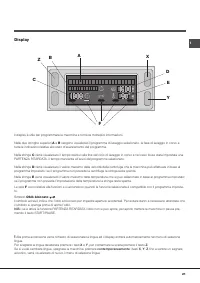
GB 7 Display The display is useful when programming the machine and provides a great deal of information. The two upper strings A and B provide details of the wash cycle selected, the wash cycle phase in progress and all informa- tion relating to the progress status of the wash cycle. String C shows...
Page 8 - Running a wash cycle
8 GB Running a wash cycle 1 . SWITCH THE MACHINE ON. Press the button; the text HELLO will appear on the display and the START/PAUSE indicator light will flash slowly in a green colour. 2. LOAD THE LAUNDRY. Open the porthole door. Load the laundry, making sure you do not exceed the maximum load valu...
Page 9 - Wash cycles and functions; Wash functions; Table of wash cycles
GB 9 Wash cycles and functions Wash functions Super Wash This option offers a high- performance wash due to the greater quantity of water used in the initial phase of the cycle, and due to the increased wash cycle duration, is particular- ly useful for the removal of stubborn stains. It can be used ...
Page 10 - Preparing the laundry; Special wash cycles; Load balancing system; Detergents and laundry
10 GB Detergent dispenser drawer Good washing results also depend on the correct dose of detergent: adding too much detergent will not necessa- rily result in a more efficient wash, and may in fact cause build up on the inside of your appliance and contribute to environmental pollution. ! Use powder...
Page 11 - Precautions and tips; General safety
GB 11 Precautions and tips ! This washing machine was designed and constructed in accordance with international safety regulations. The fol- lowing information is provided for safety reasons and must therefore be read carefully. General safety • This appliance was designed for domestic use only.• Th...
Page 12 - Care and maintenance
12 GB Care and maintenance Cutting off the water and electricity supplies • Turn off the water tap after every wash cycle. This will limit wear on the hydraulic system inside the washing machine and help to prevent leaks. • Unplug the washing machine when cleaning it and du- ring all maintenance wor...
Page 13 - Troubleshooting
GB 13 Troubleshooting Your washing machine could fail to work. Before contacting the Technical Assistance Centre ( see “Assistance” ), make sure that the problem cannot be solved easily using the following list. Problem: The washing machine does not switch on. The wash cycle does not start. The wash...
Page 14 - Service
14 GB Service Before calling for Assistance: • Check whether you can solve the problem alone ( see “Troubleshooting” ); • Restart the programme to check whether the problem has been solved; • If this is not the case, contact an authorised Technical Assistance Centre using the telephone number provid...
Page 15 - Sommario; Detersivi e biancheria, 24; LAVABIANCHERIA; Istruzioni per l’uso
15 I Italiano Sommario Installazione, 16-17-18-19 Disimballo e livellamento Collegamenti idraulici ed elettrici Primo ciclo di lavaggio Dati tecnici Istruzioni per l’installatore Descrizione della lavabiancheria, 20-21 Pannello di controllo Display Come effettuare un ciclo di lavaggio, 22Programmi e...
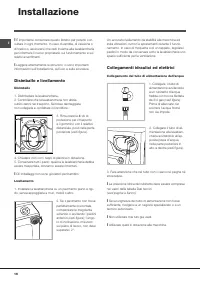
Page 16 - Disimballo e livellamento; Collegamenti idraulici ed elettrici; Installazione
16 I ! È importante conservare questo libretto per poterlo con- sultare in ogni momento. In caso di vendita, di cessione o di trasloco, assicurarsi che resti insieme alla lavabiancheria per informare il nuovo proprietario sul funzionamento e sui relativi avvertimenti. ! Leggere attentamente le istru...
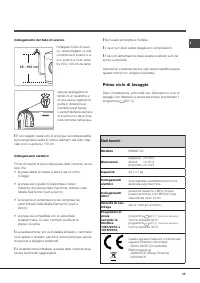
Page 17 - Primo ciclo di lavaggio
17 I Collegamento del tubo di scarico Collegare il tubo di scari- co, senza piegarlo, a una conduttura di scarico o a uno scarico a muro posti tra 65 e 100 cm da terra; oppure appoggiarlo al bordo di un lavandino o di una vasca, legando la guida in dotazione al rubinetto ( vedi figura ). L’estremità...
Page 18 - Istruzioni per l’installatore
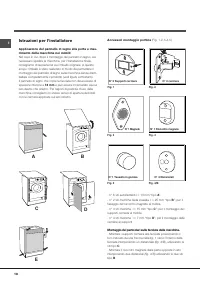
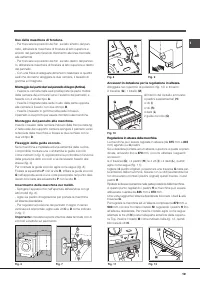
18 I Istruzioni per l’installatore Applicazione del pannello in legno alla porta e inse- rimento della macchina nei mobili: Nel caso in cui, dopo il montaggio del pannello in legno, sia necessario spedire la macchina per l’installazione finale, consigliamo di lasciarla nel suo imballo originale. A q...
Page 20 - Descrizione della lavabiancheria; Pannello di controllo
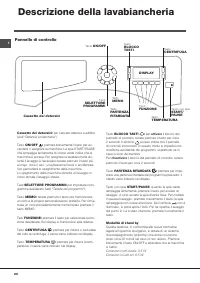
20 I Descrizione della lavabiancheria Cassetto dei detersivi: per caricare detersivi e additivi ( vedi “Detersivi e biancheria” ). Tasto ON/OFF : premere brevemente il tasto per ac- cendere o spegnere la macchina. La spia START/PAUSE che lampeggia lentamente di colore verde indica che la macchina è ...
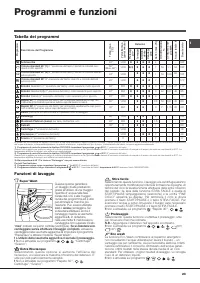
Page 23 - Programmi e funzioni; Funzioni di lavaggio; Tabella dei programmi
23 I Programmi e funzioni Funzioni di lavaggio Super Wash Questa opzione garantisce un lavaggio di alte prestazioni grazie all’utilizzo di una maggior quantità d’ acqua nella fase iniziale del ciclo e alla maggior durata del programma ed è utile per eliminare le macchie più resistenti. Può essere ut...
Page 24 - Preparare la biancheria; Programmi particolari
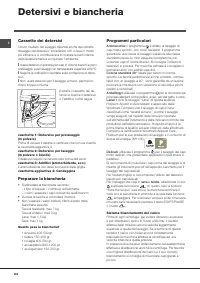
24 I Cassetto dei detersivi Il buon risultato del lavaggio dipende anche dal corretto dosaggio del detersivo: eccedendo non si lava in modo più efficace e si contribuisce a incrostare le parti interne della lavabiancheria e a inquinare l’ambiente. ! Usare detersivi in polvere per capi in cotone bian...
Page 25 - Precauzioni e consigli; Sicurezza generale
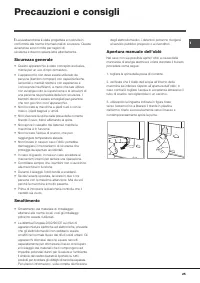
25 I Precauzioni e consigli ! La lavabiancheria è stata progettata e costruita in conformità alle norme internazionali di sicurezza. Queste avvertenze sono fornite per ragioni di sicurezza e devono essere lette attentamente. Sicurezza generale • Questo apparecchio è stato concepito esclusiva- mente ...
Page 26 - Manutenzione e cura
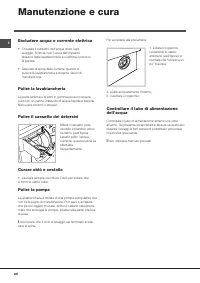
26 I Manutenzione e cura Escludere acqua e corrente elettrica • Chiudere il rubinetto dell’acqua dopo ogni lavaggio. Si limita così l’usura dell’impianto idraulico della lavabiancheria e si elimina il pericolo di perdite. • Staccare la spina della corrente quando si pulisce la lavabiancheria e duran...
Page 27 - Anomalie e rimedi; Anomalie:
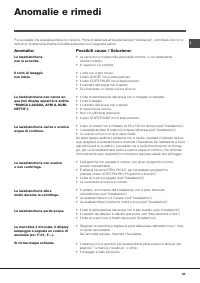
27 I Può accadere che la lavabiancheria non funzioni. Prima di telefonare all’Assistenza ( vedi “Assistenza” ), controllare che non si tratti di un problema facilmente risolvibile aiutandosi con il seguente elenco. Anomalie e rimedi Anomalie: La lavabiancheria non si accende. Il ciclo di lavaggio no...
Page 28 - Assistenza Attiva 7 giorni su 7; Assistenza
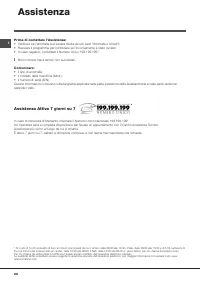
28 I Prima di contattare l’Assistenza: • Verificare se l’anomalia può essere risolta da soli ( vedi “Anomalie e rimedi” ); • Riavviare il programma per controllare se l’inconveniente è stato ovviato; • In caso negativo, contattare il Numero Unico 199.199.199*. ! Non ricorrere mai a tecnici non autor...
Page 29 - Sumario; Detergentes y ropa, 38; Manual de instrucciones; LAVADORA
ES 29 Español Sumario Instalación, 30-31-32-33 Desembalaje y nivelación Conexiones hidráulicas y eléctricas Primer ciclo de lavado Datos técnicos Instrucciones para el instalador Descripción de la lavadora, 34-35 Panel de control Pantalla Cómo efectuar un ciclo de lavado, 36Programas y funciones, 37...
Page 30 - Desembalaje y nivelación; Conexiones hidráulicas y eléctricas; Instalación
30 ES ! Es importante conservar este manual para poder consul- tarlo en cualquier momento. En caso de venta, de cesión o de traslado, verifique que permanezca junto con la lava- dora para informar al nuevo propietario sobre el funciona- miento y brindar las correspondientes advertencias. ! Lea atent...
Page 31 - Primer ciclo de lavado
ES 31 Conexión del tubo de descarga Conecte el tubo de de- scarga, sin plegarlo, a una tubería de descarga o a una descarga de pared colo- cadas a una altura del piso entre 65 y 100 cm; o apóyelo en el borde de un lavamanos o de una bañera, uniendo la guía suministrada con el aparato, al grifo ( ver...
Page 32 - Instrucciones para el instalador
32 ES Instrucciones para el instalador Aplicación del panel de madera en la puerta e intro- ducción de la máquina en los muebles: En el caso en que, después del montaje del panel de ma- dera, sea necesario trasladar la máquina para su instalación final, aconsejamos dejarla en su embalaje original. D...
Page 34 - Descripción de la lavadora; Panel de control
34 ES Contenedor de detergentes: para cargar detergentes y aditivos ( ver “Detergentes y ropa” ). Botón ON/OFF : presione brevemente el botón para encender o apagar la máquina. El piloto START/PAUSE que centellea lentamente de color verde indica que la máquina está encendida. Para apagar la lavadora...
Page 35 - Pantalla
ES 35 Pantalla La pantalla es útil para programar la máquina y brinda múltiple información. En las dos series superiores A y B se visualizan el programa de lavado seleccionado, la fase de lavado en curso y todas las indicaciones correspondientes al estado de avance del programa. En la serie C se vis...
Page 36 - Cómo efectuar un ciclo de lavado
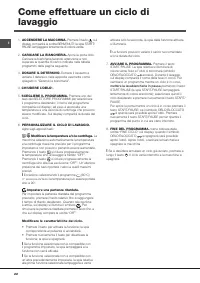
36 ES Cómo efectuar un ciclo de lavado 1. ENCENDER LA MÁQUINA. Presione el botón , en la pantalla aparecerá la palabra BIENVENIDO; el piloto START/PAUSE centelleará lentamente de color verde. 2. CARGAR LA ROPA. Abra la puerta. Cargue la ropa, cuidando no superar la cantidad de carga indicada en la t...
Page 37 - Programas y funciones; Tabla de programas
ES 37 Programas y funciones Tabla de programas Funciones de lavado Super Wash Gracias al uso de una mayor cantidad de agua en la fase inicial del ciclo y a la mayor duración del programa, esta opción garantiza un lavado con óptimos resultados, es útil para eliminar las manchas más resistentes. Puede...
Page 38 - Detergentes y ropa; Preparar la ropa; Programas particulares
38 ES Detergentes y ropa Contenedor de detergentes El buen resultado del lavado depende también de la cor- recta dosificación del detergente: si se excede la cantidad, no se lava de manera más eficaz, sino que se contribuye a encostrar las partes internas de la lavadora y a contaminar el medio ambie...
Page 39 - Precauciones y consejos; Seguridad general
ES 39 Precauciones y consejos ! La lavadora fue proyectada y fabricada en conformidad con las normas internacionales de seguridad. Estas adver- tencias se suministran por razones de seguridad y deben ser leídas atentamente. Seguridad general • Este aparato ha sido fabricado para un uso de tipo do- m...
Page 40 - Mantenimiento y cuidados
40 ES Mantenimiento y cuidados Interrumpir el agua y la corriente elé- ctrica • Cierre el grifo de agua después de cada lavado. De este modo se limita el desgaste de la instalación hidráulica de la lavadora y se elimina el peligro de pér- didas. • Desenchufe la máquina cuando la debe limpiar y du- r...
Page 41 - Anomalías y soluciones
ES 41 Anomalías y soluciones Puede suceder que la lavadora no funcione. Antes de llamar al Servicio de Asistencia Técnica ( ver “Asistencia” ), controle que no se trate de un problema de fácil solución utilizando la siguiente lista. Anomalías: La lavadora no se enciende. El ciclo de lavado no comien...
Page 42 - Asistencia
42 ES Asistencia Antes de llamar al Servicio de Asistencia Técnica: • Verifique si la anomalía la puede resolver Ud. solo (ver “Anomalías y soluciones” ); • Vuelva a poner en marcha el programa para controlar si el inconveniente fue resuelto; • Si no es así, llame al Servicio de Asistencia técnica a...
Page 43 - Содержание; Стиральные вещества и типы белья, 52; Руководство по; СТИРАЛЬНАЯ МАШИНА
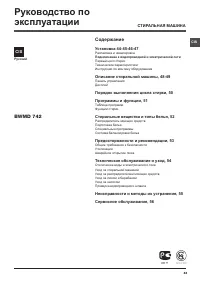
CIS 43 Русский Содержание Установка 44-45-46-47 Распаковка и нивелировка Подключение к водопроводной и электрической сети Первый цикл стирки Технические характеристики Инструкции по монтажу оборудования Описание стиральной машины, 48-49 Панель управления Дисплей Порядок выполнения цикла стирки, 50Пр...
Page 44 - Установка; Распаковка и выравнивание; Подключение к водопроводной и
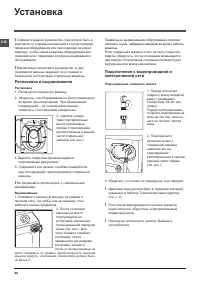
44 CIS Установка ! Сохраните данное руководство. Оно должно быть в комплекте со стиральной машиной в случае продажи, передачи оборудования или при переезде на новую квартиру, чтобы новый владелец оборудования мог ознакомиться с правилами его функционирования и обслуживания. ! Внимательно прочитайте ...
Page 45 - Первый цикл стирки
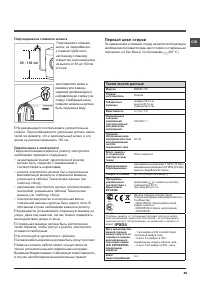
CIS 45 Первый цикл стирки По завершении установки, перед началом эксплуатации необходимо произвести один цикл стирки со стиральным порошком, но без белья, по программе (60° C). 65 - 100 cm Подсоединение сливного шланга Подсоедините сливной шланг, не перегибая его, к сливной трубе или к настенному сл...
Page 46 - Инструкции по монтажу
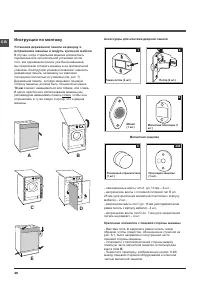
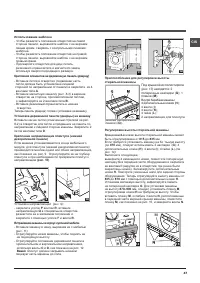
46 CIS Инструкции по монтажу Установка деревянной панели на дверцу и встраивание машины в модуль кухонной мебели В случае, когда стиральная машина должна быть перевезена для окончательной установки после того, как деревянная панель уже была навешена, мы предлагаем оставить машину в ее оригинальной у...
Page 48 - Описание стиральной машины; Панель управления
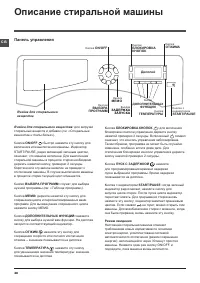
48 CIS Ячейки для стирального вещества: для загрузки стиральных веществ и добавок ( см. «Стиральные вещества и типы белья» ). Кнопка ON/OFF : быстро нажмите эту кнопку для включения или выключения машины. Индикатор START/PAUSE, редко мигающий зеленым цветом, означает, что машина включена. Для выключ...
Page 49 - Дисплей
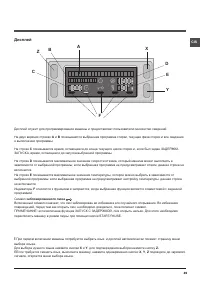
CIS 49 Дисплей Дисплей служит для программирования машины и предоставляет пользователю множество сведений. На двух верхних строках А и В показываются выбранная программа стирки, текущая фаза стирки и все сведения о выполнении программы. На строке С показывается время, остающееся до конца текущего ци...
Page 50 - Порядок выполнения цикла
50 CIS Порядок выполнения цикла стирки 1. ПОРЯДОК ВКЛЮЧЕНИЯ МАШИНЫ . Нажмите кнопку , на дисплее появится надпись ДОБРО ПОЖАЛОВАТЬ. Индикатор START/PAUSE редко мигает зеленым цветом. 2. ПОРЯДОК ЗАГРУЗКИ БЕЛЬЯ. Откройте люк машины. Загрузите в барабан белье, не превышая максимальный допустимый вес, у...
Page 51 - Программы и функции; Функции стирки; Таблица программ
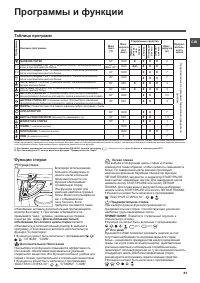
CIS 51 Программы и функции Функции стирки Суперстирка Благодаря использованию большего объема воды в начале цикла и большей продолжительности эта функция обеспечивает оптимальную стирку. Эта функция служит для удаления наиболее трудных пятен. Может использоваться как с отбеливателем, так и без него....
Page 52 - Стиральные вещества; Распределитель моющих средств; Специальные программы
52 CIS Стиральные вещества и типы белья Распределитель моющих средств Хороший результат стирки зависит также от правильной дозировки стирального вещества: избыток стирального вещества не гарантирует более эффективную стирку, напротив, способствует образованию налетов внутри стиральной машины и загря...
Page 53 - Предосторожности и; Общие требования к безопасности; Утилизация
CIS 53 Предосторожности и рекомендации ! Стиральная машина спроектирована и изготовлена в соответствии с международными нормативами по безопасности. Необходимо внимательно прочитать настоящие предупреждения, составленные в целях вашей безопасности. Общие требования к безопасности • После использован...
Page 54 - Техническое обслуживание
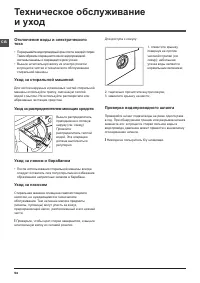
54 CIS Техническое обслуживание и уход Отключение воды и электрического тока • Перекрывайте водопроводный кран после каждой стирки. Таким образом сокращается износ водопроводной системы машины и сокращается риск утечек. • Выньте штепсельную вилку из электро розетки в процессе чистки и технического о...
Page 55 - Неисправности и методы
CIS 55 Неисправности и методы их устранения Если ваша стиральная машина не работает. Прежде чем обратиться в Центр Сервисного обслуживания ( см. Сервисное обслуживание ), проверьте, можно ли устранить неисправность, следуя рекомендациям, приведенным в следующем перечне. Неисправности: Стиральная маш...
Page 56 - Сервисное
56 CIS Сервисное обслуживание Мы заботимся о своих покупателях и стараемся сделать сервисное обслуживание наиболее качественным. Мы постоянно совершенствуем наши продукты, чтобы сделать Ваше общение с техникой простым и приятным. Уход за техникой Продлите срок эксплуатации и снизьте вероятность поло...


 Hotpoint-Ariston AQ103D 49 EU B
User Manual
Hotpoint-Ariston AQ103D 49 EU B
User Manual
 Hotpoint-Ariston AQ113D 697
User Manual
Hotpoint-Ariston AQ113D 697
User Manual
 Hotpoint-Ariston AQ7L 093 X
User Manual
Hotpoint-Ariston AQ7L 093 X
User Manual
 Hotpoint-Ariston AQ9D 292 I (EU)/VB
User Manual
Hotpoint-Ariston AQ9D 292 I (EU)/VB
User Manual
 Hotpoint-Ariston AQ9D 492 X
User Manual
Hotpoint-Ariston AQ9D 492 X
User Manual
 Hotpoint-Ariston AQD970F 49 EU
User Manual
Hotpoint-Ariston AQD970F 49 EU
User Manual
 Hotpoint-Ariston ARTXD 129
User Manual
Hotpoint-Ariston ARTXD 129
User Manual
 Hotpoint-Ariston ARTXF 149
User Manual
Hotpoint-Ariston ARTXF 149
User Manual
 Hotpoint-Ariston ARTXL 109
User Manual
Hotpoint-Ariston ARTXL 109
User Manual
 Hotpoint-Ariston AVDK 7129
User Manual
Hotpoint-Ariston AVDK 7129
User Manual
 Hotpoint-Ariston ECOT6D 1491 EU
User Manual
Hotpoint-Ariston ECOT6D 1491 EU
User Manual
 Hotpoint-Ariston ECOT6L 1091 EU
User Manual
Hotpoint-Ariston ECOT6L 1091 EU
User Manual
 Hotpoint-Ariston ECOT7D 149
User Manual
Hotpoint-Ariston ECOT7D 149
User Manual
 Hotpoint-Ariston ECOT7D 1491 EU
User Manual
Hotpoint-Ariston ECOT7D 1491 EU
User Manual
 Hotpoint-Ariston ECOT7D 1492 EU
User Manual
Hotpoint-Ariston ECOT7D 1492 EU
User Manual
 Hotpoint-Ariston ECOT7F 1291 EU
User Manual
Hotpoint-Ariston ECOT7F 1291 EU
User Manual
 Hotpoint-Ariston ECOT7F 1292 EU
User Manual
Hotpoint-Ariston ECOT7F 1292 EU
User Manual
 Hotpoint-Ariston ECOTL 1051 EU
User Manual
Hotpoint-Ariston ECOTL 1051 EU
User Manual
 Hotpoint-Ariston FDG 8640 BS
User Manual
Hotpoint-Ariston FDG 8640 BS
User Manual
 Hotpoint-Ariston FDG 962
User Manual
Hotpoint-Ariston FDG 962
User Manual