Page 2 - USER SERVICING INSTRUCTIONS; DO NOT; To reduce the; To reduce the risk of fire, DO NOT replace attached plug.; Helping to create your optimal sleep environment year-round
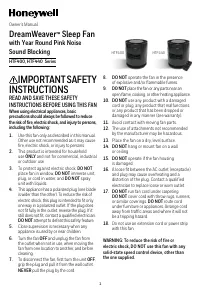
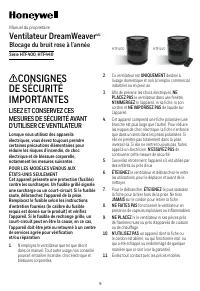
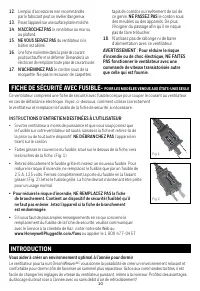
2 This fan features a fused safety plug which is designed to cut off electric current to the fan if an electrical fault occurs. Please see below for more information on how to properly use your fan and replace the safety plug fuse, if needed. FUSED SAFETY PLUG - FOR US MODELS ONLY INTRODUCTION USER ...
Page 3 - close the air shutter.; OSCILLATION; To activate the Oscillation feature, press the; Press the; Oscillation button
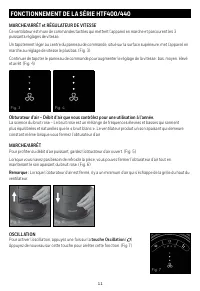
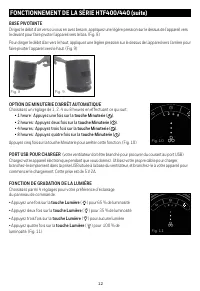
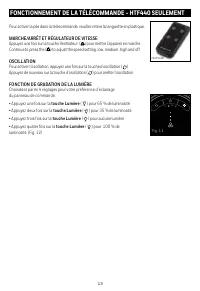
3 HTF400/440 SERIES OPERATION ON/OFF and SPEED CONTROL This fan features Quick Tap controls that turn the fan on and cycle through the 3 powerful speed settings.A light tap in the center of the control panel, located on the top surface will turn the power on at the lowest speed setting. (Fig 3) Cont...
Page 4 - • 2 hours: Press the; USB CHARGING PORT
4 HTF400/440 SERIES OPERATION (continued) PIVOTING BASE Direct airflow where you need it, apply light pressure to the top of the unit towards the front edge to pivot the unit down. (Fig 8) To direct the airflow up, apply light pressure to the top of the unit towards the back edge pivoting the unit u...
Page 5 - HTF440 ONLY REMOTE-CONTROL OPERATION
5 HTF440 ONLY REMOTE-CONTROL OPERATION To activate the battery in the remote, please remove the plastic pull tab. ON/OFF AND SPEED CONTROL Press the Fan button ( ) once to turn the fan on. Continue to press the ( ) to adjust the speed setting, low, medium, high and off. OSCILLATION To activate the o...
Page 6 - CUSTOMER SERVICE; Questions or comments; the receiver is connected.; Operation is subject to the following 2 conditions:
6 CUSTOMER SERVICE Questions or comments Call us toll-free at: 1-800-477-0457 E-mail: [email protected] Or visit our website at: www.HoneywellPluggedIn.com/fans Please be sure to specify the model number. NOTE: IF YOU EXPERIENCE A PROBLEM, PLEASE CONTACT CONSUMER RELATIONS FIRST OR SEE YOUR WARRANTY...
Page 7 - YEAR LIMITED WARRANTY; Please go to
7 1 YEAR LIMITED WARRANTY You should first read all instructions before attempting to use this product.A. This 1 year limited warranty applies to repair or replacement of product found to be defective in material or workmanship. This warranty does not apply to damage resulting from commercial, abusi...
Page 9 - LISEZ ET CONSERVEZ CES; Ventilateur DreamWeaver; Blocage du bruit rose à l’année
9 CONSIGNES DE SÉCURITÉ IMPORTANTES LISEZ ET CONSERVEZ CES MESURES DE SÉCURITÉ AVANT D’UTILISER CE VENTILATEUR Lorsque vous utilisez des appareils électriques, vous devez toujours prendre certaines précautions élémentaires pour réduire les risques d’incendie, de choc électrique et de blessure corpor...
Page 10 - INSTRU; NE DÉBRANCHEZ PAS; FICHE DE SÉCURITÉ AVEC FUSIBLE-; INTRODUCTION
10 INSTRU CTIONS D’ENTRETIEN DESTINÉES À L’UTILISATEUR • Si votre ventilateur a moins de puissance et que vous soupçonnez que le fusible sur votre ventilateur ait sauté, saisissez la fiche et retirez-la de la prise ou de tout autre dispositif. NE DÉBRANCHEZ PAS l’appareil en tirant sur le cordon. • ...
Page 11 - MARCHE/ARRÊT et RÉGULATEUR DE VITESSE; constant même lorsque vous fermez l’obturateur d’air.; Pour activer l’oscillation, appuyez une fois sur la; touche Oscillation
11 FONCTIONNEMENT DE LA SÉRIE HTF400/440 MARCHE/ARRÊT et RÉGULATEUR DE VITESSE Ce ventilateur est muni de commandes tactiles qui mettent l’appareil en marche et parcourent les 3 puissants réglages de vitesse.Un tapotement léger au centre du panneau de commande, situé sur la surface supérieure, met l...
Page 12 - Choisissez un réglage de 1, 2, 4 ou 8 heures en effectuant ce qui suit :; PORT USB POUR CHARGER; Choisissez parmi 4 réglages pour votre préférence d’éclairage
12 FONCTIONNEMENT DE LA SÉRIE HTF400/440 (suite) BASE PIVOTANTE Dirigez le débit d’air vers où vous en avez besoin, appliquez une légère pression sur le dessus de l’appareil vers le devant pour faire pivoter l’appareil vers le bas. (Fig. 8)Pour diriger le débit d’air vers le haut, appliquez une légè...
Page 13 - FONCTIONNEMENT DE LA TÉLÉCOMMANDE - HTF440 SEULEMENT; MARCHE/ARRÊT ET RÉGULATEUR DE VITESSE; • Appuyez deux fois sur la; touche Lumière; • Appuyez trois fois sur la; touche Lumière; • Appuyez quatre fois sur la; touche Lumière
13 FONCTIONNEMENT DE LA TÉLÉCOMMANDE - HTF440 SEULEMENT Pour activer la pile dans la télécommande, veuillez retirer la languette en plastique. MARCHE/ARRÊT ET RÉGULATEUR DE VITESSE Appuyez une fois sur la touche Ventilateur ( ) pour mettre l’appareil en marche.. Continue to press the ( ) to adjust t...
Page 14 - ENTRETIEN ET RANGEMENT; JAMAIS; N’ENROULEZ PAS; au moyen de l’une ou plusieurs des mesures suivantes :; Questions ou commentaires
14 SERVICE À LA CLIENTÈLE INSTRUCTIONS D’ENTRETIEN DESTINÉES À L’UTILISATEUR ENTRETIEN ET RANGEMENT • Assurez-vous que le ventilateur soit éteint et débranché.• Essuyez délicatement les surfaces extérieures avec un linge doux.• N’immergez JAMAIS le ventilateur et veillez à ce qu’il ne dégoutte pas d...
Page 17 - LEA Y GUARDE ESTAS INSTRUCCIONES; Ventilador para Dormir DreamWeaver
17 INSTRUCCIONES DE SEGURIDAD IMPORTANTES LEA Y GUARDE ESTAS INSTRUCCIONES DE SEGURIDAD ANTES DE UTILIZAR ESTE VENTILADOR Cuando utilice aparatos electrodomésticos, debe seguir siempre las precauciones básicas para reducir el riesgo de incendio, descarga eléctrica y lesión a personas, incluyendo el ...
Page 18 - ENCHUFE CON FUSIBLE DE SEGURIDAD - SÓLO PARA MODELOS DE EE.UU.; desconecte tirando del cable.; Para Reducir el Riesgo de Incendio, NO reemplace el enchufe; al Cliente de Kaz visitando nuestro sitio web en; INTRODUCCIÓN
18 ENCHUFE CON FUSIBLE DE SEGURIDAD - SÓLO PARA MODELOS DE EE.UU. 17. NO pase el cable del ventilador debajo de alfombras. NO cubra el cable con tapetes, alfombrillas o cubiertas similares. NO pase el cable por debajo de muebles o electrodomésticos. Acomode el cable lejos de las áreas de tráfico y d...
Page 19 - ENCENDIDO/APAGADO y CONTROL DE VELOCIDAD; constante incluso cuando cierre el obturador de aire.; OSCILACIÓN; de Oscilación
19 OPERACIÓN DE LA SERIE HTF400/440 ENCENDIDO/APAGADO y CONTROL DE VELOCIDAD Este ventilador ofrece controles de Pulsación Rápida que encienden el ventilador y ciclan a través de los 3 ajustes potentes de velocidad.Una pulsación ligera en el centro del panel de control, ubicado en la superficie supe...
Page 21 - OPERACIÓN DEL CONTROL REMOTO SÓLO HFT440; de plástico de extracción.; ENCENDIDO/APAGADO Y CONTROL DE VELOCIDAD; la característica de Oscilación.; CARACTERÍSTICA DE ATENUACIÓN DE LUZ
21 OPERACIÓN DEL CONTROL REMOTO SÓLO HFT440 Para activar la pila en el control remoto, por favor retire la lengüeta de plástico de extracción. ENCENDIDO/APAGADO Y CONTROL DE VELOCIDAD Presione una vez el botón del Ventilador ( ) para encender el ventilador. Continue to press the ( ) para seleccionar...
Page 22 - LIMPIEZA Y ALMACENAJE; sumerja en agua el ventilador y; NUNCA; permita que gotee agua dentro de la cubierta del motor.; NO; Almacene el ventilador en un lugar fresco y seco.; no deseado del dispositivo.; Preguntas o comentarios
22 SERVICIO AL CLIENTE INSTRUCCIONES DE SERVICIO DEL USUARIO LIMPIEZA Y ALMACENAJE • Asegúrese que el ventilador esté apagado y desconectado.• Utilice solo un paño suave para limpiar con cuidado las superficies exteriores del ventilador.• NO sumerja en agua el ventilador y NUNCA permita que gotee agu...
Page 23 - AÑO DE GARANTIA LIMITADA; Por favor visite nuestra página
23 1 AÑO DE GARANTIA LIMITADA Primero debe leer todas las instrucciones antes de intentar usar este producto.A. Esta garantía limitada por 1 año aplica para reparación o reposición del producto contra defecto en materiales o mano de obra. Esta garantía no aplica para daños hechos por uso comercial, ...