Page 2 - Workflow and Reference Guides; Check the package contents; Learning More; Connect the camera to; Viewing the PDF Manuals
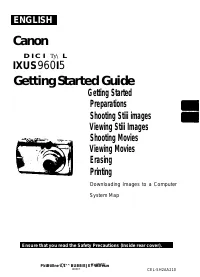
Workflow and Reference Guides The following guides are available. Refer to them as necessary according to the flowchart below. ; Contents of This Guide Check the package contents Getting Started (p. 3) Explains how to complete tasks ranging from charging batteries and installing memory cards to sett...
Page 3 - Checking the Package Contents
Checking the Package Contents The following items are included in the package. If something is missing, please contact the retail outlet at which you purchased the product. O Camera Q Battery Pack NB-5L (with Terminal Cover) e Battery Charger CB-2LX/CB-2LXE 0 Memery Card (32MB) 0 Interface Cable IFC...
Page 4 - Please Read; Test Shots; Video Format
Please Read Test Shots Before you try to photograph important subjects, we highly recommend that you shoot several trial images to confirm that the camera is operating and being operated comectly. Please note that Canon Inc., its subsidiaries and affiliates, and its distributors are not liable for a...
Page 5 - Getting Started
Getting Started • Preparations (p. 4) e Shooting Stiii images (p. 10) e Viewing Stiii images (p. 13) e Shooting Movies (p. 14) e Viewing Movies (p. 16) e Erasing (p. 17) sprinting (p. 18) s Downloading Images to a Computer (p. 20) s System Map (p. 28)
Page 6 - Preparationis; I Charging the Battery; Insert the battery into the battery charger.; Remove the battery after charging is complete.
Preparations Preparationis I Charging the Battery 1. Insert the battery into the battery charger. 2. Plug the battery charger (CB-2LX) into a power outlet, or attach the power cord to the battery charger (CB- 2LXE) and plug It Into a power outlet. Battery charger model names and types vary by region...
Page 7 - I Installing the Battery and Memory Card; Insert the memory card until it clicks into place.; Ensure that the mernory card is correctly ortented before
Preparations I 5 I Installing the Battery and Memory Card 1. Slide the cover and open it out @). 2. Insert the battery. It will lock Into place with a click. 3. Insert the memory card until it clicks into place. Front Write Protect Tab (Only SD memory cards) Confirm that the Write Protect Tab is unl...
Page 8 - ■ To Remove the Battery; ■ To Remove the Memory Card
6 1 PrepBFBlions 4. Close the cover ((D, ®). ■ To Remove the Battery Press the battery lock in the direction of the arrow (0) and pull the battery out (0). ■ To Remove the Memory Card Use a finger to push the memory card in until you hear a click, then release it.
Page 9 - Attaching the Wrist Strap
Preparations I 7 Attaching the Wrist Strap O It Is recommended to use the Wrist Strap to avoid dropping during camera use.
Page 10 - I Setting the Date and Time; Use the 4 or 4 button to select a
8 I Preparations I Setting the Date and Time The Date/Time settings menu will appear the first time the power is turned on. Set the date and time as shown in step 3 and 4 in the explanation below. Power Bjttor 1. Press the power button. 2. Select [Date/Time]. 1. Press the button. 2. Use the 4 or ^ b...
Page 11 - I Setting the Display Language; Hold down the button and press the ^ button.
Preparations I 9 0 • A rechargeable lithium battery Is built into the camera to save such settings as the date/time. Insert a charged battery into the camera. Or if you use the separately sold AC Adapter Kit ACK-DC30, the battery will charge in about four hours. It will charge even if the camera is ...
Page 12 - Shooting Still Images (Q; Set the mode dial to
10 Shooting Still Images Shooting Still Images (Q Auto Mode) Indicators Power Button Strutter Button 1. Press the power button. • The start-up sound will play and the start-up Image will display in the LCD monitor. • Pressing the power button again turns the power off. 2. Set the mode dial to Ù (Aut...
Page 13 - Press the shutter button lightly (press halfway) to set; Without changing anything eise,; Mute Setting
Shooting Still Images I 1 4. Press the shutter button lightly (press halfway) to set the focus. • When the camera focuses, it beeps twice and the indicator lights green (orange when the flash fires). ( Shooting Preparattons Complete: ' AF frames will display in green on the LCD monitor at the points...
Page 14 - Reviewing an Image Right After; • Keep the shutter button pressed fully.
2 I Shooting Still Images ■ Reviewing an Image Right After Shooting (Rec. Review) Recorded images are displayed on the LCD monitor for approximately 2 seconds immediately after shooting. Shutter Button You can also use the following methods to continue displaying the image immediately after shooting...
Page 15 - Viewing Still Images; Use the 4 or ^ button to display the image you wish to
Viewing Still Images U Viewing Still Images 1. Press the button. The last recorded image will display. 2. Use the 4 or ^ button to display the image you wish to view. • Use the 4 button to move to the previous Image and the 4 button to move to the next image. • The images advance more quickly if you...
Page 16 - Shooting Movies; Select a shooting mode.; Aim the camera at the subject.
14 Shooting Movl^ Shooting Movies (Q standard Mode) Power Button Shutter Button 1. Press the power button. 2. Select a shooting mode. 1. Set the mode dial to (Movie). 2. Press the button. 3. Use the or ^ button to select S (Standard). 4. Press the button. Button 3. Aim the camera at the subject.
Page 17 - Without changing anything else, press the shutter
Shooting Movies I 15 4. Press the shutter button lightly (press halfway) to set the focus. • An electronic beep will sound twice and the indicator wiii iight green when the camera focuses. • The exposure, focus and white baiance are automatically set when you press the button halfway. f Shooting Pre...
Page 18 - Viewing Movies; ■ Press the 0 button.
1 16 1 Viewing Movies Viewing Movies Button 1 ■ Press the 0 button. 2. Use the 4 or ^ button to display a movie and press the button. Images with a @13 icon are movies. 3. Use the > or ^ button to select □ (Playback) and press the 0 button. • The movie will start playing. ■ if you press the FUNC....
Page 19 - Erasing; Use the
Erasing 17 Erasing Button 1. Press the button. 2. Use the > or ^ button to select an image to erase and press the ^ button. 3. Confirm that [Erase] is selected and press the button. To exit instead of erasing, seiect [Cancei]. o Please note that erased images cannot be recovered. Exercise adequat...
Page 20 - Printing; Connect the camera to a direct print compatibie printer*^
18 Printing Printing 1. Connect the camera to a direct print compatibie printer*^ • Slip a fingernail under the bottom edge of the terminal cover to open it and insert the interface cable all the way into the connector. • See the printer's user guide for connection instructions. Canon Brand Printers...
Page 22 - Downloading Images to a Computer; Items to Prepare; System Requirements; Windows; os; Macintosh; os
20 Downloading Images to a Computer Downloading Images to a Computer Items to Prepare ■ Camera and computer • Canon Digital Camera Solution Disk supplied with the camera • Interface cable supplied with the camera System Requirements Please install the software on a computer meeting the following min...
Page 23 - I Preparing to Download Images; Ensure that you install the software first before connecting the; ■ Windows; Place the Canon Digital Camera Solution Disk in the; ■ Macintosh
Downloading Images to a Computer I 21 I Preparing to Download Images Ensure that you install the software first before connecting the camera to the computer. 1. Installing the software. ■ Windows 1. Place the Canon Digital Camera Solution Disk in the computer's CD-ROM drive. 2. Click [Easy Installat...
Page 24 - Preparing to download images to the computer.
2. Connecting the camera to a computer. 1. Connect the supplied interface cable to the computer's USB port and to the camera's DIGITAL terminal. • Slip a fingernail under the bottom edge of the terminal cover to open it and insert the interface cable all the way into the connector. DIGITAL Terminal ...
Page 27 - Downloading Images Using the Camera
Downloading Images to a Computer I 25 Downloading Images Using the Camera (Direct Transfer) install the software before downloading images via the Direct Transfer method for the first time (p. 21). Use this method to download images using camera operations (except Windows 2000). iDinyi Button K All ...
Page 29 - Press the ^ button after downloading finishes.; I Windows
Downloading Images to a Computer I 27 4. Press the ^ button after downloading finishes. You will return to the Direct Transfer menu. o Only JPEG Images can be downloaded as wallpaper for a computer. The option selected with the button is retained even when the camera's power is turned off. The previ...
Page 30 - System Map
28 System Map System Map Compact Power Adapter CA-OC10 High-Power Flash HF-DC1
Page 32 - I Optional Accessories; Some accessories are not sold in some regions, or may no longer; ■ Flash; ’ AC Adapter Kit ACK-DC30
30 I System Map I Optional Accessories The following camera accessories are sold separately. Some accessories are not sold in some regions, or may no longer be available. ■ Flash > High-Power Flash HF-DC1 This attachabie suppiementary fiash can be used to capture photographic subjects that are to...
Page 33 - ■ other Accessories; • SD Memory Card; I Direct Print Compatible Printers; Use of genuine Canon accessories is recommended.
System Map I 31 ■ other Accessories • SD Memory Card SD Memory Cards are used to store images recorded by the camera. Canon brand cards are available in 128 MB and 512 MB capacities. • Interface Cable IFC-400PCU Use this cable to connect the camera to a computer, Compact Photo Printer (SELPHY series...
Page 35 - Safety Precautions
Safety Precautions Be sure to read, understand and follow the safety precautions below when using the camera, in order to prevent injury, burns or electrical shock to yourself and others. Be sure to also read the safety precautions listed in the PDF version of the Camera User G u id e. A Do not trig...
Page 36 - What about the prints?; you can; Canon
Great camera. Great shots. What about the prints? you can Canon Printing has never been easier. Simply connect your Canon digital camera to a Canon 5ELPHY Compact Photo Printer, and create beautiful, lab quality borderless photos in seconds.