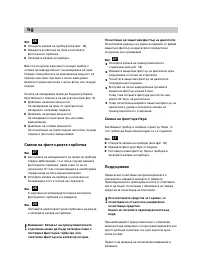
Page 2 - Typ G
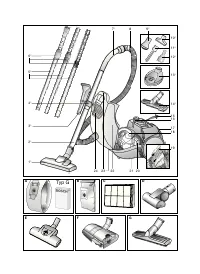
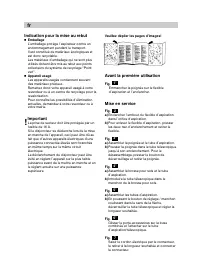
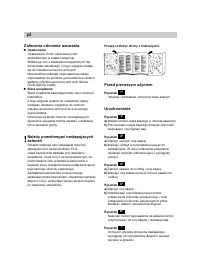
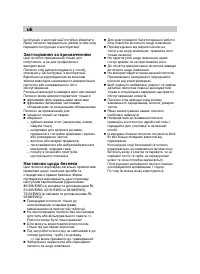
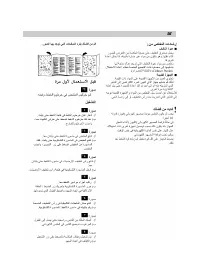
A B C D E F G Typ G 7* 8 9* 23 24 22 21 20 10* 11* 12* 14* 5* 1* 2* 3* 4* 15 16 1718 19 6* 13*
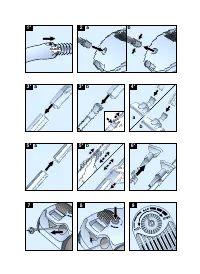
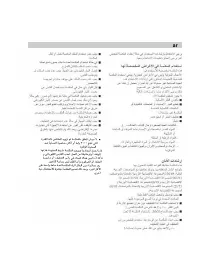
Page 10 - Handgriff und Saugrohr zusammenstecken.
de Hinweise zur Entsorgung Verpackung Die Verpackung schützt den Staubsauger vor Beschädigung auf dem Transport.Sie besteht aus umweltfreundlichen Materialien und ist deshalb recycelbar.Entsorgen Sie nicht mehr benötigte Verpackungsmaterialien an den Sammelstellen für das Verwertungssystem »Grüner P...
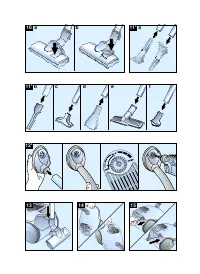
Page 11 - Saugen; Bodendüse einstellen:; Nach der Arbeit; - des Filterbeutels vor allem für herkömmliche
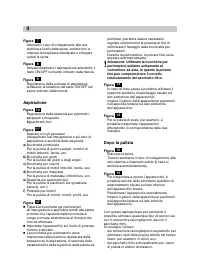
de Bild Staubsauger durch Betätigen der Ein- / Austaste in Pfeilrichtung ein-/ ausschalten. Bild Saugkrafteinstellung durch Drehen der Ein-/ Austaste in Pfeilrichtung. Saugen Bild Bodendüse einstellen: a) Teppiche und Teppichboden b) glatte Böden Bild Saugen mit Zubehör( je nach Bedarf auf Handgriff...
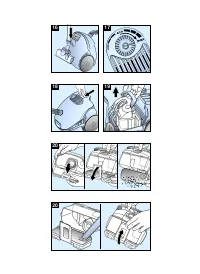
Page 12 - Arbeiten mit dem Staubbehälter; Leeren des Staubbehälters; Bodenklappe schließen.; Dauer- und M icrofilter reinigen; Spätestens halbjährlich.; Bild; Störbetrieb; Beseitigen einer Verstopfung im Staubbehälter.; Arbeiten mit Filterbeutel
de Arbeiten mit dem Staubbehälter Bild Für optimale Saugergebnisse den Leistungs- steller auf Maximalstellung bringen. Nur bei sehr empfindlichen Materialien empfehlen wir, die Leistung zurückzuregeln. Leeren des Staubbehälters Um ein optimales Saugergebnis zu erzielen,sollte der Staubbehälter nach ...
Page 13 - Motorschutzfilter durch Ausklopfen reinigen.; Hepa- Filter austauschen; Pflege; Technische Änderungen vorbehalten.; Filterbeutel austauschen
M otorschutzfilter reinigen Der Motorschutzfilter sollte in regelmäßigenAbständen durch Ausklopfen bzw. Auswaschengereinigt werden! Bild Staubraumdeckel öffnen (siehe Bild 18). Motorschutzfilter in Pfeilrichtung heraus-ziehen. Motorschutzfilter durch Ausklopfen reinigen. Bei starker Verschmutzung so...
Page 15 - Intended use; Manufacturer’s original dust bags.; Safety information
en Please keep this instruction manualWhen passing the vacuum cleaner on to a thirdparty, please also pass on this instructionmanual. Intended use This vacuum cleaner is intended for domesticuse and not for commercial use.This vacuum cleaner should only be used inaccordance with these instructions f...
Page 16 - Disposal information; Packaging; Please note; Fold out picture pages.; Before using for the first time; Setting up; Connect the suction pipes together.; Figure
en Disposal information Packaging The packaging is designed to protect thevacuum cleaner from being damaged duringtransportation.It is made of environment-friendly materialsand therefore can be recycled.Dispose of packaging which is no longerrequired at recycling points. Used vacuum cleaners Used va...
Page 17 - Vacuuming; Adjusting the floor tool:; When the work is done; - the dust bag principally for everyday
en Figure Holding the power cord by the plug, pull outthe required length and plug it into the mainssocket. Figure Press the on/off button in the direction of thearrow to switch your vacuum cleaner on/off. Figure Adjust the suction by turning the on/off buttonin the direction of the arrow. Vacuuming...
Page 18 - Using the dust collector; Emptying the dust collector; Cleaning the permanent filters and; At least every six months.; Blockages; Removing a blockage in the dust collector.
en Using the dust collector Figure Set the power setting to maximum for thebest results when vacuuming. We recommend that you reduce the settingonly when vacuuming very delicate materials. Emptying the dust collector To achieve an optimal result when vacuuming,the dust collector should be emptied ea...
Page 19 - Clean the motor protection filter by tapping it.; Replacing the Hepa filter; Remove the Hepa filter from the guide.; Care; Subject to technical modifications.; Using dust bags; Open the vacuum cleaner lid (see Figure 18); Replacing the dust bag
Cleaning the motor protection filter The motor protection filter should be cleanedregularly by knocking out the dirt and rinsing. Figure Open the dust bag compartment lid (seeFigure 18). Pull out the motor protection filter in thedirection of the arrow. Clean the motor protection filter by tapping i...
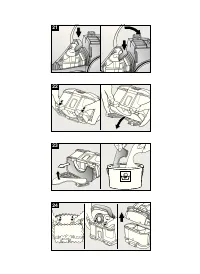
Page 22 - Indication pour la mise au rebut; Emballage; Important; Veuillez déplier les pages d’images!; Avant la première utilisation; Assembler la poignée et le tube d’aspiration.
fr Indication pour la mise au rebut Emballage L’emballage protège l’aspirateur contre unendommagement pendant le transport.Il est constitué de matériaux écologiques etest donc recyclable.Les matériaux d’emballage qui ne sont plusutilisés doivent être mis au rebut aux pointscollecteurs du système de ...
Page 23 - Aspiration; Réglage de la buse pour sols:; Après le travail; - le sac aspirateur avant tout pour des travaux
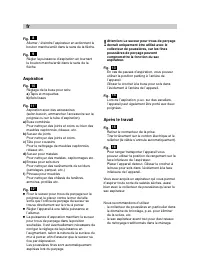
fr Fig. Allumer / éteindre l’aspirateur en actionnant lebouton marche/arrêt dans le sens de la flèche. Fig. Régler la puissance d’aspiration en tournantle bouton marche/arrêt dans le sens de laflèche. Aspiration Fig. Réglage de la buse pour sols: a) Tapis et moquettes b) Sols lisses Fig. Aspiration ...
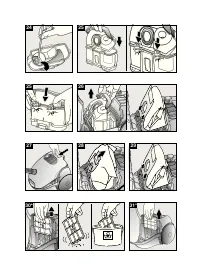
Page 24 - Vider le collecteur de poussières; Fermer le volet du fond.
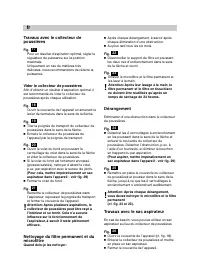
fr Travaux avec le collecteur de poussières Fig. Pour un résultat d’aspiration optimal, régler lerégulateur de puissance sur la positionmaximale. Uniquement en cas de matières trèsdélicates, nous recommandons de réduire lapuissance. Vider le collecteur de poussières Afin d’obtenir un résultat d’aspi...
Page 25 - Changer le filtre Hepa; Enlever le filtre Hepa du guidage.; Entretien; Sous réserve de modifications techniques.; Remplacement du sac aspirateur; Nettoyer le filtre de protection du moteur
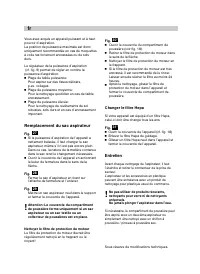
Fig. Ouvrir le couvercle du compartiment depoussière (voir fig. 18). Retirer le filtre de protection du moteur dansle sens de la flèche. Nettoyer le filtre de protection du moteur enle frappant. Si le filtre de protection du moteur est trèsencrassé, il est recommandé de le rincer. Laisser ensuite sé...
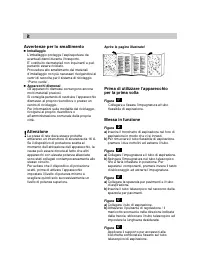
Page 28 - Avvertenze per lo smaltimento; Imballaggio; Attenzione; Aprire le pagine illustrate!; Prima di utilizzare l’apparecchio; M essa in funzione; Figura
it Avvertenze per lo smaltimento Imballaggio L’imballaggio protegge l’aspirapolvere da eventuali danni durante il trasporto. E’ costituito da materiali non inquinanti e può pertanto essere riciclato. Provvedere allo smaltimento dei materiali d’imballaggio non più necessari rivolgendosi ai centri di ...
Page 30 - Uso del contenitore raccoglisporco; Svuotamento del contenitore; Pulire il filtro permanente e il
it Uso del contenitore raccoglisporco Figura Per ottenere risultati ottimali, posizionare il regolatore di potenza sul valore massimo. Solo per i materiali più delicati si consiglia di diminuire la potenza. Svuotamento del contenitore raccoglisporco Per ottenere risultati ottimali, si consiglia di s...
Page 31 - Sostituzione del filtro Hepa; M anutenzione
Pulizia del filtro di protezione del motore Si consiglia di pulire il filtro di protezione del motore a intervalli regolari, battendolo leggermente e lavandolo! Figura Aprire il coperchio del vano di raccolta dello sporco (cfr. Figura 18). Estrarre il filtro di protezione del motore nel senso indica...
Page 33 - Gebruik volgens de voorschriften; originele filterzakken.; Veiligheidsvoorschriften
nl De gebruiksaanwijzing goed bewaren.Wanneer u de stofzuiger doorgeeft aan derdende gebruiksaanwijzing erbij voegen. Gebruik volgens de voorschriften Deze stofzuiger is alleen voor huishoudelijk enniet voor zakelijk gebruik bestemd.De stofzuiger uitsluitend gebruiken zoalsaangegeven in deze gebruik...
Page 34 - Instructies voor recycling; Verpakking; Let op; De stofzuiger in gebruik nemen; De handgreep en de zuigbuis in elkaar steken.; Afbeelding
nl Instructies voor recycling Verpakking De verpakking beschermt de stofzuiger tegenbeschadiging tijdens het transport.Deze bestaat uit milieuvriendelijk materiaal enis daarom recyclebaar.Breng verpakkingsmateriaal dat u niet meernodig heeft naar een verzamelplaats voor deverwerking van afval. Oude ...
Page 35 - Zuigen; Vloermondstuk instellen:; Na het werk; - van de filterzak, met name voor gebruikelijke
nl Afbeelding De stekker van het elektriciteitssnoervastpakken, het snoer tot de gewenste lengteuittrekken en de stekker in het stopcontactsteken. Afbeelding De stofzuiger door middel van de aan-/ uitknopin de richting van de pijl in- of uitschakelen. Afbeelding De zuigkracht instellen door de aan-/...
Page 36 - Werken met het stofreservoir; Legen van het stofreservoir; Duurzaam filter en microfilter; Uiterlijk één keer per half jaar.; Storing
nl Werken met het stofreservoir Afbeelding Voor optimale zuigresultaten devermogensregelaar op de maximale standzetten. Alleen voor zeer kwetsbaar materiaal bevelenwij aan een lager vermogen te kiezen. Legen van het stofreservoir Om een optimaal zuigresultaat te krijgen dienthet stofreservoir na het...
Page 37 - Hepa- filter vervangen; Onderhoud; Technische wijzigingen voorbehouden.; Filterzak vervangen
M otorbeveiligingsfilter schoonmaken Het motorbeveiligingsfilter dient regelmatig teworden schoongemaakt door het uit te kloppenof uit te wassen! Afbeelding Het deksel van het stofcompartiment openen(zie Afbeelding 18). Het motorbeveiligingsfilter in de richting vande pijl naar buiten trekken. Het m...
Page 40 - Anvisninger om bortskaffelse; Bemærk venligst; Fold siderne med figurerne ud!; Før apparatet tages i brug; Ibrugtagning; Sæt håndgrebet og røret sammen.; Figur
da Anvisninger om bortskaffelse Emballage Emballagen beskytter støvsugeren modbeskadigelse under transport.Den består af miljøvenlige materialer og erderfor egnet til genbrug.Bortskaf emballagematerialer, som der ikkemere er brug for, via de kommunalegenbrugsordninger. Kasserede støvsugere Kasserede...
Page 41 - Støvsugning; Indstille gulvmundstykket:; Efter arbejdets afslutning; - filterposen til almindelig rengøring i
da Figur Hold i stikket på ledningen, træk ledningen udtil den ønskede længde, og sæt stikket istikkontakten. Figur Tænd og sluk for støvsugeren ved at trykketænd-/slukknappen i pilens retning. Figur Indstil sugestyrken ved at dreje tænd-/slukknappen i pilens retning. Støvsugning Figur Indstille gul...
Page 42 - Arbejde med støvbeholderen; Tømning af støvbeholderen; Rense fast filter og M icro- filter; Mindst hvert halve år.; Funktionsfejl; Fjernelse af en tilstopning i støvbeholderen.
da Arbejde med støvbeholderen Figur Sæt sugeeffektindstillingen til maksimum forat opnå det bedste resultat. Vi anbefaler, at man kun nedsættersugeeffekten ved meget sarte materialer. Tømning af støvbeholderen Få at man kan få det optimale resultat afstøvsugningen, bør støvbeholderen tømmesefter hve...
Page 43 - Pleje; Med forbehold for tekniske ændringer.; Arbejde med filterpose; Tag støvbeholderen ud, og sæt filterposen i.; Skifte filterpose
Rense motorbeskyttelsesfiltret Motorbeskyttelsesfiltret skal med regelmæssigemellemrum bankes rent eller vaskes! Figur Åbn støvrumslåget (se figur 18). Træk motorbeskyttelsesfiltret ud i pilensretning. Rengør motorbeskyttelsesfiltret ved at bankedet, til det er rent. Hvis motorbeskyttelsesfiltret er...
Page 44 - Trådløfter
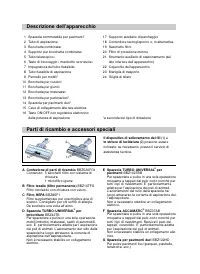
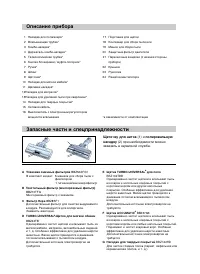
Beskrivelse av apparatet Ekstra tilbehør og reservedeler 1 Omstillbart gulvmunnstykke2 Rør*3 Kombimunnstykke*4 Tilbehørsholder for kombidyse*5 Teleskoprør*6 Låseknapp / skyveknapp*7 Slangehåndtak*8 Sugeslange9 Møbelpensel* 10 Møbelmunnstykke*11 Fugemunnstykke*12 Madrassmunnstykke*13 Boremunnstykke*1...
Page 46 - Fest håndtaket på sugeslangen.; Komme i gang; Sett sammen håndtak og teleskoprør.
no Informasjon om skroting Emballasje Emballasjen beskytter støvsugeren motskader under transport.Den består av miljøvennlige materialer og kanderfor gjenvinnes.Emballasje du ikke trenger mer, bør du leveretil gjenvinning. Gamle apparater Gamle apparater inneholder mange materialersom fortsatt kan b...
Page 47 - Støvsuging; Innstilling av gulvmunnstykke:; Når jobben er gjort; - Filterpose til vanlig rengjøring i hjemmet.
no Figur Støvsugeren slås på eller av ved å skyve på-/avknappen i pilens retning. Figur Sugekraften stilles inn ved å vri på-/avknappen i pilens retning. Støvsuging Figur Innstilling av gulvmunnstykke: a) Tepper og vegg-til-vegg-tepper b) Jevne gulv Figur Støvsuging med tilbehør(monteres ved behov p...
Page 48 - Arbeide med støvbeholderen; Tømming av støvbeholderen; Rengjøring av langtids- og mikrofilter; Minst to ganger i året.; Feil under støvsugingen; Fjerning av tilstoppinger i støvbeholderen.
no Arbeide med støvbeholderen Figur Du oppnår best sugeresultat hvis du stillereffektvelgeren på høyeste nivå. Vi anbefaler at du bare stiller effekten på etlavere nivå hvis du skal støvsuge sværtømfintlige materialer. Tømming av støvbeholderen For å oppnå et optimalt sugeresultat børstøvbeholderen ...
Page 52 - Råd beträffande skrotning; Förpackning; Observera; Sätt fast handtaget på slangen och ställ in det.; Starta dammsugaren; Sätt ihop handtaget och röret.
sv Råd beträffande skrotning Förpackning Förpackningen skyddar dammsugaren frånskador vid transporten.Förpackningen består av miljövänliga materialoch kan därför återvinnas.Lämna förpackningsmaterialet till återvinning. Din uttjänta dammsugare Din gamla och uttjänta dammsugareinnehåller mycket använ...
Page 53 - Dammsugning; Ställa in golvmunstycket:; Efter dammsugningen; - att du använder filterpåsen för vanlig
sv Bild Starta/stäng av dammsugaren genom atttrycka ned till-/frånknappen i pilens riktning. Bild Ställ in sugkraften genom att vrida till-/frånknappen i pilens riktning. Dammsugning Bild Ställa in golvmunstycket: a) Mattor och heltäckningsmattor b) hala golv Bild Dammsugning med tillbehör(sätt på d...
Page 54 - Dammsuga med dammsugarpåse; Tömma dammsugarpåsen; Rengöra permanent- och mikrofiltret; Minst en gång i halvåret.; Fel; Åtgärda igensättning i dammsugarpåsen.
sv Dammsuga med dammsugarpåse Bild Du får bäst sugresultat om effektreglaget är imaxläge. Sänk bara effekten om du ska dammsugaömtåliga material. Tömma dammsugarpåsen För att få optimal sugverkan, så skadammsugarpåsen tömmas efter varjedammsugning. Bild Öppna locket genom att skjuta låsspaken ipilen...
Page 55 - Skötsel och vård; Med förbehåll för tekniska ändringar.; Dammsuga med filterpåse; Ta ur dammsugarpåsen och sätt i filterpåsen.; Byta dammpåse
Rengöra motorskyddsfiltret Rengör motorskyddsfiltret regelbundet genomatt knacka ur resp. tvätta det. Bild Öppna dammsugarlocket (se bild 18). Dra ut motorskyddsfiltret i pilens riktning. Rengör motorskyddsfiltret genom att knackaur det. Tvätta ur motorskyddsfiltret om det är väldigtsmutsigt. Låt se...
Page 57 - Ohjeiden mukainen käyttö; alkuperäisten suodatinpussien kanssa.; Turvaohjeet
fi Säilytä käyttöohjeet.Antaessasi pölynimurin kolmannelle osapuolelle,muista liittää käyttöohjeet mukaan. Ohjeiden mukainen käyttö Tämä pölynimuri on tarkoitettu kotikäyttöön.Käytä pölynimuria näissä käyttöohjeissaannettujen ohjeiden mukaan.Valmistaja ei vastaa mahdollisista vahingoista,jotka johtu...
Page 58 - Pistä kahva imuletkuun ja lukitse.; Käyttöönotto; Kiinnitä imuletkun istukka imuaukkoon.
fi Ohjeita jätehuollosta Pakkaus Pakkaus suojaa pölynimuria vaurioiltakuljetuksen aikana.Se on ympäristöystävällistä materiaalia ja sevoidaan kierrättää.Vie tarpeettomat pakkausmateriaalitasiaankuuluvaan kierrätyspisteeseen. Vanha laite Vanhat laitteet sisältävät monia arvokkaitamateriaaleja.Vie van...
Page 59 - Imurointi; Lattiasuulakkeen säätö:; Työn jälkeen; - suodatinpussia ennen kaikkea kotitalouden
fi Kuva Imutehon säätö tapahtuu kääntämälläkäynnistys/ sammutusnäppäimestä nuolensuuntaan. Imurointi Kuva Lattiasuulakkeen säätö: a) Matot ja kokolattiamatot b) kovat lattiat Kuva Imeminen lisävarusteella (pistä tarvittaessa kahvaan tai imuputkeen). a) YhdistelmäsuutinRakojen ja kulmien siivoukseen ...
Page 60 - Imurointi pölysäiliöllä; Pölysäiliön tyhjennys; Ota pölysäiliö kantokahvasta laitteesta pois.; Kesto- ja mikrosuodattimen; Vähintään puolivuosittain.; Häiriökäyttö; Tukkeutuman poisto pölysäiliössä.
fi Imurointi pölysäiliöllä Kuva Laita tehonsäädin maksimiasentoon parhaanmahdollisen imurointituloksensaavuttamiseksi. Suosittelemme tehon pienentämistä vainerittäin herkkiä materiaaleja imuroitaessa. Pölysäiliön tyhjennys Parhaan mahdollisen imurointituloksensaavuttamiseksi, pölysäiliö tulisi tyhje...
Page 61 - Hepa- suodattimen vaihto; Hoito; Oikeus teknisiin muutoksiin pidätetään.; Imurointi suodatinpussilla; Poista pölysäiliö ja laita suodatinpussi tilalle.; Suodatinpussin vaihto
M oottorinsuojasuodattimen puhdistus Moottorinsuojasuodatin on puhdistettavasäännöllisin väliajoin ravistamalla tai pesemällä! Kuva Avaa pölypussisäiliön kansi (katso kuva 18). Vedä moottorinsuojasuodatin ulos nuolensuuntaan. Puhdista moottorinsuojasuodatinravistamalla. Jos se on voimakkaasti likain...
Page 64 - Indicações relativas à eliminação; Embalagem; Atenção; Colocação em funcionamento; Encaixe a pega no tubo de aspiração.
pt Indicações relativas à eliminação Embalagem A embalagem protege o aspirador contradanos durante o transporte.Ela é feita de materiais amigos do ambiente,sendo, por isso, reciclável.Separe e coloque as embalagens usadas noecoponto. Aparelhos usados Os aparelhos antigos contêm frequentementemateria...
Page 65 - Aspirar; Tapetes e alcatifas; Após o trabalho; - do saco de pó sobretudo para a limpeza
pt Figura Ligue/desligue o aspirador, premindo o botãode ligar/desligar no sentido da seta. Figura Regulação da potência de sucção rodando obotão de ligar/desligar no sentido da seta. Aspirar Figura Ajustar o bocal: a) Tapetes e alcatifas b) Pavimentos lisos Figura Aspirar com acessórios(encaixar na...
Page 66 - Utilização do receptáculo de pó; Esvaziar o receptáculo de pó; Feche a tampa do fundo.; Limpar o filtro permanente e o; O mais tardar semestralmente.; Anomalia
pt Utilização do receptáculo de pó Figura Para resultados de aspiração optimizadosregule o regulador da potência para o nívelmáximo. A potência só deve ser regulada para umnível mais baixo quando forem aspiradosmateriais muito sensíveis. Esvaziar o receptáculo de pó Para obter um resultado de aspira...
Page 67 - Trocar o filtro HEPA; Retire o filtro HEPA da guia.; M anutenção; Feche a tampa do aparelho.; Trocar o saco de pó
Limpe o filtro de protecção do motor O filtro de protecção do motor deve ser limpo,em intervalos regulares, por meio de lavagem ousacundindo-o! Figura Abrir a tampa do compartimento do saco depó (ver Figura 18). Extrair o filtro de protecção do motor nosentido da seta. Limpar o filtro de protecção d...
Page 70 - Unir la empuñadura y el tubo de aspiración.
es Indicaciones para una eliminación adecuada Embalaje El embalaje protege el aspirador de posiblesdesperfectos durante el transporte.Éste está compuesto por materiales nocontaminantes y, por tanto, reciclables.Entregar los materiales de embalaje que ya nose necesiten en los centros de recogida dels...
Page 71 - Aspirado; Ajustar el cepillo universal:; Tras el trabajo; - la bolsa filtrante sobre todo en las tareas
es Figura Encender / apagar el aspirador accionando latecla de conexión y desconexión en ladirección de la flecha. Figura Regular la potencia de aspiración girando latecla de conexión y desconexión en ladirección de la flecha. Aspirado Figura Ajustar el cepillo universal: a) Alfombras y moquetas b) ...
Page 72 - Trabajar con el colector de polvo; Vaciar el colector de polvo; Cerrar la tapa de fondo.; Limpieza del filtro permanente y del; Eliminar una obstrucción en el colector de polvo.; Aspirar con la bolsa filtrante
es Trabajar con el colector de polvo Figura Para obtener resultados de aspiraciónóptimos, ajustar el regulador de potencia enla posición máxima. Recomendamos reducir la potencia sólocuando se trate de materiales muy delicados. Vaciar el colector de polvo Para conseguir una máxima eficacia deaspiraci...
Page 73 - Cambiar el filtro Hepa; Extraer el filtro HEPA de la guía.; Cuidados; Quedan reservadas las modificaciones técnicas.; Sustitución de la bolsa filtrante
Limpiar el filtro protector del motor El filtro protector del motor debe limpiarseregularmente sacudiéndolo o enjuagándolo. Figura Abrir la tapa del compartimento general (ver figura 18). Extraer el filtro protector del motor en elsentido que indica la flecha. Limpiar el filtro protector del motorsa...
Page 74 - Φίλτρο προστασίας του κινητήρα
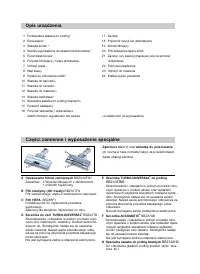
Περιγραφή συσκευής Ανταλλακτικά και ειδικς εξοπλισµς 1 Πέλµα δαπέδου µε δυναττητα εναλλαγής* 2 Σωλήνας αναρρφησης* 3 Πέλµα πολλαπλής χρήσης* 4 Φορέας εξαρτηµάτων για το πέλµα πολλαπλής χρήσης* 5 Τηλεσκοπικς σωλήνας* 6 Κουµπί ασφάλισης / Συρµενος δακτύλιος* 7 Χειρολαβή στον εύκαµπτο σωλήνα* 8 Εύκαµπτ...
Page 75 - Υποδείξεις ασφαλείας
el Παρακαλώ φυλάξτε τις οδηγίες χρήσης.Σε περίπτωση παράδοσης της ηλεκτρικής σκούπαςσε τρίτους, δώστε παρακαλώ µαζί και τις οδηγίεςχρήσης. Χρήση σύµφωνα µε το σκοππροορισµού Αυτή η ηλεκτρική σκούπα προορίζεται για χρήσηστο σπίτι και χι για επαγγελµατικούς σκοπούς.Χρησιµοποιείτε την ηλεκτρική σκούπαα...
Page 76 - Υποδείξεις για την απσυρση; Προσέξτε παρακαλώ; Πριν την πρώτη χρήση; Θέση σε λειτουργία
el Υποδείξεις για την απσυρση Συσκευασία Η συσκευασία προστατεύει την ηλεκτρικήσκούπα απ ζηµιά κατά τη µεταφορά.Αποτελείται απ φιλικά προς το περιβάλλονυλικά και γι' αυτ είναι ανακυκλώσιµη.Παραδώστε τα υλικά συσκευασίας, που δεχρειάζονται άλλο, στα κέντρα συγκέντρωσης τωνυλικών ανακύκλωσης. Παλιά συ...
Page 77 - Αναρρφηση; Μετά την εργασία; Εργασία με το δοχείο σκνης
el Εικ. Θέστε την ηλεκτρική σκούπα σε λειτουργία ήεκτς λειτουργίας, πατώντας το πλήκτροενεργοποίησης και απενεργοποίησης προς τηνκατεύθυνση του βέλους. Εικ. Ρύθµιση της δύναµης αναρρφησης,στρέφοντας το πλήκτρο ON/OFF προς τηνκατεύθυνση του βέλους. Αναρρφηση Εικ. Ρύθµιση του πέλµατος δαπέδου: α) Χαλι...
Page 78 - Άδειασμα του δοχείου σκνης; Ελαττωματική λειτουργία; Εργασία με τη σακούλα φίλτρου
el Μνο στα πάρα πολύ ευαίσθητα υλικάσυνιστούµε τη µείωση της ισχύος. Άδειασµα του δοχείου σκνης Για να πετύχετε ένα ιδανικ αποτέλεσµααναρρφησης, πρέπει να αδειάζετε το δοχείοσυλλογής της σκνης µετά απ κάθε διαδικασίααναρρφησης. Εικ. Ανοίξτε το κάλυµµα της συσκευής, σπρώχνονταςτο µοχλ κλεισίµατος προ...
Page 79 - Αντικατάσταση του φίλτρου Hepa; Φροντίδα; Αντικατάσταση της σακούλας φίλτρου
Στη συνέχεια αφήστε το φίλτρο να στεγνώσει τολιγτερο για 24 ώρες. Μετά τον καθαρισµ, σπρώξτε το φίλτροπροστασίας του κινητήρα µέσα στη συσκευή καικλείστε το κάλυµµα του χώρου συλλογής τηςσκνης. Αντικατάσταση του φίλτρου Hepa Εάν η συσκευή σας είναι εξοπλισµένη µε έναφίλτρο Hepa, πρέπει αυτ να αντικα...
Page 80 - Motor koruma filtresi; ∑plik alma ünitesi
Cihaz∂n tarifi Ek parçalar ve özel aksesuarlar 1 Aç∂l∂r-kapan∂r süpürme baµl∂π∂*2 Emiµ borusu*3 Kombi baµl∂π∂*4 Diπer süpürme baµl∂klar∂ aksesuar taµ∂y∂c∂s∂*5 Teleskobik boru*6 Kilitleme düπmesi / Sürgü manµet*7 Hortum tutamaπ∂*8 Emiµ hortumu9 Mobilya f∂rças∂* 10 Minder süpürme baµl∂π∂* 11 Dar aral∂...
Page 82 - Tutamaπ∂ ve emme borusunu birleμtirin.
tr ∑mhaya yönelik aç∂klamalar Ambalaj Ambalaj, elektrikli süpürgeyi nakliyatesnas∂nda zarar görmeye karµ∂ korur.Ambalaj çevreye zarar vermeyenmalzemelerden ibarettir ve bu nedenle tekrargeri kazan∂labilir.Almanya'da art∂k gerek kalmayan ambalajmalzemelerini, "Grüner Punkt" ad∂n∂ taµ∂yanyenid...
Page 83 - Emerek temizleme; Zemin süpürme ünitesinin ayarlanmas∂:; Çal∂μma sona erdikten sonra; - Filtre torbas∂n∂ ise evdeki s∂radan temizlik
tr Resim Elektrikli süpürgeyi açma / kapama düπmesiniok yönünde hareket ettirerek açabilir /kapatabilirsiniz. Resim Emme gücünü açma/ kapama tuµunu okyönünde çevirerek ayarlayabilirsiniz. Emerek temizleme Resim Zemin süpürme ünitesinin ayarlanmas∂: a) Hal∂ ve duvardan duvara hal∂lar b) Düz zeminler ...
Page 84 - Toz haznesi ile çal∂μma; Toz haznesinin temizlenmesi; Taban kapaπ∂n∂ kapat∂n∂z.; Sürekli ve mikro filtrenin; Toz haznesindeki bir t∂kanman∂n giderilmesi.
tr Toz haznesi ile çal∂µma Resim Optimum temizlik sonuçlar∂ için güç ayardüπmesini maksimuma getiriniz. Sadece çok hassas malzemelerde gücü dahaaza ayarlaman∂z önerilmektedir. Toz haznesinin temizlenmesi En iyi temizlik sonucunun elde edilebilmesi içintoz haznesi her temizleme iµleminden sonraboµalt...
Page 85 - Hepa filtrenin* deπiμtirilmesi; Bak∂m; Toz haznesini al∂n ve filtre torbas∂n∂ yerleμtirin.; Filtre torbas∂n∂n deπiμtirilmesi
Motor koruma filtresinin temizlenmesi Motor koruma filtresi düzenli aral∂klarla vurularakve/veya y∂kanarak temizlenmelidir! Resim Toz haznesi kapaπ∂n∂ aç∂n∂z (bkz. resim 18). Motor koruma filtresini ok yönünde çekiniz. Motor koruma filtresini vurarak temizleyiniz. Kirlenme yoπunsa motor koruma filtr...
Page 86 - 0 Szőnyegtisztító fej*; Szösztelenítő; Tartalom: 5 zárral ellátott szűrőzacskó; F ACCUMATIC
Készülékleírás Pótalkatrészek és kiegészítő tartozékok 1 Átkapcsolható padlószívófej*2 Szívócső*3 Kombi-szívófej*4 Tartozéktartó a kombi-szívófejhez*5 Teleszkópcső*6 Reteszelőgomb / tolókarmantyú*7 Porszívócső-fogantyú*8 Szívótömlő9 Bútorecset* 10 Szőnyegtisztító fej* 11 Keskeny szívófej* 12 Matrac-...
Page 88 - Környezetvédelmi tudnivalók; Csomagolás; Kérjük, hogy ügyeljen az alábbiakra; Ábra; Húzza rá a fogantyút a szívótömlőre és reteszelje.; Üzembehelyezés; Kattintsa be a szívótömő csonkját a szívónyílásba.; ábra
hu Környezetvédelmi tudnivalók Csomagolás A csomagolás védi a porszívót a szállítás soránkeletkező sérülésektől.A csomagolás környezetbarát anyagokból készült,és ezért újrafeldolgozásra alkalmas.A továbbiakban már nem szükségescsomagolóanyagot helyezze el a Zöld Pontújrahasznosítási rendszer gyűjtőh...
Page 89 - Porszívózás; A padlószívófej beállítása:; A munka után; - a szűrőzacskót a hagyományos háztartási
hu ábra Kapcsolja be, illetve ki a porszívót a be-/kikapcsoló gombnak a nyíl irányába történőnyomásával. ábra A szívóerő beállítása a be-/ kikapcsoló gomb nyílirányába történő elfordításával történhet. Porszívózás ábra A padlószívófej beállítása: a) szőnyeg és szőnyegpadló b) sima padló ábra Szívás ...
Page 90 - Munkavégzés a portartállyal; A portartály kiürítése; Vegye ki a portartályt a tartófogantyúnál fogva.; A tartós- és mikroszűrő tisztítása; A portartály eltömődésének megszüntetése.
hu Munkavégzés a portartállyal ábra Az optimális szívási eredmény érdekében állítsa ateljesítményszabályozót a maximális állásba. Csak különösen kényes anyagok esetén ajánlott ateljesítmény csökkentése. A portartály kiürítése Az optimális szívási teljesítmény eléréséhez aportartályt minden használat...
Page 91 - Ápolás; Műszaki változtatások joga fenntartva.; Munkavégzés a szűrőzacskóval
A motorvédő szűrőt rendszeres időközönkéntütögetéssel meg kell tisztítani illetve ki kell mosni! ábra Nyissa ki a porkamra fedelét (lásd: 18. ábra). Húzza ki a motorvédő szűrőt a nyíl irányában. A motorvédő szűrőt ütögetéssel tisztítsa meg. Erős szennyezettség esetén mossa meg amotorvédő szűrőt. A s...
Page 94 - Wsunąć i zatrzasnąć uchwyt na wężu ssącym.; Uruchomienie; Wzębić króciec węża ssącego w otworze ssawnym.
pl Zalecenia odnośnie usuwania Opakowanie Opakowanie chroni odkurzacz przeduszkodzeniem w czasie transportu.Składa się ono z materiałów bezpiecznych dlaśrodowiska naturalnego i z tego względu nadajesię do odzysku surowców wtórnych.Niepotrzebne materiały opakowaniowe należyodprowadzać do punktów grom...
Page 95 - Odkurzanie; Ustawianie ssawki do podłóg:; Po pracy; - worka filtrującego przede wszystkim do zwykłego
pl Rysunek Włączyć / wyłączyć odkurzacz poprzeznaciśnięcie włącznika / wyłącznika w kierunkuwskazywanym przez strzałkę. Rysunek Regulacja siły ssania poprzez przekręcanieprzycisku włączania/ wyłączania w kierunkuwskazywanym przez strzałkę. Odkurzanie Rysunek Ustawianie ssawki do podłóg: a) Dywany i ...
Page 96 - Praca z pojemnikiem na pył typu; Opróżnianie pojemnika na pył; Czyszczenie filtra trwałego i mikrofiltra; Najpóźniej co pół roku.; Zakłócenia funkcjonowania; Usuwanie zatkania pojemnika na pył.
pl Praca z pojemnikiem na pył typu Rysunek W celu uzyskania optymalnych wynikówodkurzania należy ustawić regulator mocy napozycję maksymalną. Tylko w przypadku odkurzania bardzo delikatnychmateriałów zalecane jest zmniejszenie mocyssania. Opróżnianie pojemnika na pył W celu osiągnięcia optymalnego w...
Page 97 - Wymiana filtra Hepa; Konserwacja
filtrującym względnie filtrze tekstylnym lubpojemniku na pył. Czyszczenie filtra zabezpieczającego silnik Filtr zabezpieczający silnik należy czyścić wregularnych odstępach czasu poprzez wytrzepaniewzględnie wymycie! Rysunek Otworzyć pokrywę komory pyłowej (patrz rysunek 18). Wyciągnąć filtr zabezpi...
Page 98 - ᇠ̆ËÚÂÌ ÙËÎÚ ̇ Á‡ ÏÓÚÓ‡; ÔÓÎËÓ‚ ̇ ̃ÌË
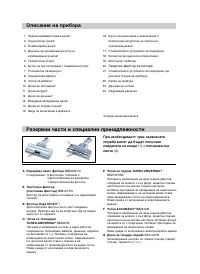
éÔËÒ‡ÌË ̇ ÔË·Ó‡ êÂÁ‚ÌË ˜‡ÒÚË Ë ÒÔˆˇÎÌË ÔË̇‰ÎÂÊÌÓÒÚË 1 è‚Íβ˜‚‡Âχ ÔÓ‰Ó‚‡ ‰˛Á‡* 2 ëÏÛ͇ÚÂÎ̇ Ú˙·‡* 3 äÓÏ·ËÌˇ̇ ‰˛Á‡* 4 Ñ˙ʇ˜ Á‡ ÔË̇‰ÎÂÊÌÓÒÚËÚ ̇ ÍÓÏ·ËÌˇ̇ڇ ‰˛Á‡* 5íÂÎÂÒÍÓÔ̇ Ú˙·‡* 6 ÅÛÚÓÌ Á‡ Á‡ÒÚÓÔÓfl‚‡Ì / ÔÓ‰‚ËÊ̇ ‚ÚÛÎ͇* 7 ê˙ÍÓı‚‡Ú͇ ̇ χÍÛ˜‡* 8 ëÏÛ͇ÚÂÎÂÌ Ï‡ÍÛ˜ 9 óÂÚ͇ Á...
Page 100 - ì͇Á‡ÌËfl ÔÓ ÓÚÒÚ‡Ìfl‚‡ÌÂ; åÓÎfl ËχÈÚ Ô‰‚ˉ; èÛÒ͇Ì ‚ ‰ÂÈÒÚ‚ËÂ
bg ì͇Á‡ÌËfl ÔÓ ÓÚÒÚ‡Ìfl‚‡Ì éÔ‡Íӂ͇ éÔ‡Íӂ͇ڇ Ô‡ÁË Ô‡ıÓÒÏÛ͇˜Í‡Ú‡ ÓÚ ÔÓ‚Â‰Ë ÔÓ‚ÂÏ ̇ Ú‡ÌÒÔÓÚˇÌÂ.ífl  ̇ԇ‚Â̇ ÓÚ ·Î‡„ÓÔËflÚÌË Á‡ ÓÍÓÎ̇ڇÒ‰‡ χÚ¡ÎË Ë ÔÓ‡‰Ë ÚÓ‚‡ ÏÓÊ ‰‡ ·˙‰ÂˆËÍΡ̇.àÁı‚˙ÎflÈÚ ÌÂÌÛÊÌËÚ ÇË ‚˜ ÓÔ‡ÍÓ‚˙˜ÌËχÚ¡ÎË ‚ ÏÂÒÚ‡Ú‡ Á‡ Ò˙·Ë‡Ì ̇ ÒËÒÚÂχڇÁ‡ ÔÓ‚ÚÓÌÓ ËÁ...
Page 101 - àÁÒÏÛÍ‚‡Ì ̇ Ô‡ı; ëΉ ‡·ÓÚ‡
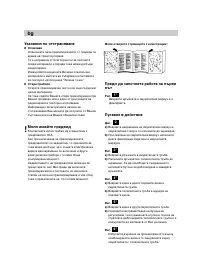
bg îË„. ÌÂÚ ͇·Â· Á‡ ‚Íβ˜‚‡Ì ‚ ÏÂʇڇ Á‡˘Â͇, ËÁ‰˙Ô‡ÈÚ „Ó ‰Ó Ê·̇ڇ ‰˙ÎÊË̇ Ë‚Íβ˜ÂÚ ˘Â͇ ‚ ÍÓÌÚ‡ÍÚ‡. îË„. ÇÍβ˜‚‡ÈÚ ËÎË ËÁÍβ˜‚‡ÈÚ ԇıÓÒÏÛ͇˜Í‡Ú‡Í‡ÚÓ ‰‚ËÊËÚ ·ÛÚÓ̇ Á‡ ‚Íβ˜‚‡Ì ËÎËËÁÍβ˜‚‡Ì ‚ ÔÓÒÓ͇ ̇ ÒÚÂÎ͇ڇ. ÙË„. ê„ÛΡÌÂÚÓ Ì‡ ÒË·ڇ ̇ Ô‡ıÓËÁÒÏÛÍ‚‡ÌÂÒÚ‡‚‡ ÔÓÒ‰ÒÚ‚ÓÏ ...
Page 102 - ꇷÓÚ‡ Ò ÍÓÎÂÍÚÓ‡ Á‡ Ô‡ı; àÁÔ‡Á‚‡Ì ̇ ÍÓÎÂÍÚÓ‡ Á‡ Ô‡ı; çÂËÁÔ‡‚ÌÓÒÚË; ꇷÓÚ‡ Ò ÙËÎÚ ̇̇ ÚÓ·Ë ͇̃
bg - Úӷ˘͇ڇ Á‡ Ô‡ı ÔÂ‰Ë ‚Ò˘ÍË Á‡ ӷ˘‡ÈÌËÚ ‡·ÓÚË ‚ ‰ÓχÍËÌÒÚ‚ÓÚÓ. ꇷÓÚ‡ Ò ÍÓÎÂÍÚÓ‡ Á‡ Ô‡ı îË„. ᇠÔÓÒÚË„‡Ì ̇ ÓÔÚËχÎÌË ÂÁÛÎÚ‡ÚË ÔËËÁÒÏÛÍ‚‡ÌÂÚÓ Ì‡ Ô‡ı ÔÓÒÚ‡‚ÂÚ „Û·ÚÓ‡ Á‡ÏÓ˘ÌÓÒÚ ‚ χÍÒËχÎÌÓ ÔÓÎÓÊÂÌËÂ. çË ÔÂÔÓ˙˜‚‡Ï ‰‡ Ò ̇χÎfl‚‡ ÏÓ˘ÌÓÒÚÚ‡Ò‡ÏÓ ÔË ÏÌÓ„Ó ˜Û‚ÒÚ‚ËÚÂÎÌË Ï‡Ú¡ÎË...
Page 103 - ëÏfl̇ ̇ ÙËÎÚ ̇‡ Hepa; èÓ‰‰ ̇ʇÌÂ; ëÏfl̇ ̇ ÙËÎÚ ̇̇ڇ ÚÓ·Ë ͇̃
èÓ˜ËÒÚ‚‡Ì ̇ Á‡˘ËÚÌËfl ÙËÎÚ˙ ̇ ‰‚Ë„‡ÚÂÎfl èÓ˜ËÒÚ‚‡ÈÚ ‰ӂÌÓ Ì‡ ‡‚ÌË ËÌÚ‚‡ÎË ÓÚ ‚ÂÏÂÁ‡˘ËÚÌËfl ÙËÎÚ˙ ̇ ‰‚Ë„‡ÚÂÎfl ÔÓÒ‰ÒÚ‚ÓÏÔÓ˜ÛÍ‚‡Ì ËÎË ÔÓÏË‚‡ÌÂ! îË„. éÚ‚ÓÂÚ ͇ԇ͇ ̇ Ô‡ıÓÛÎÓ‚ËÚÂÎÌÓÚÓÓÚ‰ÂÎÂÌË (‚ËÊ ËÒ. 18). àÁ‚‡‰ÂÚ Á‡˘ËÚÌËfl ÙËÎÚ˙ ̇ ‰‚Ë„‡ÚÂÎfl ˜ÂÁËÁ‰˙Ô‚‡Ì ‚ ÔÓÒÓ͇ ̇ ÒÚÂÎ͇ڇ. èÓ˜...
Page 104 - ôÂÚÓ ̃ÍÛ ‰Îfl ÌËÚÓÍ; Á‡Í‡Á‡Ú ̧ ‚ Ò‚ËÒÌÓÈ ÒÎÛÊ·Â.
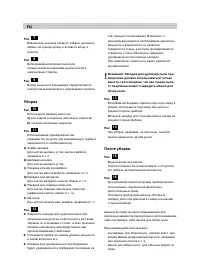
éÔËÒ‡ÌË ÔË·Ó‡ á‡Ô‡ÒÌ˚ ˜‡ÒÚË Ë ÒÔˆÔË̇‰ÎÂÊÌÓÒÚË 1 ç‡Ò‡‰Í‡ ‰Îfl ÔÓ·/ÍÓ‚‡* 2 ÇÒ‡Ò˚‚‡˛˘‡fl Ú۷͇* 3 äÓÏ·Ë-̇҇‰Í‡* 4 ÑÂʇÚÂθ ÍÓÏ·Ë-̇҇‰ÍË* 5íÂÎÂÒÍÓÔ˘ÂÒ͇fl Ú۷͇* 6 äÌÓÔ͇ ·ÎÓÍËÓ‚ÍË / ÏÛÙÚ‡-ÔÓÎÁÛÌÓÍ* 7 ê͇ۘ* 8 ò·̄ 9 ôÂÚӘ͇* 10 ç‡Ò‡‰Í‡ ‰Îfl Ïfl„ÍÓÈ Ï·ÂÎË* 11 ôÂ΂‡fl ̇҇‰Í‡* 12ç‡Ò‡‰Í‡ ‰Îfl ...
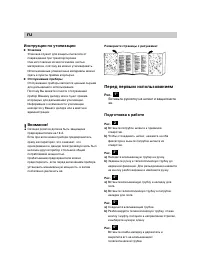
Page 106 - àÌÒÚÛ͈ËË ÔÓ ÛÚËÎËÁ‡ˆËË; è‰ Ô‚ ̊Ï ËÒÔÓÎ ̧ÁÓ‚‡ÌËÂÏ; èÓ‰„ÓÚӂ͇ Í ‡·ÓÚÂ
ru àÌÒÚÛ͈ËË ÔÓ ÛÚËÎËÁ‡ˆËË ìÔ‡Íӂ͇ ìÔ‡Íӂ͇ ÒÎÛÊËÚ ‰Îfl Á‡˘ËÚ˚ Ô˚ÎÂÒÓÒ‡ ÓÚÔÓ‚ÂʉÂÌËÈ ÔË Ú‡ÌÒÔÓÚËÓ‚ÍÂ.é̇ ËÁ„ÓÚÓ‚ÎÂ̇ ËÁ ˝ÍÓÎӄ˘ÂÒÍË ˜ËÒÚ˚ıχÚ¡ÎÓ‚, ÔÓ˝ÚÓÏÛ Â ÏÓÊÌÓ ÛÚËÎËÁËÓ‚‡Ú¸.àÒÔÓθÁÓ‚‡ÌÌ˚ ÛÔ‡ÍÓ‚Ó˜Ì˚ χÚ¡Î˚ ÏÓÊÌÓÒ‰‡Ú¸ ‚ ÔÛÌÍÚ˚ ÔËÂχ ‚ÚÓÒ˚¸fl. éÚÒÎÛÊË‚¯Ë ÔË·Ó˚ éÚÒÎÛÊË‚¯Ë ÔË·Ó...
Page 107 - ì·Ó͇; èÓÒΠ۷ÓÍË
ru êËÒ. ÇÓÁ¸ÏËÚÂÒ¸ Á‡ ‚ËÎÍÛ ÒÂÚÂ‚Ó„Ó Í‡·ÂÎfl, ‚˚ÚflÌËÚÂ͇·Âθ ̇ ÌÛÊÌÛ˛ ‰ÎËÌÛ Ë ‚ÒÚ‡‚¸Ú ‚ËÎÍÛ ‚ÓÁÂÚÍÛ. êËÒ. ÇÍβ˜ÂÌËÂ/‚˚Íβ˜ÂÌË Ô˚ÎÂÒÓÒ‡ÓÒÛ˘ÂÒÚ‚ÎflÂÚÒfl ̇ʇÚËÂÏ ‚˚Íβ˜‡ÚÂÎfl ‚̇ԇ‚ÎÂÌËË ÒÚÂÎÍË. êËÒ. Ç˚·Ó ÏÓ˘ÌÓÒÚË ‚Ò‡Ò˚‚‡ÌËfl ÓÒÛ˘ÂÒÚ‚ÎflÂÚÒflÔÓ‚ÓÓÚÓÏ ‚˚Íβ˜‡ÚÂÎfl ‚ ̇ԇ‚ÎÂÌËË ÒÚÂÎÍË. ì·Ó͇ êËÒ. àÒÔ...
Page 108 - éÔÓÓÊÌÂÌË ÍÓÌÚÂÈ̇ ‰Îfl Ò·Ó‡ Ô ̊ÎË; êÂÊËÏ ÛÒÚ‡ÌÂÌËfl ÌÂËÒÔ‡‚ÌÓÒÚÂÈ
ru àÒÔÓθÁÓ‚‡ÌË ÍÓÌÚÂÈ̇ ‰ÎflÒ·Ó‡ Ô˚ÎË êËÒ. ÑÎfl ‰ÓÒÚËÊÂÌËfl ÓÔÚËχθÌ˚ı ÂÁÛθڇÚÓ‚Û·ÓÍË ÛÒÚ‡ÌÓ‚ËÚ „ÛÎflÚÓ ÏÓ˘ÌÓÒÚË Ì‡Ï‡ÍÒËÏÛÏ. å˚ ÂÍÓÏẨÛÂÏ ÛÏÂ̸¯‡Ú¸ ÏÓ˘ÌÓÒÚ¸ ÚÓθÍÓÔË ˜ËÒÚÍ ӘÂ̸ ˜Û‚ÒÚ‚ËÚÂθÌ˚ı χÚ¡ÎÓ‚. éÔÓÓÊÌÂÌË ÍÓÌÚÂÈ̇ ‰Îfl Ò·Ó‡ Ô˚ÎË ÑÎfl ‰ÓÒÚËÊÂÌËfl ÓÔÚËχθÌÓ„Ó ÂÁÛθڇڇÓÔÓÓÊ...
Page 109 - á‡ÏÂ̇ ÙËÎ ̧Ú‡ Hepa; ìıÓ‰; á‡ÏÂ̇ Ï ͇̄ ‰Îfl Ò·Ó‡ Ô ̊ÎË
óËÒÚ͇ ÙËθڇ Á‡˘ËÚ˚ ‰‚Ë„‡ÚÂÎfl îËÎ¸Ú Á‡˘ËÚ˚ ‰‚Ë„‡ÚÂÎfl ÂÍÓÏẨÛÂÚÒfl„ÛÎflÌÓ ˜ËÒÚËÚ¸! êËÒ. éÚÍÓÈÚ Í˚¯ÍÛ Ô˚ÎÂÒ·ÓÌÓ„Ó ÓÚÒÂ͇ (ÒÏ. ËÒ.18). Ç˚̸Ú ÙËÎ¸Ú Á‡˘ËÚ˚ ‰‚Ë„‡ÚÂÎfl ‚ ̇ԇ‚ÎÂÌËËÒÚÂÎÍË. éÚflıÌËÚ Ô˚θ Ò ÙËθڇ Á‡˘ËÚ˚ ‰‚Ë„‡ÚÂÎfl. Ç ÒÎÛ˜‡Â ÒËθÌÓ„Ó Á‡„flÁÌÂÌËfl Á‡ÏÂÌËÚ ÙËθÚÁ‡˘ËÚ˚ ‰‚Ë„‡ÚÂÎfl...
Page 111 - Utilizare conform destinaøiei; saci de filtrare originali.; Indicaøii de securitate
ro Vå rugåm så påstraøi instrucøiunile de utilizare.În cazul predårii aspiratorului unei terøe persoanevå rugåm så înmânaøi totodatå µi instrucøiunilede utilizare. Utilizare conform destinaøiei Acest aspirator este destinat utilizårii îngospodårie, nu µi în scopuri profesionale.Utilizaøi aspiratorul...
Page 112 - Ambalajul; Vå rugåm så aveøi în vedere; Vå rugåm så deschideøi la paginile cu imagini!; Înainte de prima utilizare; Îmbinaøi mânerul μi tubul de aspiraøie.
ro Indicaøii asupra îndepårtårii ambalajului µi aparatului scos din uz Ambalajul Ambalajul protejeazå aspiratorul împotrivadeteriorårii pe timpul transportului.Ambalajul constå din materiale favorabilemediului ambiant µi este de aceea reciclabil.Predaøi materialele de ambalaj, care nu maisunt necesa...
Page 113 - Aspirarea; Reglarea periei pentru podele:; Dupå lucrul cu aspiratorul; - sacului de filtrare înainte de toate pentru
ro Imag. Conectaøi/deconectaøi aspiratorul prinacøionarea butonului de pornire-oprire îndirecøia sågeøii. Imag. Reglarea puterii de aspirare se efectueazåprin rotirea butonului de pornire-oprire îndirecøia sågeøii. Aspirarea Imag. Reglarea periei pentru podele: a) covoare µi mochete b) podele netede...
Page 114 - Lucrul cu recipientul de praf; Golirea recipientului de praf; Închideøi clapeta de fund.; Curåøarea filtrului permanent μi a; Când trebuie curåøat:; cel târziu o datå la jumåtate de an.; Deranjament; Remedierea unei înfundåri în recipientul de praf.
ro Lucrul cu recipientul de praf Imag. Pentru rezultate optime de aspiraøie poziøionaøiregulatorul de putere pe poziøia maximå. Numai în cazul materialelor foarte sensibile vårecomandåm så reduceøi puterea. Golirea recipientului de praf Pentru a atinge un rezultat optim de aspiraøie,recipientul de p...
Page 115 - Curåøarea filtrului de protecøia a motorului; Înlocuirea filtrului Hepa; Întreøinere; Nu scufundaøi niciodatå aspiratorul în apå.; Se rezervå dreptul la modificåri tehnice.; Lucrul cu sacul de filtrare; Închideøi capacul aparatului.; Înlocuirea sacului de filtrare
Curåøarea filtrului de protecøia a motorului Filtrul de protecøie a motorului trebuie curåøat laintervale regulate prin scuturare, respectiv prinspålare! Imag. Deschideøi capacul compartimentului de praf(vezi imag. 18). Scoateøi filtrul de protecøie a motorului îndirecøia sågeøii. Curåøaøi filtrul d...
Page 116 - ÇÓÎÓÍÌÓÁ·Ë‡ ̃
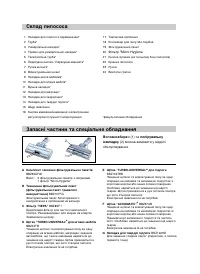
ëÍ·‰ ÔËÎÓÒÓÒ‡ á‡Ô‡ÒÌ¥ ˜‡ÒÚËÌË Ú‡ ÒÔˆ¥‡Î¸Ì ӷ·‰Ì‡ÌÌfl 1 ç‡Ò‡‰Í‡ ‰Îfl Ô¥‰ÎÓ„Ë Á ÔÂÂÏË͇˜ÂÏ* 2 íÛ·‡* 3 ìÌ¥‚Â҇θ̇ ̇҇‰Í‡* 4 íËχ˜ ‰Îfl ÛÌ¥‚Â҇θÌÓª ̇҇‰ÍË* 5íÂÎÂÒÍÓÔ¥˜Ì‡ ÚÛ·‡* 6 èÂÂÒۂ̇ ÍÌÓÔ͇ / èÂÂÒۂ̇ χÌÊÂÚ‡* 7 ê͇ۘ ¯Î‡Ì„‡* 8 ÇÒÏÓÍÚÛ‚‡Î¸ÌËÈ ¯Î‡Ì„ 9 ç‡Ò‡‰Í‡-˘¥Ú͇ Ϸ΂‡* 10 ç‡Ò‡‰Í‡ ‰Î...
Page 117 - á‡ÒÚÓÒÛ‚‡ÌÌfl Á‡ ÔËÁ̇ ̃ÂÌÌflÏ; Ù¥ÏÓ‚ËÏË Ù¥Î ̧ÚÛ‚‡Î ̧ÌËÏË Ô‡ÍÂÚ‡ÏË; ç‡ÒÚ‡ÌÓ‚Ë ̆Ó‰Ó ·ÂÁÔÂÍË
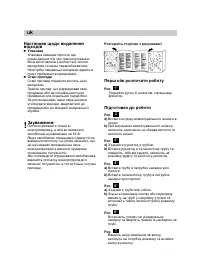
uk ßÌÒÚÛ͈¥˛ Á ÂÍÒÔÎÛ‡Ú‡ˆ¥ª ÔÓÚ¥·ÌÓ Á·Â¥„‡ÚË.üÍ˘Ó ÔËÎÓÒÓÒ Ô‰‡πÚ¸Òfl, ‡ÁÓÏ ¥Á ÌËÏ ÒÎ¥‰Ô‰‡ÚË ßÌÒÚÛ͈¥˛ Á ÂÍÒÔÎÛ‡Ú‡ˆ¥ª. á‡ÒÚÓÒÛ‚‡ÌÌfl Á‡ ÔËÁ̇˜ÂÌÌflÏ ñÂÈ ÔËÎÓÒÓÒ ÔËÁ̇˜ÂÌËÈ Ú¥Î¸ÍË ‰ÎflÔÓ·ÛÚÓ‚Ó„Ó, ‡ Ì ‰Îfl ÔÓÙÂÒ¥ÈÌÓ„Ó‚ËÍÓËÒÚ‡ÌÌfl.èËÎÓÒÓÒ ÒÎ¥‰ ‚ËÍÓËÒÚÓ‚Û‚‡ÚË Û ÒÔÓÒ¥·,ÓÔËÒ‡ÌËÈ Û ˆ¥È ßÌÒÚÛ͈¥ª ...
Page 118 - è ̄ Ì¥Ê ÓÁÔÓ ̃‡ÚË Ó·ÓÚÛ
uk ç‡ÒÚ‡ÌÓ‚Ë ˘Ó‰Ó ‚ˉ‡ÎÂÌÌfl ‚¥‰ıÓ‰¥‚ ìÔ‡Íӂ͇ ìÔ‡Íӂ͇ Á‡ıˢ‡π ÔËÎÓÒÓÒ ‚¥‰ÔÓ¯ÍÓ‰ÊÂÌÌfl Ô¥‰ ˜‡Ò Ú‡ÌÒÔÓÚÛ‚‡ÌÌfl.ÇÓ̇ ‚Ë„ÓÚÓ‚ÎÂ̇ Á ÂÍÓÎÓ„¥˜ÌÓ ˜ËÒÚËıχÚÂ¥‡Î¥‚ Ú‡ ÏÓÊ ÔÂÂӷ₇ÚËÒfl.çÂÔÓÚ¥·Ì¥ Ô‡ÍÛ‚‡Î¸Ì¥ χÚÂ¥‡ÎË Á‰‡ÈÚ ‚ÔÛÌÍÚ ÔËÈχÌÌfl ‚ÚÓÒËÓ‚ËÌË. ëÚ‡¥ ÔË·‰Ë ëÚ‡¥ ÔË·‰Ë ÔÓ‰ÂÍÓÎË Ï¥ÒÚflÚ¸ ˆ¥ÌÌ...
Page 119 - óË ̆ÂÌÌfl; èÂÂÏË͇ ̃ ̇҇‰ÍË ‰Îfl Ô¥‰ÎÓ„Ë:; á‡Í¥Ì ̃ÂÌÌfl Ó·ÓÚË; - ٥Π̧ÚÛ‚‡Î ̧ÌËÈ Ô‡ÍÂÚ Ô¥‰ ̃‡Ò ·Û‰ ̧-flÍÓ„Ó
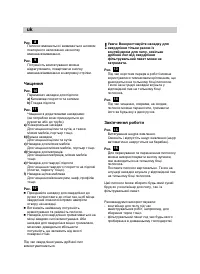
uk êËÒ. èËÎÓÒÓÒ ‚ÏË͇πÚ¸Òfl ¥ ‚ËÏË͇πÚ¸Òfl ¯ÎflıÓÏÔÓ‚ÚÓÌÓ„Ó Ì‡ÚËÒ͇ÌÌfl ̇ ÍÌÓÔÍÛ‚ÏË͇ÌÌfl/‚ËÏË͇ÌÌfl. êËÒ. èÓÚÛÊÌ¥ÒÚ¸ ‚ÒÏÓÍÚÛ‚‡ÌÌfl ÏÓÊ̇‚¥‰Â„Û₇ÚË, ÔÓ‚ÂÚ‡˛˜Ë ÍÌÓÔÍÛ‚ÏË͇ÌÌfl/‚ËÏË͇ÌÌfl ‚ ̇ÔflÏÍÛ ÒÚ¥ÎÍË. óˢÂÌÌfl êËÒ. èÂÂÏË͇˜ ̇҇‰ÍË ‰Îfl Ô¥‰ÎÓ„Ë: a) äËÎËÏÓ‚Â ÔÓÍËÚÚfl Ú‡ ÍËÎËÏË b) É·‰Í‡ Ô¥‰ÎÓ„‡ êËÒ....
Page 120 - óË ̆ÂÌÌfl ÍÓÌÚÂÈ̇ ‰Îfl ÔËÎÛ; èÓÒÚ‡‚Ú ̇ ϥ҈ ‚¥‰ÍˉÌ ‰ÌÓ ÍÓÌÚÂÈ̇.; äÓÎË ÔÓÚ¥·ÌÓ ̃ËÒÚËÚË:; èÓfl‰ÓÍ ‚ËÍÓËÒÚ‡ÌÌfl; ìÒÛÌÂÌÌfl Á‡ÒÏ¥ ̃ÂÌÌfl ‚ ÍÓÌÚÂÈÌÂ¥ ‰Îfl ÔËÎÛ.
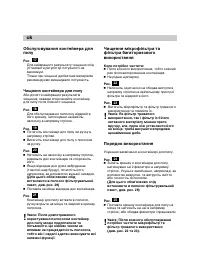
uk é·ÒÎÛ„Ó‚Û‚‡ÌÌfl ÍÓÌÚÂÈ̇ ‰ÎflÔËÎÛ êËÒ. ÑÎfl ̇È͇˘Ó„Ó ÂÁÛθڇÚÛ ˜Ë˘ÂÌÌfl ÒÎ¥‰ÛÒÚ‡ÌÓ‚ËÚË Â„ÛÎflÚÓ ÔÓÚÛÊÌÓÒÚ¥ ̇χÍÒËÏÛÏ. í¥Î¸ÍË ÔË ˜Ë˘ÂÌÌ¥ ‰ÂΥ͇ÚÌËı χÚÂ¥‡Î¥‚ÂÍÓÏẨÛπÏÓ ÁÏÂ̯ۂ‡ÚË ÔÓÚÛÊÌ¥ÒÚ¸. óˢÂÌÌfl ÍÓÌÚÂÈ̇ ‰Îfl ÔËÎÛ Ä·Ë ‰ÓÒfl„ÚË Ì‡È͇˘Ëı ÂÁÛθڇڥ‚˜Ë˘ÂÌÌfl, Á‡‚Ê‰Ë ÒÔÓÓÊÌflÈÚ ÍÓÌÚÂÈ̉Î...
Page 121 - óË ̆ÂÌÌfl Á‡ıËÒÌÓ„Ó Ù¥Î ̧Ú‡ ‰‚Ë„Û̇; ÇËÚÛÒ¥Ú ̧ Á‡ıËÒÌËÈ Ù¥Î ̧Ú ‰‚Ë„Û̇.; é·ÒÎÛ„Ó‚Û‚‡ÌÌfl; ᇷÓÓÌÂÌÓ Á‡ÌÛ ̨‚‡ÚË ÔËÎÓÒÓÒ Û ‚Ó‰Û!; á‡ÍËÈÚ ÍË ̄ÍÛ ÔËÎÓÒÓÒ‡.; á‡Ï¥Ì ̨‚‡ÌÌfl ٥Π̧ÚÛ‚‡Î ̧ÌÓ„Ó
! 삇„‡: ä˯͇ ‚¥‰Ò¥ÍÛ ‰Îfl ÔËÎÛÁ‡ÍËπÚ¸Òfl, ڥθÍË flÍ˘Ó ‚ÒÚ‡ÌÓ‚ÎÂÌËÈ‚¥‰ÔÓ‚¥‰ÌËÈ Ù¥Î¸ÚÛ‚‡Î¸ÌËÈ Ô‡ÍÂÚ,Ú͇ÌËÌÌËÈ Ù¥Î¸ÚÛ‚‡Î¸ÌËÈ Ô‡ÍÂÚ ‡·ÓÍÓÌÚÂÈÌ ‰Îfl ÔËÎÛ. óˢÂÌÌfl Á‡ıËÒÌÓ„Ó Ù¥Î¸Ú‡ ‰‚Ë„Û̇ é·Ó‚'flÁÍÓ‚Ó Â„ÛÎflÌÓ ‚ËÚÛ¯ÛÈÚ ‡·Ó ÏËÈÚÂÁ‡ıËÒÌËÈ Ù¥Î¸Ú ‰‚Ë„Û̇! êËÒ. Ç¥‰ÍËÈÚ Í˯ÍÛ ‚¥‰Ò¥ÍÛ ‰Îfl ÔËÎÛ (‰Ë‚....
Page 128 - Zentralwerkstatt; Darmstadt; Bestellung von Zubehör und Ersatzteilen
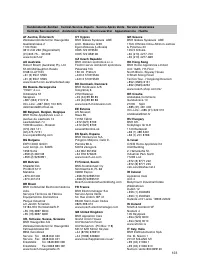
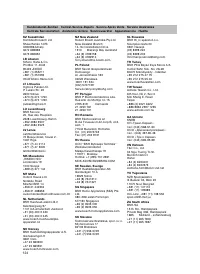
122 Kundendienst Kontakte Kleine Hausgeräte Standorte Service Shops Zentralwerkstatt Der direkte Weg, falls Ihr Gerät repariert werdenmuss. Senden Sie Ihr Gerät einfach an: Robert Bosch Hausgeräte GmbH Zentralwerkstatt Kleine HausgeräteWitschelstraße 10490431 Nürnberg Service-Tel.: 01801 – 33 53 03 ...
Page 133 - und Elektronikaltgeräte (waste electrical and
"Dieses Gerät ist entsprechend der euro- päischen Richtlinie 2002/96/EG über Elektro- und Elektronikaltgeräte (waste electrical and electronic equipment - WEEE) gekennzeichnet.Die Richtlinie gibt den Rahmen für eine EU-weitgültige Rücknahme und Verwertung derAltgeräte vor." This appliance is...
Page 135 - Garantiebedingungen; Gültig in der Bundesrepublik Deutschland; AT
Garantiebedingungen Gültig in der Bundesrepublik Deutschland Die nachstehenden Bedingungen, die Voraus- setzungen und Umfang unserer Garantieleistung umschreiben, lassen die Gewährleistungsver- pflichtungen des Verkäufers aus dem Kaufvertrag mit dem Endabnehmer unberührt. Für dieses Gerät leisten wi...