Black & Decker LST136B - User Manual

Black & Decker LST136B Grass Trimmer – User Manual, read for free online in PDF format. We hope this helps you resolve any issues you may have. If you have further questions, please contact us through the contact form.


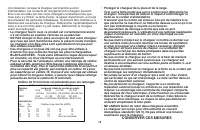
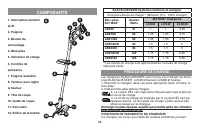
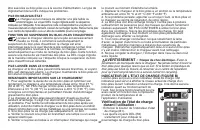
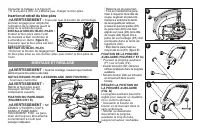
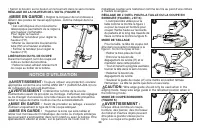
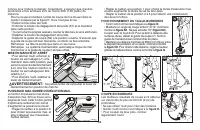
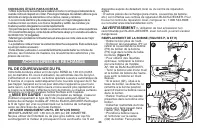
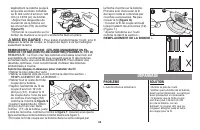
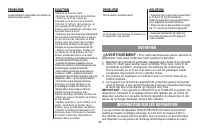


Table of Contents:
- Page 2 – SAFETY GUIDELINES - DEFINITIONS; Indicates an imminently hazardous situation which,; IMPORTANT SAFETY WARNINGS; IMPORTANT SAFETY WARNINGS & INSTRUCTIONS; When using electric gardening appliances, basic; Read All Instructions
- Page 3 – The label on your tool may include the following symbols.; chemicals known to the State of California to cause cancer,; important safety instructions for battery chargers; SAVE THESE INSTRUCTIONS: This manual contains important; other than the ones in this manual. The charger and battery
- Page 4 – SAVE THESE INSTRUCTIONS; important safety instructions for battery pacKs; READ ALL INSTRUCTIONS
- Page 5 – • If battery contents come into contact with the skin,; • Charge the battery packs only in BLACK+DECKER chargers.; • Do not store or use the tool and battery pack in locations; NOTE: Batteries should not be put in checked baggage.; COMPONENTS
- Page 7 – assembLy & aDJustment; Remove the battery before attempting to attach any
- Page 8 – OPERATING INSTRUCTIONS; always use proper eye protection that conforms
- Page 9 – TRIMMING MODE; WARNING; SURE that other persons and pets are at least 100 feet (30m) away.
- Page 10 – REPLACEMENT ACCESSORIES; Before you begin trimming, only use the appropriate
- Page 11 – REPLACING THE SPOOL; To avoid tool; REWINDING SPOOL; Replacement
- Page 12 – Maintenance; To avoid serious injury, remove the battery from; IMPORTANT: To assure product SaFETY and RELIaBILITY,; Rechargeable Battery Recycling Corporation.; NOTE: This equipment has been tested and found to comply with
- Page 13 – Service inforMation; ProBLeM; trouBLe Shooting guiDe
- Page 14 – trouBLe Shooting continueD; THREE-YEAR LIMITED WARRANTY; LATIN AMERICA: This warranty does not apply to products sold in
- Page 15 – • Utiliser uniquement avec un bloc-piles de; MANUEL D’ INSTRUCTIONS; AVEC PILE AU LITHIUM DE 40 V MAX*; CONSERVER CE MODE D’EMPLOI POUR UN USAGE ULTÉRIEUR.; NUMÉRO DE MODèLE
- Page 16 – AVERTISSEMENTS DE SéCURITé ET DIRECTIVES; Lorsque des outils de jardinage; LIRE TOUTES LES DIRECTIVES
- Page 17 – SYMBOLES; L’étiquette apposée sur votre outil peut comprendre les symboles; DIRECTIVES DE SéCURITé IMPORTANTES POUR; Ce mode d’emploi comprend d’importantes directives de sécurité; risque de choc; risque de brûlure. Pour; DANGEREUSES - Ne pas utiliser d’outils électriques dans des; CONSERVER CES MESURES.
- Page 18 – CONSERVER CES MESURES
- Page 20 – PROCéDURE DE CHARGE; pour prolonger leur durée de vie.; COMPOSANTS; BLACK+DECKER Systèmes batteries et chargeur
- Page 21 – Risque de choc électrique. Éviter la; INDICATEUR DE L’éTAT DE CHARGE (FIGURE B); Vérification de l’état de charge
- Page 22 – Insertion et retrait du bloc-piles; RETRAIT DU BLOC-PILES; MONTAGE ET RéGLAGE; FIXATION DE LA POIGNéE
- Page 23 – NOTICE D’UTILISATION; Toujours utiliser une protection oculaire; RéGLAGE DE L’OUTIL POUR LA TAILLE OU LA COUPE EN
- Page 25 – CONSEJOS ÚTILES PARA CORTAR; ACCESSORIES DE RECHANGE; FIL DE COUPE/AVANCE DU FIL; • UTILIsER UNIQUEMENT UN FIL DE NYLON ROND
- Page 26 – Pour éviter d’endommager l’outil, si le fil; REMBOBINER LA BOBINE (UTILISER UNIQUEMENT UN FIL; ProBLÈMe; REMPLACEMENT DE LA BOBINE ».; DePannage
- Page 28 – LE SCEAU SRPRC; la fin de sa vie utile est déjà payé par BLACK+DECKER . La SRPRC; GARANTIE LIMITéE DE TROIS ANS; ce produit annule par
- Page 29 – • Utilizar únicamente con una batería B&D serie; DE PODADORA / BORDEADORA; MANUAL DE INSTRUCCIONES; MODELO N°
- Page 30 – PAUTAS DE SEGURIDAD/DEFINICIONES; PELIGRO: indica una situación de peligro inminente que, si no se; INSTRUCCIONES Y aDVERTENCIaS DE SEGURIDaD; Lea todas las instrucciones
- Page 31 – o DC; INSTRUCCIONES DE SEGURIDAD IMPORTANTES; Riesgo de descarga; CONSERVE ESTAS INSTRUCCIONES; o AC
- Page 32 – Esto reducirá el riesgo de dañar el enchufe y el cable.
- Page 33 – LEA TODAS LAS INSTRUCCIONES; NOTA: Las baterías de iones de LI-ION no deben colocarse
- Page 34 – COMPONENTES
- Page 35 – paquete de baterías se rompe o agrieta, devuélvala a un centro de; INDICADOR DEL ESTADO DE LA
- Page 37 – LIBERACIÓN DE LA CUERDA DE CORTE; INSTRUCCIONES DE OPERACIÓN; antes de comenzar a podar, asegúrese de; PRECAUCIÓN; AJUSTE DE LA HERRAMIENTA
- Page 39 – ACCESORIOS DE REPUESTO; antes de comenzar a podar, asegúrese de utilizar
- Page 41 – DETECCION DE PROBLEMAS; PROBLEMA; La herramienta; La alimentación automática de; SOLUCIÓN
- Page 42 – IMPORTANTE: Para garantizar la SEGURIDaD y la; INFORMACIÓN DE MANTENIMIENTO; eL seLLo rbrcTM
- Page 43 – GARANTÍA LIMITADA DE TRES AñOS; AMéRICA LATINA: Esta garantía no se aplica a productos vendidos en
- Page 44 – Copyright© 2015 BLaCK+DECKER
1
KEY INFORMATION YOU SHOULD KNOW:
• The guard must be installed before trimming or
edging - if not, the motor will overheat.
• When replacing the line, use only .065 inch diameter
ROUND line (B+D Model #AF-100 is recommended) -
otherwise the tool will not function properly.
• Do not bump the feed head against the ground - it
will disrupt the feed mechanism.
For use only with LB series 36v or 40v Max* batteries.
INSTRUCTION MANUAL
40V MAX* LITHIUM
TRIMMER / EDGER
Thank you for choosing BLACK+DECKER!
PLEASE READ BEFORE RETURNING THIS PRODUCT FOR ANY REASON.
If you have a question or experience a problem with your BlAck+DeckeR purchase, go to http://www.blackanddecker.com/instantanswers . If
you can’t find the answer or do not have access to the Internet, call 1-800-544-6986 from 8 a.m. to 5 p.m. eST Mon. - Fri. to speak with an agent.
Please have the catalog number available when you call.
SAVE THIS MANUAL FOR FUTURE REFERENCE.
VEA EL ESPANOL EN LA CONTRAPORTADA. INSTRUCTIVO DE OPERACIÓN, CENTROS DE SERVICIO Y PÓLIZA DE GARANTÍA. ADVERTENCIA: LÉASE
ESTE INSTRUCTIVO ANTES DE USAR EL PRODUCTO.
*Maximum initial battery pack voltage (measured without a workload) is 40 volts. Measured under a workload, nominal voltage is 36.
CATALOG NUMBER
LST136
To register your new product, visit www.BlackandDecker.com/NewOwner
"Loading the manual" means you need to wait until the file loads and becomes available for online reading. Some manuals are very large, and the time they take to appear depends on your internet speed.
Summary
SAFETY GUIDELINES - DEFINITIONS It is important for you to read and understand this manual. The information it contains relates to protecting YOUR SaFETY and PREVENTING PROBLEMS. The symbols below are used to help you recognize this information. DANGER: Indicates an imminently hazardous situation wh...
3 appliance, a guard or other part that is damaged should be carefully checked to determine that it will operate properly and perform its intended function. Check for alignment of moving parts, binding of moving parts, breakage of parts, mounting, and any other condition that may affect its operatio...
to any surface. The charger is intended to use on a flat, stable surface (i.e., table top, bench top). • Do not operate charger with damaged cord or plug — have them replaced immediately. • Do not operate charger if it has received a sharp blow, been dropped, or otherwise damaged in any way. Take it...