AQUARIAN THDPURBCH1833525 - User Manual
AQUARIAN THDPURBCH1833525 Swimming Pool – User Manual, read for free online in PDF format. We hope this helps you resolve any issues you may have. If you have further questions, please contact us through the contact form.


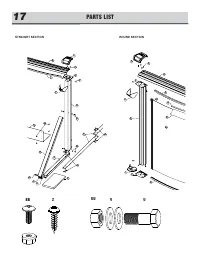


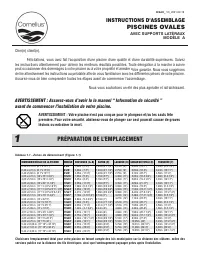
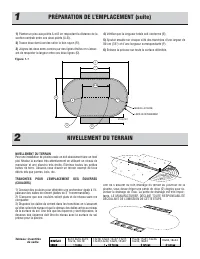
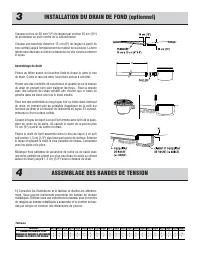
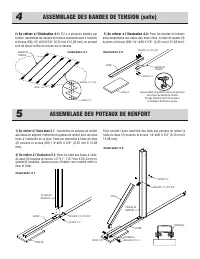
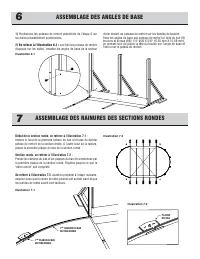
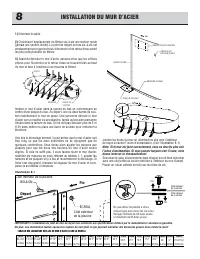
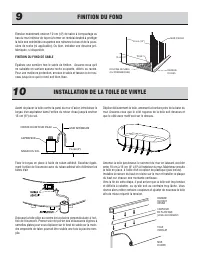
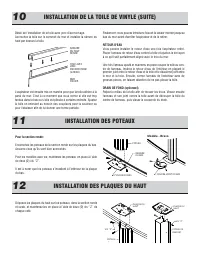

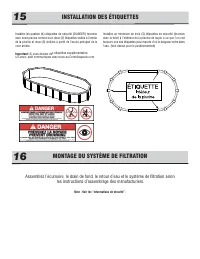
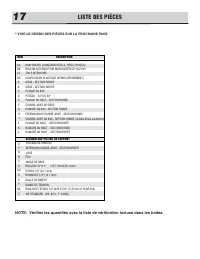
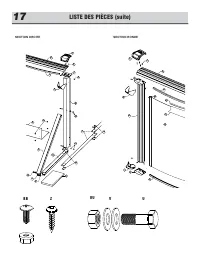


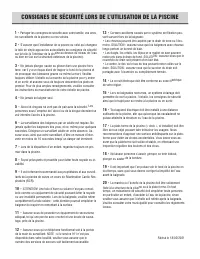
Table of Contents:
- Page 2 – SITE LEVELLING
- Page 3 – Bottom Drain Assembly; TENSION STRAPS ASSEMLBY
- Page 4 – BUTTRESS POSTS ASSEMBLY
- Page 5 – BEARING PLATE ASSEMBLY; Start with round; ROUND SECTION BOTTOM TRACKS ASSEMBLY
- Page 6 – WALL INSTALLATION; nd
- Page 7 – SAND BASE FINISHING
- Page 8 – PUMP RETURN FITTING; UPRIGHT POST INSTALLATION; For the round section:; UPRIGHT POST TOP PLATE
- Page 9 – TOP SEAT INSTALLATION; SEAT CAP INSTALLATION
- Page 10 – manufacturer’s instructions.; LABEL
- Page 11 – PARTS LIST; * SEE DRAWING PARTS NEXT PAGE
- Page 12 – BB
- Page 13 – SAFETY AND FUN GO; SAFETY INFORMATION; Read this before installing your above-ground pool.
- Page 14 – We recommend that you purchase one of the following:; GENERAL INFORMATION
- Page 15 – USAGE SAFETY INFORMATION
- Page 16 – Nous vous souhaitons un été des plus agréable et rafraîchissant; INSTRUCTIONS D’ASSEMBLAGE; PISCINES OVALES; AVEC SUPPORTS LATÉRAUX; PRÉPARATION DE L’EMPLACEMENT
- Page 17 – NIVELLEMENT DU TERRAIN
- Page 18 – Assemblage du drain; INSTALLATION DU DRAIN DE FOND (optionnel)
- Page 19 – ASSEMBLAGE DES POTEAUX DE RENFORT
- Page 20 – ASSEMBLAGE DES ANGLES DE BASE; Début de la section ronde, se reférer à l’illustration 7.1; ASSEMBLAGE DES RAINURES DES SECTIONS RONDES
- Page 21 – INSTALLATION DU MUR D’ACIER; épart
- Page 22 – FINITION DU FOND DE SABLE; FINITION DU FOND; INSTALLATION DE LA TOILE DE VINYLE
- Page 23 – INSTALLATION DE LA TOILE DE VINYLE (SUITE); INSTALLATION DES POTEAUX; Pour la section ronde:; INSTALLATION DES PLAQUES DU HAUT
- Page 24 – INSTALLATION DES SIÈGES; INSTALLATION DU COUVRE-JOINT
- Page 25 – les instructions d’assemblage des manufacturiers.; Note : Voir les “Informations de sécurité”.
- Page 26 – LISTE DES PIÈCES; * VOIR LE DESSIN DES PIÈCES SUR LA PROCHAINE PAGE
- Page 28 – CONSIGNES DE SÉCURITÉ
- Page 29 – Nous recommandons de se procurer le matériel suivant :; NE PAS PLONGER NI SAUTER; RENSEIGNEMENTS GÉNÉRAUX
- Page 30 – CONSIGNES DE SÉCURITÉ LORS DE L’UTILISATION DE LA PISCINE
INSAO_
V0_2021-02-18
When selecting the site for your pool, take into account city by-laws regarding fences and utilities laws pertaining to electrical cables
as well as the landscaping which you are planning once the pool is installed.
Dear Customer
Congratulations! You have purchased a pool of superior quality and durability. To achieve the best possible results,
follow the instructions carefully. Failure to follow the installation procedures may result in damage to your pool or
proper ty and void your warranty. We recommend that you make a preliminary study of the instruction booklet to
familiarize yourself with the different par ts of your pool. Make sure that you understand each step thoroughly before
you begin assembling.
We wish you a most pleasant and refreshing summer.
WARNING: Be sure you have read and understand the “Safety Information” sheets
before you begin your pool installation.
WARNING: For your safety, your pool is not designed for diving and/or jumping head first.
Please do not dive. Diving may result in permanent injury or death.
ASSEMBLY INSTRUCTIONS
OVAL POOLS
WITH SIDE SUPPORTS
MODEL A
SITE PREPARATION
1
Chart 1.1 - Grass removal area (Figure 1.1)
1.70m (5'7")
1.70m (5'7")
2.13m (7')
2.13m (7')
2.44m (8')
2.44m (8')
2.44m (8')
2.90m (9'-6")
2.90m (9'-6")
2.90m (9'-6")
3.35m (11')
3.35m (11')
4.27m (14')
4.27m (14')
4.88m (16')
4.88m (16')
4.88m (16')
5.79m (19')
5.79m (19')
5.79m (19')
5.03m (16'-5 3/4")
6.69m (21-11")
5.48m (17'-11 3/4")
7.14m (23'-5")
6.30m (20'-8")
7.96m (26'-1 1/2")
9.64m (31'-7 1/4")
10.31m (33'-10")
11.98m (39'-4")
13.66m (44'-10")
1.90m (6'-3 1/2")
3.33m (10'-11")
1.66m (5'-5 1/2")
3.33m (10'-11")
1.66m (5'-5 1/2")
3.33m (10'-11")
4.99m (16'-4 1/2")
5.24m (16'-4 1/2")
6.90m (22'-8")
8.56m (28'-1 1/2")
MODEL
TRUE POOL SIZE
DISTANCE (A-B)
RADIUS (R)
WIDTH (D)
TOTAL LENGTH (E)
TRENCH (F)
10'x16'
1.68m (5'-6")
10'x21'
3.35m (11'-0")
13'x17'
1.18m (3'-10 1/2")
13'x23'
2.84m (9'-3 3/4")
15'x20'
1.42m (4'-7 3/4")
15'x26'
3.07m (10'-1")
15'x31'
4.75m (15'-7")
18'x33'
4.57m (15'-0")
18'x38'
6.25m (20'-6")
18'x44'
7.92m (26'-0")
3.05 x 4.72 m (10' x 15' 5-3/4")
3.05 x 6.38 m (10' x 20' 11-1/8")
3.96 x 5.17 m (13' x 16' 11-3/4")
3.96 x 6.83 m (13' x 22' 5")
4.57 x 5.99 m (15' x 19' 8")
4.57 x 7.65 m (15' x 25' 1-3/8")
4.57 x 9.33 m (15' x 30' 7-1/4")
5.44 x 10.00 m (17' 10" x 32' 10")
5.44 x 11.61 m (17' 10" x 38' 4")
5.44 x 13.36 m (17' 10" x 43' 10")
1.40m (4'7 1/2")
1.40m (4'7 1/2")
1.40m (4'7 1/2")
2.75m (9')
2.75m (9')
2.75m (9')
4.45m (14'-7")
5.03m (16'-6")
6.12m (20'-1")
1.90m (6'-3 1/2")
3.33m (10'-11")
3.58m (11'-9")
8'x14'
1.68m (5'-6")
8'x16'
2.45m (7'-5")
8'x19'
3.35m (11'-0")
2.46 x 4.14 m (8' 1"x 13' 7")
2.46 x 4.72 m (8' 1"x 15' 6")
2.46 x 5.82 m (8' 1"x 19' 1")
1.70m (5'7")
3.35m (11')
5.85m (19-2 1/2")
3.33m (10'-11")
10'x18'
2.45m (8'-3")
3.05 x 5.53 m (10' x 18' 2-1/2")
1.98m (6'6 3/4")
1.98m (6'6 3/4")
1.98m (6'6 3/4")
3.96m (13')
3.96m (13')
3.96m (13')
5.94m (19'-6")
7.59m (24'-11 1/2")
8.43m (27'-8 1/4")
1.90m (6'-3 1/2")
3.58m (11'-9")
5.23m (17'-2 1/2")
12'x18'
1.98m (6'-6 1/2")
12'x24'
3.65m (12'-0")
12'x27'
4.47m (14'-8")
3.65 x 5.63 m (11' 11-1/2"x 18' 6")
3.65 x 7.30 m (11' 11-1/2"x 23' 11-1/2")
3.65 x 8.12 m (11' 11-1/2"x 26' 8-1/4")
2.31m (7'7 1/2")
2.31m (7'7 1/2")
4.57m (15')
4.57m (15')
6.27m (20'-7")
7.95m (26'-1")
1.90m (6'-3 1/2")
3.58m (11'-9")
14'x20'
1.68m (5'-6")
14'x25'
3.35m (11'-0")
4.29 x 5.97 m (14' 1"x 19' 7")
4.29 x 7.65 m (14' 1"x 25' 1")
2.59m (8'6 1/2")
2.59m (8'6 1/2")
5.18m (17')
5.18m (17')
8.38m (27'-6")
10.05m (33')
3.58m (11'-9")
5.23m (17'-2 1/2")
16'x26'
3.23m (10'-7 1/2")
16'x32'
4.90m (16'-1")
4.85 x 8.08 m (15' 11"x 26' 6")
4.85 x 9.75 m (15' 11"x 32' )
"Loading the manual" means you need to wait until the file loads and becomes available for online reading. Some manuals are very large, and the time they take to appear depends on your internet speed.
Summary
1) Drive a stake into the ground at points A and B respecting the distance of the straight section between those two points (A-B). 2) Draw two half circles respecting the radius (R). 3) Join the two half circles with straight lines respecting the width between these two lines (D). 4) Verify that the...
Dig a hole 30 cm (12") wide by approximately 25 cm (10") deep inthe center of the circumference. From the center hole to the projected location of the pool motor, diga 15 cm (6") wide trench. Place the removed soil aside to be usedlater to cover the hose. Bottom Drain Assembly Place tefl...
1) Refer to Illustration 5.1. Assemble the buttress post to the bottom brace using two (2) bolts and nuts (BB) 1/4"#20 X 5/8"(6,35 mm X 15,88 mm). 2) Refer to Illustration 5.2. Assemble the lower par t of the angle brace using bolts and nuts 1/2" X 1" (12,7 mm X 25,4 mm) andfour (4) ...