Page 2 - Please do not dive. Diving may result in permanent injury or death.; SITE PREPARATION
INSAO_ V0_2021-02-18 When selecting the site for your pool, take into account city by-laws regarding fences and utilities laws pertaining to electrical cablesas well as the landscaping which you are planning once the pool is installed. Dear Customer Congratulations! You have purchased a pool of supe...
Page 3 - SITE LEVELLING
1) Drive a stake into the ground at points A and B respecting the distance of the straight section between those two points (A-B). 2) Draw two half circles respecting the radius (R). 3) Join the two half circles with straight lines respecting the width between these two lines (D). 4) Verify that the...
Page 4 - Bottom Drain Assembly; TENSION STRAPS ASSEMLBY
Dig a hole 30 cm (12") wide by approximately 25 cm (10") deep inthe center of the circumference. From the center hole to the projected location of the pool motor, diga 15 cm (6") wide trench. Place the removed soil aside to be usedlater to cover the hose. Bottom Drain Assembly Place tefl...
Page 5 - BUTTRESS POSTS ASSEMBLY
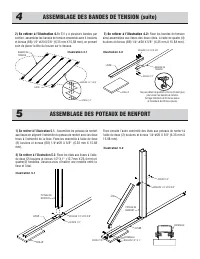
1) Refer to Illustration 5.1. Assemble the buttress post to the bottom brace using two (2) bolts and nuts (BB) 1/4"#20 X 5/8"(6,35 mm X 15,88 mm). 2) Refer to Illustration 5.2. Assemble the lower par t of the angle brace using bolts and nuts 1/2" X 1" (12,7 mm X 25,4 mm) andfour (4) ...
Page 6 - BEARING PLATE ASSEMBLY; Start with round; ROUND SECTION BOTTOM TRACKS ASSEMBLY
1) Position the buttress posts assembled in step 5 on the patio blocks in the trenches previously placed. 2) Refer to Illustration 6.1 : Once the buttress posts are placed on the patio blocks, assemble the bearing plate in front of the but- tress posts and on the tension straps. Fix the bearing plat...
Page 7 - WALL INSTALLATION; nd
WALL INSTALLATION 8 1) Add sand. 2) Choose the filter location beside a round section (never in a straight section). The star ting point should be at that location wherethe skimmer and return holes, and as close as possible to the fil-tration system. 3) Before uncoiling the wall, make sure the pre-p...
Page 8 - SAND BASE FINISHING
You can now spread approximately 10 cm (4") of compacting sandall around the inside base of the wall in order to protect the linerfrom the cutting edges of the bottom tracks and the stone dust (ifapplicable), or install a prefabricated cove if available. SAND BASE FINISHING Level finishing sand ...
Page 9 - PUMP RETURN FITTING; UPRIGHT POST INSTALLATION; For the round section:; UPRIGHT POST TOP PLATE
VINYL LINER INSTALLATION (continued) 10 Installation detail of a bead liner with top track.Hang the liner on the top of the wall and install the top track to se-cure. Star t the vacuum cleaner to allow the liner to adhere to the wall andcheck for excess tension at the bottom or for wrinkles. Adjust ...
Page 10 - TOP SEAT INSTALLATION; SEAT CAP INSTALLATION
TOP SEAT INSTALLATION 13 Place the top seats on the top of the uprights. Center the top seatbetween the two the uprights and be cer tain to evenly distribute theledges all around. Be sure to have a ver tical (plumb) upright before fixing the top seat. Secure the top seat in place using four (4) scre...
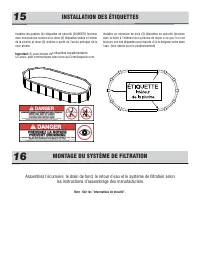
Page 11 - manufacturer’s instructions.; LABEL
SECURITY LABELS INSTALLATION 15 FILTRATION SYSTEM ASSEMBLY 16 Assemble skimmer, inlet, drain, filter, pumps, hoses according to separate manufacturer’s instructions. Note: See 'Safety Information" Manual. Install the four (4) safety labels (DANGER) supplied with your poolas follows: two (2) labe...
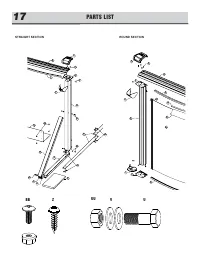
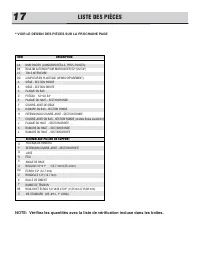
Page 12 - PARTS LIST; * SEE DRAWING PARTS NEXT PAGE
PARTS LIST 17 ITE M D E SCR I P TI ON POO L WALL ( f i n i shed l enght, i nch ) BO LT & N U T F OR 52 " ( OR 5 4" ) WALL POO L LINE R P LA S TI C COUP LE R ( SO L D S E P A R ATELY ) T OP S EAT - ROU N D S E C TI O N T OP S EAT- S T R AI G HT S E C TI O N BO TT O M P LATE - ROU N D S E ...
Page 13 - BB
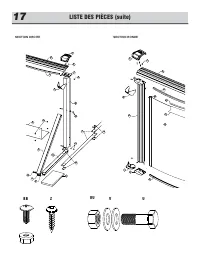
PARTS LIST 17 BB Z U UU V DD AA K BB CC A Z C G E D F H U O I Q V B L S R F UU P Y X BB Z J Z BB BB BB BB ROUND SECTION STRAIGHT SECTION
Page 14 - SAFETY AND FUN GO; SAFETY INFORMATION; Read this before installing your above-ground pool.
SAFETY AND FUN GO TOGETHER! SAFETY INFORMATION Read this before installing your above-ground pool. 12 775, Brault Street, Mirabel, Quebec, Canada J7J 0C4 Phone: 1 800 448-7384 Fax: 1 866 777-0167
Page 15 - We recommend that you purchase one of the following:; GENERAL INFORMATION
The pool is subject to wear and deterioration if not maintained prop-erly. Cer tain types of excessive or accelerated deterioration can leadto failure of the pool’s structure, which may release large quantitiesof water that could cause bodily harm, death and proper ty damages. In order to ensure pro...
Page 16 - USAGE SAFETY INFORMATION
USAGE SAFETY INFORMATION 1 • Share safety instructions with family, friends, pool watchers or neighbors. 2 •The installer of the vinyl liner shall affix on the original or re- placement liner, or on the pool structure, all safety signs in accor-dance with the manufacturer’s instructions. The safety ...
Page 17 - Nous vous souhaitons un été des plus agréable et rafraîchissant; INSTRUCTIONS D’ASSEMBLAGE; PISCINES OVALES; AVEC SUPPORTS LATÉRAUX; PRÉPARATION DE L’EMPLACEMENT
INSAO_ V0_2021-02-18 Cher(e) client(e), Félicitations, vous avez fait l'acquisition d'une piscine d'une qualité et d'une durabilité supérieures. Suivez les instructions attentivement pour obtenir les meilleurs résultats possibles. Toute dérogation à la marche à suivrepeut occasionner des dommages à ...
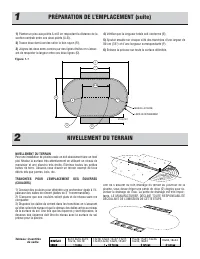
Page 18 - NIVELLEMENT DU TERRAIN
NIVELLEMENT DU TERRAIN Pour une installation de piscine ovale on doit absolument faire un fondplat. Nivelez la sur face très attentivement en utilisant un niveau demenuisier et une planche très droite. Éliminez toutes les petitesbuttes de terre. Assurez-vous d'avoir un terrain exempt de tousdébris t...
Page 19 - Assemblage du drain; INSTALLATION DU DRAIN DE FOND (optionnel)
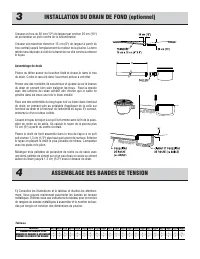
Creusez un trou de 30 cm (12") de largeur par environ 25 cm (10")de profondeur en plein centre de la circonférence. Creusez une tranchée d'environ 15 cm (6") de largeur à par tir dutrou central jusqu'à l'emplacement du moteur de la piscine. La terreretirée sera déposée à côté de la tranc...
Page 20 - ASSEMBLAGE DES POTEAUX DE RENFORT
2) Se reférer à l’illustration 4.1: S’il y a plusieurs bandes par section, assemblez les bandes de tension ensemble avec 4 boulonset écrous (BB) 1/4" #20 X 5/8" (6,35 mm X 15,88 mm), en prenantsoin de placer la tête du boulon sur le dessus. 3) Se reférer à l’illustration 4.2: Fixez les bande...
Page 21 - ASSEMBLAGE DES ANGLES DE BASE; Début de la section ronde, se reférer à l’illustration 7.1; ASSEMBLAGE DES RAINURES DES SECTIONS RONDES
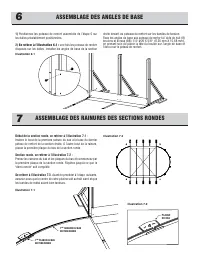
1) Positionnez les poteaux de renfor t assemblés de l’étape 5 sur les dalles préalablement positionnées. 2) Se reférer à l’illustration 6.1 : une fois les poteaux de renfor t disposés sur les dalles, installez les angles de base de la section droite devant les poteaux de renfor t sur les bandes de t...
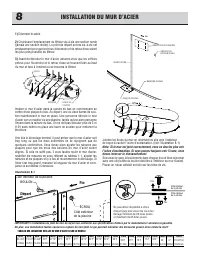
Page 22 - INSTALLATION DU MUR D’ACIER; épart
1) Déversez le sable. 2) Choisissez l'emplacement du filtreur vis-à-vis une section ronde (jamais une section droite). Le point de dépar t se fera vis-à-vis cetemplacement pour que les trous d'écumoire et de retour d'eau soientles plus près possible du filtreur. 3) Avant de dérouler le mur d’acier, ...
Page 23 - FINITION DU FOND DE SABLE; FINITION DU FOND; INSTALLATION DE LA TOILE DE VINYLE
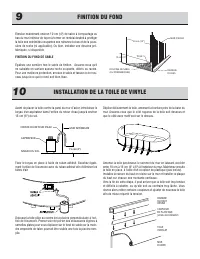
Étendez maintenant environ 10 cm (4") de sable à compactage aubas du mur intérieur de façon à former un remblai destiné à protégerla toile des extrémités coupantes des rainures du bas et de la pous-sière de roche (si applicable). Ou bien, installez une doucine pré-fabriquée, si disponible. FINIT...
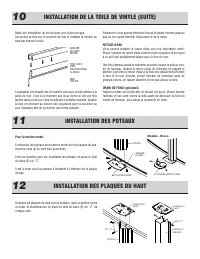
Page 24 - INSTALLATION DE LA TOILE DE VINYLE (SUITE); INSTALLATION DES POTEAUX; Pour la section ronde:; INSTALLATION DES PLAQUES DU HAUT
INSTALLATION DE LA TOILE DE VINYLE (SUITE) 10 Détail de l’installation de la toile avec jonc d’accrochage.Accrochez la toile sur le sommet du mur et installez la rainure duhaut par dessus la toile. L'aspirateur est ensuite mis en marche pour que la toile adhère à laparoi du mur. C'est à ce moment qu...
Page 25 - INSTALLATION DES SIÈGES; INSTALLATION DU COUVRE-JOINT
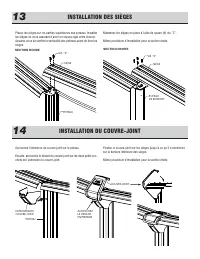
INSTALLATION DES SIÈGES 13 Placez les sièges sur les par ties supérieures des poteaux. Installezles sièges en vous assurant d’avoir un espace égal entre chacun.Assurez-vous de vérifier la ver ticalité des poteaux avant de fixer lessièges. Maintenez les sièges en place à l’aide de quatre (4) vis ‘’Z’...
Page 26 - les instructions d’assemblage des manufacturiers.; Note : Voir les “Informations de sécurité”.
MONTAGE DU SYSTÈME DE FILTRATION 16 INSTALLATION DES ÉTIQUETTES 15 Assemblez l’écumoire, le drain de fond, le retour d’eau et le système de filtration selon les instructions d’assemblage des manufacturiers. Note : Voir les “Informations de sécurité”. Installez les quatres (4) étiquettes de sécurité ...
Page 27 - LISTE DES PIÈCES; * VOIR LE DESSIN DES PIÈCES SUR LA PROCHAINE PAGE
LISTE DES PIÈCES 17 ITE M D E SCR I P TI ON M UR D 'A C IE R ( L O N GU E UR RÉ ELLE , P IE DS - POUC E S ) BOU L O N & ÉCROU POUR M UR D 'A C IE R 52 " ( OU 5 4" ) T O ILE INT ÉR IE UR E COUP LE UR EN P LA S TI QU E ( VEN DU SÉP A RÉ MENT ) S IÈ G E - S E C TI O N RO N D E S IÈ G E - S ...
Page 29 - CONSIGNES DE SÉCURITÉ
LE PLAISIR PASSE D’ABORD ET AVANT TOUT PAR LA SÉCURITÉ CONSIGNES DE SÉCURITÉ Veuillez lire ceci avant de procéder à l’installation de votre piscine hors terre. 12 775, rue Brault, Mirabel, Québec, Canada J7J 0C4 Téléphone : 1 800 448-7384 Télécopieur : 1 866 777-0167
Page 30 - Nous recommandons de se procurer le matériel suivant :; NE PAS PLONGER NI SAUTER; RENSEIGNEMENTS GÉNÉRAUX
Votre piscine peut être sujette à une usure et à une détérioration pré-maturée si elle n’est pas entretenue adéquatement. Cela pourrait en-traîner une défaillance de la structure de la piscine, ce qui pourraitprovoquer la libération de grandes quantités d’eau et causer desdommages, des blessures et ...
Page 31 - CONSIGNES DE SÉCURITÉ LORS DE L’UTILISATION DE LA PISCINE
CONSIGNES DE SÉCURITÉ LORS DE L’UTILISATION DE LA PISCINE 1 • Par tager les consignes de sécurité avec votre famille, vos amis, les surveillants de la piscine ou vos voisins. 2 • S’assurer que l’installateur de la piscine ou celui qui changera la toile de vinyle appose les autocollants de consignes ...