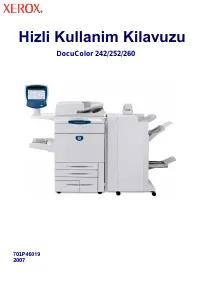
Page 2 - Hizli Kullanim Kilavuzu
Hizli Kullanim Kilavuzu D ocuColor 242/252/260 7 01P 46019 2007
Page 3 - Şİ
NOT: MAV İ ba ş lık BT yöneticisi personeli, YE Şİ L son kullanıcılar içindir. KIRMIZI makinenin dikkat gerektirdi ğ i anlamına gelir. Makinenin yapılandırmasına ba ğ lı olarak, bazı Kullanıcı Arayüzü ekranları de ğ i ş ebilir. Microsoft, MS-DOS, W indows, W indows NT, Microsoft Network ve W indows ...
Page 4 - çindekiler; Sayaçlar
DocuColor 242/252/260 DocuColor 242/252/260 Hizli Kullanim Kilavuzu İ çindekiler Kontrol Paneli Sayaçlar Raporlar Basit A ğ Tarama Kitapçık Olu ş turma Basit Kopyalama 3 5 9 13 15 17 Sistem Yöneticisi Menüsü Genel Bakı ş 19 Denetleyici 23 Ka ğ ıt ve Ortam Yükleme 25 Toner Kartu ş larının De ğ i ş ti...
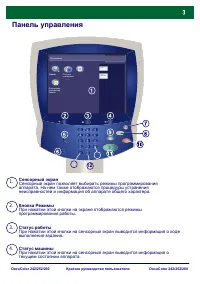
Page 5 - Kontrol Paneli; Hizmetler
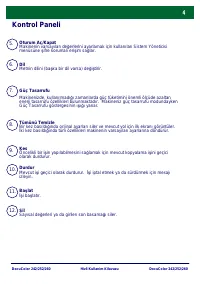
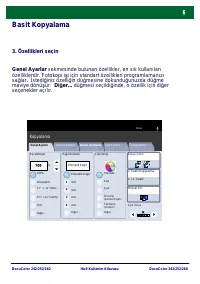
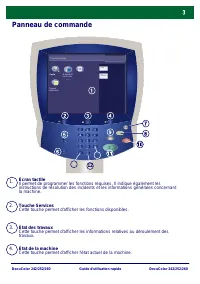
DocuColor 242/252/260 DocuColor 242/252/260 Hizli Kullanim Kilavuzu Kontrol Paneli Tüm Hizmetler A ğ Tarama Kopyalama Saklanan Program Dil Ayarlar Menüsü 1. 2. 3. 4. Dokunmatik EkranDokunmatik ekran, programlanabilir özelliklerin tümünü seçebilmenizi sa ğ lar. Ayrıca arıza giderme i ş lemlerini ve m...
Page 6 - Ba; İş; Güç Tasarrufu
DocuColor 242/252/260 DocuColor 242/252/260 Hizli Kullanim Kilavuzu Kontrol Paneli 5. 6. 7. 11. 1 2 . SilSayısal de ğ erleri ya da girilen son basama ğ ı siler. 10. 9. 8. Tümünü TemizleBir kez basıldı ğ ında orijinal ayarları siler ve mevcut yol için ilk ekranı görüntüler. İ ki kez basıldı ğ ında tü...
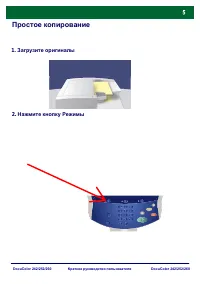
Page 7 - Basit Kopyalama; Dokümanları yükleyin
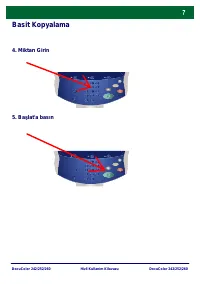
DocuColor 242/252/260 DocuColor 242/252/260 Hizli Kullanim Kilavuzu Basit Kopyalama 1. Dokümanları yükleyin 2. Hizmetler dü ğ mesine basın
Page 11 - Kitapçık Olu; Çıktı Formatı sekmesini seçin.
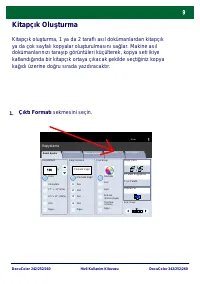
DocuColor 242/252/260 DocuColor 242/252/260 Hizli Kullanim Kilavuzu Kitapçık Olu ş turma Kitapçık olu ş turma, 1 ya da 2 taraflı asıl dokümanlardan kitapçık ya da çok sayfalı kopyalar olu ş turulmasını sa ğ lar. Makine asıl dokümanlarınızı tarayıp görüntüleri küçülterek, kopya seti ikiye katlandı ğ ...
Page 12 - mesin
DocuColor 242/252/260 DocuColor 242/252/260 Hizli Kullanim Kilavuzu Kitapçık Olu ş turma Kitapçık Olu ş turma dü ğ mesin i seç ın. 2. Kitapçık Olu ş turma Sayfa Düzeni Çıktı Formatı Kapalı 1'er Sayfa Ek Açıklama Kapalı Poster Kimlik Kartı Kopyalama Kapaklar Kapalı Asetat Ayırıcıları Ayırıcı Yok Kapa...
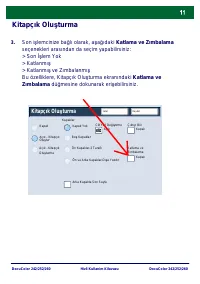
Page 13 - Zımbalama dü; Kitapç
DocuColor 242/252/260 DocuColor 242/252/260 Hizli Kullanim Kilavuzu Kitapçık Olu ş turma Son i ş lemcinize ba ğ lı olarak, a ş a ğ ıdaki Katlama ve Zımbalama seçenekleri arasından da seçim yapabilirsiniz:> Son İş lem Yok > Katlanmı ş > Katlanmı ş ve Zımbalanmı ş Bu özelliklere, Kitapçık Olu...
Page 14 - tirme ya da Çıktı
DocuColor 242/252/260 DocuColor 242/252/260 Hizli Kullanim Kilavuzu Kitapçık Olu ş turma Katlama ve zımbalamaya ek olarak, Kitapçık Olu ş turma ekranından Cilt Yeri De ğ i ş tirme ya da Çıktı yi Böl (büyük bir kitapçı ğ ın alt setlere ayrılması) ekleyebilirsiniz. Kitapçıklarınızı olu ş turmak için u...
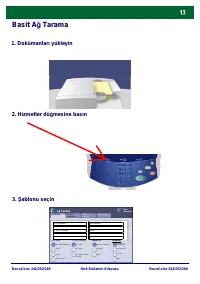
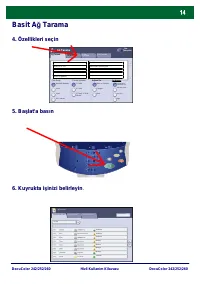
Page 15 - Basit A
DocuColor 242/252/260 DocuColor 242/252/260 Hizli Kullanim Kilavuzu Basit A ğ Tarama 1. Dokümanları yükleyin 3. Ş ablonu seçin 2. Hizmetler dü ğ mesine basın Çıktı Rengi Otomatik Algılama Düzen Ayarlama A ğ Tarama Tüm Hizmetler A ğ Tarama 2 Taraflı Orijinaller Çıktı Formatı Renk Siyah Gri Tonlama 1 ...
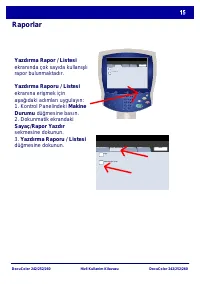
Page 17 - Raporlar; Yazdırma Rapor
DocuColor 242/252/260 DocuColor 242/252/260 Hizli Kullanim Kilavuzu M ak ine Dur um u Sayaç / Rapor Yazdır Sar f M alze m e le r Ar ızalar Kapat Sayaç Yazdır m a Rapor u / Lis te s Makine Durumu Sayaç / Rapor Yazdır Sarf Malzemeler Arızalar Kapat Sayaç Yazdırma Raporu / Liste Raporlar Yazdırma Rapor...
Page 18 - Tipik bir Yazdırma Raporu; dü; Yazd
DocuColor 242/252/260 DocuColor 242/252/260 Hizli Kullanim Kilavuzu Tipik bir Yazdırma Raporu / Listesi ekranı burada gösterilmektedir. Görüntülenen raporlardan birini yazdırmak için, dokunmatik ekrandaki ilgili dü ğ meye dokunun ve kontrol panelindeki Ba ş lat dü ğ mesine basın. NOT: Kullanılabilen...
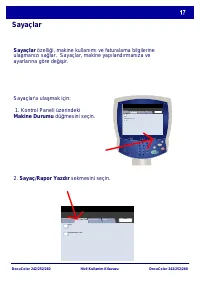
Page 19 - Sayaçlar özelli; i, makine kullanımı ve faturalama bilgilerine
DocuColor 242/252/260 DocuColor 242/252/260 Hizli Kullanim Kilavuzu Sayaçlar'a ula ş mak için: 1. Kontrol Paneli üzerindeki Makine Durumu dü ğ mesini seçin. Sayaçlar Sayaçlar özelli ğ i, makine kullanımı ve faturalama bilgilerine ula ş manızı sa ğ lar. Sayaçlar, makine yapılandırmanıza ve ayarlarına...
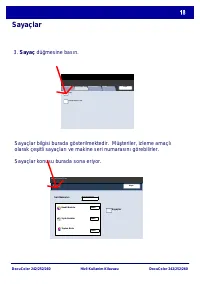
Page 20 - Sayaçlar bilgisi burada gösterilmektedir. Mü
DocuColor 242/252/260 DocuColor 242/252/260 Hizli Kullanim Kilavuzu Sayaçlar Sayaçlar bilgisi burada gösterilmektedir. Mü ş teriler, izleme amaçlı olarak çe ş itli sayaçları ve makine seri numarasını görebilirler. Sayaçlar konusu burada sona eriyor. Kapat Seri Numarası Sayaç Makine Durumu Ekranı Say...
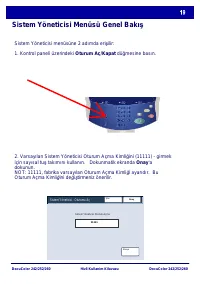
Page 21 - Sistem Yöneticisi Menüsü Genel Bakı; Sistem Yöneticisi menüsüne 2 adımda eri; Kontrol paneli üzerindeki Oturum Aç/Kapat dü; Varsayılan Sistem Yöneticisi Oturum Açma Kimli; takımını kullanın. Dokunmatik ekranda Onay'a; Oturum Açma Kimli; Sistem Yöneticisi - Oturumu Aç
DocuColor 242/252/260 DocuColor 242/252/260 Hizli Kullanim Kilavuzu Sistem Yöneticisi Menüsü Genel Bakı ş Sistem Yöneticisi menüsüne 2 adımda eri ş ilir: 1. Kontrol paneli üzerindeki Oturum Aç/Kapat dü ğ mesine basın. 2. Varsayılan Sistem Yöneticisi Oturum Açma Kimli ğ ini (11111) - girmek için sayı...
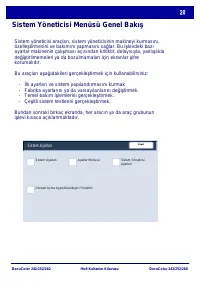
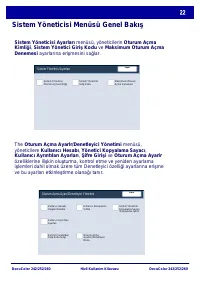
Page 22 - Sistem Ayarlar
DocuColor 242/252/260 DocuColor 242/252/260 Hizli Kullanim Kilavuzu Sistem Yöneticisi Menüsü Genel Bakı ş Sistem yöneticisi araçları, sistem yöneticisinin makineyi kurmasını, özelle ş tirmesini ve bakımını yapmasını sa ğ lar. Bu i ş levdeki bazı ayarlar makinenin çalı ş ması açısından kritiktir, dol...
Page 23 - Ayarlar Menüsü yöneticilerin Ka; eri; Denetleyici Ayarları; alt menülerine eri
DocuColor 242/252/260 DocuColor 242/252/260 Hizli Kullanim Kilavuzu Sistem Yöneticisi Menüsü Genel Bakı ş Ayarlar Menüsü yöneticilerin Ka ğ ıt Kaseti Öznitelikleri ayarlarına eri ş mesini sa ğ lar. Sistem Ayarları menüsü yöneticilerin Ortak Ayarlar, Kopyalama Modu Ayarları, Tarama Modu Ayarları ve A...
Page 24 - ifre Giri; Sistem Yöneticisi Ayarlar; Oturum Açma Ayar
DocuColor 242/252/260 DocuColor 242/252/260 Hizli Kullanim Kilavuzu Sistem Yöneticisi Menüsü Genel Bakı ş The Oturum Açma Ayarlr/Denetleyici Yönetimi menüsü, yöneticilere Kullanıcı Hesabı, Yönetici Kopyalama Sayacı, Kullanıcı Ayrıntıları Ayarları, Ş ifre Giri ş i ve Oturum Açma Ayarlr özelliklerine ...
Page 25 - Denetleyici
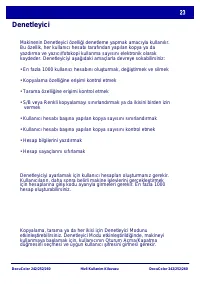
DocuColor 242/252/260 DocuColor 242/252/260 Hizli Kullanim Kilavuzu Denetleyici Denetleyiciyi ayarlamak için kullanıcı hesapları olu ş turmanız gerekir. Kullanıcıların, daha sonra belirli makine i ş levlerini gerçekle ş tirmek için hesaplarına giri ş kodu ayarıyla girmeleri gerekir. En fazla 1000 he...
Page 26 - Sistem Ayarları dü
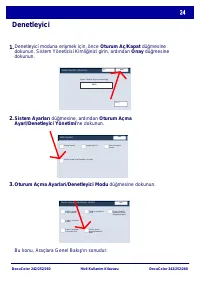
DocuColor 242/252/260 DocuColor 242/252/260 Hizli Kullanim Kilavuzu Denetleyici Denetleyici moduna eri ş mek için, önce Oturum Aç/Kapat dü ğ mesine dokunun, Sistem Yöneticisi Kimli ğ inizi girin, ardından Onay dü ğ mesine dokunun. Sistem Ayarları dü ğ mesine, ardından Oturum Açma Ayarl/Denetleyici Y...
Page 27 - ıt ve Ortam Yükleme
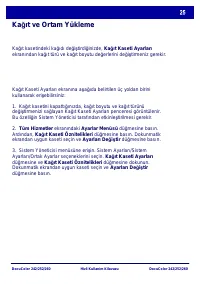
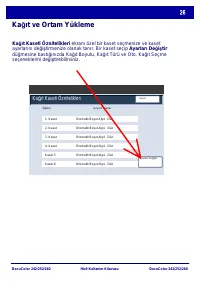
DocuColor 242/252/260 DocuColor 242/252/260 Hizli Kullanim Kilavuzu Ka ğ ıt ve Ortam Yükleme Ka ğ ıt Kaseti Ayarları ekranına a ş a ğ ıda belirtilen üç yoldan birini kullanarak eri ş ebilirsiniz: 1. Ka ğ ıt kasetini kapattı ğ ınızda, ka ğ ıt boyutu ve ka ğ ıt türünü de ğ i ş tirmenizi sa ğ layan Ka ...
Page 28 - ıt Kaseti Öznitelikleri ekranı özel bir kaset seçmenize ve kaset; t Kaseti Öznitelikleri
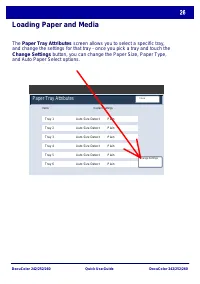
DocuColor 242/252/260 DocuColor 242/252/260 Hizli Kullanim Kilavuzu Ka ğ ıt ve Ortam Yükleme Ka ğ ıt Kaseti Öznitelikleri ekranı özel bir kaset seçmenize ve kaset ayarlarını de ğ i ş tirmenize olanak tanır. Bir kaset seçip Ayarları De ğ i ş tir dü ğ mesine bastı ğ ınızda Ka ğ ıt Boyutu, Ka ğ ıt Türü...
Page 29 - ıt Boyutu seçenekleri, ka; t Türü
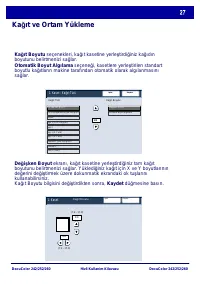
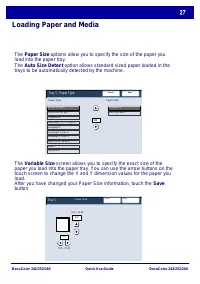
DocuColor 242/252/260 DocuColor 242/252/260 Hizli Kullanim Kilavuzu Ka ğ ıt ve Ortam Yükleme Ka ğ ıt Boyutu seçenekleri, ka ğ ıt kasetine yerle ş tirdi ğ iniz ka ğ ıdın boyutunu belirtmenizi sa ğ lar. Otomatik Boyut Algılama seçene ğ i, kasetlere yerle ş tirilen standart boyutlu ka ğ ıtların makine ...
Page 30 - ıt Türü seçenekleri, kullanılabilir ka; ıt Türü seçimleri burada gösterilmektedir. Ka
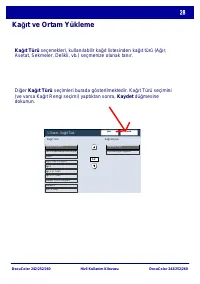
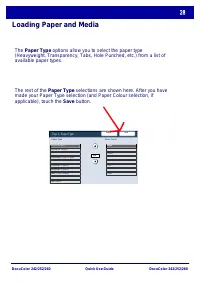
DocuColor 242/252/260 DocuColor 242/252/260 Hizli Kullanim Kilavuzu Ka ğ ıt ve Ortam Yükleme Ka ğ ıt Türü seçenekleri, kullanılabilir ka ğ ıt listesinden ka ğ ıt türü (A ğ ır, Asetat, Sekmeler, Delikli, vb.) seçmenize olanak tanır. Beyaz Di ğ er Ka ğ ıt Türü seçimleri burada gösterilmektedir. Ka ğ ı...
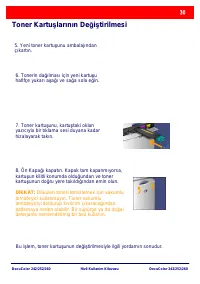
Page 31 - Toner Kartu
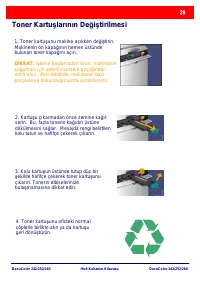
DocuColor 242/252/260 DocuColor 242/252/260 Hizli Kullanim Kilavuzu Toner Kartu ş larının De ğ i ş tirilmesi 1. Toner kartu ş unu makine açıkken de ğ i ş tirin. Makinenin ön kapa ğ ının hemen üstünde bulunan toner kapa ğ ını açın. D İ KKAT: İş leme ba ş lamadan önce, makinenin so ğ uması için yeterl...
Page 32 - Dökülen toneri temizlemek için vakumlu
DocuColor 242/252/260 DocuColor 242/252/260 Hizli Kullanim Kilavuzu Toner Kartu ş larının De ğ i ş tirilmesi 5. Yeni toner kartu ş unu ambalajından çıkartın. 6. Tonerin da ğ ılması için yeni kartu ş u hafifçe yukarı a ş a ğ ı ve sa ğ a sola e ğ in. 7. Toner kartu ş unu, kartu ş taki okları yazıcıyla...
Page 34 - Guide d'utilisation rapide
Guide d'utilisation rapide DocuColor 242/252/260 701P 46019 2007
Page 35 - Xerox et Ethernet sont des marques déposées.
REMARQUE : les intitulés en BLEU identifient des informations destinées au personnel d'administration système, les intitulés en VERT celles destinées aux utilisateurs et les intitulés en ROUGE indiquent que la machine nécessite une intervention. Certains écrans de l'interface utilisateur peuvent var...
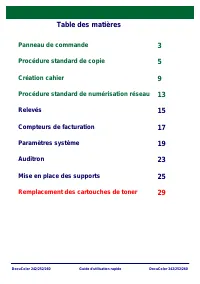
Page 36 - Table des matières; Panneau de commande
DocuColor 242/252/260 DocuColor 242/252/260 Guide d'utilisation rapide Table des matières Panneau de commande Compteurs de facturation Relevés Procédure standard de numérisation réseau Création cahier Procédure standard de copie 3 5 9 13 15 17 Paramètres système 19 Auditron 23 Mise en place des supp...
Page 38 - pour en effectuer un autre plus urgent.; Mode Économie d'énergie; dès que cette fonction est mise en oeuvre.
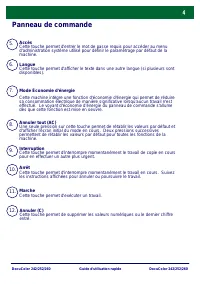
DocuColor 242/252/260 DocuColor 242/252/260 Guide d'utilisation rapide Panneau de commande 5. 6. 7. 11. 1 2 . Annuler (C)Cette touche permet de supprimer les valeurs numériques ou le dernier chiffre entré. 10. 9. 8. Annuler tout (AC)Une seule pression sur cette touche permet de rétablir les valeurs ...
Page 39 - Procédure standard de copie; Mettre les documents en place
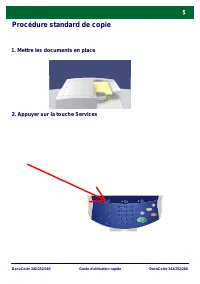
DocuColor 242/252/260 DocuColor 242/252/260 Guide d'utilisation rapide Procédure standard de copie 1. Mettre les documents en place 2. Appuyer sur la touche Services
Page 40 - des
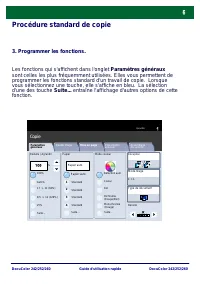
DocuColor 242/252/260 DocuColor 242/252/260 Guide d'utilisation rapide Procédure standard de copie 3. Programmer les fonctions. 1.2.3 1.2.3 2.2. 1.1. Papier Réduire / Agrandir Mode couleur Réception Standard 100% % Auto% 17 > 11 (64%) 8,5 > 11 (129%) 25% Suite... Suite... Standard Standard Sta...
Page 41 - Appuyer sur Marche
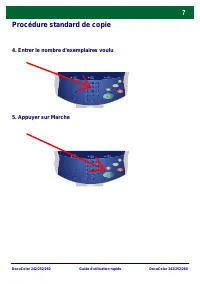
DocuColor 242/252/260 DocuColor 242/252/260 Guide d'utilisation rapide Procédure standard de copie 4. Entrer le nombre d'exemplaires voulu 5. Appuyer sur Marche
Page 42 - Identifier le travail dans la file
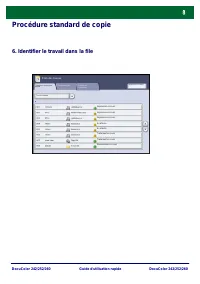
DocuColor 242/252/260 DocuColor 242/252/260 Guide d'utilisation rapide Procédure standard de copie 6. Identifier le travail dans la file Travaux en cours et en attente En attente Traitement en cours Numérisation en cours Travaux terminés Impression en cours En attente Traitement en cours Impression ...
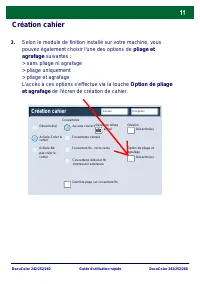
Page 43 - Création cahier; Sélectionnez l'onglet Présentation spéciale.
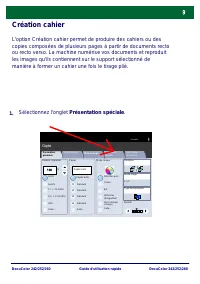
DocuColor 242/252/260 DocuColor 242/252/260 Guide d'utilisation rapide Création cahier L'option Création cahier permet de produire des cahiers ou des copies composées de plusieurs pages à partir de documents recto ou recto verso. La machine numérise vos documents et reproduit les images qu'ils conti...
Page 44 - Sélectionnez la touche Création cahier.
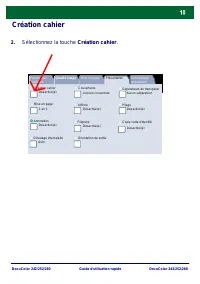
DocuColor 242/252/260 DocuColor 242/252/260 Guide d'utilisation rapide Création cahier Sélectionnez la touche Création cahier. 2. Création cahier Mise en page Présentation Désactivé(e) 1 en 1 Annotation Désactivé(e) Affiche Copie carte d'identité Couvertures Désactivé(e) Séparateurs de transparen Au...
Page 45 - sans pliage ni agrafage
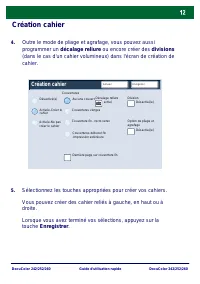
DocuColor 242/252/260 DocuColor 242/252/260 Guide d'utilisation rapide Création cahier Selon le module de finition installé sur votre machine, vous pouvez également choisir l'une des options de pliage et agrafage suivantes : > sans pliage ni agrafage > pliage uniquement > pliage et agrafage...
Page 46 - Sélectionnez les touches appropriées pour créer vos cahiers.
DocuColor 242/252/260 DocuColor 242/252/260 Guide d'utilisation rapide Création cahier Outre le mode de pliage et agrafage, vous pouvez aussi programmer un décalage reliure ou encore créer des divisions (dans le cas d'un cahier volumineux) dans l'écran de création de cahier. Sélectionnez les touches...
Page 47 - Procédure standard de numérisation réseau
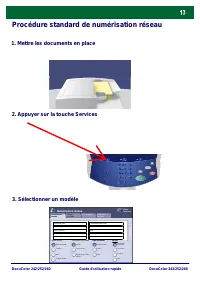
DocuColor 242/252/260 DocuColor 242/252/260 Guide d'utilisation rapide Procédure standard de numérisation réseau 1. Mettre les documents en place 3. Sélectionner un modèle 2. Appuyer sur la touche Services Mode couleur Détection auto Mise en page Numérisation réseau Tous services Numérisation réseau...
Page 48 - Programmer les fonctions
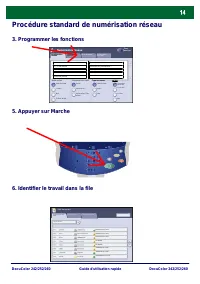
DocuColor 242/252/260 DocuColor 242/252/260 Guide d'utilisation rapide Procédure standard de numérisation réseau 3. Programmer les fonctions 5. Appuyer sur Marche 6. Identifier le travail dans la file Travaux en cours et en attente En attente Traitem ent en cours Num érisation en cours Travaux termi...
Page 49 - Relevés
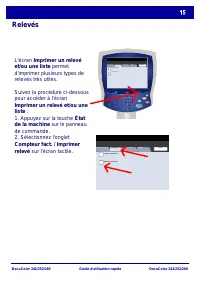
DocuColor 242/252/260 DocuColor 242/252/260 Guide d'utilisation rapide État de la m achine Com pte ur fact. / Im pr im e Cons om m able s Incide nts Fe r m e r Com pte ur de factur ation Im pr im e r un r e le vé e t/ou État de la machine Compteur fact. / Imprime Consommables Incidents Fermer Compte...
Page 50 - Imprimer un relevé et/ou une liste
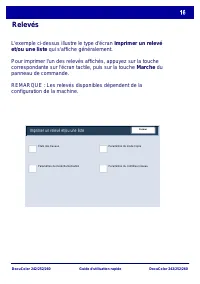
DocuColor 242/252/260 DocuColor 242/252/260 Guide d'utilisation rapide L'exemple ci-dessus illustre le type d'écran Imprimer un relevé et/ou une liste qui s'affiche généralement. Pour imprimer l'un des relevés affichés, appuyez sur la touche correspondante sur l'écran tactile, puis sur la touche Mar...
Page 51 - Compteurs de facturation
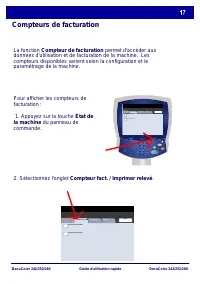
DocuColor 242/252/260 DocuColor 242/252/260 Guide d'utilisation rapide Pour afficher les compteurs de facturation : 1. Appuyez sur la touche État de la machine du panneau de commande. Compteurs de facturation La fonction Compteur de facturation permet d'accéder aux données d'utilisation et de factur...
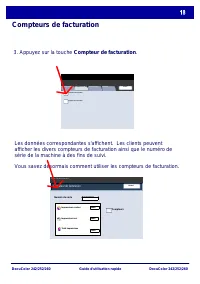
Page 52 - Vous savez désormais comment utiliser les compteurs de; Appuyez sur la touche Compteur de facturation.
DocuColor 242/252/260 DocuColor 242/252/260 Guide d'utilisation rapide Compteurs de facturation Les données correspondantes s'affichent. Les clients peuvent afficher les divers compteurs de facturation ainsi que le numéro de série de la machine à des fins de suivi. Vous savez désormais comment utili...
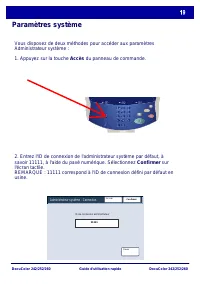
Page 53 - Paramètres système; Appuyez sur la touche Accès du panneau de commande.; Administrateur système - Connexion
DocuColor 242/252/260 DocuColor 242/252/260 Guide d'utilisation rapide Paramètres système Vous disposez de deux méthodes pour accéder aux paramètres Administrateur système : 1. Appuyez sur la touche Accès du panneau de commande. 2. Entrez l'ID de connexion de l'administrateur système par défaut, à s...
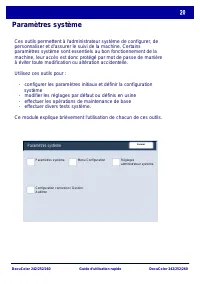
Page 54 - Utilisez ces outils pour :
DocuColor 242/252/260 DocuColor 242/252/260 Guide d'utilisation rapide Paramètres système Ces outils permettent à l'administrateur système de configurer, de personnaliser et d'assurer le suivi de la machine. Certains paramètres système sont essentiels au bon fonctionnement de la machine, leur accès ...
Page 56 - Réglages administrateur système; Configuration connexion / Gestion Auditron
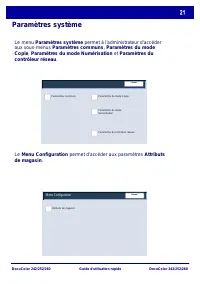
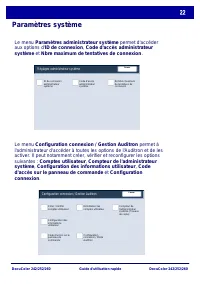
DocuColor 242/252/260 DocuColor 242/252/260 Guide d'utilisation rapide Paramètres système Le menu Configuration connexion / Gestion Auditron permet à l'administrateur d'accéder à toutes les options de l'Auditron et de les activer. Il peut notamment créer, vérifier et reconfigurer les options suivant...
Page 57 - Auditron
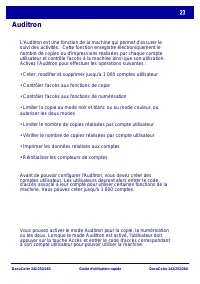
DocuColor 242/252/260 DocuColor 242/252/260 Guide d'utilisation rapide Auditron Avant de pouvoir configurer l'Auditron, vous devez créer des comptes utilisateur. Les utilisateurs devront alors entrer le code d'accès associé à leur compte pour utiliser certaines fonctions de la machine. Vous pouvez c...
Page 58 - Appuyez sur la touche Configuration connexion / Mode Auditron.; La présentation de l'Auditron est à présent terminée.
DocuColor 242/252/260 DocuColor 242/252/260 Guide d'utilisation rapide Auditron Pour accéder au mode Auditron, appuyez sur la touche Accès, entrez l'ID de connexion administrateur système, puis appuyez sur la touche Confirmer. Appuyez sur la touche Paramètres système, puis sélectionnez Configuration...
Page 59 - Mise en place des supports; de configuration des magasins.
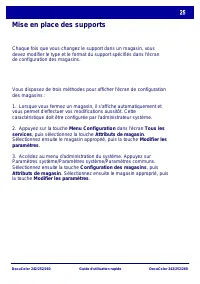
DocuColor 242/252/260 DocuColor 242/252/260 Guide d'utilisation rapide Mise en place des supports Vous disposez de trois méthodes pour afficher l'écran de configuration des magasins : 1. Lorsque vous fermez un magasin, il s'affiche automatiquement et vous permet d'effectuer vos modifications aussitô...
Page 61 - Magasin 1; Magasin 1 - Type de papier
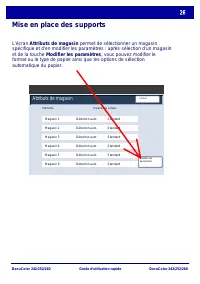
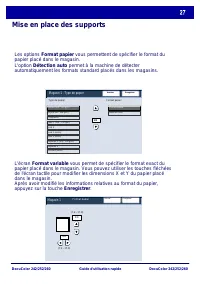
DocuColor 242/252/260 DocuColor 242/252/260 Guide d'utilisation rapide Mise en place des supports Les options Format papier vous permettent de spécifier le format du papier placé dans le magasin.L'option Détection auto permet à la machine de détecter automatiquement les formats standard placés dans ...
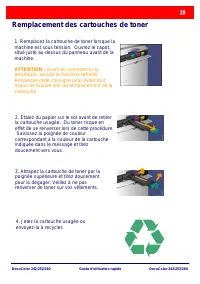
Page 63 - Remplacement des cartouches de toner
DocuColor 242/252/260 DocuColor 242/252/260 Guide d'utilisation rapide Remplacement des cartouches de toner 1. Remplacez la cartouche de toner lorsque la machine est sous tension. Ouvrez le capot, situé juste au-dessus du panneau avant de la machine. ATTENTION : Avant de commencer la procédure, lais...
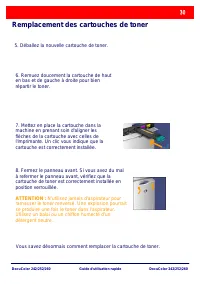
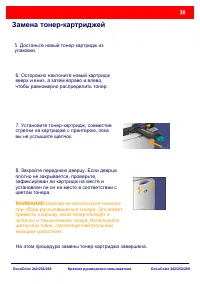
Page 64 - Déballez la nouvelle cartouche de toner.
DocuColor 242/252/260 DocuColor 242/252/260 Guide d'utilisation rapide Remplacement des cartouches de toner 5. Déballez la nouvelle cartouche de toner. 6. Remuez doucement la cartouche de haut en bas et de gauche à droite pour bien répartir le toner. 7. Mettez en place la cartouche dans la machine e...
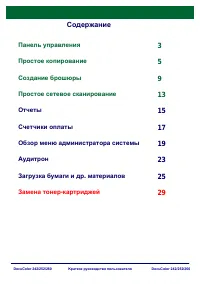
Page 68 - Содержание; Замена; раткое
Содержание Панель управления Счетчики оплаты Отчеты Простое сетевое сканирование Создание брошюры Простое копирование 3 5 9 13 15 17 Обзор меню администратора системы 19 Аудитрон 23 Загрузка бумаги и др . материалов 25 Замена тонер - картриджей 29 DocuColor 242/252/260 K раткое руководство пользоват...
Page 71 - Загрузите
Простое копирование 1. Загрузите оригиналы 2. Нажмите кнопку Режимы DocuColor 242/252/260 K раткое руководство пользователя DocuColor 242/252/260
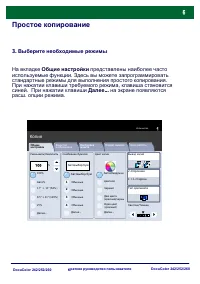
Page 72 - Выберите; Общие
Простое копирование 3. Выберите необходимые режимы 1.2.3 1.2.3 2.2. 1.1. Снабжение бумагой Уменьшить / Увеличить Цвет копии Вывод копий Обычные 100% % Авто % 17" > 11" (64%) 8.5" > 11" (129%) 25% Далее ... Далее ... Обычные Обычные Обычные Автообнаружен Цветной Черный Далее ......
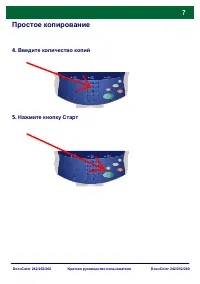
Page 74 - Укажите
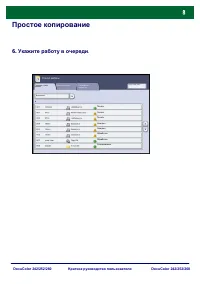
Простое копирование 6. Укажите работу в очереди . Текущая и ожид . работы Ожидает Обработка Сканирование Выполн . работы Печать Ожидает Обработка Печать Печать Статус работы Все работы Сохраненные документы Печать ожид . работ DocuColor 242/252/260 K раткое руководство пользователя DocuColor 242/252...
Page 75 - Формат
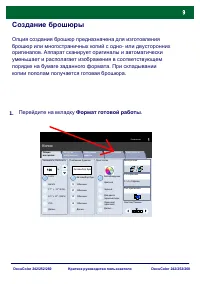
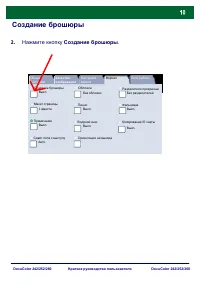
Создание брошюры Опция создания брошюр предназначена для изготовления брошюр или многостраничных копий с одно - или двусторонних оригиналов . Аппарат сканирует оригиналы и автоматически уменьшает и располагает изображения в соответствующем порядке на бумаге заданного формата . При складывании копии ...
Page 76 - Нажмите; Создание; Качество
Создание брошюры Нажмите кнопку Создание брошюры . 2. Создание брошюры Макет страницы Формат Выкл . 1 вместе Примечание Выкл . Панно Копирование ID карты Обложки Выкл . Разделители прозрачных Без разделителей Без обложек Сдвиг поля к выступу Водяной знак Ориентация на выходе Авто Выкл . Выкл . Фальц...
Page 77 - Фальцовка
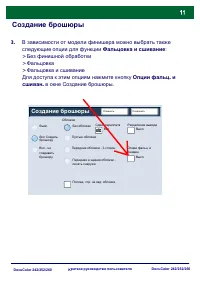
Создание брошюры В зависимости от модели финишера можно выбрать также следующие опции для функции Фальцовка и сшивание : > Без финишной обработки > Фальцовка > Фальцовка и сшивание Для доступа к этим опциям нажмите кнопку Опции фальц . и сшиван . в окне Создание брошюры . 3. Разделение выво...
Page 78 - Сдвиг
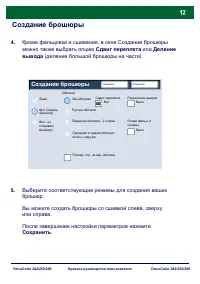
Создание брошюры Кроме фальцовки и сшивания , в окне Создание брошюры можно также выбрать опцию Сдвиг переплета или Деление вывода ( деление большой брошюры на части ). Выберите соответствующие режимы для создания ваших брошюр . Вы можете создать брошюры со сшивкой слева , сверху или справа . После ...
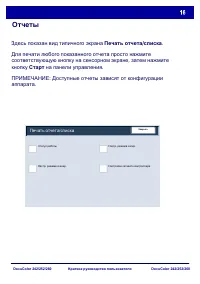
Page 81 - Отчеты
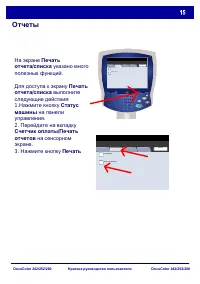
Статус машины Счетчик копий / Печать о Расх . мат - лы Неисправности Закрыть Счетчик копий Печать отчета / списка Статус машины Счетчик копий / Печать Расх . мат - лы Неисправности Закрыть Счетчик копий Печать отчета / списка Отчеты На экране Печать отчета / списка указано много полезных функций . Д...
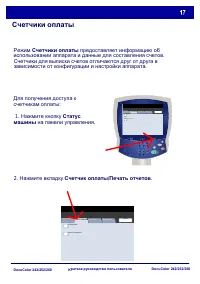
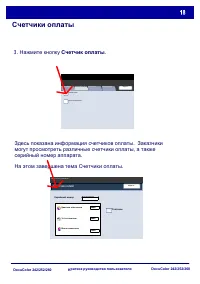
Page 84 - Счетчик
Счетчики оплаты Здесь показана информация счетчиков оплаты . Заказчики могут просмотреть различные счетчики оплаты , а также серийный номер аппарата . На этом завершена тема Счетчики оплаты . Закрыть Серийный номер Счетчик копий Экран « Статус машины » Счетчики UGW22222 Цветных отпечатков 5608 7209 ...
Page 85 - Вход; ПРИМЕЧАНИЕ; Системный
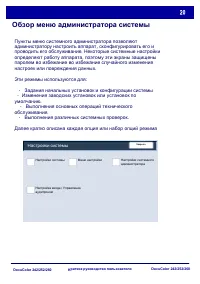
Обзор меню администратора системы Вызов меню системного администратора проводится в 2 этапа : 1. Нажмите кнопку Вход / Выход из системы на панели управления . 2. С цифровой клавиатуры введите ID системного администратора по умолчанию - 11111. Нажмите кнопку Подтвердить на сенсорном экране . ПРИМЕЧАН...
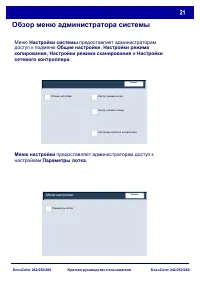
Page 86 - Настройки
Обзор меню администратора системы Пункты меню системного администратора позволяют администратору настроить аппарат , сконфигурировать его и проводить его обслуживание . Некоторые системные настройки определяют работу аппарата , поэтому эти экраны защищены паролем во избежание во избежание случайного...
Page 87 - Меню
Обзор меню администратора системы Меню настройки предоставляет администраторам доступ к настройкам Параметры лотка . Меню Настройки системы предоставляет администраторам доступ к подменю Общие настройки , Настройки режима копирования , Настройки режима сканирования и Настройки сетевого контроллера ....
Page 89 - Аудитрон
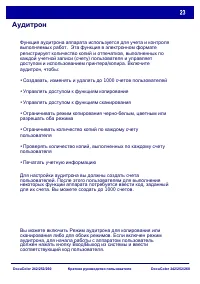
Аудитрон Для настройки аудитрона вы должны создать счета пользователей . После этого пользователям для выполнения некоторых функций аппарата потребуется ввести код , заданный для их счета . Вы можете создать до 1000 счетов . Функция аудитрона аппарата используется для учета и контроля выполняемых ра...
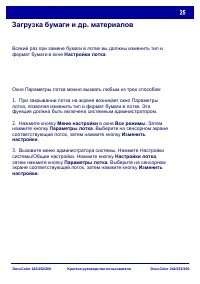
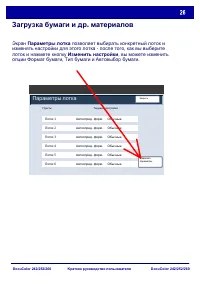
Page 92 - Параметры
Загрузка бумаги и др . материалов Экран Параметры лотка позволяет выбирать конкретный лоток и изменять настройки для этого лотка - после того , как вы выберите лоток и нажмете кнопку Изменить настройки , вы можете изменить опции Формат бумаги , Тип бумаги и Автовыбор бумаги . Пункты Параметры лотка ...
Page 93 - Лоток
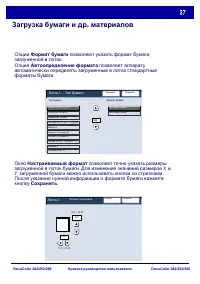
Загрузка бумаги и др . материалов Опции Формат бумаги позволяют указать формат бумаги , загруженной в лоток . Опция Автоопределение формата позволяет аппарату автоматически определять загруженные в лоток стандартные форматы бумаги . Окно Настраиваемый формат позволяет точно указать размеры загруженн...
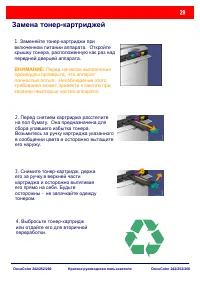
Page 95 - ВНИМАНИЕ
Замена тонер - картриджей 1. Заменяйте тонер - картриджи при включенном питании аппарата . Откройте крышку тонера , расположенную как раз над передней дверцей аппарата . ВНИМАНИЕ : Перед началом выполнения процедуры проверьте , что аппарат полностью остыл . Несоблюдение этого требования может привес...
Page 98 - Quick Use Guide
Quick Use Guide DocuColor 242/252/260 701P 46019 2007
Page 99 - Xerox and Ethernet are registered trademarks.
NOTE: BLUE title is for IT administrator type personnel, GREEN for end users and RED means machine needs attention. Depending on the configuration of the machine, some User Interface screens may vary. Microsoft, MS-DOS, W indows, W indows NT, Microsoft Network, and W indows Server are either tradema...
Page 100 - Table of Contents; Control Panel
DocuColor 242/252/260 DocuColor 242/252/260 Quick Use Guide Table of Contents Control Panel Billing Meters Reports Simple Network Scanning Booklet Creation Simple Copying 3 5 9 13 15 17 System Administrator Menu Overview 19 Auditron 23 Loading Paper and Media 25 Replacing the Toner Cartridges 29
Page 102 - adjust the defaults of the machine.; Power Saver; mode, the Power Saver indicator light is lit.
DocuColor 242/252/260 DocuColor 242/252/260 Quick Use Guide Control Panel 5. 6. 7. 11. 12. 10. 9. 8. ClearDeletes numeric values or the last digit entered. Clear AllIf pressed once, resets the default settings and displays the first screen for the current pathway. If pressed twice, resets all the fe...
Page 103 - Simple Copying; Load the documents
DocuColor 242/252/260 DocuColor 242/252/260 Quick Use Guide Simple Copying 1. Load the documents 2. Press the Services button
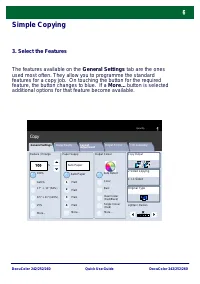
Page 104 - Select the Features
DocuColor 242/252/260 DocuColor 242/252/260 Quick Use Guide Simple Copying 3. Select the Features 1.2.3 1.2.3 2.2. 1.1. Paper Supply Reduce / Enlarge Output Colour Copy Output Plain 100% % Auto% 17" > 11" (64%) 8.5" > 11" (129%) 25% More... More... Plain Plain Plain Auto Detect...
Page 105 - Enter the Quantity
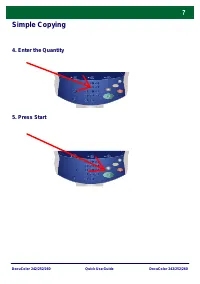
DocuColor 242/252/260 DocuColor 242/252/260 Quick Use Guide Simple Copying 4. Enter the Quantity 5. Press Start
Page 107 - Booklet Creation; Select the Output Format tab.
DocuColor 242/252/260 DocuColor 242/252/260 Quick Use Guide Booklet Creation Booklet creation enables the production of booklets or multi-page copies from 1 or 2-sided originals. The machine will scan your originals and automatically reduce and arrange the images in the correct sequence on your sele...
Page 108 - Select the Booklet Creation button.
DocuColor 242/252/260 DocuColor 242/252/260 Quick Use Guide Booklet Creation Select the Booklet Creation button. 2. Booklet Creation Page Layout Output Format Off 1 Up Annotation Off Poster ID Card Copying Covers Off Transparency Separators No Separators No Covers Tab Margin Shift Watermark Output O...
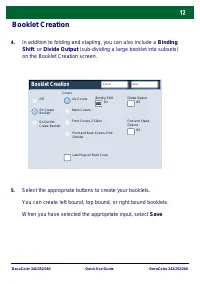
Page 110 - Select the appropriate buttons to create your booklets.; When you have selected the appropriate input, select Save.
DocuColor 242/252/260 DocuColor 242/252/260 Quick Use Guide Booklet Creation In addition to folding and stapling, you can also include a Binding Shift, or Divide Output (sub-dividing a large booklet into subsets) on the Booklet Creation screen. Select the appropriate buttons to create your booklets....
Page 111 - Simple Network Scanning
DocuColor 242/252/260 DocuColor 242/252/260 Quick Use Guide Simple Network Scanning 1. Load the documents 3. Select the template 2. Press the Services button Output Colour Auto Detect Layout Adjustment Netw ork Scanning All Services Network Scanning 2 Sided Originals Output Format Colour Black Grays...
Page 112 - Select the features
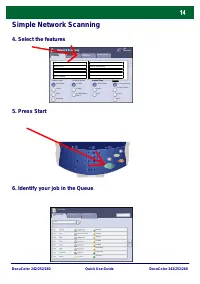
DocuColor 242/252/260 DocuColor 242/252/260 Quick Use Guide Simple Network Scanning 4. Select the features 5. Press Start 6. Identify your job in the Queue. Current and Pending Jobs Pending Processing Scanning Completed Jobs Printing Pending Processing Printing Printing Job Status All Jobs Stored Do...
Page 113 - Reports
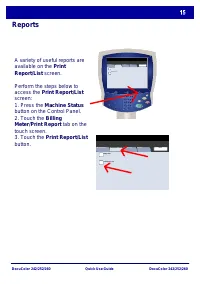
DocuColor 242/252/260 DocuColor 242/252/260 Quick Use Guide M achine Status Billing M e te r / Pr int Re po Cons um able s Faults Clos e Billing M e te r Pr int Re por t / Lis t Machine Status Billing Meter / Print Repo Consumables Faults Close Billing Meter Print Report / List Reports A variety of ...
Page 114 - An example of a typical Print Report/List screen is shown here.
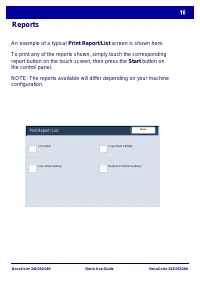
DocuColor 242/252/260 DocuColor 242/252/260 Quick Use Guide An example of a typical Print Report/List screen is shown here. To print any of the reports shown, simply touch the corresponding report button on the touch screen, then press the Start button on the control panel. NOTE: The reports availab...
Page 115 - To access the Billing Meters:; Billing Meters
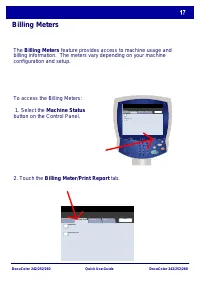
DocuColor 242/252/260 DocuColor 242/252/260 Quick Use Guide To access the Billing Meters: 1. Select the Machine Status button on the Control Panel. Billing Meters The Billing Meters feature provides access to machine usage and billing information. The meters vary depending on your machine configurat...
Page 116 - This completes the Billing Meters topic.
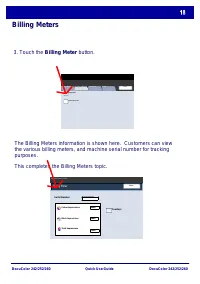
DocuColor 242/252/260 DocuColor 242/252/260 Quick Use Guide Billing Meters The Billing Meters information is shown here. Customers can view the various billing meters, and machine serial number for tracking purposes. This completes the Billing Meters topic. Close Serial Number Billing Meter Machine ...
Page 117 - System Administrator Menu Overview; There are 2 steps to accessing the System Administrator menu:; System Administrator - Login
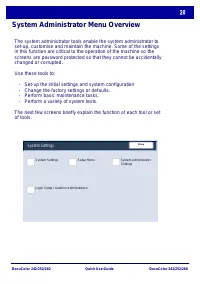
DocuColor 242/252/260 DocuColor 242/252/260 Quick Use Guide System Administrator Menu Overview There are 2 steps to accessing the System Administrator menu: 1. Press the Log In/Out button on the control panel. 2. Use the number keypad to enter the default System Administrator Login ID - 11111. Touch...
Page 118 - System Settings
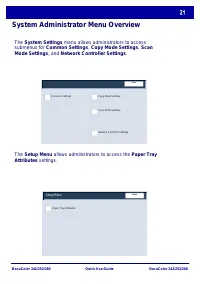
DocuColor 242/252/260 DocuColor 242/252/260 Quick Use Guide System Administrator Menu Overview The system administrator tools enable the system administrator to set-up, customise and maintain the machine. Some of the settings in this function are critical to the operation of the machine so the scree...
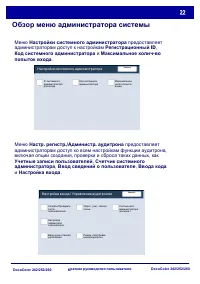
Page 120 - System Administrator Settings; Login Setup / Auditron Administration
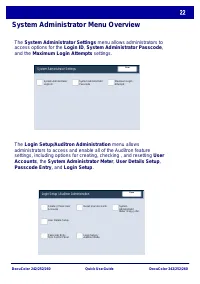
DocuColor 242/252/260 DocuColor 242/252/260 Quick Use Guide System Administrator Menu Overview The Login Setup/Auditron Administration menu allows administrators to access and enable all of the Auditron feature settings, including options for creating, checking , and resetting User Accounts, the Sys...
Page 122 - Touch the Login Setup/Auditron Mode button.; This completes the Auditron Overview.
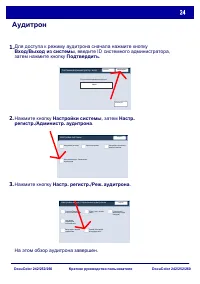
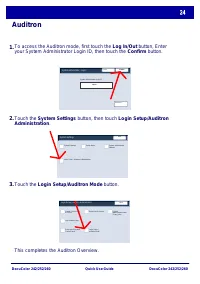
DocuColor 242/252/260 DocuColor 242/252/260 Quick Use Guide Auditron To access the Auditron mode, first touch the Log In/Out button, Enter your System Administrator Login ID, then touch the Confirm button. Touch the System Settings button, then touch Login Setup/Auditron Administration. Touch the Lo...
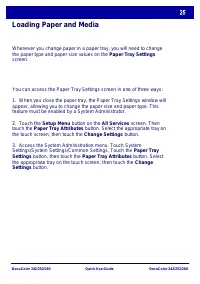
Page 123 - Loading Paper and Media; You can access the Paper Tray Settings screen in one of three ways:
DocuColor 242/252/260 DocuColor 242/252/260 Quick Use Guide Loading Paper and Media You can access the Paper Tray Settings screen in one of three ways: 1. When you close the paper tray, the Paper Tray Settings window will appear, allowing you to change the paper size and paper type. This feature mus...
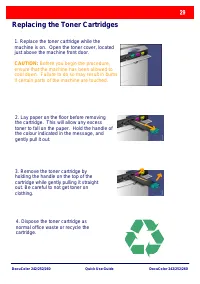
Page 127 - Replacing the Toner Cartridges
DocuColor 242/252/260 DocuColor 242/252/260 Quick Use Guide Replacing the Toner Cartridges 1. Replace the toner cartridge while the machine is on. Open the toner cover, located just above the machine front door. CAUTION: Before you begin the procedure, ensure that the machine has been allowed to coo...
Page 128 - That completes the procedure for replacing the toner cartridge.
DocuColor 242/252/260 DocuColor 242/252/260 Quick Use Guide Replacing the Toner Cartridges 5. Remove the new toner cartridge from its packaging. 6. Gently tilt the new cartridge up and down, and then left and right to redistribute the toner. 7. Install the toner cartridge by aligning the arrows on t...