Page 3 - Contents; Xerox
Xerox ® C315 Color Multifunction Printer User Guide 3 Contents 1 Safety . . . . . . . . . . . . . . . . . . . . . . . . . . . . . . . . . . . . . . . . . . . . . . . . . . . . . . . . . . . . . . . . . . . . . . . . . . . . . . . . . . . . . . . . . . . . . . . . . . . . . . . . . . . . . . . . . . ...
Page 11 - Safety; This chapter contains:
Xerox ® C315 Color Multifunction Printer User Guide 11 1 Safety This chapter contains: Conventions . . . . . . . . . . . . . . . . . . . . . . . . . . . . . . . . . . . . . . . . . . . . . . . . . . . . . . . . . . . . . . . . . . . . . . . . . . . . . . . . . . . . . . . . . . . . . . . . . . . . ....
Page 12 - Conventions
Conventions Note: A note identifies information that could help you. W Waarrnniinngg:: A warning identifies something that could damage the product hardware or software. C Caauuttiioonn:: A caution indicates a potentially hazardous situation that could injure you. Different types of statements inclu...
Page 13 - Product Statements; Do not use this product with extension cords, multi-outlet power
Product Statements C CA AU UTTIIO ON N— —PPO OTTEEN NTTIIA ALL IIN NJJU URRYY:: To avoid the risk of fire or electrical shock, connect the power cord to an appropriately rated and properly grounded electrical outlet that is near the product and easily accessible. C CA AU UTTIIO ON N— —PPO OTTEEN NTT...
Page 16 - Maintenance Safety; Do not use aerosol cleaners. Aerosol cleaners can be explosive or
Maintenance Safety Do not carry out any maintenance on this product that is not described in the customer documentation. C CA AU UTTIIO ON N— —PPO OTTEEN NTTIIA ALL IIN NJJU URRYY:: Do not use aerosol cleaners. Aerosol cleaners can be explosive or flammable when used on electromechanical equipment. ...
Page 17 - Consumable Information; When handling cartridges such as ink or fuser, avoid skin or eye
Consumable Information C CA AU UTTIIO ON N— —PPO OTTEEN NTTIIA ALL IIN NJJU URRYY:: When handling cartridges such as ink or fuser, avoid skin or eye contact. Eye contact can cause irritation and inflammation. Do not attempt to disassemble the cartridge. This can increase the risk of skin or eye cont...
Page 19 - Learn About the Printer
Xerox ® C315 Color Multifunction Printer User Guide 19 2 Learn About the Printer This chapter contains: Printer configurations. . . . . . . . . . . . . . . . . . . . . . . . . . . . . . . . . . . . . . . . . . . . . . . . . . . . . . . . . . . . . . . . . . . . . . . . . . . . . . . . . . . . . . . ...
Page 20 - Printer configurations; Installing optional trays
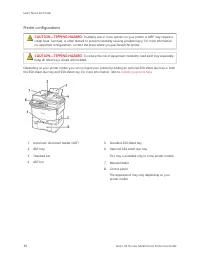
Printer configurations C CA AU UTTIIO ON N— —TTIIPPPPIIN NG G H HA AZZA ARRD D:: Installing one or more options on your printer or MFP may require a caster base, furniture, or other feature to prevent instability causing possible injury. For more information on supported configurations, contact the ...
Page 21 - Using the Control Panel
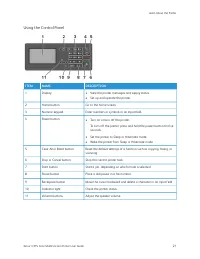
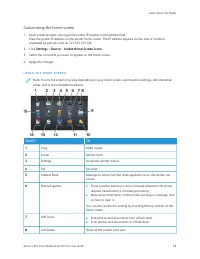
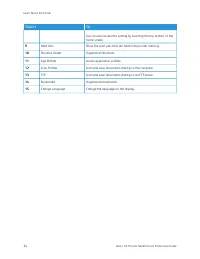
Using the Control Panel IITTEEM M N NA AM MEE D DEESSC CRRIIPPTTIIO ON N 1 Display • View the printer messages and supply status. • Set up and operate the printer. 2 Home button Go to the home screen. 3 Numeric keypad Enter numbers or symbols in an input field. 4 Power button • Turn on or turn off t...
Page 23 - Customizing the home screen; U S I N G T H E H O M E S C R E E N; TTO
Customizing the home screen 1. Open a web browser, then type the printer IP address in the address field.View the printer IP address on the printer home screen. The IP address appears as four sets of numbersseparated by periods, such as 123.123.123.123. 2. Click SSeettttiinnggss > D Deevviiccee &...
Page 25 - Changing the Language of the Keyboard on the Display; Touch the input field.
Changing the Language of the Keyboard on the Display Note: You can only change the language of the keyboard in printer tasks that require alphanumeric inputsuch as e-mail or scan. 1. Touch the input field. 2. On the keyboard, touch and hold the language key. 3. Select a language. Xerox ® C315 Color ...
Page 26 - Using Display Customization; M A N A G I N G S C R E E N S AV E R A N D S L I D E S H O W I M A G E S
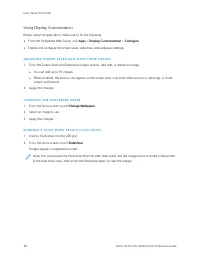
Using Display Customization Before using the application, make sure to do the following: • From the Embedded Web Server, click A Appppss > D Diissppllaayy C Cuussttoom miizzaattiioonn > C Coonnffiigguurree. • Enable and configure the screen saver, slideshow, and wallpaper settings. M A N A G I...
Page 27 - Selecting Paper; PA P E R G U I D E L I N E S; on the paper package.; PA P E R C H A R A C T E R I S T I C S; Weight; The trays can feed paper weights from 60–176 g/m; Curl
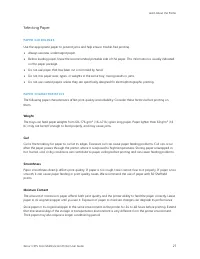
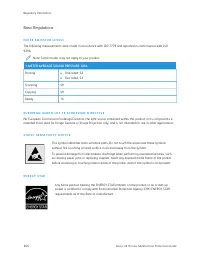
Selecting Paper PA P E R G U I D E L I N E S Use the appropriate paper to prevent jams and help ensure trouble-free printing. • Always use new, undamaged paper. • Before loading paper, know the recommended printable side of the paper. This information is usually indicated on the paper package. • Do ...
Page 28 - Grain Direction; grain long; Fiber Content; U N A C C E P TA B L E PA P E R
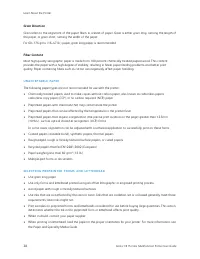
Grain Direction Grain refers to the alignment of the paper fibers in a sheet of paper. Grain is either grain long , running the length of the paper, or grain short , running the width of the paper. For 60–176 g/m 2 (16–47 lb.) paper, grain long paper is recommended. Fiber Content Most high-quality x...
Page 32 - S U P P O R T E D PA P E R T Y P E S
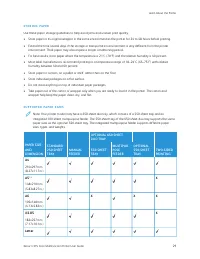
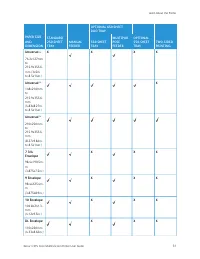
PPA APPEERR SSIIZZEE A AN ND D D DIIM MEEN NSSIIO ON N SSTTA AN ND DA ARRD D 225 500--SSH HEEEETT TTRRA AYY M MA AN NU UA ALL FFEEEED DEERR O OPPTTIIO ON NA ALL 665 50 0--SSH HEEEETT D DU UO O TTRRA AYY O OPPTTIIO ON NA ALL 5 55 500--SSH HEEEETT TTRRA AYY TTW WO O--SSIID DEED D PPRRIIN NTTIIN NG G 5...
Page 33 - S U P P O R T E D PA P E R W E I G H T S
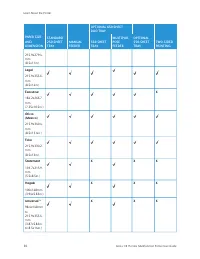
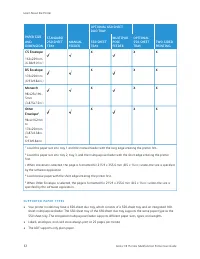
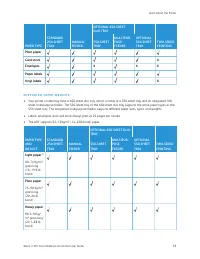
PPA APPEERR TTYYPPEE SSTTA AN ND DA ARRD D 225 50 0--SSH HEEEETT TTRRA AYY M MA AN NU UA ALL FFEEEED DEERR O OPPTTIIO ON NA ALL 6 6550 0--SSH HEEEETT D DU UO O TTRRA AYY O OPPTTIIO ON NA ALL 5 5550 0--SSH HEEEETT TTRRA AYY TTW WO O--SSIID DEED D PPRRIIN NTTIIN NG G 555 50 0--SSH HEEEETT TTRRA AYY M ...
Page 36 - Selecting a location for the printer
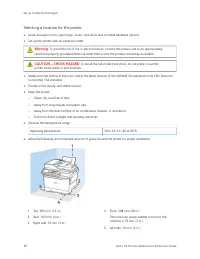
Selecting a location for the printer • Leave enough room to open trays, covers, and doors and to install hardware options. • Set up the printer near an electrical outlet. W Waarrnniinngg:: To avoid the risk of fire or electrical shock, connect the power cord to an appropriately rated and properly gr...
Page 37 - Attaching Cables; Waarrnniinngg—
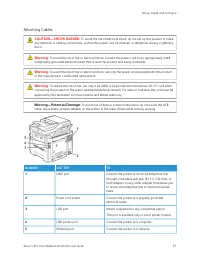
Attaching Cables C CA AU UTTIIO ON N— —SSH HO OC CKK H HA AZZA ARRD D:: To avoid the risk of electrical shock, do not set up this product or make any electrical or cabling connections, such as the power cord, fax feature, or telephone, during a lightning storm. W Waarrnniinngg:: To avoid the risk of...
Page 38 - Turn off the printer.
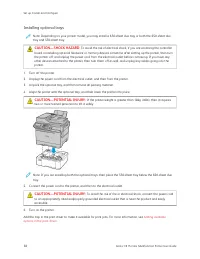
Installing optional trays Note: Depending on your printer model, you may install a 650-sheet duo tray or both the 650-sheet duotray and 550-sheet tray. C CA AU UTTIIO ON N— —SSH HO OC CKK H HA AZZA ARRD D:: To avoid the risk of electrical shock, if you are accessing the controller board or installin...
Page 39 - Initial Setup Wizard
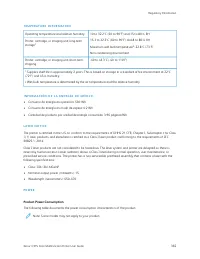
Initial Setup Wizard The initial setup wizard appears when the printer is powered on for the first time. You can use the initial setupwizard to complete the general settings and register the printer on the network. The initial setup wizard is a set of screens with instructions that help you to compl...
Page 40 - Connecting to the Xerox
Xerox ® Easy Assist App To access the printer from your smartphone, download and install the Xerox Easy Assist app to your mobile device.By installing the Xerox Easy Assist app on your smartphone, you can setup your new printer easily, manage itsconfiguration, view alerts indicating supply requireme...
Page 43 - Apple App Store or Google Play Store.
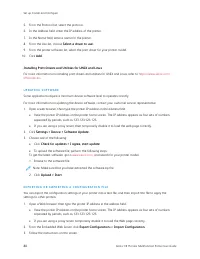
• Based on your smartphone, to install the app for the first time, you are prompted to download the app from Apple App Store or Google Play Store. • If you have the app installed already, to access Xerox Easy Assist features, connect to the printer with your smartphone. Important: For the printers w...
Page 44 - Networking; C O N N E C T I N G T H E P R I N T E R T O A W I R E D E T H E R N E T N E T W O R K; Using the wireless setup wizard in the printer; Updating; Using the Settings Menu in the Printer
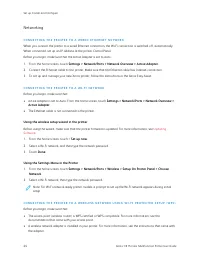
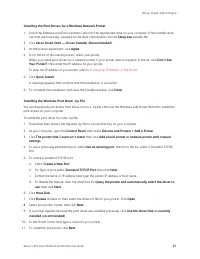
Networking C O N N E C T I N G T H E P R I N T E R T O A W I R E D E T H E R N E T N E T W O R K When you connect the printer to a wired Ethernet connection, the Wi-Fi connection is switched off, automatically.When connected, set up an IP address at the printer Control Panel. Before you begin, make ...
Page 45 - C O N F I G U R I N G W I - F I D I R E C T; Configuring Wi-Fi Direct
Using the Push Button method 1. From the control panel, navigate to: SSeettttiinnggss > N Neettw woorrkk//PPoorrttss > W Wiirreelleessss > W Wii--FFii PPrrootteecctteedd SSeettuupp > SSttaarrtt PPuusshh B Buuttttoonn M Meetthhoodd 2. Follow the instructions on the display. Using the pers...
Page 46 - C O N N E C T I N G A C O M P U T E R T O T H E P R I N T E R; For Windows Users; D E A C T I VAT I N G T H E W I - F I N E T W O R K
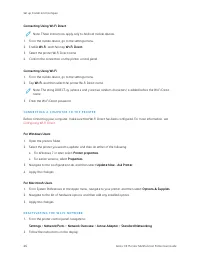
Connecting Using Wi-Fi Direct Note: These instructions apply only to Android mobile devices. 1. From the mobile device, go to the settings menu. 2. Enable W Wii--FFii, and then tap W Wii--FFii D Diirreecctt. 3. Select the printer Wi-Fi Direct name. 4. Confirm the connection on the printer control pa...
Page 47 - C H E C K I N G T H E P R I N T E R C O N N E C T I V I T Y; For Windows users
C H E C K I N G T H E P R I N T E R C O N N E C T I V I T Y 1. From the home screen, touch SSeettttiinnggss > RReeppoorrttss > N Neettw woorrkk > N Neettw woorrkk SSeettuupp PPaaggee. 2. Check the first section of the network setup page, and confirm that the status is connected. If the stat...
Page 48 - Setting Up and Using the Home Screen Applications; F I N D I N G T H E I P A D D R E S S O F T H E P R I N T E R; Creating bookmarks
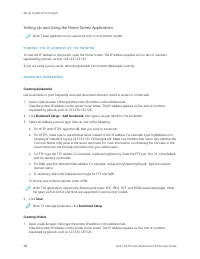
Setting Up and Using the Home Screen Applications Note: These applications are supported only in some printer models. F I N D I N G T H E I P A D D R E S S O F T H E P R I N T E R To view the IP address of the printer, open the Home Screen. The IP address appears as four sets of numbersseparated by ...
Page 50 - Setting up the printer to fax; S E T T I N G U P T H E FA X F U N C T I O N; Using the fax setup wizard in the printer
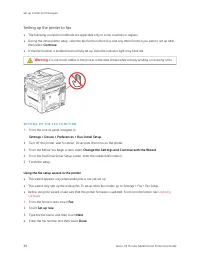
Setting up the printer to fax • The following connection methods are applicable only in some countries or regions. • During the initial printer setup, clear the fax function check box and any other function you plan to set up later, then select C Coonnttiinnuuee. • If the fax function is enabled and...
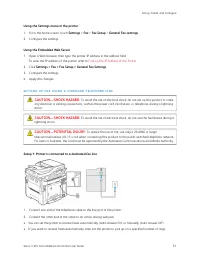
Page 51 - Finding the IP Address of the Printer; S E T T I N G U P FA X U S I N G A S TA N D A R D T E L E P H O N E L I N E; Setup 1: Printer is connected to a dedicated fax line
Using the Settings menu in the printer 1. From the home screen, touch SSeettttiinnggss > FFaaxx > FFaaxx SSeettuupp > G Geenneerraall FFaaxx sseettttiinnggss. 2. Configure the settings. Using the Embedded Web Server 1. Open a Web browser, then type the printer IP address in the address fiel...
Page 52 - Setup 2: Printer is sharing the line with an answering machine; waallll jjaacckkss; P L U G S; approved by the Australian Communications and Media Authority.
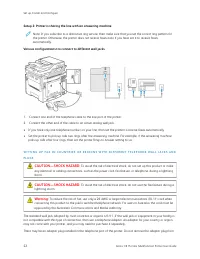
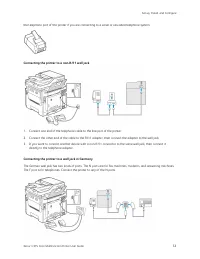
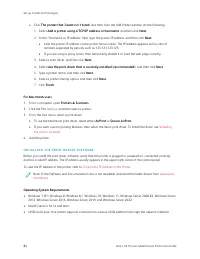
Setup 2: Printer is sharing the line with an answering machine Note: If you subscribe to a distinctive ring service, then make sure that you set the correct ring pattern forthe printer. Otherwise, the printer does not receive faxes even if you have set it to receive faxes automatically. V Vaarriioou...
Page 55 - Configuring the Email SMTP Settings; U S I N G T H E E M A I L S E T U P W I Z A R D I N T H E P R I N T E R; U S I N G T H E S E T T I N G S M E N U I N T H E P R I N T E R; U S I N G T H E E M B E D D E D W E B S E R V E R; Email Service Providers
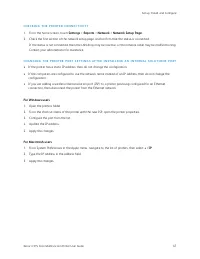
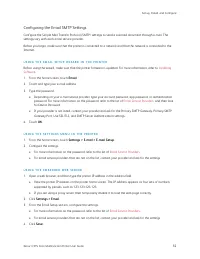
Configuring the Email SMTP Settings Configure the Simple Mail Transfer Protocol (SMTP) settings to send a scanned document through e-mail. Thesettings vary with each email service provider. Before you begin, make sure that the printer is connected to a network and that the network is connected to th...
Page 56 - E M A I L S E R V I C E P R O V I D E R S; Gmail; Google Account Security; Mail
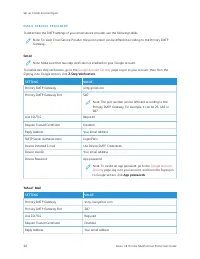
E M A I L S E R V I C E P R O V I D E R S To determine the SMTP settings of your email service provider, use the following tables. Note: For each Email Service Provider, the port number can be different according to the Primary SMTPGateway. Gmail ™ Note: Make sure that two-step verification is enabl...
Page 57 - Outlook Live; AOL Mail
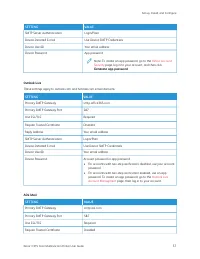
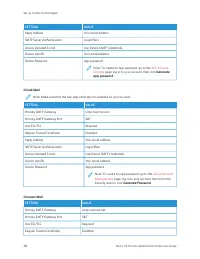
SSEETTTTIIN NG G V VA ALLU UEE SMTP Server Authentication Login/Plain Device-Initiated E-mail Use Device SMTP Credentials Device UserID Your email address Device Password App password Note: To create an app password, go to the Yahoo Account Security page, log in to your account, and then click G Gee...
Page 58 - iCloud Mail; iCloud Account; Comcast Mail
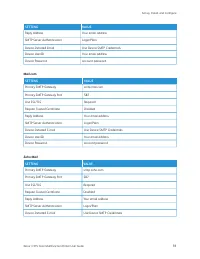
SSEETTTTIIN NG G V VA ALLU UEE Reply Address Your email address SMTP Server Authentication Login/Plain Device-Initiated E-mail Use Device SMTP Credentials Device UserID Your email address Device Password App password Note: To create an app password, go to the AOL Account Security page, log in to you...
Page 59 - Zoho Mail
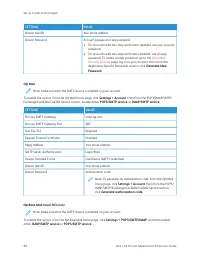
SSEETTTTIIN NG G V VA ALLU UEE Reply Address Your email address SMTP Server Authentication Login/Plain Device-Initiated Email Use Device SMTP Credentials Device UserID Your email address Device Password Account password Mail.com SSEETTTTIIN NG G V VA ALLU UEE Primary SMTP Gateway smtp.mail.com Prima...
Page 60 - QQ Mail
SSEETTTTIIN NG G V VA ALLU UEE Device UserID Your email address Device Password Account password or app password • For accounts with two-step verification disabled, use your account password. • For accounts with two-step verification enabled, use an app password. To create an app password, go to the...
Page 62 - Sohu Mail
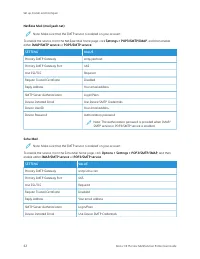
NetEase Mail (mail.yeah.net) Note: Make sure that the SMTP service is enabled on your account. To enable the service, from the NetEase Mail home page, click SSeettttiinnggss >> PPO OPP3 3//SSM MTTPP//IIM MA APP, and then enable either IIM MA APP//SSM MTTPP sseerrvviiccee or PPO OPP3 3//SSM MTT...
Page 63 - Sina Mail
SSEETTTTIIN NG G V VA ALLU UEE Device UserID Your email address Device Password Independent password Note: The independent password is provided when IMAP/SMTPservice or POP3/SMTP service is enabled. Sina Mail Note: Make sure that the POP3/SMTP service is enabled on your account. To enable the servic...
Page 64 - Setting up using accessbility features; A C T I VAT I N G V O I C E G U I D A N C E; From the control panel; N AV I G AT I N G T H E S C R E E N U S I N G G E S T U R E S
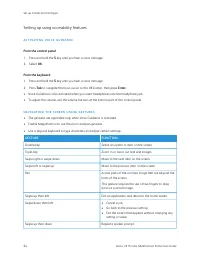
Setting up using accessbility features A C T I VAT I N G V O I C E G U I D A N C E From the control panel 1. Press and hold the 55 key until you hear a voice message. 2. Select O OKK. From the keyboard 1. Press and hold the 55 key until you hear a voice message. 2. Press TTaabb to navigate the focus...
Page 65 - E N A B L I N G M A G N I F I C AT I O N M O D E; Navigating the screen using gestures; A D J U S T I N G T H E V O I C E G U I D A N C E S P E E C H R AT E
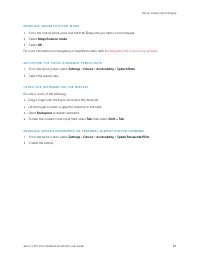
E N A B L I N G M A G N I F I C AT I O N M O D E 1. From the control panel, press and hold the 5 5 key until you hear a voice message. 2. Select M Maaggnniiffiiccaattiioonn m mooddee. 3. Select O OKK. For more information on navigating a magnified screen, refer to Navigating the screen using gesture...
Page 66 - Loading paper and specialty media; S E T T I N G T H E PA P E R S I Z E A N D T Y P E
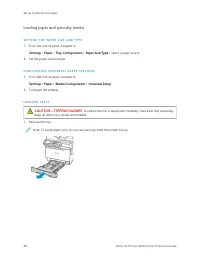
Loading paper and specialty media S E T T I N G T H E PA P E R S I Z E A N D T Y P E 1. From the control panel, navigate to: SSeettttiinnggss > PPaappeerr > TTrraayy C Coonnffiigguurraattiioonn > PPaappeerr SSiizzee//TTyyppee > select a paper source 2. Set the paper size and type. C O N ...
Page 67 - • Do not slide paper into the tray.
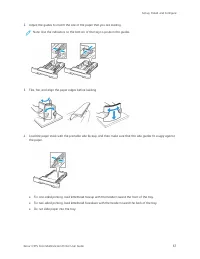
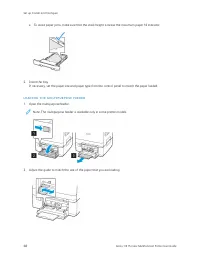
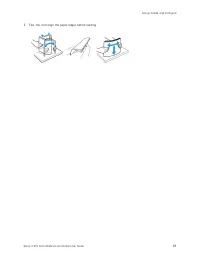
2. Adjust the guides to match the size of the paper that you are loading. Note: Use the indicators on the bottom of the tray to position the guides. 3. Flex, fan, and align the paper edges before loading. 4. Load the paper stack with the printable side faceup, and then make sure that the side guides...
Page 68 - L O A D I N G T H E M U LT I P U R P O S E F E E D E R; Open the multipurpose feeder.
• To avoid paper jams, make sure that the stack height is below the maximum paper fill indicator. 5. Insert the tray.If necessary, set the paper size and paper type from the control panel to match the paper loaded. L O A D I N G T H E M U LT I P U R P O S E F E E D E R 1. Open the multipurpose feede...
Page 71 - L O A D I N G T H E M A N U A L F E E D E R; Adjust the guide to match the size of the paper that you are loading.
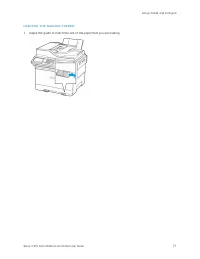
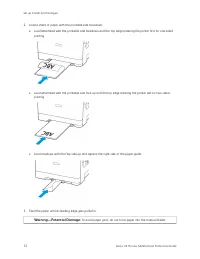
L O A D I N G T H E M A N U A L F E E D E R 1. Adjust the guide to match the size of the paper that you are loading. Xerox ® C315 Color Multifunction Printer User Guide 71 Set up, Install, and Configure
Page 72 - To avoid paper jams, do not force paper into the manual feeder.
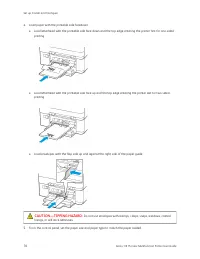
2. Load a sheet of paper with the printable side facedown. • Load letterhead with the printable side facedown and the top edge entering the printer first for one-sided printing. • Load letterhead with the printable side face up and the top edge entering the printer last for two-sided printing. • Loa...
Page 73 - L I N K I N G T R AY S; Coonnffiigguurraattiioonn.
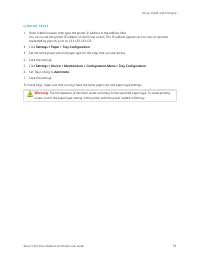
L I N K I N G T R AY S 1. Open a Web browser, then type the printer IP address in the address field.You can locate the printer IP address on the home screen. The IP address appears as four sets of numbersseparated by periods, such as 123.123.123.123 2. Click SSeettttiinnggss >> PPaappeerr >...
Page 74 - Adjusting the speaker volume; A D J U S T I N G T H E D E FA U LT I N T E R N A L S P E A K E R V O L U M E
Adjusting the speaker volume A D J U S T I N G T H E D E FA U LT I N T E R N A L S P E A K E R V O L U M E Note: The speaker is available only in some printer models. 1. From the control panel, touch SSeettttiinnggss >> D Deevviiccee >> PPrreeffeerreenncceess >> D Deevviiccee SSoou...
Page 75 - Configuring Device Sounds Settings
Configuring Device Sounds Settings Note: The Device Sounds icon is available only in some printer models. 1. From the control panel, touch the D Deevviiccee SSoouunnddss icon. The Status/Supplies screen appears. 2. At the Status/Supplies screen, touch D Deevviiccee SSoouunnddss:: O Onn. The Device S...
Page 76 - Setting up Card Copy; Click A
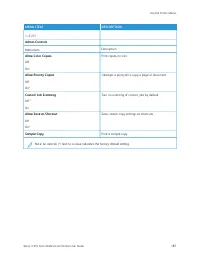
Setting up Card Copy 1. Open a web browser, then type the printer IP address in the address field.View the printer IP address on the printer home screen. The IP address appears as four sets of numbersseparated by periods, such as 123.123.123.123. 2. Click A Appppss > C Caarrdd C Cooppyy > C Co...
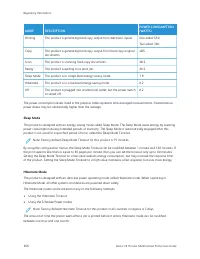
Page 77 - Using Shortcut Center; From the home screen, touch SShhoorrttccuutt C
Using Shortcut Center 1. From the home screen, touch SShhoorrttccuutt C Ceenntteerr, then select a printer function. 2. Touch C Crreeaattee SShhoorrttccuutt, then configure the settings. 3. Touch SSaavvee, then type a unique shortcut name. 4. Apply the changes. Xerox ® C315 Color Multifunction Print...
Page 78 - Setting up Device Quotas; You may need administrative rights to access the application.
Setting up Device Quotas You may need administrative rights to access the application. 1. Open a Web browser, then type the printer IP address in the address field.View the printer IP address on the printer home screen. The IP address appears as four sets of numbersseparated by periods, such as 123....
Page 79 - Configuring Eco-Settings; Configure Eco-Mode or Schedule Power Modes.
Configuring Eco-Settings 1. From the home screen, touch EEccoo--SSeettttiinnggss. 2. Configure Eco-Mode or Schedule Power Modes. 3. Apply the changes. Xerox ® C315 Color Multifunction Printer User Guide 79 Set up, Install, and Configure
Page 80 - Using Customer Support; From the home screen, touch C
Using Customer Support 1. From the home screen, touch C Cuussttoom meerr SSuuppppoorrtt. 2. Print or e-mail the information. Note: For information on configuring the application settings, see the Customer Support Administrator’sGuide. 80 Xerox ® C315 Color Multifunction Printer User Guide Set up, In...
Page 81 - Managing contacts; A D D I N G C O N TA C T S
Managing contacts A D D I N G C O N TA C T S 1. Open a web browser, then type the printer IP address in the address field.View the printer IP address on the printer home screen. The IP address appears as four sets of numbersseparated by periods, such as 123.123.123.123. 2. Click A Addddrreessss B Bo...
Page 83 - Installing and updating software, drivers, and firmware; I N S TA L L I N G T H E P R I N T E R S O F T W A R E; Connecting the Printer to a Wi-Fi Network; Installing the printer software
Installing and updating software, drivers, and firmware I N S TA L L I N G T H E P R I N T E R S O F T W A R E • The print driver is included in the software installer package. • For Macintosh computers with macOS version 10.7 or later, you do not need to install the driver to print on an AirPrint-c...
Page 84 - For Macintosh users; Installing; I N S TA L L I N G T H E P R I N T D R I V E R S O F T W A R E; Operating System Requirements
• Click TThhee pprriinntteerr tthhaatt II w waanntt iissnn’’tt lliisstteedd, and then from the Add Printer window, do the following: 1. Select A Adddd aa pprriinntteerr uussiinngg aa TTC CPP//IIPP aaddddrreessss oorr hhoossttnnaam mee, and then click N Neexxtt. 2. In the “Hostname or IP address” fie...
Page 85 - Installing the Print Drivers for a Windows Network Printer; Software and Documentation disc; Installing the Windows Print Driver .zip File
Installing the Print Drivers for a Windows Network Printer 1. Insert the Software and Documentation disc into the appropriate drive on your computer. If the installer does not start automatically, navigate to the drive, then double-click the SSeettuupp..eexxee installer file. 2. Click XXeerrooxx SSm...
Page 86 - Installing the Print Drivers for a Windows USB Printer; Installing the Printer as a Web Service on Devices; Installing a WSD Printer Using the Add Device Wizard; Installing the Drivers and Utilities for MacOS
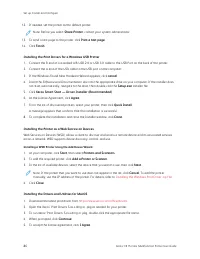
12. If needed, set the printer as the default printer. Note: Before you select SShhaarree PPrriinntteerr, contact your system administrator. 13. To send a test page to the printer, click PPrriinntt aa tteesstt ppaaggee. 14. Click FFiinniisshh. Installing the Print Drivers for a Windows USB Printer 1...
Page 87 - Adding the Printer for MacOS; Addddiinngg tthhee PPrriinntteerr U
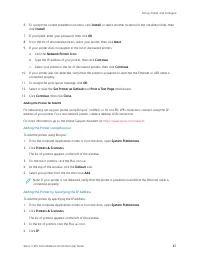
6. To accept the current installation location, click IInnssttaallll, or select another location for the installation files, thenclick IInnssttaallll. 7. If prompted, enter your password, then click O OKK. 8. From the list of discovered printers, select your printer, then click N Neexxtt. 9. If your...
Page 88 - Installing Print Drivers and Utilities for UNIX and Linux; U P D AT I N G S O F T W A R E
5. From the Protocol list, select the protocol. 6. In the Address field, enter the IP address of the printer. 7. In the Name field, enter a name for the printer. 8. From the Use list, choose SSeelleecctt aa ddrriivveerr ttoo uussee. 9. From the printer software list, select the print driver for your...
Page 89 - A D D I N G AVA I L A B L E O P T I O N S I N T H E P R I N T D R I V E R
4. If the printer supports applications, then do the following: a. Click A Appppss, select the application, then click C Coonnffiigguurree. b. Click EExxppoorrtt or IIm mppoorrtt. A D D I N G AVA I L A B L E O P T I O N S I N T H E P R I N T D R I V E R For Windows users 1. Open the printers folder....
Page 90 - Printing the Menu Settings Page; From the home screen, touch SSeettttiinnggss > RReeppoorrttss > M
Printing the Menu Settings Page From the home screen, touch SSeettttiinnggss > RReeppoorrttss > M Meennuu SSeettttiinnggss PPaaggee. 90 Xerox ® C315 Color Multifunction Printer User Guide Set up, Install, and Configure
Page 91 - Secure the printer
Xerox ® C315 Color Multifunction Printer User Guide 91 4 Secure the printer This chapter contains: Locating the security slot . . . . . . . . . . . . . . . . . . . . . . . . . . . . . . . . . . . . . . . . . . . . . . . . . . . . . . . . . . . . . . . . . . . . . . . . . . . . . . . . . . . . . . . ...
Page 92 - Locating the security slot
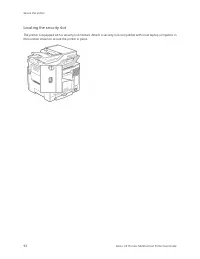
Locating the security slot The printer is equipped with a security lock feature. Attach a security lock compatible with most laptop computers inthe location shown to secure the printer in place. 92 Xerox ® C315 Color Multifunction Printer User Guide Secure the printer
Page 93 - Erasing printer memory
Erasing printer memory To erase volatile memory or buffered data in your printer, turn off the printer. To erase non-volatile memory or individual settings, device and network settings, security settings, and embeddedsolutions, do the following: 1. From the control panel, navigate to: SSeettttiinngg...
Page 94 - Erasing printer hard disk memory
Erasing printer hard disk memory 1. From the home screen, touch SSeettttiinnggss > D Deevviiccee > M Maaiinntteennaannccee > O Ouutt ooff SSeerrvviiccee EErraassee. 2. Select the SSaanniittiizzee aallll iinnffoorrm maattiioonn oonn hhaarrdd ddiisskk check box, then touch EERRA ASSEE. 3. Fol...
Page 95 - Encrypting the printer hard disk; From the home screen, touch SSeettttiinnggss > SSeeccuurriittyy > D
Encrypting the printer hard disk This process erases all contents in the hard disk. If necessary, back up important data from the printer beforestarting the encryption. 1. From the home screen, touch SSeettttiinnggss > SSeeccuurriittyy > D Diisskk EEnnccrryyppttiioonn > SSttaarrtt eennccrry...
Page 96 - Restoring factory default settings; Deevviiccee > RReessttoorree FFaaccttoorryy D
Restoring factory default settings 1. From the control panel, navigate to: SSeettttiinnggss > D Deevviiccee > RReessttoorree FFaaccttoorryy D Deeffaauullttss 2. In the Restore Settings menu, select the settings that you want to restore. 3. Select RREESSTTO ORREE. 4. Follow the instructions on ...
Page 97 - Statement of Volatility; D I S P O S I N G O F A P R I N T E R H A R D D I S K
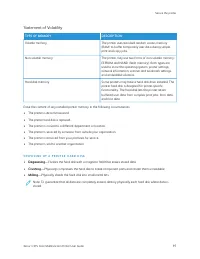
Statement of Volatility TTYYPPEE O OFF M MEEM MO ORRYY D DEESSC CRRIIPPTTIIO ON N Volatile memory The printer uses standard random access memory(RAM) to buffer temporarily user data during simpleprint and copy jobs. Non-volatile memory The printer may use two forms of non-volatile memory:EEPROM and ...
Page 99 - Print; Office Products
Xerox ® C315 Color Multifunction Printer User Guide 99 5 Print Office Products This chapter contains: Printing from a computer . . . . . . . . . . . . . . . . . . . . . . . . . . . . . . . . . . . . . . . . . . . . . . . . . . . . . . . . . . . . . . . . . . . . . . . . . . . . . . . . . . . . . . ....
Page 100 - Printing from a computer
Printing from a computer Note: For labels, card stock, and envelopes, set the paper size and type in the printer before printing thedocument. 1. From the document that you are trying to print, open the Print dialog. 2. If necessary, adjust the settings. 3. Print the document. 100 Xerox ® C315 Color ...
Page 101 - Printing from a mobile device; Note: Mobile printing is available only in some printer models.; P R I N T I N G F R O M A M O B I L E D E V I C E U S I N G M O P R I A P R I N T S E R V I C E; allows you to print directly to any Mopria-certified printer.; P R I N T I N G F R O M A M O B I L E D E V I C E U S I N G A I R P R I N T; • This application is supported only in some Apple devices.
Printing from a mobile device Note: Mobile printing is available only in some printer models. P R I N T I N G F R O M A M O B I L E D E V I C E U S I N G M O P R I A P R I N T S E R V I C E Mopria® Print Service is a mobile printing solution for mobile devices running on Android TM version 4.4 or la...
Page 102 - Printing from a flash drive
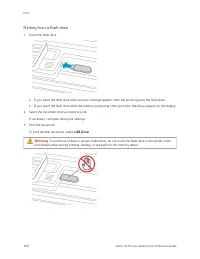
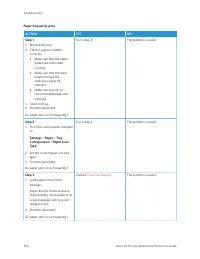
Printing from a flash drive 1. Insert the flash drive. • If you insert the flash drive when an error message appears, then the printer ignores the flash drive. • If you insert the flash drive while the printer is processing other print jobs, then Busy appears on the display. 2. Select the document t...
Page 103 - Supported flash drives and file types; F L A S H D R I V E S; Documents
Supported flash drives and file types F L A S H D R I V E S • Lexar JumpDrive S70 (16GB and 32GB) • SanDisk Cruzer (16GB and 32GB) • PNY Attache (16GB and 32GB) – The printer supports high-speed USB flash drives with full-speed standard. – USB flash drives must support the File Allocation Table (FAT...
Page 104 - Configuring confidential jobs; USSEE
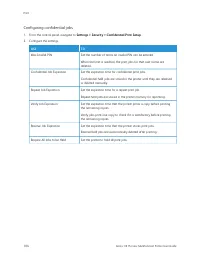
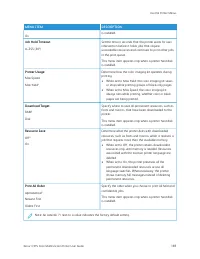
Configuring confidential jobs 1. From the control panel, navigate to SSeettttiinnggss >> SSeeccuurriittyy >> C Coonnffiiddeennttiiaall PPrriinntt SSeettuupp. 2. Configure the settings. U USSEE TTO O Max Invalid PIN Set the number of times an invalid PIN can be entered. When the limit is ...
Page 105 - Printing confidential and other held jobs; F O R W I N D O W S U S E R S
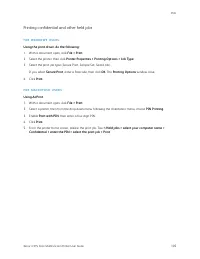
Printing confidential and other held jobs F O R W I N D O W S U S E R S U Ussiinngg tthhee pprriinntt ddrriivveerr,, ddoo tthhee ffoolllloow wiinngg:: 1. With a document open, click FFiillee >> PPrriinntt. 2. Select the printer, then click PPrriinntteerr PPrrooppeerrttiieess >> PPrriinnt...
Page 106 - Printing a font sample list; Select a font sample.
Printing a font sample list 1. From the control panel, navigate to: SSeettttiinnggss > RReeppoorrttss > PPrriinntt > PPrriinntt FFoonnttss 2. Select a font sample. 106 Xerox ® C315 Color Multifunction Printer User Guide Print
Page 107 - Copy
Xerox ® C315 Color Multifunction Printer User Guide 107 6 Copy This chapter contains: Using the automatic document feeder and scanner glass . . . . . . . . . . . . . . . . . . . . . . . . . . . . . . . . . . . . . . . . . . . . . . . . . . . . . . . . . . . . . . . . . . . . . . . . . . 108 Making a...
Page 108 - Using the automatic document feeder and scanner glass; • Use the ADF for multiple-page or two-sided
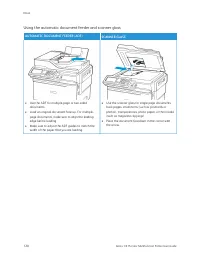
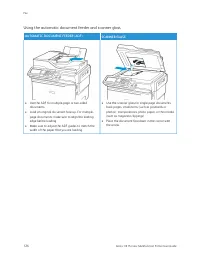
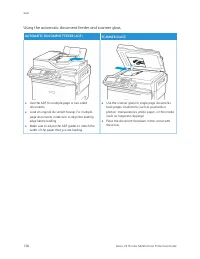
Using the automatic document feeder and scanner glass A AU UTTO OM MA ATTIIC C D DO OC CU UM MEEN NTT FFEEEED DEERR ((A AD DFF)) SSC CA AN NN NEERR G GLLA ASSSS • Use the ADF for multiple-page or two-sided documents. • Load an original document face-up. For multiple- page documents, make sure to ali...
Page 109 - Making a copy; Load an original document into the ADF tray or on the scanner glass.
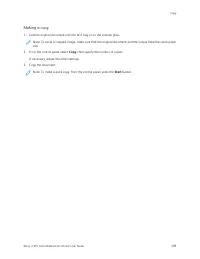
Making a copy 1. Load an original document into the ADF tray or on the scanner glass. Note: To avoid a cropped image, make sure that the original document and the output have the same papersize. 2. From the control panel, select C Cooppyy, then specify the number of copies. If necessary, adjust the ...
Page 110 - Copying photos; Place a photo on the scanner glass.
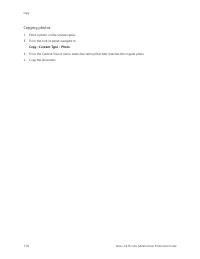
Copying photos 1. Place a photo on the scanner glass. 2. From the control panel, navigate to: C Cooppyy >C Coonntteenntt TTyyppee > PPhhoottoo 3. From the Content Source menu, select the setting that best matches the original photo. 4. Copy the document. 110 Xerox ® C315 Color Multifunction Pr...
Page 111 - Copying on letterhead
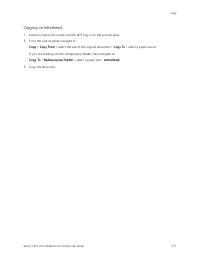
Copying on letterhead 1. Load an original document into the ADF tray or on the scanner glass. 2. From the control panel, navigate to: C Cooppyy > C Cooppyy FFrroom m > select the size of the original document > C Cooppyy TToo > select a paper source If you are loading into the multipurpo...
Page 112 - Copying on both sides of the paper
Copying on both sides of the paper 1. Load an original document into the ADF tray or on the scanner glass. 2. From the control panel, navigate to: C Cooppyy > SSiiddeess 3. Adjust the settings. 4. Copy the document. 112 Xerox ® C315 Color Multifunction Printer User Guide Copy
Page 113 - Reducing or enlarging copies
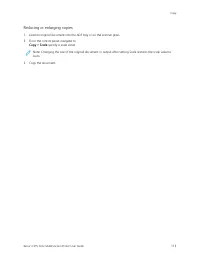
Reducing or enlarging copies 1. Load an original document into the ADF tray or on the scanner glass. 2. From the control panel, navigate to:C Cooppyy >> SSccaallee specify a scale value Note: Changing the size of the original document or output after setting Scale restores the scale value toAu...
Page 114 - Collating copies
Collating copies 1. Load an original document into the ADF tray or on the scanner glass. 2. From the control panel, navigate to:C Cooppyy >> C Coollllaattee >> O Onn [[1 1,,2 2,,11,,2 2,,11,,2 2]]. 3. Copy the document. 114 Xerox ® C315 Color Multifunction Printer User Guide Copy
Page 115 - Placing separator sheets between copies
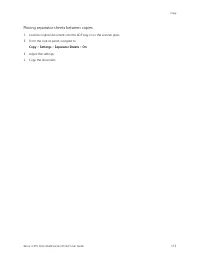
Placing separator sheets between copies 1. Load an original document into the ADF tray or on the scanner glass. 2. From the control panel, navigate to: C Cooppyy > SSeettttiinnggss > SSeeppaarraattoorr SShheeeettss > O Onn 3. Adjust the settings. 4. Copy the document. Xerox ® C315 Color Mul...
Page 116 - Copying multiple pages onto a single sheet
Copying multiple pages onto a single sheet 1. Load an original document into the ADF tray or on the scanner glass. 2. From the control panel, navigate to:C Cooppyy >> PPaaggeess PPeerr SSiiddee 3. Adjust the settings. 4. Copy the document. 116 Xerox ® C315 Color Multifunction Printer User Guid...
Page 117 - Creating a copy shortcut
Creating a copy shortcut 1. From the home screen, touch C Cooppyy. 2. Configure the settings, then touch the SSttaarr icon. The Copy Shortcuts window appears. 3. Touch the Plus ++ icon, then create a shortcut. Xerox ® C315 Color Multifunction Printer User Guide 117 Copy
Page 119 - Email
Xerox ® C315 Color Multifunction Printer User Guide 119 7 Email This chapter contains: Using the automatic document feeder and scanner glass . . . . . . . . . . . . . . . . . . . . . . . . . . . . . . . . . . . . . . . . . . . . . . . . . . . . . . . . . . . . . . . . . . . . . . . . . . 120 Setting...
Page 121 - Setting up the e-mail function; Configure the settings.
Setting up the e-mail function 1. Open a web browser, then type the printer IP address in the address field. • View the printer IP address on the home screen. The IP address appears as four sets of numbers separated by periods, such as 123.123.123.123. • If you are using a proxy server, then tempora...
Page 122 - Configuring e-mail settings; Enter the needed information.
Configuring e-mail settings 1. Open a Web browser, then type the printer IP address in the address field. • View the printer IP address on the printer home screen. The IP address appears as four sets of numbers separated by periods, such as 123.123.123.123. • If you are using a proxy server, then te...
Page 124 - Creating an e-mail shortcut; Note: You may need administrative rights to create a shortcut.
Creating an e-mail shortcut Note: You may need administrative rights to create a shortcut. 1. Open a web browser, then type the printer IP address in the address field. • View the printer IP address on the home screen. The IP address appears as four sets of numbers separated by periods, such as 123....
Page 125 - Fax
Xerox ® C315 Color Multifunction Printer User Guide 125 8 Fax This chapter contains: Using the automatic document feeder and scanner glass . . . . . . . . . . . . . . . . . . . . . . . . . . . . . . . . . . . . . . . . . . . . . . . . . . . . . . . . . . . . . . . . . . . . . . . . . . 126 Sending a...
Page 127 - Sending a fax; U S I N G T H E C O N T R O L PA N E L; If necessary, configure other fax settings.
Sending a fax U S I N G T H E C O N T R O L PA N E L 1. Load the original document into the ADF tray or on the scanner glass. 2. From the control panel, select FFaaxx, then enter the needed information. 3. If necessary, configure other fax settings. 4. Fax the document. Xerox ® C315 Color Multifunct...
Page 128 - Scheduling a fax; Doonnee
Scheduling a fax 1. Load the original document into the ADF tray or on the scanner glass. 2. From the control panel, navigate to: FFaaxx > TToo > enter the fax number > D Doonnee 3. Select SSeenndd TTiim mee to configure the date and time, then select D Doonnee. If necessary, configure othe...
Page 129 - Creating a fax destination shortcut
Creating a fax destination shortcut Note: You may need administrative rights to create a shortcut. 1. Open a web browser, then type the printer IP address in the address field. • View the printer IP address on the home screen. The IP address appears as four sets of numbers separated by periods, such...
Page 130 - Changing the fax resolution
Changing the fax resolution 1. Load an original document into the ADF tray or on the scanner glass. 2. From the control panel, touch FFaaxx >> SSeettttiinnggss, then touch RReessoolluuttiioonn. 3. In the Resolution menu, select a setting. 4. Send the fax job. 130 Xerox ® C315 Color Multifuncti...
Page 131 - Adjusting the fax darkness
Adjusting the fax darkness 1. Load an original document into the ADF tray or on the scanner glass. 2. From the control panel, touch FFaaxx >> SSeettttiinnggss, then touch D Daarrkknneessss. 3. From the Darkness menu, adjust the setting. 4. Fax the document. Xerox ® C315 Color Multifunction Pri...
Page 132 - Viewing a fax log; Note: You may need administrative rights to view the fax logs.
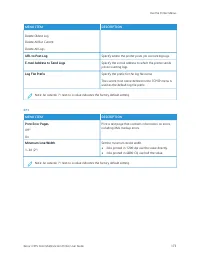
Viewing a fax log Note: You may need administrative rights to view the fax logs. 1. Open a web browser, then type the printer IP address in the address field. • View the printer IP address on the printer home screen. The IP address appears as four sets of numbers separated by periods, such as 123.12...
Page 133 - Blocking junk faxes; Addm
Blocking junk faxes 1. From the control panel, navigate to:SSeettttiinnggss >> FFaaxx >> FFaaxx SSeettuupp >> FFaaxx RReecceeiivvee SSeettttiinnggss >> A Addm miinn C Coonnttrroollss 2. Set Block No Name Fax to O Onn. Xerox ® C315 Color Multifunction Printer User Guide 133 Fa...
Page 134 - Holding faxes; Hoollddiinngg FFaaxxeess
Holding faxes 1. From the control panel, navigate to:SSeettttiinnggss >> FFaaxx >> FFaaxx SSeettuupp >> FFaaxx RReecceeiivvee SSeettttiinnggss >> H Hoollddiinngg FFaaxxeess 2. Select a mode. 134 Xerox ® C315 Color Multifunction Printer User Guide Fax
Page 135 - Forwarding a fax
Forwarding a fax 1. From the control panel, navigate to: SSeettttiinnggss > FFaaxx > FFaaxx SSeettuupp > FFaaxx RReecceeiivvee SSeettttiinnggss > A Addm miinn C Coonnttrroollss 2. In the Fax Forwarding menu, select PPrriinntt aanndd FFoorrw waarrdd or FFoorrw waarrdd, then configure the ...
Page 137 - Scan
Xerox ® C315 Color Multifunction Printer User Guide 137 9 Scan This chapter contains: Using the automatic document feeder and scanner glass . . . . . . . . . . . . . . . . . . . . . . . . . . . . . . . . . . . . . . . . . . . . . . . . . . . . . . . . . . . . . . . . . . . . . . . . . . 138 Scanning...
Page 139 - Scanning to an FTP server; If necessary, configure other FTP settings.
Scanning to an FTP server 1. Load the original document into the ADF tray or on the scanner glass. 2. From the control panel, select FFTTPP, then enter the needed information. For non-touch-screen printer models, press # #, then enter the shortcut number using the keypad. 3. If necessary, configure ...
Page 140 - Creating an FTP shortcut
Creating an FTP shortcut Note: You may need administrative rights to create a shortcut. 1. Open a web browser, then type the printer IP address in the address field. • View the printer IP address on the printer home screen. The IP address appears as four sets of numbers separated by periods, such as...
Page 141 - Scanning to a flash drive
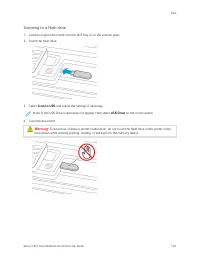
Scanning to a flash drive 1. Load an original document into the ADF tray or on the scanner glass. 2. Insert the flash drive. 3. Select SSccaann ttoo U USSB B and adjust the settings if necessary. Note: If the USB Drive screen does not appear, then select U USSB B D Drriivvee on the control panel. 4....
Page 142 - Sending scanned documents to a computer
Sending scanned documents to a computer 1. Load an original document into the ADF tray or on the scanner glass. 2. From the control panel, navigate to: SSccaann PPrrooffiilleess > SSccaann ttoo C Coom mppuutteerr 3. Select the scan profile where you want to save the document. 142 Xerox ® C315 Col...
Page 143 - Use the Printer Menus
Xerox ® C315 Color Multifunction Printer User Guide 143 10 Use the Printer Menus This chapter contains: Menu map. . . . . . . . . . . . . . . . . . . . . . . . . . . . . . . . . . . . . . . . . . . . . . . . . . . . . . . . . . . . . . . . . . . . . . . . . . . . . . . . . . . . . . . . . . . . . . ...
Page 144 - Menu map
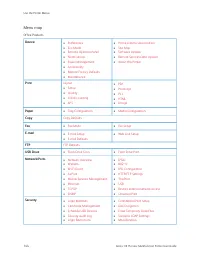
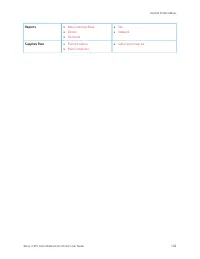
Menu map Office Products D Deevviiccee • Preferences • Eco-Mode • Remote Operator Panel • Notifications • Power Management • Accessibility • Restore Factory Defaults • Maintenance • Home screen customization • Site Map • Software Update • Remote Services Data Upload • About this Printer PPrriinntt L...
Page 146 - Device; P R E F E R E N C E S
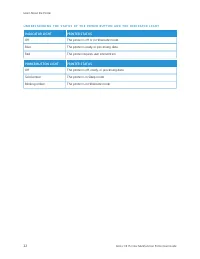
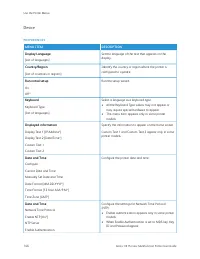
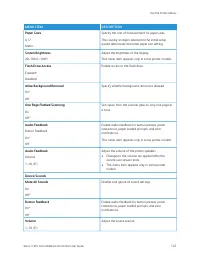
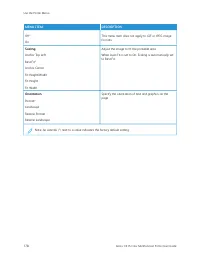
Device P R E F E R E N C E S M MEEN NU U IITTEEM M D DEESSC CRRIIPPTTIIO ON N D Diissppllaayy LLaanngguuaaggee [List of languages] Set the language of the text that appears on thedisplay. C Coouunnttrryy//RReeggiioonn [List of countries or regions] Identify the country or region where the printer is...
Page 155 - P O W E R M A N A G E M E N T
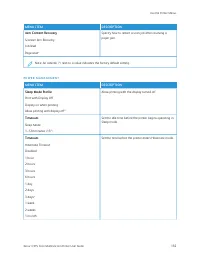
M MEEN NU U IITTEEM M D DEESSC CRRIIPPTTIIO ON N JJaam m C Coonntteenntt RReeccoovveerryy Scanner Jam Recovery Job level Page level* Specify how to restart a scan job after resolving apaper jam. Note: An asterisk (*) next to a value indicates the factory default setting. P O W E R M A N A G E M E N ...
Page 156 - A C C E S S I B I L I T Y
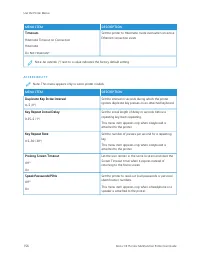
M MEEN NU U IITTEEM M D DEESSC CRRIIPPTTIIO ON N TTiim meeoouuttss Hibernate Timeout on Connection Hibernate Do Not Hibernate* Set the printer to Hibernate mode even when an activeEthernet connection exists. Note: An asterisk (*) next to a value indicates the factory default setting. A C C E S S I B...
Page 157 - Configuration Menu
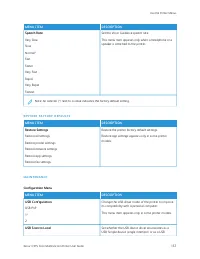
M MEEN NU U IITTEEM M D DEESSC CRRIIPPTTIIO ON N SSppeeeecchh RRaattee Very Slow Slow Normal* Fast Faster Very Fast Rapid Very Rapid Fastest Set the Voice Guidance speech rate. This menu item appears only when a headphone or aspeaker is attached to the printer. Note: An asterisk (*) next to a value ...
Page 163 - Out of Service Erase; V I S I B L E H O M E S C R E E N I C O N S
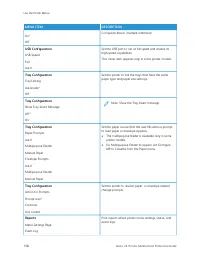
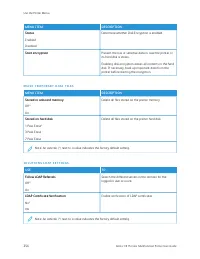
M MEEN NU U IITTEEM M D DEESSC CRRIIPPTTIIO ON N ADF Disabled SSccaannnneerr C Coonnffiigguurraattiioonn Tiff Byte Order CPU Endianness* Little Endian Big Endian Set the byte order of a TIFF-formatted scan output. SSccaannnneerr C Coonnffiigguurraattiioonn Exact Tiff Rows Per Strip On* Off Set the R...
Page 165 - S O F T W A R E U P D AT E
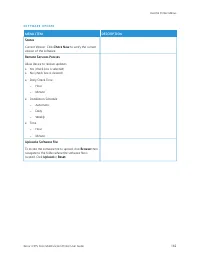
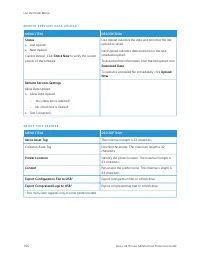
S O F T W A R E U P D AT E M MEEN NU U IITTEEM M D DEESSC CRRIIPPTTIIO ON N SSttaattuuss Current Version: Click C Chheecckk N Noow w to verify the current version of the software. RReem moottee SSeerrvviicceess PPoolliicciieess Allow device to receive updates• Yes (check box is selected) • No (check...
Page 167 - L AY O U T
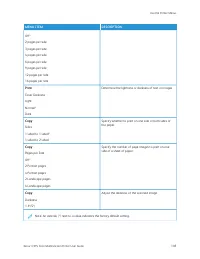
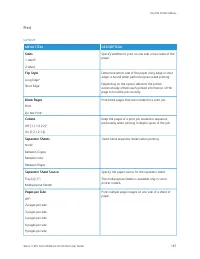
Print L AY O U T M MEEN NU U IITTEEM M D DEESSC CRRIIPPTTIIO ON N SSiiddeess 1-sided* 2-sided Specify whether to print on one side or two sides of thepaper. FFlliipp SSttyyllee Long Edge* Short Edge Determine which side of the paper (long edge or shortedge) is bound when performing two-sided printin...
Page 168 - S E T U P
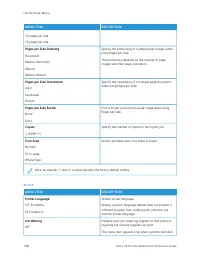
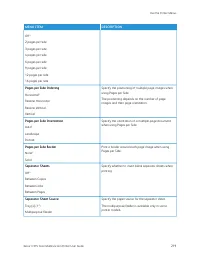
M MEEN NU U IITTEEM M D DEESSC CRRIIPPTTIIO ON N 12 pages per side 16 pages per side PPaaggeess ppeerr SSiiddee O Orrddeerriinngg Horizontal* Reverse Horizontal Vertical Reverse Vertical Specify the positioning of multiple page images whenusing Pages per Side. The positioning depends on the number o...
Page 170 - Q U A L I T Y
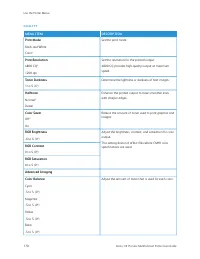
Q U A L I T Y M MEEN NU U IITTEEM M D DEESSC CRRIIPPTTIIO ON N PPrriinntt M Mooddee Black and White Color* Set the print mode. PPrriinntt RReessoolluuttiioonn 4800 CQ* 1200 dpi Set the resolution for the printed output. 4800 CQ provides high-quality output at maximumspeed. TToonneerr D Daarrkknneess...
Page 171 - J O B A C C O U N T I N G
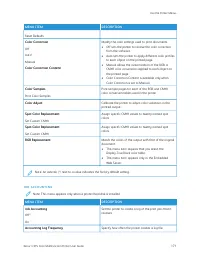
M MEEN NU U IITTEEM M D DEESSC CRRIIPPTTIIO ON N Reset Defaults C Coolloorr C Coorrrreeccttiioonn Off Auto* Manual C Coolloorr C Coorrrreeccttiioonn C Coonntteenntt Modify the color settings used to print documents.• Off sets the printer to receive the color correction from the software. • Auto sets...
Page 173 - X P S
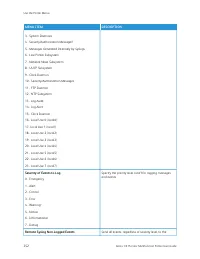
M MEEN NU U IITTEEM M D DEESSC CRRIIPPTTIIO ON N Delete Oldest Log Delete All But Current Delete All Logs U URRLL ttoo PPoosstt LLoogg Specify where the printer posts job accounting logs. EE--m maaiill A Addddrreessss ttoo SSeenndd LLooggss Specify the e-mail address to which the printer sendsjob ac...
Page 175 - P C L
M MEEN NU U IITTEEM M D DEESSC CRRIIPPTTIIO ON N W Waaiitt TTiim meeoouutt Off On* (40 seconds) Set the printer to wait for more data before canceling aprint job. Note: An asterisk (*) next to a value indicates the factory default setting. P C L M MEEN NU U IITTEEM M D DEESSC CRRIIPPTTIIO ON N FFoon...
Page 179 - Paper; T R AY C O N F I G U R AT I O N
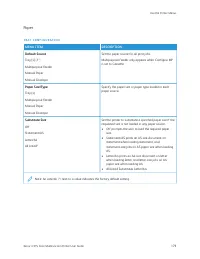
Paper T R AY C O N F I G U R AT I O N M MEEN NU U IITTEEM M D DEESSC CRRIIPPTTIIO ON N D Deeffaauulltt SSoouurrccee Tray [x] (1*) Multipurpose Feeder Manual Paper Manual Envelope Set the paper source for all print jobs. Multipurpose Feeder only appears when Configure MPis set to Cassette. PPaappeerr...
Page 180 - M E D I A C O N F I G U R AT I O N; Universal Setup
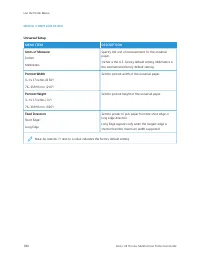
M E D I A C O N F I G U R AT I O N Universal Setup M MEEN NU U IITTEEM M D DEESSC CRRIIPPTTIIO ON N U Unniittss ooff M Meeaassuurree Inches Millimeters Specify the unit of measurement for the universalpaper. Inches is the U.S. factory default setting. Millimeters isthe international factory default ...
Page 181 - Custom Scan Sizes
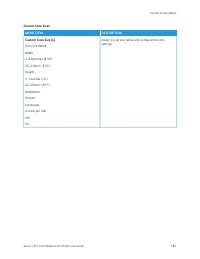
Custom Scan Sizes M MEEN NU U IITTEEM M D DEESSC CRRIIPPTTIIO ON N C Cuussttoom m SSccaann SSiizzee [[xx]] Scan Size Name Width 1–8.50inches (8.50*) 25–216mm (216*) Height 1–14inches (14*) 25–356mm (297*) Orientation Portrait* Landscape 2 scans per side Off* On Assign a scan size name and configure ...
Page 182 - Media Types
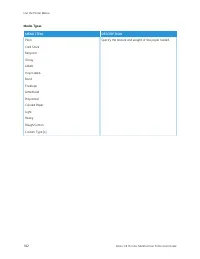
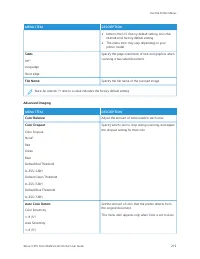
Media Types M MEEN NU U IITTEEM M D DEESSC CRRIIPPTTIIO ON N Plain Card Stock Recycled Glossy Labels Vinyl Labels Bond Envelope Letterhead Preprinted Colored Paper Light Heavy Rough/Cotton Custom Type [x] Specify the texture and weight of the paper loaded. 182 Xerox ® C315 Color Multifunction Printe...
Page 183 - C O P Y D E FA U LT S
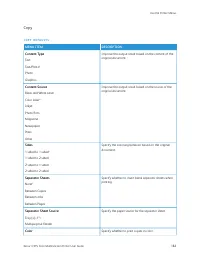
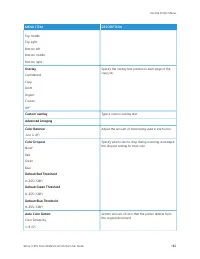
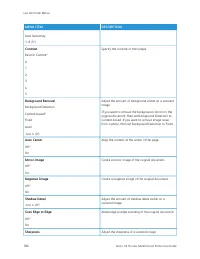
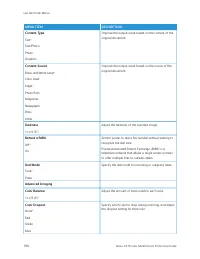
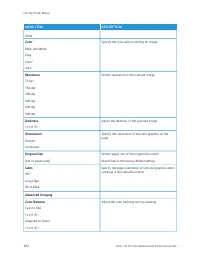
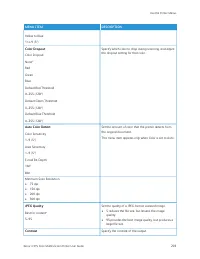
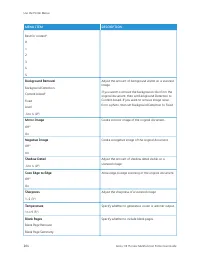
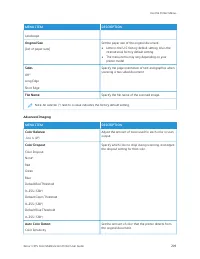
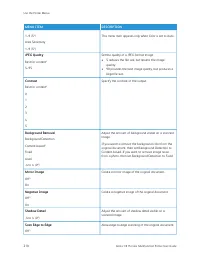
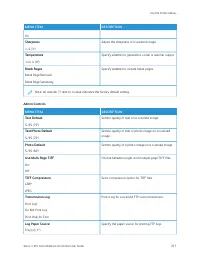
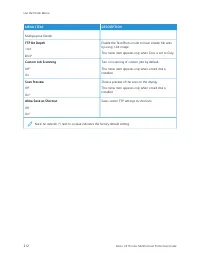
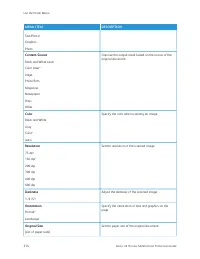
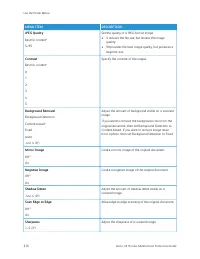
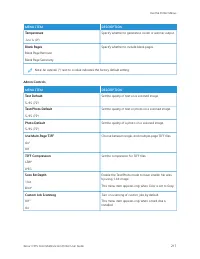
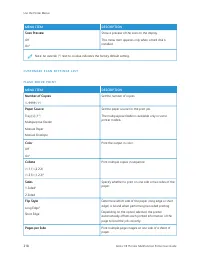
Copy C O P Y D E FA U LT S M MEEN NU U IITTEEM M D DEESSC CRRIIPPTTIIO ON N C Coonntteenntt TTyyppee Text Text/Photo* Photo Graphics Improve the output result based on the content of theoriginal document. C Coonntteenntt SSoouurrccee Black and White Laser Color Laser* Inkjet Photo/Film Magazine News...
Page 188 - FA X M O D E; General Fax Settings
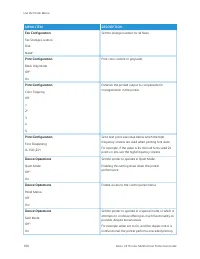
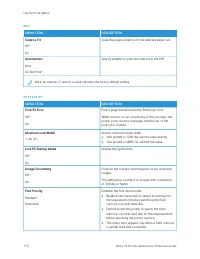
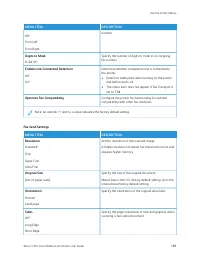
Fax FA X M O D E M MEEN NU U IITTEEM M D DEESSC CRRIIPPTTIIO ON N FFaaxx M Mooddee Fax Server Disabled Select a fax mode. * Indicates the default value. FA X S E T U P General Fax Settings M MEEN NU U IITTEEM M D DEESSC CRRIIPPTTIIO ON N FFaaxx N Naam mee Identify your fax machine. FFaaxx N Nuum mbb...
Page 189 - Fax Send Settings
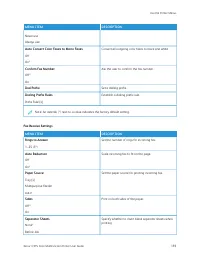
M MEEN NU U IITTEEM M D DEESSC CRRIIPPTTIIO ON N Off* From Left From Right number. D Diiggiittss ttoo M Maasskk 0–58 (0*) Specify the number of digits to mask in an outgoingfax number. EEnnaabbllee LLiinnee C Coonnnneecctteedd D Deetteeccttiioonn Off On* Determine whether a telephone line is connect...
Page 193 - Fax Receive Settings
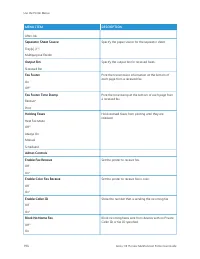
M MEEN NU U IITTEEM M D DEESSC CRRIIPPTTIIO ON N Never use Always use A Auuttoo C Coonnvveerrtt C Coolloorr FFaaxxeess ttoo M Moonnoo FFaaxxeess Off On* Convert all outgoing color faxes to black and white. C Coonnffiirrm m FFaaxx N Nuum mbbeerr Off* On Ask the user to confirm the fax number. D Diiaa...
Page 196 - Fax Cover Page
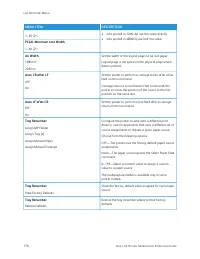
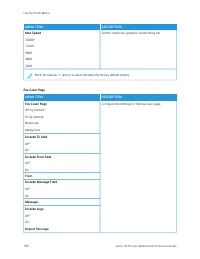
M MEEN NU U IITTEEM M D DEESSC CRRIIPPTTIIO ON N M Maaxx SSppeeeedd 33600* 14400 9600 4800 2400 Set the maximum speed for transmitting fax. Note: An asterisk (*) next to a value indicates the factory default setting. Fax Cover Page M MEEN NU U IITTEEM M D DEESSC CRRIIPPTTIIO ON N FFaaxx C Coovveerr ...
Page 197 - Fax Log Settings
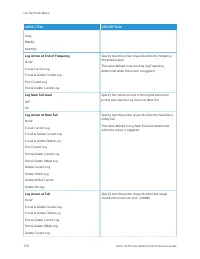
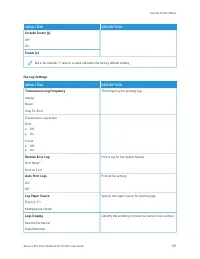
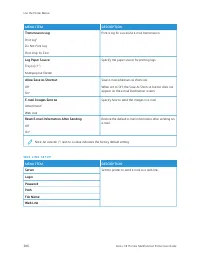
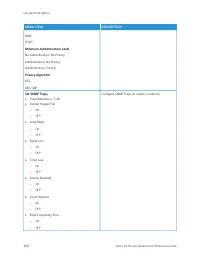
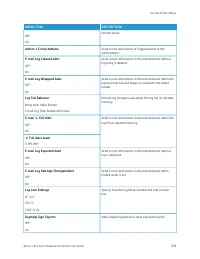
M MEEN NU U IITTEEM M D DEESSC CRRIIPPTTIIO ON N IInncclluuddee FFooootteerr [[xx]] Off* On FFooootteerr [[xx]] Note: An asterisk (*) next to a value indicates the factory default setting. Fax Log Settings M MEEN NU U IITTEEM M D DEESSC CRRIIPPTTIIO ON N TTrraannssm miissssiioonn LLoogg FFrreeqquuee...
Page 198 - Speaker Settings
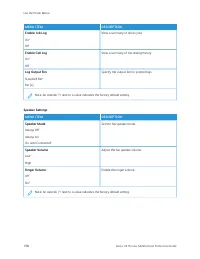
M MEEN NU U IITTEEM M D DEESSC CRRIIPPTTIIO ON N EEnnaabbllee JJoobb LLoogg On* Off View a summary of all fax jobs. EEnnaabbllee C Caallll LLoogg On* Off View a summary of fax dialing history. LLoogg O Ouuttppuutt B Biinn Standard Bin* Bin [x] Specify the output bin for printed logs. Note: An asteri...
Page 199 - E - M A I L S E T U P
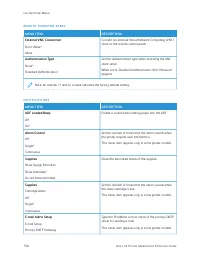
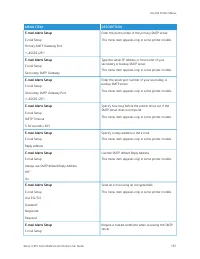
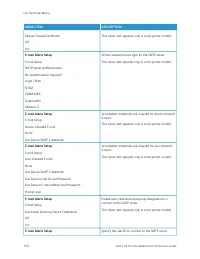
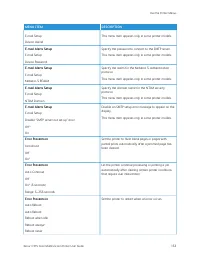
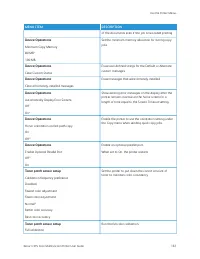
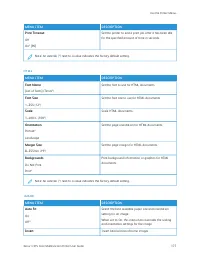
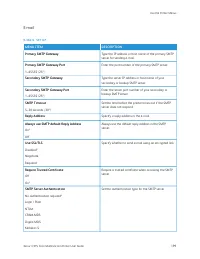
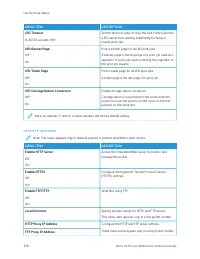
E-mail E - M A I L S E T U P M MEEN NU U IITTEEM M D DEESSC CRRIIPPTTIIO ON N PPrriim maarryy SSM MTTPP G Gaatteew waayy Type the IP address or host name of the primary SMTPserver for sending e-mail. PPrriim maarryy SSM MTTPP G Gaatteew waayy PPoorrtt 1–65535 (25*) Enter the port number of the prima...
Page 200 - E - M A I L D E FA U LT S
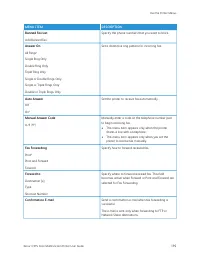
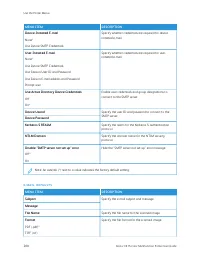
M MEEN NU U IITTEEM M D DEESSC CRRIIPPTTIIO ON N D Deevviiccee--IInniittiiaatteedd EE--m maaiill None* Use Device SMTP Credentials Specify whether credentials are required for device-initiated e-mail. U Usseerr--IInniittiiaatteedd EE--m maaiill None* Use Device SMTP Credentials Use Session User ID a...
Page 206 - W E B L I N K S E T U P
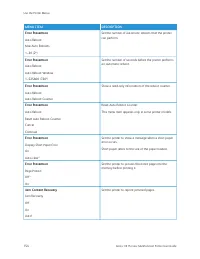
M MEEN NU U IITTEEM M D DEESSC CRRIIPPTTIIO ON N TTrraannssm miissssiioonn LLoogg Print log* Do Not Print Log Print Only for Error Print a log for successful e-mail transmission. LLoogg PPaappeerr SSoouurrccee Tray [x] (1*) Multipurpose Feeder Specify the paper source for printing logs. A Alllloow w...
Page 207 - FTP; F T P D E FA U LT S
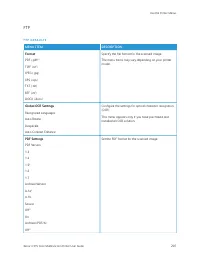
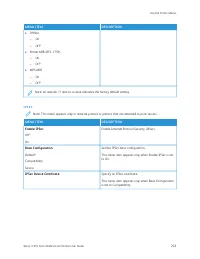
FTP F T P D E FA U LT S M MEEN NU U IITTEEM M D DEESSC CRRIIPPTTIIO ON N FFoorrm maatt PDF (.pdf)* TIFF (.tif) JPEG (.jpg) XPS (.xps) TXT (.txt) RTF (.rtf) DOCX (.docx) Specify the file format for the scanned image. The menu items may vary depending on your printermodel. G Glloobbaall O OC CRR SSeet...
Page 213 - USB Drive; F L A S H D R I V E S C A N
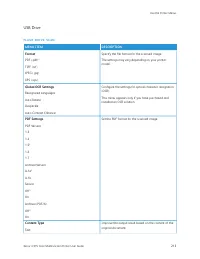
USB Drive F L A S H D R I V E S C A N M MEEN NU U IITTEEM M D DEESSC CRRIIPPTTIIO ON N FFoorrm maatt PDF (.pdf)* TIFF (.tif) JPEG (.jpg) XPS (.xps) Specify the file format for the scanned image. The settings may vary depending on your printermodel. G Glloobbaall O OC CRR SSeettttiinnggss Recognized ...
Page 220 - C U S T O M I Z E P R I N T S E T T I N G S L I S T
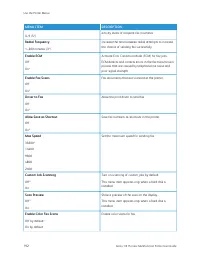
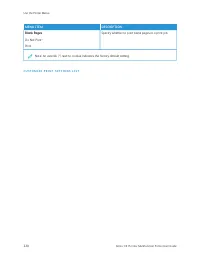
M MEEN NU U IITTEEM M D DEESSC CRRIIPPTTIIO ON N B Bllaannkk PPaaggeess Do Not Print* Print Specify whether to print blank pages in a print job. Note: An asterisk (*) next to a value indicates the factory default setting. C U S T O M I Z E P R I N T S E T T I N G S L I S T 220 Xerox ® C315 Color Mul...
Page 221 - N E T W O R K O V E R V I E W
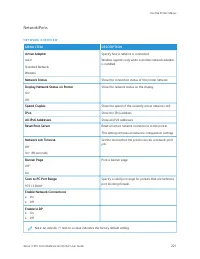
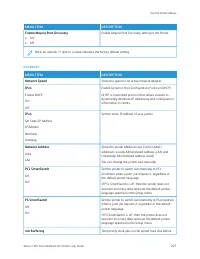
Network/Ports N E T W O R K O V E R V I E W M MEEN NU U IITTEEM M D DEESSC CRRIIPPTTIIO ON N A Accttiivvee A Addaapptteerr Auto* Standard Network Wireless Specify how a network is connected. Wireless appears only when a wireless network adapteris installed. N Neettw woorrkk SSttaattuuss Show the con...
Page 222 - W I R E L E S S; Wireless
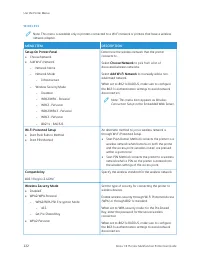
W I R E L E S S Note: This menu is available only in printers connected to a Wi-Fi network or printers that have a wirelessnetwork adapter. M MEEN NU U IITTEEM M D DEESSC CRRIIPPTTIIO ON N SSeettuupp O Onn PPrriinntteerr PPaanneell • Choose Network• Add Wi-Fi Network – Network Name – Network Mode – ...
Page 224 - W I - F I D I R E C T
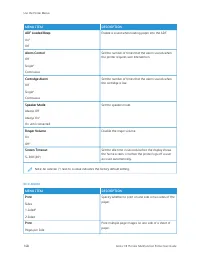
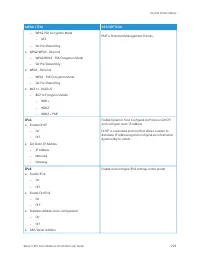
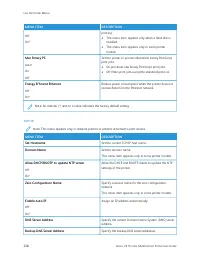
M MEEN NU U IITTEEM M D DEESSC CRRIIPPTTIIO ON N • Manually Assigned IPv6 Address• Manually Assigned IPv6 Router • Address Prefix 0–128 (64 * ) • All IPv6 Addresses • All IPv6 Router Addresses N Neettw woorrkk A Addddrreessss • UAA• LAA View the network addresses. PPC CLL SSm maarrttSSw wiittcchh • ...
Page 225 - A I R P R I N T
M MEEN NU U IITTEEM M D DEESSC CRRIIPPTTIIO ON N SShhoow w PPaassssw woorrdd oonn SSeettuupp PPaaggee • On • Off Specify the IP address of the group owner. PPrreeffeerrrreedd C Chhaannnneell N Nuum mbbeerr • Auto • 1 through 11 G Grroouupp O Ow wnneerr IIPP A Addddrreessss A Auuttoo--A Acccceepptt P...
Page 226 - M O B I L E S E R V I C E S M A N A G E M E N T
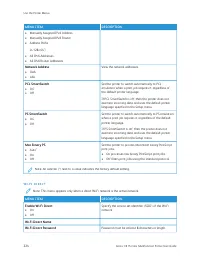
M MEEN NU U IITTEEM M D DEESSC CRRIIPPTTIIO ON N Waste Toner Bottle Imaging Kit Waste Toner Bottle PPrriinntteerr Device Type Device Speed Firmware Level Multipurpose Feeder Tray 1 Tray 2 Standard Bin This menu lists the printer specifications and input/output tray status/notifications. LLooggiinn M...
Page 227 - E T H E R N E T
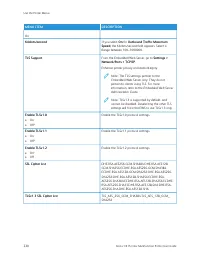
M MEEN NU U IITTEEM M D DEESSC CRRIIPPTTIIO ON N EEnnaabbllee M Moopprriiaa PPrriinntt D Diissccoovveerryy • On* • Off Enable Mopria Print Discovery setting in the Printer. Note: An asterisk (*) next to a value indicates the factory default setting. E T H E R N E T M MEEN NU U IITTEEM M D DEESSC CRR...
Page 231 - S N M P
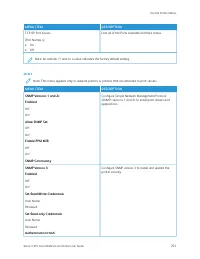
M MEEN NU U IITTEEM M D DEESSC CRRIIPPTTIIO ON N TCP /IP Port Access [Port Names x] • On• Off Lists all of the Ports available and their status. Note: An asterisk (*) next to a value indicates the factory default setting. S N M P Note: This menu appears only in network printers or printers that are ...
Page 233 - I P S E C
M MEEN NU U IITTEEM M D DEESSC CRRIIPPTTIIO ON N • Offline – On – Off* • Printer MIB (RFC 1759) – On – Off* • MPS MIB – On – Off* Note: An asterisk (*) next to a value indicates the factory default setting. I P S E C Note: This menu appears only in network printers or printers that are attached to p...
Page 235 - L P D C O N F I G U R AT I O N
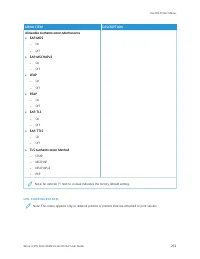
M MEEN NU U IITTEEM M D DEESSC CRRIIPPTTIIO ON N A Alllloow waabbllee A Auutthheennttiiccaattiioonn M Meecchhaanniissm mss • EEA APP--M MD D55 – On – Off • EEA APP--M MSSC CH HA APPvv2 2 – On – Off • LLEEA APP – On – Off • PPEEA APP – On – Off • EEA APP--TTLLSS – On – Off • EEA APP--TTTTLLSS – On – ...
Page 236 - H T T P / F T P S E T T I N G S
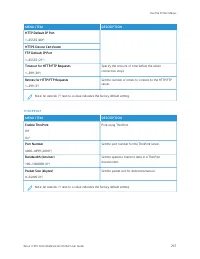
M MEEN NU U IITTEEM M D DEESSC CRRIIPPTTIIO ON N LLPPD D TTiim meeoouutt 0–65535 seconds (90*) Set the time-out value to stop the Line Printer Daemon(LPD) server from waiting indefinitely for hung orinvalid print jobs. LLPPD D B Baannnneerr PPaaggee Off* On Print a banner page for all LPD print jobs...
Page 237 - T H I N P R I N T
M MEEN NU U IITTEEM M D DEESSC CRRIIPPTTIIO ON N H HTTTTPP D Deeffaauulltt IIPP PPoorrtt 1–65535 (80*) H HTTTTPPSS D Deevviiccee C Ceerrttiiffiiccaattee FFTTPP D Deeffaauulltt IIPP PPoorrtt 1–65535 (21*) TTiim meeoouutt ffoorr H HTTTTPP//FFTTPP RReeqquueessttss 1–299 (30*) Specify the amount of time...
Page 238 - U S B
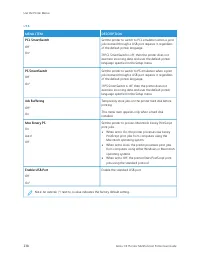
U S B M MEEN NU U IITTEEM M D DEESSC CRRIIPPTTIIO ON N PPC CLL SSm maarrttSSw wiittcchh Off On* Set the printer to switch to PCL emulation when a printjob received through a USB port requires it, regardlessof the default printer language. If PCL SmartSwitch is off, then the printer does notexamine i...
Page 240 - Embedded Web Server Administrator Guide; Additional information for Universal Print; To add a Printer from Windows Server
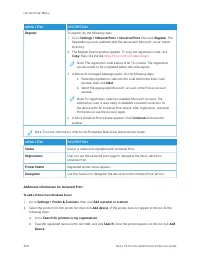
M MEEN NU U IITTEEM M D DEESSC CRRIIPPTTIIO ON N RReeggiisstteerr To register, do the following steps:1 Go to SSeettttiinnggss >> N Neettw woorrkk//PPoorrttss >> U Unniivveerrssaall PPrriinntt, then click RReeggiisstteerr. The Registration process authenticates the device with Microsoft ...
Page 242 - Security; L O G I N M E T H O D S; Manage Permissions
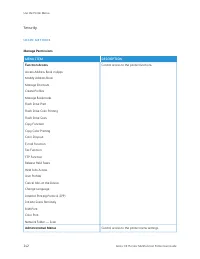
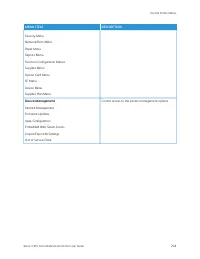
Security L O G I N M E T H O D S Manage Permissions M MEEN NU U IITTEEM M D DEESSC CRRIIPPTTIIO ON N FFuunnccttiioonn A Acccceessss Access Address Book in Apps Modify Address Book Manage Shortcuts Create Profiles Manage Bookmarks Flash Drive Print Flash Drive Color Printing Flash Drive Scan Copy Fun...
Page 245 - Local Accounts
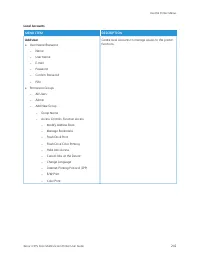
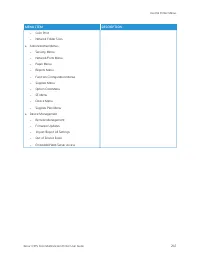
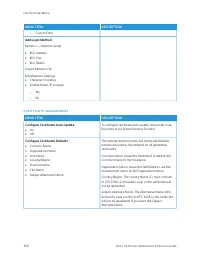
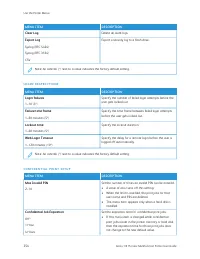
Local Accounts M MEEN NU U IITTEEM M D DEESSC CRRIIPPTTIIO ON N A Adddd U Usseerr • User Name/Password – Name – User Name – E-mail – Password – Confirm Password – PIN • Permission Groups – All Users – Admin – Add New Group – Group Name – Access Controls: Function Access – Modify Address Book – Manag...
Page 248 - Network Accounts
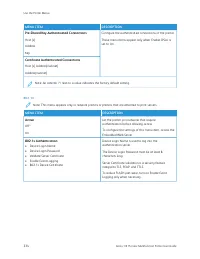
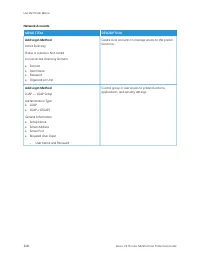
Network Accounts M MEEN NU U IITTEEM M D DEESSC CRRIIPPTTIIO ON N A Adddd LLooggiinn M Meetthhoodd Active Directory Status is Joined or Not Joined. Join an Active Directory Domain: • Domain • User Name • Password• Organization Unit Create local accounts to manage access to the printerfunctions. A Ad...
Page 250 - C E R T I F I C AT E M A N A G E M E N T
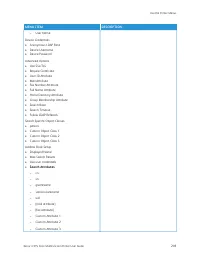
M MEEN NU U IITTEEM M D DEESSC CRRIIPPTTIIO ON N – Custom Filter A Adddd LLooggiinn M Meetthhoodd Kerberos — Kerberos Setup • KDC Address • KDC Port • KDC Realm Import Kerberos File Miscellaneous Settings• Character Encoding • Disable Revers IP Lookups – Yes – No C E R T I F I C AT E M A N A G E M E...
Page 255 - D I S K E N C R Y P T I O N
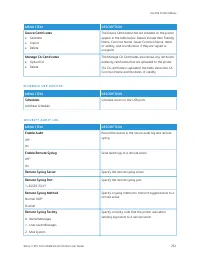
M MEEN NU U IITTEEM M D DEESSC CRRIIPPTTIIO ON N 24 Hours 1 Week • If the printer is turned off, then all confidential jobs held in the printer memory are deleted. RReeppeeaatt JJoobb EExxppiirraattiioonn Off* 1 Hour 4 Hours 24 Hours 1 Week Set the expiration time for a print job that you want torep...
Page 257 - M I S C E L L A N E O U S
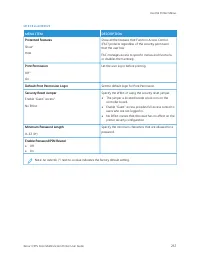
M I S C E L L A N E O U S M MEEN NU U IITTEEM M D DEESSC CRRIIPPTTIIO ON N PPrrootteecctteedd FFeeaattuurreess Show* Hide Show all the features that Function Access Control(FAC) protects regardless of the security permissionthat the user has. FAC manages access to specific menus and functionsor disa...
Page 258 - Reports; M E N U S E T T I N G S PA G E
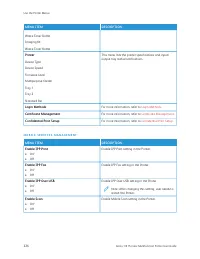
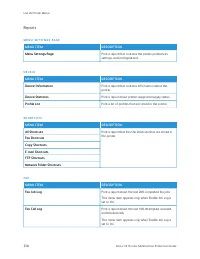
Reports M E N U S E T T I N G S PA G E M MEEN NU U IITTEEM M D DEESSC CRRIIPPTTIIO ON N M Meennuu SSeettttiinnggss PPaaggee Print a report that contains the printer preferences,settings, and configurations. D E V I C E M MEEN NU U IITTEEM M D DEESSC CRRIIPPTTIIO ON N D Deevviiccee IInnffoorrm maatti...
Page 259 - N E T W O R K; Neettw
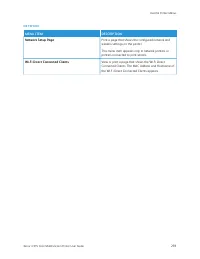
N E T W O R K M MEEN NU U IITTEEM M D DEESSC CRRIIPPTTIIO ON N N Neettw woorrkk SSeettuupp PPaaggee Print a page that shows the configured network andwireless settings on the printer. This menu item appears only in network printers orprinters connected to print servers. W Wii--FFii D Diirreecctt C C...
Page 260 - Supplies Plan; P L A N A C T I VAT I O N
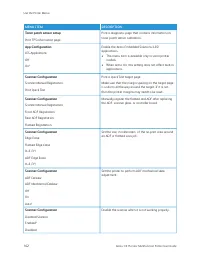
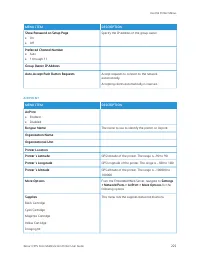
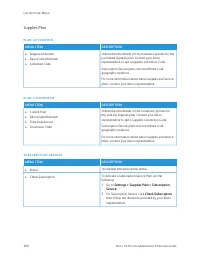
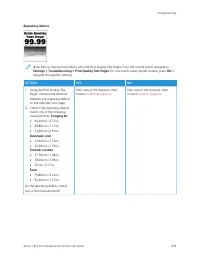
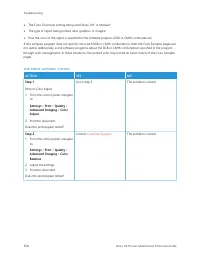
Supplies Plan P L A N A C T I VAT I O N M MEEN NU U IITTEEM M D DEESSC CRRIIPPTTIIO ON N • Sequence Number • Device Serial Number• Activation Code It describes the details of the activation process for thepurchased Supplies plan. Contact your Xeroxrepresentative to get a Supplies Activation Code. Su...
Page 261 - Address Book; C O N TA C T S
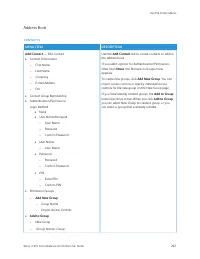
Address Book C O N TA C T S M MEEN NU U IITTEEM M D DEESSC CRRIIPPTTIIO ON N A Adddd C Coonnttaacctt — Edit Contact • Contact Information – First Name – Last Name – Company – E-mail Address – Fax • Contact Group Membership • Authentication/Permissions Login Method • None• User Name/Password – User N...
Page 262 - C O N TA C T G R O U P S
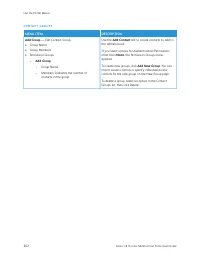
C O N TA C T G R O U P S M MEEN NU U IITTEEM M D DEESSC CRRIIPPTTIIO ON N A Adddd G Grroouupp — Edit Contact Group • Group Name• Group Members • Permission Groups – A Adddd G Grroouupp – Group Name – Members: Indicates the number ofcontacts in the group. Use the A Adddd C Coonnttaacctt link to creat...
Page 263 - Bookmarks
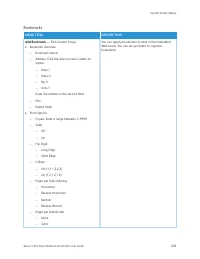
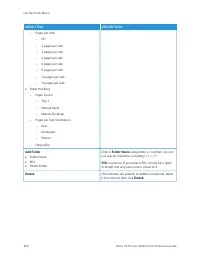
Bookmarks M MEEN NU U IITTEEM M D DEESSC CRRIIPPTTIIO ON N A Adddd B Booookkm maarrkk — Edit Contact Group • Bookmark Overview – Bookmark Name – Address: Click the down arrow to select anoption: – http:// – https:// – ftp:// – smb:// Enter the address in the second field. – PIN – Parent folder • Pri...
Page 265 - Apps
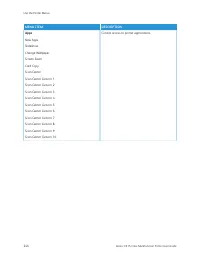
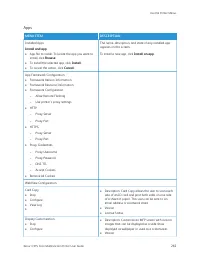
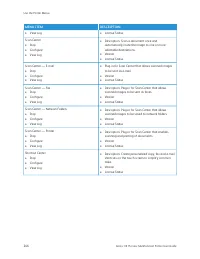
Apps M MEEN NU U IITTEEM M D DEESSC CRRIIPPTTIIO ON N Installed Apps IInnssttaallll aanndd aapppp • App file to install: To locate the app you want to install, click B Brroow wssee. • To install the selected app, click IInnssttaallll.• To cancel the action, click C Caanncceell. The name, description...
Page 267 - Maintain the Printer
Xerox ® C315 Color Multifunction Printer User Guide 267 11 Maintain the Printer This chapter contains: Checking the Status of Supplies . . . . . . . . . . . . . . . . . . . . . . . . . . . . . . . . . . . . . . . . . . . . . . . . . . . . . . . . . . . . . . . . . . . . . . . . . . . . . . . . . . ....
Page 268 - Checking the Status of Supplies; Select the parts or supplies that you want to check.
Checking the Status of Supplies 1. From the home screen, touch SSttaattuuss//SSuupppplliieess. 2. Select the parts or supplies that you want to check. Note: You can also access this setting by touching the top section of the home screen. 268 Xerox ® C315 Color Multifunction Printer User Guide Mainta...
Page 269 - Configuring supply notifications
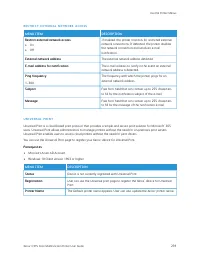
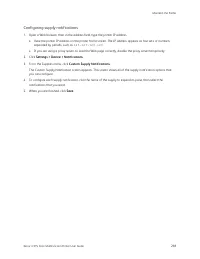
Configuring supply notifications 1. Open a Web browser, then in the address field, type the printer IP address. • View the printer IP address on the printer home screen. The IP address appears as four sets of numbers separated by periods, such as 123.123.123.123 . • If you are using a proxy server, ...
Page 270 - Setting up e-mail alerts; Click SSeettttiinnggss > D
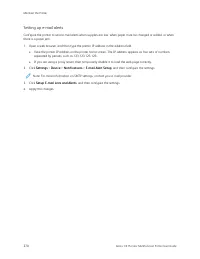
Setting up e-mail alerts Configure the printer to send e-mail alerts when supplies are low, when paper must be changed or added, or whenthere is a paper jam. 1. Open a web browser, and then type the printer IP address in the address field. • View the printer IP address on the printer home screen. Th...
Page 271 - Viewing reports; From the home screen, touch SSeettttiinnggss > RReeppoorrttss.
Viewing reports 1. From the home screen, touch SSeettttiinnggss > RReeppoorrttss. 2. Select the report that you want to view. Xerox ® C315 Color Multifunction Printer User Guide 271 Maintain the Printer
Page 272 - Ordering supplies; To view and order supplies for your printer, go to; U S I N G G E N U I N E X E R O X S U P P L I E S
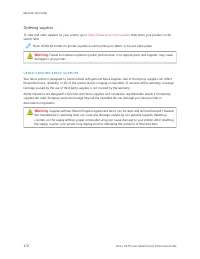
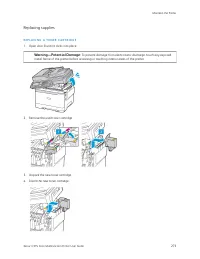
Ordering supplies To view and order supplies for your printer, go to https://www.xerox.com/supplies , then enter your product in the search field. Note: All life estimates for printer supplies assume printing on letter- or A4-size plain paper. W Waarrnniinngg:: Failure to maintain optimum printer pe...
Page 273 - Replacing supplies; R E P L A C I N G A T O N E R C A R T R I D G E; Open door B until it; Remove the used toner cartridge.
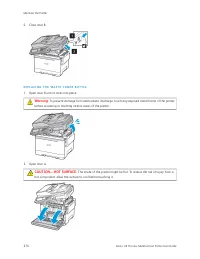
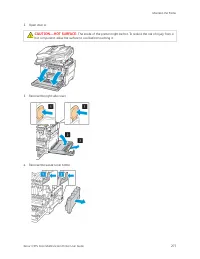
Replacing supplies R E P L A C I N G A T O N E R C A R T R I D G E 1. Open door B until it clicks into place. W Waarrnniinngg— —PPootteennttiiaall D Daam maaggee:: To prevent damage from electrostatic discharge, touch any exposed metal frame of the printer before accessing or touching interior areas...
Page 274 - R E P L A C I N G T H E W A S T E T O N E R B O T T L E
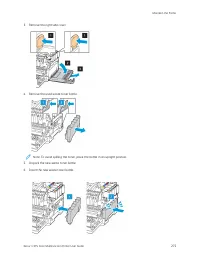
5. Close door B. R E P L A C I N G T H E W A S T E T O N E R B O T T L E 1. Open door B until it clicks into place. W Waarrnniinngg:: To prevent damage from electrostatic discharge, touch any exposed metal frame of the printer before accessing or touching interior areas of the printer. 2. Open door ...
Page 276 - Insert the right side cover.; R E P L A C I N G A N I M A G I N G K I T
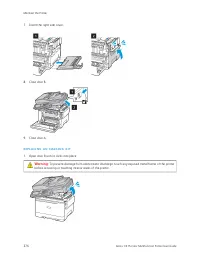
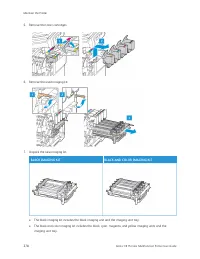
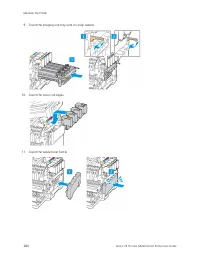
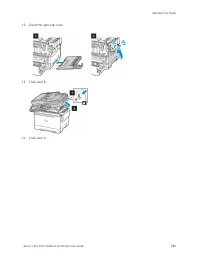
7. Insert the right side cover. 8. Close door B. 9. Close door A. R E P L A C I N G A N I M A G I N G K I T 1. Open door B until it clicks into place. W Waarrnniinngg:: To prevent damage from electrostatic discharge, touch any exposed metal frame of the printer before accessing or touching interior ...
Page 279 - Remove the packing material.
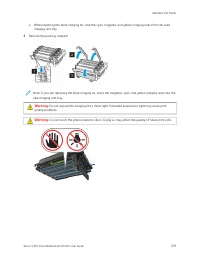
• When replacing the black imaging kit, save the cyan, magenta, and yellow imaging units from the used imaging unit tray. 8. Remove the packing material. Note: If you are replacing the black imaging kit, insert the magenta, cyan, and yellow imaging units into thenew imaging unit tray. W Waarrnniinng...
Page 282 - Cleaning printer parts; C L E A N I N G T H E P R I N T E R; • Perform this task after every few months.; C L E A N I N G T H E T O U C H S C R E E N; • Make sure that the touch screen is dry after cleaning.
Cleaning printer parts C L E A N I N G T H E P R I N T E R C CA AU UTTIIO ON N— —SSH HO OC CKK H HA AZZA ARRD D:: To avoid the risk of electrical shock when cleaning the exterior of the printer, unplug the power cord from the electrical outlet and disconnect all cables from the printer before procee...
Page 283 - C L E A N I N G T H E S C A N N E R; Open the scanner cover.
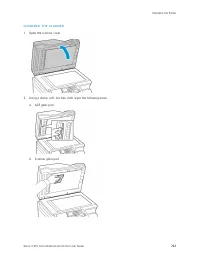
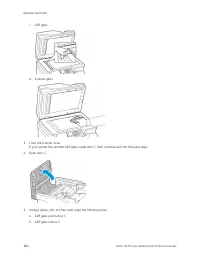
C L E A N I N G T H E S C A N N E R 1. Open the scanner cover. 2. Using a damp, soft, lint-free cloth, wipe the following areas: a. ADF glass pad b. Scanner glass pad Xerox ® C315 Color Multifunction Printer User Guide 283 Maintain the Printer
Page 286 - Saving energy and paper; C O N F I G U R I N G T H E P O W E R S AV E M O D E S E T T I N G S; Sleep Mode; A D J U S T I N G T H E B R I G H T N E S S O F T H E D I S P L AY
Saving energy and paper C O N F I G U R I N G T H E P O W E R S AV E M O D E S E T T I N G S Sleep Mode 1. From the control panel, navigate to: SSeettttiinnggss >> D Deevviiccee >> PPoow weerr M Maannaaggeem meenntt >> TTiim meeoouuttss >> SSlleeeepp M Mooddee 2. Enter the am...
Page 287 - Moving the printer; M O V I N G T H E P R I N T E R T O A N O T H E R L O C AT I O N
Moving the printer M O V I N G T H E P R I N T E R T O A N O T H E R L O C AT I O N C CA AU UTTIIO ON N— —PPO OTTEEN NTTIIA ALL IIN NJJU URRYY:: If the printer weight is greater than 20kg (44lb), then it requires two or more trained personnel to lift it safely. C CA AU UTTIIO ON N— —PPO OTTEEN NTTII...
Page 289 - Troubleshooting
Xerox ® C315 Color Multifunction Printer User Guide 289 12 Troubleshooting This chapter contains: Network connection problems . . . . . . . . . . . . . . . . . . . . . . . . . . . . . . . . . . . . . . . . . . . . . . . . . . . . . . . . . . . . . . . . . . . . . . . . . . . . . . . . . . . . . . . ...
Page 290 - Network connection problems; C A N N O T O P E N E M B E D D E D W E B S E R V E R; AC
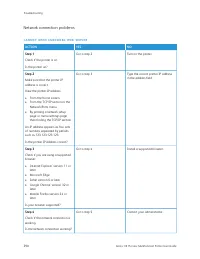
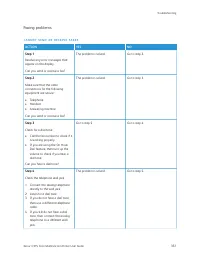
Network connection problems C A N N O T O P E N E M B E D D E D W E B S E R V E R A AC CTTIIO ON N YYEESS N NO O SStteepp 11 Check if the printer is on. Is the printer on? Go to step 2. Turn on the printer. SStteepp 22 Make sure that the printer IPaddress is correct. View the printer IP address: • F...
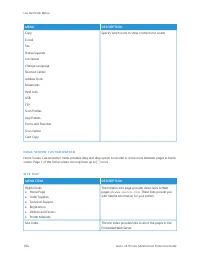
Page 291 - Customer Support; U N A B L E T O R E A D F L A S H D R I V E
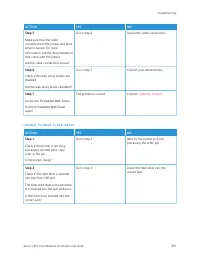
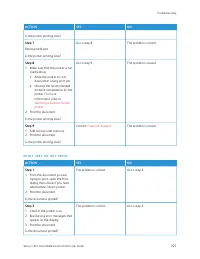
A AC CTTIIO ON N YYEESS N NO O SStteepp 55 Make sure that the cableconnections to the printer and printserver is secure. For moreinformation, see the documentationthat came with the printer. Are the cable connections secure? Go to step 6. Secure the cable connections. SStteepp 66 Check if the web pr...
Page 292 - E N A B L I N G T H E U S B P O R T
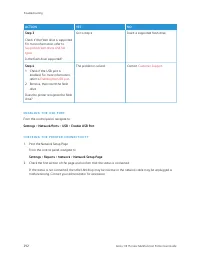
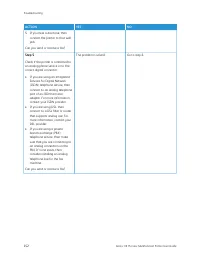
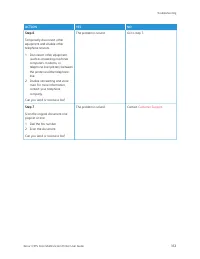
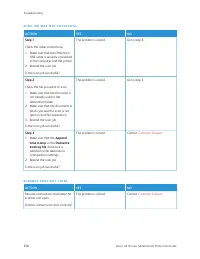
A AC CTTIIO ON N YYEESS N NO O SStteepp 33 Check if the flash drive is supported.For more information, refer to Supported flash drives and filetypes . Is the flash drive supported? Go to step 4. Insert a supported flash drive. SStteepp 44 1 Check if the USB port is enabled. For more information,refe...
Page 293 - Hardware options problems; C A N N O T D E T E C T I N T E R N A L O P T I O N
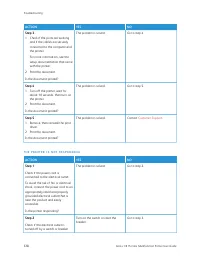
Hardware options problems C A N N O T D E T E C T I N T E R N A L O P T I O N A AC CTTIIO ON N YYEESS N NO O SStteepp 11 Turn off the printer, wait for about10 seconds, then turn on theprinter. Does the internal option operatecorrectly? The problem is solved. Go to step 2. SStteepp 22 Print the Menu...
Page 294 - D E F E C T I V E F L A S H D E T E C T E D
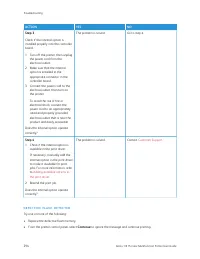
A AC CTTIIO ON N YYEESS N NO O SStteepp 33 Check if the internal option isinstalled properly into the controllerboard. 1 Turn off the printer, then unplug the power cord from theelectrical outlet. 2 Make sure that the internal option is installed in theappropriate connector in thecontroller board. 3...
Page 296 - Printing problems; P R I N T Q U A L I T Y I S P O O R; Blank or white pages; Dark print
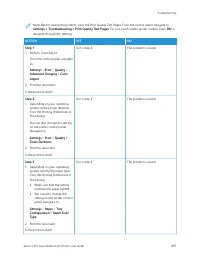
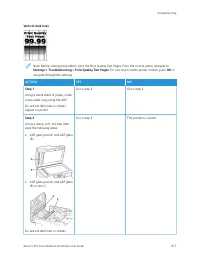
Printing problems P R I N T Q U A L I T Y I S P O O R Blank or white pages Note: Before solving the problem, print the Print Quality Test Pages. From the control panel, navigate toSSeettttiinnggss >> TTrroouubblleesshhoooottiinngg >> PPrriinntt Q Quuaalliittyy TTeesstt PPaaggeess. For no...
Page 298 - Ghost images
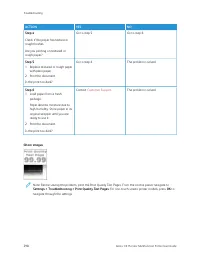
A AC CTTIIO ON N YYEESS N NO O SStteepp 44 Check if the paper has texture orrough finishes. Are you printing on textured orrough paper? Go to step 5. Go to step 6. SStteepp 55 1 Replace textured or rough paper with plain paper. 2 Print the document. Is the print too dark? Go to step 6. The problem i...
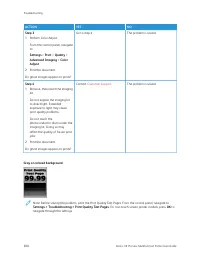
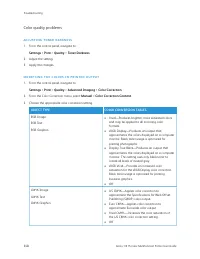
Page 300 - Gray or colored background
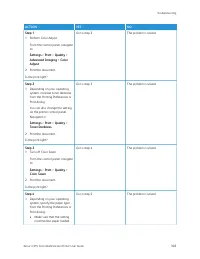
A AC CTTIIO ON N YYEESS N NO O SStteepp 331 Perform Color Adjust. From the control panel, navigateto: SSeettttiinnggss > PPrriinntt > Q Quuaalliittyy > A Addvvaanncceedd IIm maaggiinngg > C Coolloorr A Addjjuusstt 2 Print the document. Do ghost images appear on prints? Go to step 4. The ...
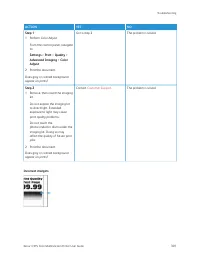
Page 301 - Incorrect margins
A AC CTTIIO ON N YYEESS N NO O SStteepp 111 Perform Color Adjust. From the control panel, navigateto: SSeettttiinnggss > PPrriinntt > Q Quuaalliittyy > A Addvvaanncceedd IIm maaggiinngg > C Coolloorr A Addjjuusstt 2 Print the document. Does gray or colored backgroundappear on prints? Go ...
Page 302 - Light print
A AC CTTIIO ON N YYEESS N NO O SStteepp 111 Adjust the paper guides to the correct position for the paperloaded. 2 Print the document. Are the margins correct? The problem is solved. Go to step 2. SStteepp 22 1 Set the paper size from the control panel. Navigate to: SSeettttiinnggss > PPaappeerr ...
Page 305 - Missing colors
A AC CTTIIO ON N YYEESS N NO O SStteepp 771 Load paper from a fresh package. Paper absorbs moisture due tohigh humidity. Store paper in itsoriginal wrapper until you areready to use it. 2 Print the document. Is the print light? Go to step 8. The problem is solved. SStteepp 88 1 Remove, then insert t...
Page 306 - Mottled print and dots
A AC CTTIIO ON N YYEESS N NO O 1 Remove the toner cartridge of the missing color. 2 Remove the imaging kit. Do not expose the imaging kitto direct light. Extendedexposure to light may causeprint quality problems. Do not touch thephotoconductor drum under theimaging kit. Doing so mayaffect the qualit...
Page 308 - Paper curl
A AC CTTIIO ON N YYEESS N NO O SStteepp 441 Load paper from a fresh package. Paper absorbs moisture due tohigh humidity. Store paper in itsoriginal wrapper until you areready to use it. 2 Print the document. Is the print mottled? Go to step 5. The problem is solved. SStteepp 55 1 Remove, then insert...
Page 310 - Print crooked or skewed
Print crooked or skewed Note: Before solving the problem, print the Print Quality Test Pages. From the control panel, navigate toSSeettttiinnggss >> TTrroouubblleesshhoooottiinngg >> PPrriinntt Q Quuaalliittyy TTeesstt PPaaggeess. For non-touch-screen printer models, press O OKK to navig...
Page 311 - Solid color or black images; Text or images cut off
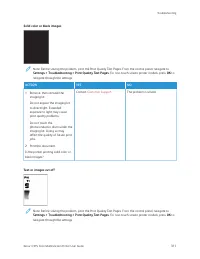
Solid color or black images Note: Before solving the problem, print the Print Quality Test Pages. From the control panel, navigate toSSeettttiinnggss >> TTrroouubblleesshhoooottiinngg >> PPrriinntt Q Quuaalliittyy TTeesstt PPaaggeess. For non-touch-screen printer models, press O OKK to n...
Page 313 - Toner easily rubs off; OKK to
Toner easily rubs off Note: Before solving the problem, print the Print Quality Test Pages. From the control panel, navigate toSSeettttiinnggss >> TTrroouubblleesshhoooottiinngg >> PPrriinntt Q Quuaalliittyy TTeesstt PPaaggeess. For non-touch-screen printer models, press O OKK to navigat...
Page 315 - Uneven print density; Horizontal dark lines
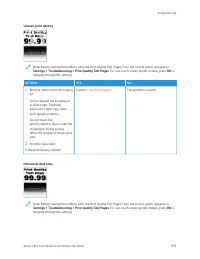
Uneven print density Note: Before solving the problem, print the Print Quality Test Pages. From the control panel, navigate toSSeettttiinnggss >> TTrroouubblleesshhoooottiinngg >> PPrriinntt Q Quuaalliittyy TTeesstt PPaaggeess. For non-touch-screen printer models, press O OKK to navigate...
Page 317 - Vertical dark lines
Vertical dark lines Note: Before solving the problem, print the Print Quality Test Pages. From the control panel, navigate toSSeettttiinnggss >> TTrroouubblleesshhoooottiinngg >> PPrriinntt Q Quuaalliittyy TTeesstt PPaaggeess. For non-touch-screen printer models, press O OKK to navigate ...
Page 319 - Horizontal white lines; Repeating defects
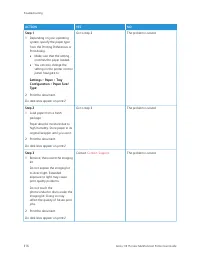
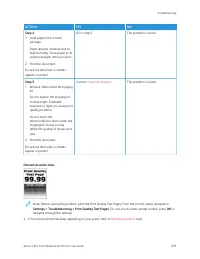
A AC CTTIIO ON N YYEESS N NO O SStteepp 441 Load paper from a fresh package. Paper absorbs moisture due tohigh humidity. Store paper in itsoriginal wrapper until you use it. 2 Print the document. Do vertical dark lines or streaksappear on prints? Go to step 5. The problem is solved. SStteepp 55 1 Re...
Page 320 - Vertical white lines
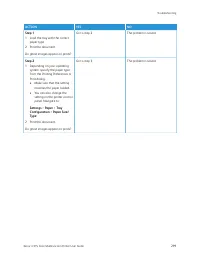
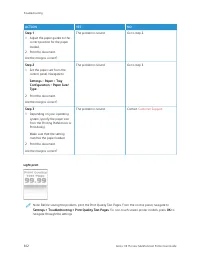
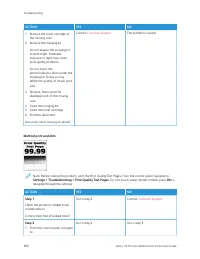
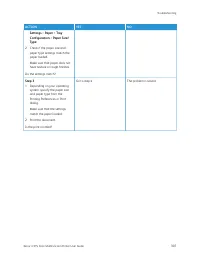
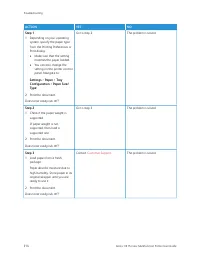
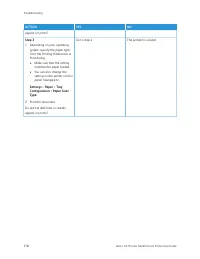
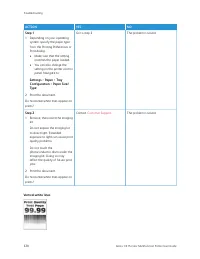
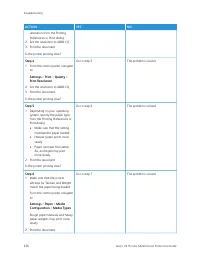
A AC CTTIIO ON N YYEESS N NO O SStteepp 111 Depending on your operating system, specify the paper typefrom the Printing Preferences orPrint dialog.• Make sure that the setting matches the paper loaded. • You can also change the setting on the printer controlpanel. Navigate to: SSeettttiinnggss > ...
Page 324 - C O N F I D E N T I A L A N D O T H E R H E L D D O C U M E N T S D O N O T P R I N T
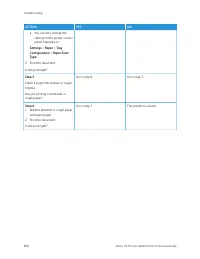
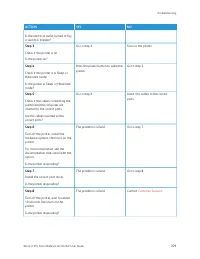
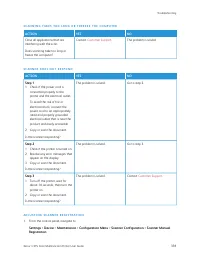
C O N F I D E N T I A L A N D O T H E R H E L D D O C U M E N T S D O N O T P R I N T A AC CTTIIO ON N YYEESS N NO O SStteepp 11 1 From the control panel, check if the documents appear in theHeld Jobs list. If the documents are not listed,then print the documents usingthe Print and Hold options. 2 P...
Page 325 - S L O W P R I N T I N G
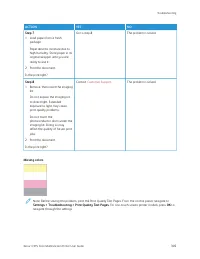
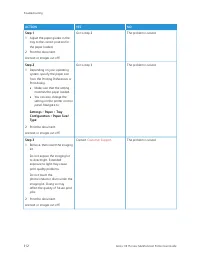
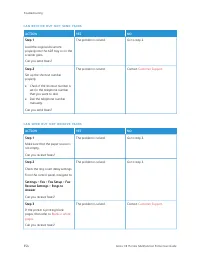
A AC CTTIIO ON N YYEESS N NO O SStteepp 441 Delete some held jobs to free up printer memory. 2 Resend the print job. Are the documents printed? The problem is solved. Go to step 5. SStteepp 551 Add printer memory. 2 Resend the print job. Are the documents printed? The problem is solved. Contact Cust...
Page 327 - P R I N T J O B S D O N O T P R I N T
A AC CTTIIO ON N YYEESS N NO O Is the printer printing slow? SStteepp 77 Remove held jobs. Is the printer printing slow? Go to step 8. The problem is solved. SStteepp 88 1 Make sure that the printer is not overheating. • Allow the printer to cool down after a long print job. • Observe the recommende...
Page 328 - T H E P R I N T E R I S N O T R E S P O N D I N G
A AC CTTIIO ON N YYEESS N NO O SStteepp 331 Check if the ports are working and if the cables are securelyconnected to the computer andthe printer. For more information, see thesetup documentation that camewith the printer. 2 Print the document. Is the document printed? The problem is solved. Go to s...
Page 330 - J O B P R I N T S F R O M T H E W R O N G T R AY O R O N T H E W R O N G PA P E R
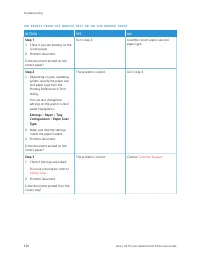
J O B P R I N T S F R O M T H E W R O N G T R AY O R O N T H E W R O N G PA P E R A AC CTTIIO ON N YYEESS N NO O SStteepp 11 1 Check if you are printing on the correct paper. 2 Print the document. Is the document printed on thecorrect paper? Go to step 2. Load the correct paper size andpaper type. S...
Page 331 - Issues with supplies; R E P L A C E C A R T R I D G E , P R I N T E R R E G I O N M I S M AT C H
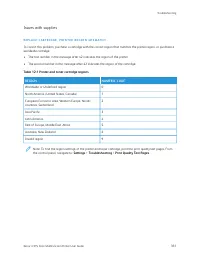
Issues with supplies R E P L A C E C A R T R I D G E , P R I N T E R R E G I O N M I S M AT C H To correct this problem, purchase a cartridge with the correct region that matches the printer region, or purchase aworldwide cartridge. • The first number in the message after 42 indicates the region of ...
Page 332 - N O N - X E R O X S U P P L I E S; of third-party supplies or parts may not be covered by the warranty.; S C A N N E R M A I N T E N A N C E R E Q U I R E D , U S E A D F K I T
N O N - X E R O X S U P P L I E S The printer has detected a non-Xerox supply installed in the printer. Your Xerox printer is designed to function best with genuine Xerox supplies. Use of third-party supplies can affectthe performance, reliability, or life of the printer and its imaging components. ...
Page 333 - Paper feed problems; PA P E R J A M S; Avoiding jams; Load paper properly; • Make sure that the paper lies flat in the tray.
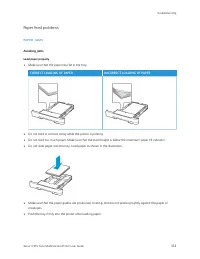
Paper feed problems PA P E R J A M S Avoiding jams Load paper properly • Make sure that the paper lies flat in the tray. C CO ORRRREEC CTT LLO OA AD DIIN NG G O OFF PPA APPEERR IIN NC CO ORRRREEC CTT LLO OA AD DIIN NG G O OFF PPA APPEERR • Do not load or remove a tray while the printer is printing. ...
Page 334 - Use recommended paper; • Use only recommended paper or specialty media.; Identifying Jam Locations; has been cleared. Check your printed output for blank pages.
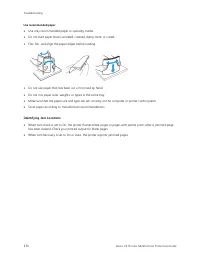
Use recommended paper • Use only recommended paper or specialty media. • Do not load paper that is wrinkled, creased, damp, bent, or curled. • Flex, fan, and align the paper edges before loading. • Do not use paper that has been cut or trimmed by hand. • Do not mix paper sizes, weights, or types in ...
Page 335 - Paper Jam in Tray 1
1. Automatic Document Feeder (ADF) 2. Standard Output Tray 3. Door A 4. Trays 5. Multipurpose Feeder 6. Manual Feeder Paper Jam in Tray 1 1. Remove the tray. Xerox ® C315 Color Multifunction Printer User Guide 335 Troubleshooting
Page 336 - Paper Jam in Door A; Paper Jam Below the Fuser; Open door A, and then open door B until it
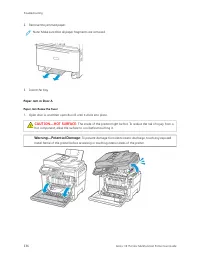
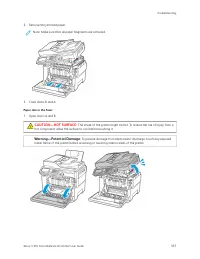
2. Remove the jammed paper. Note: Make sure that all paper fragments are removed. 3. Insert the tray. Paper Jam in Door A Paper Jam Below the Fuser 1. Open door A, and then open door B until it clicks into place. C CA AU UTTIIO ON N— —H HO OTT SSU URRFFA AC CEE:: The inside of the printer might be h...
Page 337 - Paper Jam in the Fuser; hot component, allow the surface to cool before touching it.
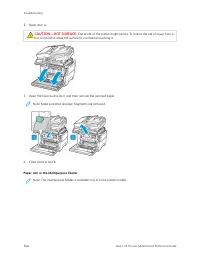
2. Remove the jammed paper. Note: Make sure that all paper fragments are removed. 3. Close doors B and A. Paper Jam in the Fuser 1. Open doors A and B. C CA AU UTTIIO ON N— —H HO OTT SSU URRFFA AC CEE:: The inside of the printer might be hot. To reduce the risk of injury from a hot component, allow ...
Page 338 - Paper Jam in the Duplex Unit
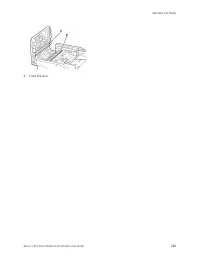
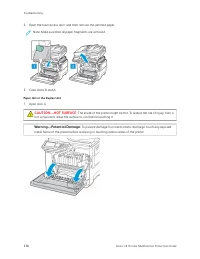
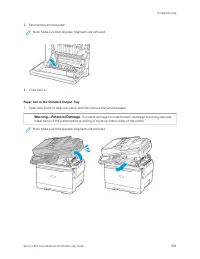
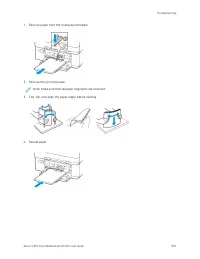
2. Open the fuser access door, and then remove the jammed paper. Note: Make sure that all paper fragments are removed. 3. Close doors B and A. Paper Jam in the Duplex Unit 1. Open door A. C CA AU UTTIIO ON N— —H HO OTT SSU URRFFA AC CEE:: The inside of the printer might be hot. To reduce the risk of...
Page 339 - Paper Jam in the Standard Output Tray; Note: Make sure that all paper fragments are removed.
2. Remove the jammed paper. Note: Make sure that all paper fragments are removed. 3. Close door A. Paper Jam in the Standard Output Tray 1. Open door B until it clicks into place, and then remove the jammed paper. W Waarrnniinngg— —PPootteennttiiaall D Daam maaggee:: To prevent damage from electrost...
Page 340 - Paper Jam in the Multipurpose Feeder
2. Open door A. C CA AU UTTIIO ON N— —H HO OTT SSU URRFFA AC CEE:: The inside of the printer might be hot. To reduce the risk of injury from a hot component, allow the surface to cool before touching it. 3. Open the fuser access door, and then remove the jammed paper. Note: Make sure that all paper ...
Page 342 - Paper Jam in the Manual Feeder; Remove the jammed paper.; Paper Jam in Door C; Remove all original documents from the ADF tray.
Paper Jam in the Manual Feeder 1. Remove the tray. 2. Remove the jammed paper. Note: Make sure that all paper fragments are removed. 3. Insert the tray. Paper Jam in Door C 1. Remove all original documents from the ADF tray. 342 Xerox ® C315 Color Multifunction Printer User Guide Troubleshooting
Page 344 - Paper frequently jams
Paper frequently jams A AC CTTIIO ON N YYEESS N NO O SStteepp 111 Remove the tray. 2 Check if paper is loaded correctly. • Make sure that the paper guides are positionedcorrectly. • Make sure that the stack height is below themaximum paper fillindicator. • Make sure to print on recommended paper siz...
Page 345 - Jammed pages are not reprinted; E N V E L O P E S E A L S W H E N P R I N T I N G
Jammed pages are not reprinted A AC CTTIIO ON N YYEESS N NO O 1 From the control panel, navigate to: SSeettttiinnggss > D Deevviiccee > N Noottiiffiiccaattiioonnss > JJaam m C Coonntteenntt RReeccoovveerryy 2 Select O Onn or A Auuttoo, then apply the changes. 3 Print the document. Are the j...
Page 346 - C O L L AT E D P R I N T I N G D O E S N O T W O R K
C O L L AT E D P R I N T I N G D O E S N O T W O R K A AC CTTIIO ON N YYEESS N NO O SStteepp 11 1 From the printer control panel, navigate to: SSeettttiinnggss > PPrriinntt > LLaayyoouutt >C Coollllaattee 2 Set Collate to O Onn. 3 Print the document. Are the pages collated correctly? The pr...
Page 347 - T R AY L I N K I N G D O E S N O T W O R K
T R AY L I N K I N G D O E S N O T W O R K A AC CTTIIO ON N YYEESS N NO O SStteepp 11 1 Check if the trays contain the same paper size and paper type. 2 Check if the paper guides are positioned correctly. 3 Print the document. Do the trays link correctly? The problem is solved. Go to step 2. SStteep...
Page 348 - Color quality problems; A D J U S T I N G T O N E R D A R K N E S S
Color quality problems A D J U S T I N G T O N E R D A R K N E S S 1. From the control panel, navigate to: SSeettttiinnggss > PPrriinntt > Q Quuaalliittyy > TToonneerr D Daarrkknneessss 2. Adjust the setting. 3. Apply the changes. M O D I F Y I N G T H E C O L O R S I N P R I N T E D O U T ...
Page 349 - FA Q A B O U T C O L O R P R I N T I N G; Modifying the colors in printed output
FA Q A B O U T C O L O R P R I N T I N G W Whhaatt iiss RRG GB B ccoolloorr?? RGB color is a method of describing colors by indicating the amount of red, green, or blue used to produce a certaincolor. Red, green, and blue light can be added in various amounts to produce a large range of colors obser...
Page 350 - T H E P R I N T A P P E A R S T I N T E D
• The Color Correction setting being used (Auto, Off, or Manual) • The type of object being printed (text, graphics, or images) • How the color of the object is specified in the software program (RGB or CMYK combinations) If the software program does not specify colors with RGB or CMYK combinations,...
Page 351 - Faxing problems; C A N N O T S E N D O R R E C E I V E FA X E S
Faxing problems C A N N O T S E N D O R R E C E I V E FA X E S A AC CTTIIO ON N YYEESS N NO O SStteepp 11 Resolve any error messages thatappear on the display. Can you send or receive a fax? The problem is solved. Go to step 2. SStteepp 22 Make sure that the cableconnections for the followingequipme...
Page 354 - C A N R E C E I V E B U T N O T S E N D FA X E S; C A N S E N D B U T N O T R E C E I V E FA X E S; Blank or white
C A N R E C E I V E B U T N O T S E N D FA X E S A AC CTTIIO ON N YYEESS N NO O SStteepp 11 Load the original documentproperly into the ADF tray or on thescanner glass. Can you send faxes? The problem is solved. Go to step 2. SStteepp 22 Set up the shortcut numberproperly. • Check if the shortcut nu...
Page 355 - P O O R FA X P R I N T Q U A L I T Y
P O O R FA X P R I N T Q U A L I T Y A AC CTTIIO ON N YYEESS N NO O SStteepp 11 Make sure that there are no printquality defects. 1 From the control panel, navigate to SSeettttiinnggss > TTrroouubblleesshhoooottiinngg> PPrriinntt Q Quuaalliittyy TTeesstt PPaaggeess. 2 Correct any print quality...
Page 356 - Scanning problems; C A N N O T S C A N F R O M A C O M P U T E R; PA R T I A L C O P I E S O F D O C U M E N T O R P H O T O
Scanning problems C A N N O T S C A N F R O M A C O M P U T E R A AC CTTIIO ON N YYEESS N NO O SStteepp 11 1 Turn off the printer, wait for about 10 seconds, then turn itback on. 2 Resend the scan job. Can you send the scan job? The problem is solved. Go to step 2. SStteepp 22 1 Make sure that the c...
Page 357 - P O O R C O P Y Q U A L I T Y
P O O R C O P Y Q U A L I T Y A AC CTTIIO ON N YYEESS N NO O SStteepp 11 1 Clean the scanner glass and the ADF glass with a damp, soft,lint-free cloth. If your printer hasa second ADF glass inside theADF, then also clean that glass. For more information, refer to Cleaning the Scanner . 2 Make sure t...
Page 358 - S C A N J O B W A S N O T S U C C E S S F U L; S C A N N E R D O E S N O T C L O S E
S C A N J O B W A S N O T S U C C E S S F U L A AC CTTIIO ON N YYEESS N NO O SStteepp 11 Check the cable connections. 1 Make sure that the Ethernet or USB cable is securely connectedto the computer and the printer. 2 Resend the scan job. Is the scan job successful? The problem is solved. Go to step ...
Page 359 - S C A N N I N G TA K E S T O O L O N G O R F R E E Z E S T H E C O M P U T E R; S C A N N E R D O E S N O T R E S P O N D; A D J U S T I N G S C A N N E R R E G I S T R AT I O N
S C A N N I N G TA K E S T O O L O N G O R F R E E Z E S T H E C O M P U T E R A AC CTTIIO ON N YYEESS N NO O Close all applications that areinterfering with the scan. Does scanning take too long orfreeze the computer? Contact Customer Support . The problem is solved. S C A N N E R D O E S N O T R E...
Page 360 - A D J U S T I N G A D F R E G I S T R AT I O N
2. From the Print Quick Test menu, select SSttaarrtt. 3. Place the Print Quick Test page on the scanner glass, then select FFllaattbbeedd RReeggiissttrraattiioonn. 4. From the Copy Quick Test menu, select SSttaarrtt. 5. Compare the Copy Quick Test page with the original document. Note: If the margin...
Page 361 - Contacting customer support; • Printer problem
Contacting customer support Before contacting customer support, make sure to have the following information: • Printer problem • Error message • Printer model type and serial number Go to e-mail or chat support, or browse through the library of manuals, support documentation, drivers, and otherdownl...
Page 363 - Regulatory Information; This appendix contains:
Xerox ® C315 Color Multifunction Printer User Guide 363 Regulatory Information This appendix contains: Basic Regulations . . . . . . . . . . . . . . . . . . . . . . . . . . . . . . . . . . . . . . . . . . . . . . . . . . . . . . . . . . . . . . . . . . . . . . . . . . . . . . . . . . . . . . . . . ....
Page 364 - Basic Regulations; N O I S E E M I S S I O N L E V E L S; Note: Some modes may not apply to your product.; E U R O P E A N U N I O N L O T 1 9 E C O D E S I G N D I R E C T I V E
Basic Regulations N O I S E E M I S S I O N L E V E L S The following measurements were made in accordance with ISO 7779 and reported in conformance with ISO9296. Note: Some modes may not apply to your product. 1 1--M MEETTEERR A AV VEERRA AG GEE SSO OU UN ND D PPRREESSSSU URREE,, D DB BA A Printing...
Page 365 - Product Power Consumption
T E M P E R AT U R E I N F O R M AT I O N Operating temperature and relative humidity 10 to 32.2°C (50 to 90°F) and 15 to 80% RH 15.3 to 32.2°C (60 to 90°F) and 8 to 80% RH Maximum wet bulb temperature 2 : 22.8°C (73°F) Non-condensing environment Printer, cartridge, or imaging unit long-termstorage ...
Page 367 - T E L E C O M M U N I C AT I O N R E G U L AT O R Y N O T I C E S; Regulatory Notices for Telecommunication Terminal Equipment
Off Mode If this product has an off mode which still consumes a small amount of power, then to completely stop productpower consumption, disconnect the power supply cord from the electrical outlet. Total Energy Usage It is sometimes helpful to estimate the total product energy usage. Since power con...
Page 368 - Notice to Users of the Canadian Telephone Network; This equipment uses CA11A telephone jacks.; Avis Réservé aux Utilisateurs du Réseau Téléphonique du Canada; Cet équipement utilise des prises de téléphone CA11A.; Notice to Users of the New Zealand Telephone Network
This equipment contains no user serviceable parts. For repair and warranty information, contact your point ofpurchase. Connection to party line service is subject to state tariffs. Contact the state public utility commission, public servicecommission, or corporation commission for information. If yo...
Page 369 - Verwendung dieses Produkts in Deutschland; Utilisation de ce produit en Suisse
This equipment should not be used under any circumstances that may constitute a nuisance to other Telecomcustomers. This equipment is not capable, under all operating conditions, of correct operation at the higher speeds for which itis designed. Telecom will accept no responsibility should difficult...
Page 370 - R E G U L AT O R Y N O T I C E S F O R W I R E L E S S P R O D U C T S; If in doubt as to whether your model is a wireless model, go to; Modular Component Notice; This device may not cause interference, and; Innovation, Sciences et Développement économique Canada; Cet appareil ne doit pas causer d'interférences et; European Union and European Economic Area Compliance; Restrictions
R E G U L AT O R Y N O T I C E S F O R W I R E L E S S P R O D U C T S This section contains regulatory information that applies only to wireless models. If in doubt as to whether your model is a wireless model, go to http://support.xerox.com . Modular Component Notice Wireless models contain modula...
Page 372 - G E R M A N Y; Blendschutz; T U R K E Y R O H S R E G U L AT I O N
W Weebb aaddddrreessss: https://www.xerox.com/en-us/about/ehs C Caallll ((U USS aanndd C Caannaaddaa oonnllyy)): 1–800–ASK-XEROX (1–800–275–9376) EEm maaiill: [email protected] I N N O VAT I O N , S C I E N C E A N D E C O N O M I C D E V E L O P M E N T C A N A D A C O M P L I A N C E S TAT E M E N...
Page 373 - U K R A I N E R O H S C O M P L I A N C E
U K R A I N E R O H S C O M P L I A N C E Обладнання відповідаєвимогам Технічного регламенту щодо обмеження використання деяких небезпечних речовин в електричному та електронному обладнані, затвердженого постановою Кабінету Міністрів України від 3 грудня 2008 № 1057. (The equipment complies with req...
Page 374 - Copy Regulations; U N I T E D S TAT E S
Copy Regulations U N I T E D S TAT E S Congress, by statute, has forbidden the reproduction of the following subjects under certain circumstances. Penaltiesof fine or imprisonment may be imposed on those guilty of making such reproductions. 1. Obligations or Securities of the United States Governmen...
Page 375 - C A N A D A
4. Certificate of Citizenship or Naturalization. Foreign Naturalization Certificates may be photographed. 5. Passports. Foreign Passports may be photographed. 6. Immigration papers. 7. Draft Registration Cards. 8. Selective Service Induction papers that bear any of the following Registrant’s informa...
Page 376 - O T H E R C O U N T R I E S
• Impressed or adhesive stamps used for the purpose of revenue by the Government of Canada or of a province or by the government of a state other than Canada • Documents, registers, or records kept by public officials charged with the duty of making or issuing certified copies thereof, where the cop...
Page 377 - Material Safety Data Sheets; • Other markets, send an email request to
Material Safety Data Sheets For Material Safety Data information regarding your printer, go to: • Web Address: https://safetysheets.business.xerox.com/en-us/ • United States and Canada: 1-800-ASK-XEROX (1-800-275-9376) • Other markets, send an email request to [email protected] Xerox ® C315 Color Mu...
Page 379 - Recycling and Disposal
Xerox ® C315 Color Multifunction Printer User Guide 379 Recycling and Disposal This appendix contains: Product Disposal and Recycling. . . . . . . . . . . . . . . . . . . . . . . . . . . . . . . . . . . . . . . . . . . . . . . . . . . . . . . . . . . . . . . . . . . . . . . . . . . . . . . . . . . ....
Page 380 - Product Disposal and Recycling
Product Disposal and Recycling Do not dispose of the printer or supplies in the same manner as normal household waste. Consult your localauthorities for disposal and recycling options. 380 Xerox ® C315 Color Multifunction Printer User Guide Recycling and Disposal
Page 381 - North America
North America Xerox operates an equipment take-back and reuse and recycle program. Contact your Xerox representative (1–800–ASK-XEROX) to determine if this Xerox product is part of the program. For more information about Xeroxenvironmental programs, go to https://www.xerox.com/en-us/about/ehs . Xero...
Page 382 - Xerox Green World Alliance; Go to
Xerox Green World Alliance The Xerox Green World Alliance Program allows you to return qualified supplies to Xerox for reuse or recycling. Onehundred percent of the empty cartridges returned to Xerox are either reused or de-manufactured for recycling. Theboxes used to return the cartridges are also ...
Page 383 - Waste from Electrical and Electronic Equipment (WEEE) Directive; I N D I A E - W A S T E N O T I C E
Waste from Electrical and Electronic Equipment (WEEE) Directive The WEEE logo signifies specific recycling programs and procedures for electronic productsin countries of the European Union. We encourage the recycling of our products. If you have further questions about recycling options, contact you...