Weber 7471001 - User Manual
Weber 7471001 Grill – User Manual, read for free online in PDF format. We hope this helps you resolve any issues you may have. If you have further questions, please contact us through the contact form.
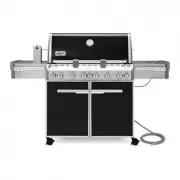
670
™
56701 08/15/11
US — ENGLISH
1
2
Support de l’égouttoir - 1
Clé - 1
Egouttoir jetable - 1
Egouttoir - 1
Grille de cuisson - 3
Grille de maintien au chaud - 1
Logement des piles - 1
Fourche de la rôtissoire - 4
Brôche de la rôtissoire - 1
Plateau-égouttoir amovible - 1
Moteur de la rôtissoire - 1
Barre Flavorizer
®
- 12
Barre du fumoir - 1
Boîtier du fumoir - 1
Tablette du brûleur latéral - 1
Tablette latérale - 1
Matériel:
Support - 4
Boulon hexagonal argenté
(1/4 - 20 x 5/8 po.) - 4
Vis - 3
Bouchon en plastique - 3
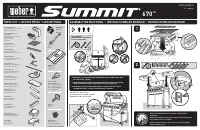
LISta dE PIEzaS
INStRUCtIONS dE mONtaGE
OUtILS NECESSaIRES:
m
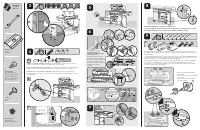
ImPORtaNt: POUR aLIGNER CORRECtEmENt LE CHaSSIS Et LES PORtES,
aSSEmbLEz LE GRILL SUR UNE SURFaCE PLaNE Et a NIVEaU.
• Ajustez la porte si nécessaire
Retirez la pellicule de protection de la surface inoxydable
avant d’utiliser le grill.
Catch Pan Holder - 1
Wrench - 1
Rotisserie Motor - 1
Slide Out Grease Tray - 1
Disposable Drip Pan - 1
Catch Pan - 1
Cooking Grate - 3
Warming Rack - 1
Battery Housing - 1
Rotisserie Fork - 4
Rotisserie Spit - 1
Flavorizer
®
Bar - 12
Smoker Bar - 1
Smoker Box - 1
Side Burner Table - 1
Side Table - 1
Hardware:
Bracket - 4
Silver Hex Bolt
(1/4 - 20 x 5/8 In.) - 4
Screw - 3
Plastic Plug - 3
PaRtS LISt •
aSSEmbLY INStRUCtIONS •
tOOLS NEEdEd:
m
ImPORtaNt: tO PROPERLY aLIGN FRamE aNd dOORS, aSSEmbLE GRILL ON a
FLat aNd LEVEL SURFaCE.
• Adjust doors, if necessary
Remove protective film from stainless surface before
using grill.
INStRUCCIONES dE mONtajE •
HerramientaERRamIENtaS REQUERIdaS:
m
ImPORtaNtE: PaRa aLINEaR CORRECtamENtE EL baStIdOR Y LaS PUERtaS,
aRmE La baRbaCOa SObRE UNa SUPERFICIE PLaNa Y HORIzONtaL.
Perno hexagonal plateado
(1/4 - 20 x 5/8 pulg.) - 4
LIStE dES PIèCES •
Sostenedor del plato recolector - 1
Llave - 1
Bandeja de goteo desechable - 1
Plato recolector - 1
Parrilla de cocción - 3
Rejilla para calentar - 1
Compartimiento de las baterías - 1
Horquilla del asador giratorio - 4
Espetón del asador giratorio - 1
Bandeja corrediza inferior - 1
Barras Flavorizer
®
- 12
Motor del asador giratorio - 1
Barra del ahumador - 1
Caja del ahumador - 1
Mesa del quemador lateral - 1
Mesa lateral - 1
Herrajes:
Soporte - 4
Tornillo - 3
Tapón plástico - 3
• Si fuese necesario, ajuste la puerta
Antes de instalar el componente, retire la película protectora
de la pieza de acero inoxidable.
"Loading the manual" means you need to wait until the file loads and becomes available for online reading. Some manuals are very large, and the time they take to appear depends on your internet speed.