Page 2 - DANGER; Important; co
2 Installation and Assembly m DANGER: This grill is not intended to be installed in or on recreational vehicles or boats. m WARNING: Do not use this grill unless all parts are in place and the grill was properly assembled according to the assembly instructions. m WARNING: Do not build this model of ...
Page 3 - TABLE OF CONTENTS
3 W elco m e t o Web er TABLE OF CONTENTS 2 Welcome to Weber Important Safety Information 4 The Weber Promise 5 Product Features GENESIS Features Hign Performance Grilling 6 Get ting Star ted Important Information about LP Gas & Gas Connections LP Tank Installation & Leak Checking Refilling ...
Page 4 - PROTECT; Shield your grill from the; The WEBER Promise
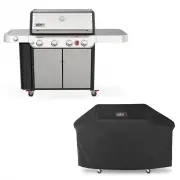
4 Th e W eb er P ro m is e PROTECT YOUR INVESTMENT Shield your grill from the elements with a heavy-duty premium grill cover. Thank you for purchasing a WEBER product. Weber-Stephen Products LLC, 1415 S. Roselle Road, Palatine, Illinois 60067 (“WEBER”) prides itself on delivering a safe, durable, an...
Page 5 - G E N E S I S; F E AT U R E S; H I G H
5 Pr od uc t F ea tur es G E N E S I S F E AT U R E S A Prep & Serve Table Use the side tables to keep platters, seasonings, and tools within arm’s reach. Hang your essential grilling tools on the hooks for easy access and organization of your backyard workspace. B WEBER CRAFTED Outdoor Kitchen ...
Page 6 - Important Information about
6 Ge tt in g S tar te d Important Information about LP Gas & Gas Connections What Is LP Gas? Liquefied petroleum gas, also called LP, LP gas, liquid propane, or simply propane or butane, is the flammable, petroleum-based product used to fuel your grill. It is a gas at moderate temperatures and p...
Page 7 - LP Tank Installation
7 Ge ttin g S tar te d LP Tank Installation Installation Location The tank is hung onto the tank scale which is located inside the cabinet. The shape of the collar assembly (the metal protective ring around the tank valve) determines one of two directions in which the tank will correctly hang on the...
Page 8 - Leak Checking
8 Ge tt in g S tar te d m DANGER: Do not use a flame to check for gas leaks. Be sure there are no sparks or open flames in the area while you check for leaks. m DANGER: Leaking gas may cause a fire or explosion. m DANGER: Do not operate the grill if there is a gas leak present. m DANGER: If you see,...
Page 9 - GRILLING PAN; TONGS; BRUSH
9 Ge ttin g S tar te d C D Refilling or Replacing an LP Tank How Much Fuel is in the Tank? The tank scale indicates the amount of fuel in a standard 20 pound (9.07 kg) tank once the tank is hung from the scale. The fuel level is checked by viewing the red level indicator arrow on the front of the gr...
Page 10 - The Very First Time You Grill; Every Time You Grill
10 Op er at ion The Very First Time You Grill Perform an Initial Burn-Off Heat the grill on the highest setting, with the lid closed, for at least 20 minutes prior to grilling for the first time. Every Time You Grill Meal-to-Meal Maintenance The Meal-To-Meal Maintenance plan includes the following s...
Page 11 - Igniting the Grill
11 A B C D E Op er at ion m WARNING: Open lid during ignition. m WARNING: Do not lean over open grill while igniting or cooking. m WARNING: Each burner must be ignited individually by pushing the electronic ignition button. m WARNING: If ignition does not occur within four seconds of attempting to l...
Page 12 - Using the sear zone
12 Op er at ion B Using the sear zone Searing is a direct grilling technique used on meats, such as steak, poultry parts, fish and chops. Searing browns the surface of the food at a high temperature. By searing both sides of the meat, you caramelize the food surface, creating a more desirable flavor...
Page 13 - I N D I R E C T H E AT; Direct or Indirect; D I R E C T H E AT; S E T U P; BARBECUE; ones are insulated and protect; Tip
13 I N D I R E C T H E AT S E T U P Use the indirect method for larger cuts of meat that require 20 minutes or more of grilling time, or for foods so delicate that direct exposure to the heat would dry them out or scorch them, such as: roasts, bone-in poultry pieces, whole fish, delicate fish fillet...
Page 14 - Discover What's Possible; WEBER CRAFTED Outdoor Kitchen Collection Ready
14 Ti ps an d H in ts B Discover What's Possible WEBER CRAFTED Outdoor Kitchen Collection Ready This feature is only available on select models. Some models are Outdoor Kitchen Collection Ready with the included Grates and Frame. Remove the right-hand cooking grate. Place the Frame on the right-hand...
Page 15 - Grilling Do’s and Don’ts
15 Preheat each and every time. If the cooking grates aren’t hot enough, food will stick, and you will likely never have a chance of searing properly or developing those handsome grill marks. Even if a recipe calls for medium or low heat, always preheat the grill on the highest setting first. Open t...
Page 16 - Using the Smoker Box
16 Ti ps an d H in ts Real Smoke Flavor Using the Smoker Box This feature is only available on select models. Use dry wood chips in the smoker box as they ignite quickly and create smoke faster. For longer cooking foods such as roasts, chicken, and turkeys, etc., fill the entire legth of the smoker ...
Page 17 - WEBER CRAFTED Grill Locker; Storage Hooks; Using the Expandable Top
17 Tip s and H in ts Extra on the Side Grilling at Night This feature is only available on select models. Using the Grill Lighting To activate the grill light press the awake button. The grill light has a tilt sensor that will turn on the light if the grill lid is opened and turn off the light when ...
Page 18 - Cleaning and Maintenance
18 Pr od uc t C ar e m WARNING: Turn your grill off and wait for it to cool before thoroughly cleaning. m WARNING: Over time, the development of rough surfaces can form on the FLAVORIZER BARS. Wearing gloves is recommended when handling. Do not clean FLAVORIZER BARS or cooking grates in a sink, dish...
Page 19 - GRILL BRUSH; A must-use before you even dream; FOIL PANS; Perfect for lining the; Pr
19 Cleaning the Heat Deflectors Located under the burners, the heat deflectors distribute heat evenly throughout the cookbox while cooking. Keeping heat deflectors clean will enhance the cooking performance of your grill.1) Scrape the heat deflectors with a plastic scraper (G) . 2) If necessary, br...
Page 20 - REPLACEMENT; To obtain replacement parts,; Lighting Your Grill with a Match
20 Tr oub le sho ot in g REPLACEMENT PARTS To obtain replacement parts, contact the local retailer in your area or log onto weber.com. MAIN BURNER(S) WILL NOT IGNITE SYMPTOM • Main burners do not ignite when following the electronic ignition instructions in the “Operation” section of this owner's ma...
Page 21 - GAS FLOW
21 Proper Burner Flame Pattern The burners in your grill were factory set for the correct air and gas mixture. When the burners are performing correctly, you will see a specific flame pattern. The tips may occasionally flicker yellow (A) , with a descending light blue (B) to dark blue flame (C) . m ...
Page 22 - CALL; If you are still experiencing any
22 Tr oub le sho ot in g CALL CUSTOMER SERVICE If you are still experiencing any problems, contact the Customer Service Representative in your area using the contact information on weber.com. GREASY GRILL (Peeling Paint & Flare-Ups) SYMPTOM • Inside of lid appears to have the appearance of peeli...
Page 24 - Grilling Guide; DON'T FORGET TO REGISTER; ill
24 Grilling Guide Type Thickness/Weight Approximate Total Grill Time RED MEAT Steak: New York strip, porterhouse, rib-eye, T-bone, and filet mignon (tenderloin) ¾ inch (19 mm) thick 4 to 6 minutes direct high heat 1 inch (25 mm) thick 6 to 8 minutes direct high heat 2 inches (5 cm) thick 14 to 18 mi...