Page 2 - Table of contents
2 Dear customer! Thank you for purchasing our product. For safety, it is strongly recommended to read this manual carefullybefore connecting, operating and/or adjusting the product and keep the manual for reference in the future. Table of contents Table of contents .....................................
Page 3 - Important safeguards
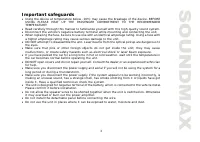
3 Important safeguards Using the device at temperature below -10º may cause the breakage of the device. BEFORE USING PLEASE HEAT UP THE PASSENGER COMPARTMENT TO THE RECOMMENDED TEMPERATURE! Read carefully through this manual to familiarize yourself with this high-quality sound system. Disconnect the...
Page 4 - Installation/Connections; Before the installation
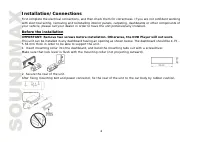
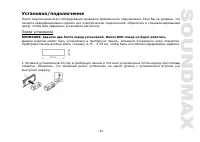
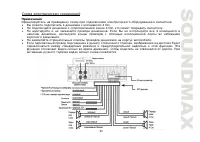
4 Installation/Connections First complete the electrical connections, and then check them for correctness. If you are not confident workingwith electrical wiring, removing and reinstalling interior panels, carpeting, dashboards or other components ofyour vehicle, please call your dealer in order to ...
Page 6 - Electrical connections; Speaker Wiring Notes
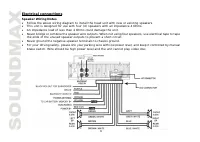
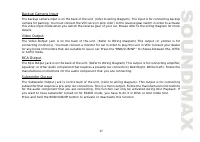
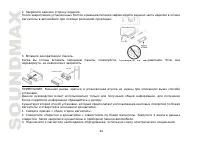
6 Electrical connections Speaker Wiring Notes Follow the above wiring diagram to install the head unit with new or existing speakers.This unit is designed for use with four (4) speakers with an impedance 4 Ohms.An impedance load of less than 4 Ohms could damage the unit.Never bridge or combine the s...
Page 7 - Using the ISO Connector
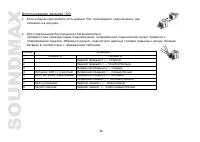
7 Using the ISO Connector 1. If your car is equipped with the ISO connector, then connect the ISO connectors asillustrated. 2. For connections without the ISO connectors, check the wiring in the vehicle carefully beforeconnecting, incorrect connection may cause serious damage to this unit.Cut the co...
Page 8 - Panel controls; Front panel
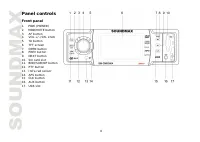
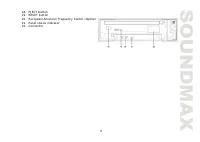
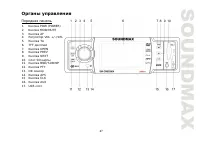
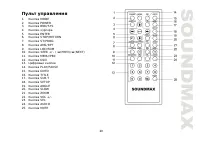
8 Panel controls Front panel 1. POW (POWER)2. MOD/MUTE button3. AF button4. VOL +/-/SEL knob5. TA button6. TFT screen7. OPEN button8. PREV button9. NEXT button10. SD card slot11. BND/SUB/NP button12. PTY button13. Infra red sensor14. APS button15. CLK button16. AUX button17. USB slot
Page 10 - Remote control; Changing the battery
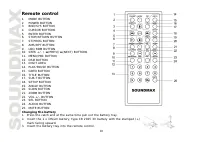
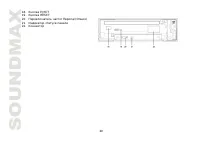
10 Remote control 1. MODE BUTTON2. POWER BUTTON3. BND/SYS BUTTON4. CURSOR BUTTONS5. ENTER BUTTON6. STOP/RETURN BUTTON7. ST/PROG BUTTON8. AMS/RPT BUTTON9. LOC/RDM BUTTON10. SEEK +/- / (PREV)/ (NEXT) BUTTONS 11. MENU/PBC BUTTON12. OSD BUTTON13. DIGIT AREA14. PLAY/PAUSE BUTTON15. GOTO BUTTON16. TITLE B...
Page 11 - Glossary; Title
11 Glossary PBC (PlayBack Control) PlayBack Control is a menu recorded on the disc with SVCD or VCD2.0 format. For the discs contained PBC, it canplayback interactive software with the menu displayed on TV. And if the disc contains still images, it canplayback high definition of still image. Title T...
Page 12 - Features; Fully compatible
12 Features Fully compatible Fully compatible with the most popular discs’ formats such as DVD, CD, CD-R (containing MP3, JPEG), CD-RWrepresented in the market. Upgrade intelligently Support the function of upgrading the software for playing discs of new formats to keep up with the marketcompetition...
Page 13 - Compatible discs
13 Compatible discs DVD VideoDVD disc include video and audio data. The data can contained by the 12 cm diameter of DVD disc is 7 times ofone can contained by the common CD-R disc. Its maximum continuous playback time can be up to 2 hours (oneof double-sided disc can be up to 4 hours). DVD disc sort...
Page 14 - Discs for playback
14 CD-R/CD-RWCompatible with CD-R/CD-RW disc with ISO9660 specification include the format of MP3, JPG, JPEG, Ac3, PCM,MP4, MPEG.DVD+/-RCompatible with DVD+/-R disc with UDF specification include the format of MP3, JPG, JPEG, Ac3, PCM, MP4,MPEG4, DivX (3.11/4.0/5.0/6.XX). Note: Support of MPEG4 Stan...
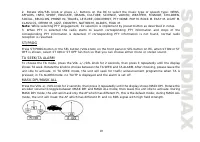
Page 16 - General operation; Mode Selection
16 General operation Power ON/OFF Press POW button on the front panel or POWER button on the RC to turn the unit on . Press it again to turn the unit off. Mode Selection Press MOD/MUT button on the front panel or MODE button on the RC to cycle the Play Mode: AUX => TUNER(RADIO) => DISK => U...
Page 17 - Radio Operations
17 Clock display Press the CLK button to display the clock. To set the clock press and hold the button until the hour becomes whitein color. Rotate the VOL knob to set hours, then press the VOL knob for the minutes to become white in colorand rotate the VOL knob to set. Press the CLK button again or...
Page 20 - BEEP
20 RETUNE S/L - SHORT/LONG "RETUNE" refers to the time period the unit allows for radio scan when reception is interrupted. 'S' representsa time period of 30 seconds and 'L' represents a time period of 90 seconds. BEEP Turn BEEP ON if you want the pressing of buttons to be sounded.Press SEL ...
Page 21 - DVD operations
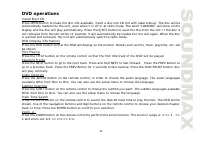
21 DVD operations Insert/Eject CDPress OPEN button to make the disc slot available, insert a disc into CD slot with label side up. The disc will beautomatically loaded into the unit, even when it is off or at radio mode. The word “LOADING” will show on thedisplay and the disc will play automatically...
Page 26 - Other operations; AUX input
26 RANDOM Press LOC/RDM button if you want the files to play in random order. RANDOM will be displayed on the screen.Press this button one more time to cancel random function. RANDOM OFF will be displayed on the screen. Electronic Shock Protection Electronic Shock Protection (ESP) is ideal for drivi...
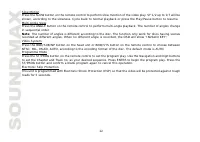
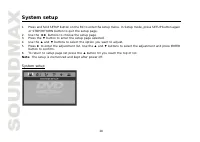
Page 28 - Note: The setup is memorized and kept after power off.; System setup
28 System setup 1. Press and hold SETUP button on the RC to enter the setup menu. In Setup mode, press SETUP button again or STOP/RETURN button to quit the setup page. 2. Use the buttons to choose the setup page. 3. Press the button to enter the setup page selected. 4. Use the and buttons to select ...
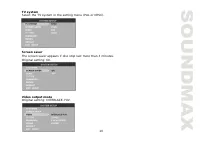
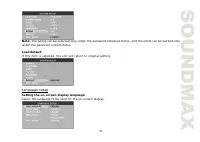
Page 31 - Language setup
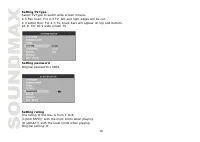
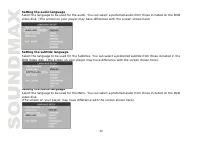
31 Note: The rating can be selected only under the password unlocked status, and the limits can be worked onlyunder the password locked status. Load defaultIf this item is selected, the unit will return to original setting. Language setup Setting the on-screen display languageSelect the language to ...
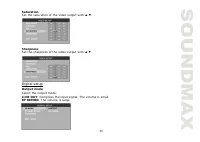
Page 33 - Audio setup
33 Audio setup Digital outputSelect digital output format. SPDIF/OFF : There is no signal output from coaxial or optical output. SPDIF/RAW : When the unit is connected with the amplifier by coaxial or optical connecter, please select this mode. SPDIF/PCM : When the unit is connected with the two-cha...
Page 34 - Video setup
34 Video setup BrightnessSet the brightness of the video output with . ContrastSet the contrast of the video output with . HueSet the hue of the video output with .
Page 35 - Digital setup
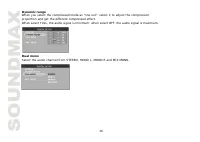
35 SaturationSet the saturation of the video output with . SharpnessSet the sharpness of the video output with . Digital setup Output modeSelect the output mode:LINE OUT: Compress the input signal. The volume is small.RF REMOD: The volume is large.
Page 38 - Cleaning the cabinet
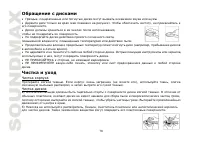
38 Handling discs Dirty, scratched or warped discs may cause skip ping or noise.Handle the disc only by the edges. To keep clean do not touch its surface.Discs should be stored in their cases after use to avoid scratches.Do not expose discs to direct sunlight, high humidity, high temperature or dust...
Page 39 - Troubleshooting guide
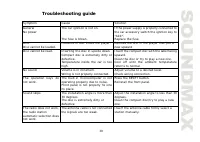
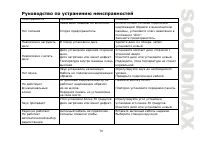
39 Troubleshooting guide Symptom Cause Solution GeneralNo power The car ignition is not on. The fuse is blown. If the power supply is properly connected tothe car accessory switch the ignition key to“ACC”.Replace the fuse. DiscDisc cannot be loaded. Presence of disc inside the player. Remove the dis...
Page 40 - Specification; General
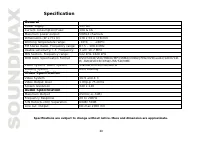
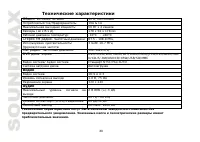
40 Specification Specifications are subject to change without notice. Mass and dimension are approximate. General Power supply: 12V DC Current consumption/Fuse: 10A & 1A Maximum power output: 50Wx4 channels Dimensions (W x H x D) 178 x 50 x 178 mm Working temperature range: -10º - +60º FM Stereo...
Page 41 - DVD
41 ! . , , . ........................................................................................................................................................... 41 ...................................................................................................................................
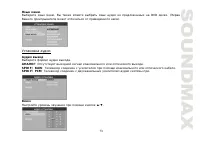
Page 56 - MODE; Mute
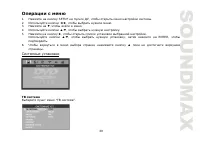
56 POW POWER , . , . MODE MOD/MUT MODE – AUX => TUNER (RADIO) => DISK => USB => CARD. : USB, CARD, DISK , USB , . SEL ( VOL) SEL , : VOL => BAS => TRE => BAL => FAD => LOUD => LOC => ST => EQ. VOL VOL+/VOL- , . LOUD VOL/SEL “LOUD OFF” (“LOUD ON”). , ON ( ) OFF ( )...
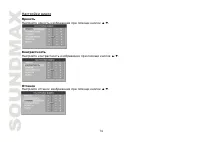
Page 59 - PTY
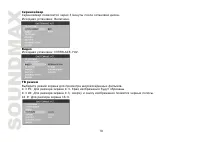
59 FM APS AMS/RPT , FM , , . RDS : PI, TP, PTY, TA, AF. PI: . TP: – , . TA: – . AF: – , . TA ( , ) , . CD . TA , , . AF ( ) , , . . AF, AF. AF , RDS . , . PTY 1. PTY , PTY. 2. VOL/SEL +/- , : NEWS, AFFAIRS, INFO, SPORT, EDUCATE, DRAMA, CULTURE, SCIENCE, VARIED, WEATHER, FINANCE, CHILDREN,SOCIAL, REL...
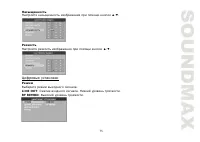
Page 66 - RANDOM
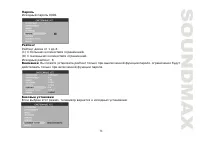
66 VCD/CD : OPEN, . . , . , LOADING, . : EJECT, . . , 12 . , , . CD CD . . SEEK + /(NEXT) , . , . SEEK - /(PREV) , . , . AUDIO : Mono L --> Mono R --> Stereo. VCD2.0 MENU/PBC . RANDOM LOC/RDM, . “RANDOM” . , .. “RANDOM OFF” .
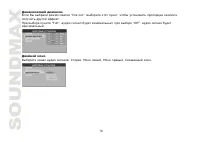
Page 67 - AUX
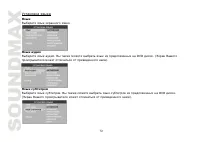
67 . VCD– 10 , CD - 10 , MP3 - 120 . , . ID3 MP3 ID3 , . ID3 , . ID3 : ROOT )----FILE ( )-----TITLE ( )-----ARTIST ( )-----ALBUM ( ). USB/SD USB SD . . MOD/MUT MODE , . “ ”. AUX AUX . RCA AUX IN. RCA , , DVD . Mode AUX. . ( . “ ”). ,