Page 2 - Table of contents
2 Dear customer! Thank you for purchasing our product. For safety, it is strongly recommended to read this manual carefully beforeconnecting, operating and/or adjusting the product and keep the manual for reference in the future. Table of contents Table of contents......................................
Page 3 - Important safeguards; BEFORE USING PLEASE HEAT
3 Important safeguards · Using the device at temperature below -10º may cause the breakage of the device. BEFORE USING PLEASE HEAT UP THE PASSENGER COMPARTMENT TO THE RECOMMENDED TEMPERATURE! · Read carefully through this manual to familiarize yourself with this high-quality sound system. · Disconne...
Page 4 - Installation/Connections; Before the installation
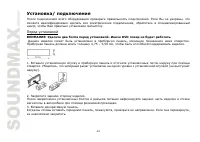
4 Installation/Connections First complete the electrical connections, and then check them for correctness. If you are not confident working withelectrical wiring, removing and reinstalling interior panels, carpeting, dashboards or other components of yourvehicle, please call your dealer in order to ...
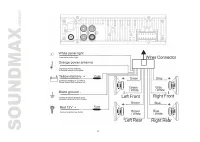
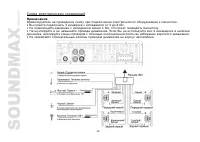
Page 5 - Electrical connections; Speaker Wiring Notes; ends of the unused speaker outputs to prevent a short circuit.
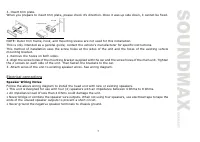
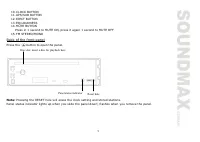
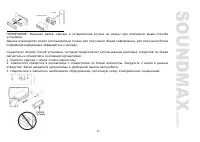
5 3. Insert trim plate.When you prepare to insert trim plate, please check it s direction. Once it was up side down, it cannot be fixed. NOTE: Outer trim frame, hook, and mounting sleeve are not used for this installation.This is only intended as a general guide; contact the vehicle's manufacturer f...
Page 7 - Using the ISO Connector
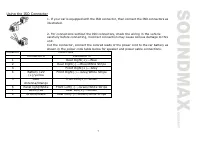
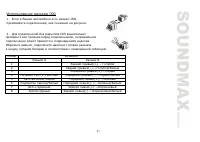
7 Using the ISO Connector 1. If your car is equipped with the ISO connector, then connect the ISO connectors asillustrated. 2. For connections without the ISO connectors, check the wiring in the vehiclecarefully before connecting, incorrect connection may cause serious damage to thisunit.Cut the con...
Page 8 - Panel controls; Front panel
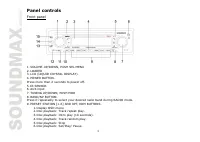
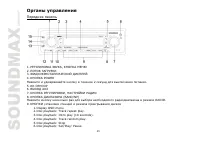
8 Panel controls Front panel 1. VOLUME-UP/DOWN, PUSH SEL MENU2. LOADER3. LCD (LIQUID CRYSTAL DISPLAY).4. POWER BUTTON.Press more than 2 seconds to power off.5. IR SENSOR6. AUX input7. TUNING UP/DOWN, PUSH MOD8. BAND/NP BUTTON.Press it repeatedly to select your desired radio band during RADIO mode.9....
Page 9 - Press in 1 second to MUTE ON, press it again 1 second to MUTE OFF; Back of the front panel; Press the
9 10. CLOCK BUTTON11. APS/SUB BUTTON12. EJECT BUTTON13. EQ/LOUDNESS14. MUTE BUTTON Press in 1 second to MUTE ON, press it again 1 second to MUTE OFF 15. FM STEREO/MONO Back of the front panel Press the button to open the panel. Note: Pressing the RESET hole will erase the clock setting and stored st...
Page 10 - ISO connector; PLEASE USE ONLY ORIGINAL CONNECTOR WHICH GOES WITH SET.
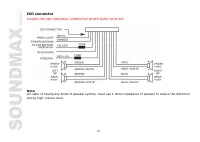
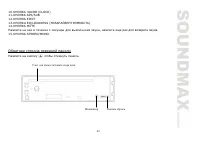
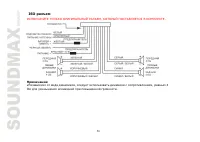
10 ISO connector PLEASE USE ONLY ORIGINAL CONNECTOR WHICH GOES WITH SET. Note: · In spite of having any kinds of speaker system, must use 4 ohms impedance of speaker to reduce the distortion during high volume level.
Page 11 - Remote control
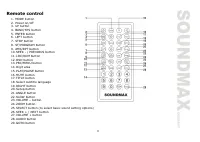
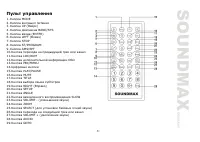
11 Remote control 1. MODE button2. Power on/off3. UP button4. BAND/SYS button5. ENTER button6. LEFT button7. STOP button8. ST/PROGRAM button9. AMS/RPT button10. SEEK - / PREVIOUS button11. LOC/RDM button12. OSD button13. PBC/MENU button14. Digit area15. PLAY/PAUSE button16. MUTE button17. TITLE butt...
Page 12 - Battery information of remote controller; Press the catch and at the same time pull out the battery tray.
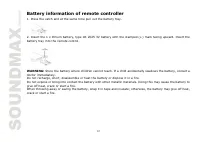
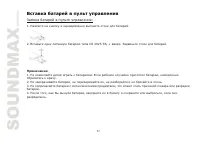
12 Battery information of remote controller 1. Press the catch and at the same time pull out the battery tray. 2. Insert the 1 x lithium battery, type CR 2025 3V battery with the stamped (+) mark facing upward. Insert thebattery tray into the remote control. WARNING: Store the battery where children...
Page 13 - Glossary; Title
13 Glossary PBC (PlayBack Control) PlayBack Control is a menu recorded on the disc with SVCD or VCD2.0 format. For the discs contained PBC, it canplayback interactive software with the menu displayed on TV. And if the disc contains still images, it can playbackhigh definition of still image. Title T...
Page 14 - Features; Fully compatible
14 Features Fully compatible Fully compatible with the most popular discs formats such as DVD, CD, CD-R (containing MP3, JPEG), CD-RWrepresented in the market. Upgrade intelligently Support the function of upgrading the software for playing discs of new formats to keep up with the marketcompetition....
Page 15 - Compatible discs; DVD Video
15 Compatible discs DVD Video DVD disc include video and audio data. The data can contained by the 12 cm diameter of DVD disc is 7 times of onecan contained by the common CD-R disc. Its maximum continuous playback time can be up to 2 hours (one ofdouble-sided disc can be up to 4 hours). DVD disc sor...
Page 17 - General operation; Power button; POWER; Mode Selection
17 General operation Power button Press POWER button on the front panel or any other button on the panel except EJECT to turn on the unit. Press POWER to switch the set to POWER OFF. When you switch off the system or car ignition, the settings, tuner presets and the volume level will be retained in ...
Page 19 - Digital tuner; Choose Radio Band; MO/ST operation which may cut down some reception noise.; Local/Distance Control
19 Digital tuner Choose Radio Band Press the MODE Button to access the radio function. The unit comes with five bands- three FM Bands (FM1, FM2,and FM3) and two AM Bands (MW1, and MW2). Each of the five bands can store up to six preset stations, for a totalof 30 preset memory stations. Radio Tune / ...
Page 20 - Automatic Store/Preset Scan; B. Scan Saved Stations
20 Automatic Store/Preset Scan A. Automatic Scan & Store While listening to the FM Radio, press and hold the APS Button for 3 seconds. The receiver will automatically scanand save stations for all the 3 FM Bands, whichever band (FM1, 2 or 3) you are listening to.While listening to the AM Radio, ...
Page 21 - Discs for playback
21 DVD/VCD/CD/MP3/CD-R Discs for playback · This set can play all digital audio CD, HDCD, CD-R/RW, MP3,WMA, VCD, SVCD, DVD, DVD-ROM. · The following file types are supported: Audio files: MP3 (*.mp3) WMA (*.wma)Video files: MP4 (*.avi, DIVX3.11/4.0/5.0 /6.XX and XVID) MPEG 2(*.vob) MPEG 1(*.dat)Pict...
Page 23 - Audio Selection
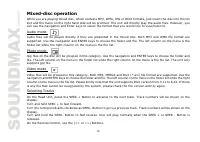
23 Button 2: Right + Repeat Press the No.2 Button to navigate the setup menu right-ward. Press and hold the button for 3 seconds forrepeating the same track continuously. RPT" will appear on the display. Press and hold this button again to stoprepeating. Button 3: Up + Scanning Tracks Press the ...
Page 27 - The functions of button 1-6 also apply to the mixed-disc play.; Back to the menu
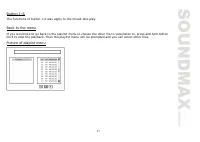
27 Button 1-6 The functions of button 1-6 also apply to the mixed-disc play. Back to the menu If you would like to go back to the playlist menu to choose the other file to view/listen to, press and hold buttonNo.5 to stop the playback. Then the playlist menu will be prompted and you can select other...
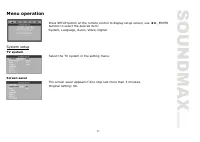
Page 31 - Menu operation; buttons to select the desired item:; System setup; TV system; Select the TV system in the setting menu.; Screen saver
31 Menu operation Press SETUP button on the remote control to display setup screen, use , ENTER buttons to select the desired item: System, Language, Audio, Video, Digital. System setup TV system Select the TV system in the setting menu. Screen saver The screen saver appears if disc stop last more t...
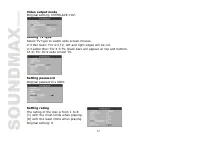
Page 32 - Select TV type to watch wide screen movies.; Setting password
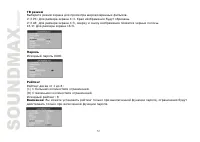
32 Video output mode Original setting: INTERLACE-YUV. Setting TV type Select TV type to watch wide screen movies. 4:3 Pan Scan : For 4:3 TV, left and right edges will be cut. 4:3 Letter Box : For 4:3 TV, black bars will appear on top and bottom. 16:9 : For 16:9 wide screen TV. Setting password Origi...
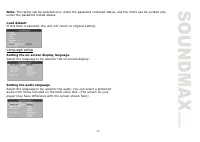
Page 33 - under the password locked status.; Load default; If this item is selected, the unit will return to original setting.; Language setup; Setting the on-screen display language; Select the language to be used for the on-screen display.; Setting the audio language
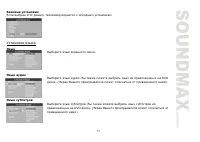
33 Note: The rating can be selected only under the password unlocked status, and the limits can be worked only under the password locked status. Load default If this item is selected, the unit will return to original setting. Language setup Setting the on-screen display language Select the language ...
Page 34 - Audio setup; Digital output; Select digital output format.
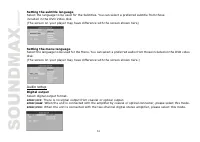
34 Setting the subtitle language Select the language to be used for the Subtitles. You can select a preferred subtitle from thoseincluded in the DVD Video disk.(The screen on your player may have difference with the screen shown here) Setting the menu language Select the language to be used for the ...
Page 35 - Setting volume; Setup the volume with the; Video setup; Brightness; Set the brightness of the video output with; Contrast; Set the contrast of the video output with; Hue; Set the hue of the video output with
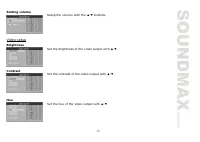
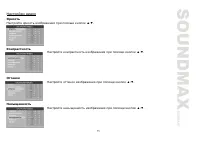
35 Setting volume Setup the volume with the buttons. Video setup Brightness Set the brightness of the video output with . Contrast Set the contrast of the video output with . Hue Set the hue of the video output with .
Page 36 - Saturation; Set the saturation of the video output with; Sharpness; Set the sharpness of the video output with; Digital setup; Output mode; Select the output mode:; LINE OUT
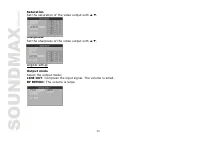
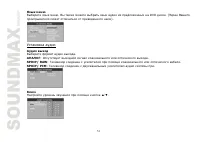
36 Saturation Set the saturation of the video output with . Sharpness Set the sharpness of the video output with . Digital setup Output mode Select the output mode: LINE OUT : Compress the input signal. The volume is small. RF REMOD : The volume is large.
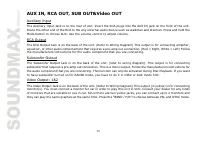
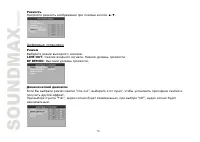
Page 37 - Select the audio channel from STEREO, MONO L, MONO R and MIX MONO.
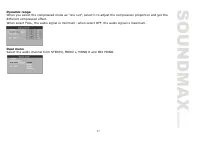
37 Dynamic range When you select the compressed mode as line out , select it to adjust the compression proportion and get thedifferent compressed effect.When select FULL, the audio signal is minimum; when select OFF, the audio signal is maximum. Dual mono Select the audio channel from STEREO, MONO L...
Page 39 - Handling discs; Dirty, scratched or warped discs may cause skip ping or noise.; Cleaning; Cleaning the cabinet
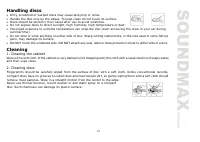
39 Handling discs · Dirty, scratched or warped discs may cause skip ping or noise. · Handle the disc only by the edges. To keep clean do not touch its surface. · Discs should be stored in their cases after use to avoid scratches. · Do not expose discs to direct sunlight, high humidity, high temperat...
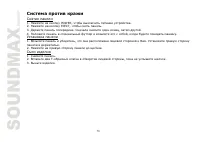
Page 40 - Troubleshooting guide
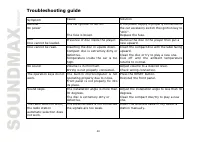
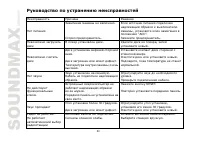
40 Troubleshooting guide Symptom Cause Solution GeneralNo power The car ignition is not on. The fuse is blown. If the power supply is properly connected tothe car accessory switch the ignition key to ACC . Replace the fuse. DiscDisc cannot be loaded. Presence of disc inside the player. Remove the di...
Page 41 - Specification; Maximum power output:; DVD Deck Specification
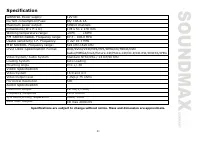
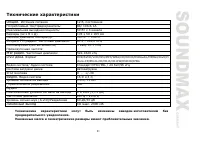
41 Specification Specifications are subject to change without notice. Mass and dimension are approximate. General. Power supply: 12V DC Current consumption/Fuse: 8A/ 10A & 1A Maximum power output: 50Wx4 channels Dimensions (W x H x D) 178 x 51 x 178 mm Working temperature range: -20º - +60º FM S...
Page 44 - DVD
44 / . , , , . : . DVD . , . 4,75 5,56 , . 1. . , ( ). 2. . . 3. . , , . , .
Page 47 - ISO
47 ISO 1. ISO, , . 2. ISO , . , . A B 1 (+)--- 2 (-)--- 3 (+)--- 4 12 (+)/ (-)--- 5 / (+)--- 6 ((-)--- 7 ACC+/ (+)--- 8 (-)---
Page 54 - icture CD Photo CD
54 1. DVD, CD, CD-R ( MP3, JPEG), CD-RW, . 2. , . 3. , 2- , , . 4. icture CD, Photo CD icture CD Photo CD . . 5. (Screen Saver) (Screen Saver). 5 , Screen Saver. .
Page 56 - DivX
56 Photo-CD Photo-CD . Photo-CD , , Konica. CD-R/CD-RW CD-R/CD-RW ISO9660, 3, JPG, JPEG, Ac3, PCM, MP4, MPEG. DVD+/-R DVD+/-R UDF, 3, JPG, JPEG, Ac3, PCM, MP4, MPEG4, DivX (3.11/4.0/5.0 /6.XX ). : MPEG4: , DivX 3.11, DivX 4.0, DivX5.0, DivX 6.XX ( DivX , ).
Page 58 - LOUD; LOUD ON
58 LOUD EQ/LUD, . LOUD ON LOUD OFF. . 1. CLK 3 , . . 2. , . 3. VOL, . . 4. , . 5. CLK , . EJECT, . RESET, . EQ/LUD . : CLASS POP ROCK FLAT OFF
Page 62 - OSD; PBC
62 ( ) 1 OSD . . , . . DVD ( ) . . LOC/MENU PBC . PBC , . TITLE , . . . . . . . . , , . . 1: + OSD 1-6 . Setup ( 6 ) . . 1 . 3 .
Page 63 - AUDIO
63 2: 2 . 3 . RPT". . Button 3: + 3 . 3 10 . INT". . 4: 4 . 3 . RDM . . 5: 5 . 3 . 5 . 6: SETUP + 6 . , , , , , . 1-5 . 6 . 3 . . MO/ST AUDIO . , . .
Page 68 - CD
68 VCD/CD : EJECT, . . , . , LOAD, . : EJECT, . . , 5 . , , . : MP3, JPEG, . CD CD . . . . . . . . , , . . 1-6 1-6 (OSD, INTRO, REPEAT, RANDOM, STOP & PLAY/PAUSE) VCD/CD .
Page 71 - SETUP
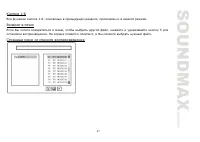
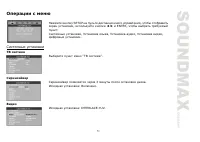
71 SETUP , , ENTER, : , , , , . . 3 . : . : INTERLACE-YUV.