Page 2 - Table of contents
2 Dear customer! Thank you for purchasing our product. For safety, it is strongly recommended to read this manual carefully before connecting, operating and/or adjusting the product and keep the manual for reference in the future. Table of contents Table of contents ....................................
Page 3 - Important safeguards
3 Important safeguards • Read carefully through this manual to familiarize yourself with this high-quality sound system. • Disconnect the vehicle's negative battery terminal while mounting and connecting the unit. • When replacing the fuse, be sure to use one with an identical amperage rating. Using...
Page 4 - Installation/Connections; Parts List
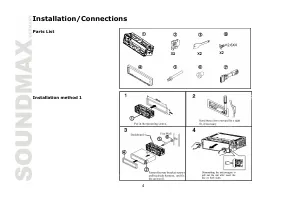
4 Installation/Connections Parts List Installation method 1
Page 6 - Connection diagram
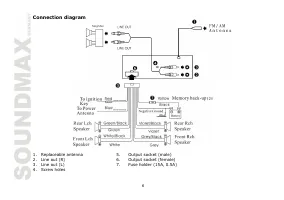
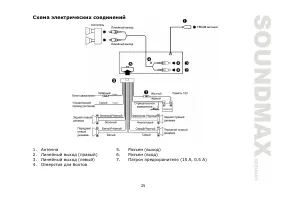
6 Connection diagram 1. Replaceable antenna 5. Output socket (male) 2. Line out (R) 6. Output socket (female) 3. Line out (L) 7. Fuse holder (15A, 0.5A) 4. Screw holes
Page 7 - Panel controls; Front panel; Inner
7 Panel controls Front panel 1. RESET button 2. POWER button 3. VOL knob (volume) 4. SEL button 5. TA button 6. SCAN button 7. MU button (mute) 8. DSP button 9. MOD button (mode) 10. Infra red sensor 11. BND button (band) 12. / buttons 13. AF button 14. PTY button 15. AMS button Inner panel 16. Numb...
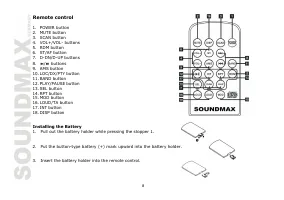
Page 8 - Remote control; Installing the Battery
8 Remote control 1. POWER button 2. MUTE button 3. SCAN button 4. VOL+/VOL- buttons 5. RDM button 6. ST/AF button 7. D-DN/D-UP buttons 8. / buttons 9. AMS button 10. LOC/DX/PTY button 11. BAND button 12. PLAY/PAUSE button 13. SEL button 14. RPT button 15. MOD button 16. LOUD/TA button 17. INT button...
Page 9 - General operations
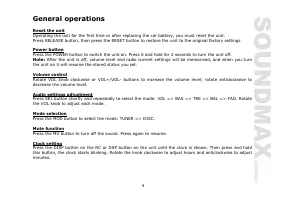
9 General operations Reset the unit Operating the unit for the first time or after replacing the car battery, you must reset the unit. Press RELEASE button, then press the RESET button to restore the unit to the original factory settings. Power button Press the POWER button to switch the unit on. Pr...
Page 12 - MP3 overview; Notes on MP3; Notes on creating your own CD-Rs or CD-RWs containing MP3 files
12 MP3 overview Notes on MP3 • MP3 is short for MPEG Audio Layer 3 and refers to an audio compression technology standard. • This product allows playback of MP3 files on CD-ROM, CD-R or CD-RW discs. • The unit can read MP3 files written in the format compliant with ISO 9660. However it does not supp...
Page 13 - Radio operations; BAND selection
13 Radio operations Note: RDS (Radio Data System) service availability varies with areas. Please understand if RDS service is not available in you area, the following service is not available, either. BAND selection Press the BND button on the panel or the BAND button on the remote control repeatedl...
Page 14 - Loud mode; Radio functions setting
14 Loud mode Press and hold for 3 seconds the LOUD/TA button on the RC to increase bass output. Stereo mode Press the ST/AF button on the remote control to select stereo or mono reception for FM radio stations. Stereo reception is activated when “AF” appears in the display. Note: You can sometimes i...
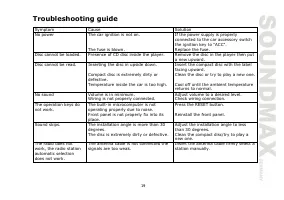
Page 19 - Troubleshooting guide
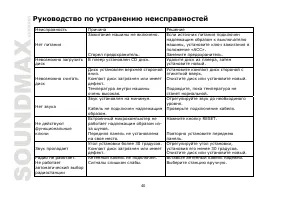
19 Troubleshooting guide Symptom Cause Solution No power The car ignition is not on. The fuse is blown. If the power supply is properly connected to the car accessory switch the ignition key to "ACC". Replace the fuse. Disc cannot be loaded. Presence of CD disc inside the player. Remove the ...
Page 20 - Specification
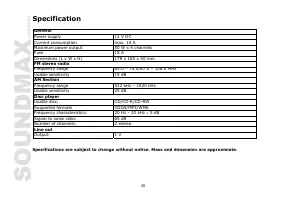
20 Specification Specifications are subject to change without notice. Mass and dimension are approximate. General Power supply 12 V DC Current consumption max. 14 A Maximum power output 50 W x 4 channels Fuse 15 A Dimensions (L x W x H) 178 x 165 x 50 mm FM stereo radio Frequency range 65.0 – 74.0/8...
Page 21 - Содержание
21 Уважаемый покупатель ! Благодарим Вас за покупку нашего изделия . Для обеспечения безопасности рекомендуется тщательно изучить настоящее руководство перед подключением , эксплуатацией и / или регулировкой изделия , и сохраняйте руководство для использования в будущем . Содержание Содержание ........
Page 23 - Перечень
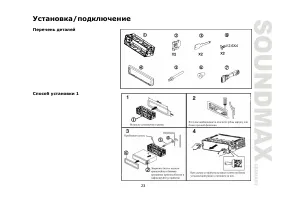
23 Установка / подключение Перечень деталей Способ установки 1
Page 26 - Передняя
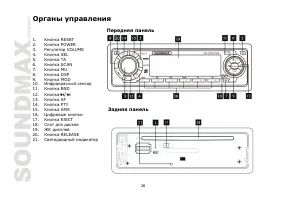
26 Органы управления Передняя панель 1. Кнопка RESET 2. Кнопка POWER 3. Регулятор VOLUME 4. Кнопка SEL 5. Кнопка TA 6. Кнопка SCAN 7. Кнопка MU 8. Кнопка DSP 9. Кнопка MOD 10. Инфракрасный сенсор 11. Кнопка BND 12. Кнопка / 13. Кнопка AF 14. Кнопка PTY 15. Кнопка AMS Задняя панель 16. Цифровые кнопк...
Page 27 - Установка
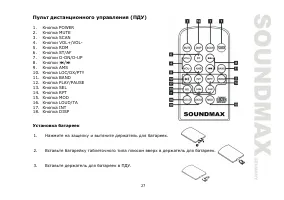
27 Пульт дистанционного управления ( ПДУ ) 1. Кнопка POWER 2. Кнопка MUTE 3. Кнопка SCAN 4. Кнопки VOL+/VOL- 5. Кнопка RDM 6. Кнопка ST/AF 7. Кнопки D-DN/D-UP 8. Кнопки / 9. Кнопка AMS 10. Кнопка LOC/DX/PTY 11. Кнопка BAND 12. Кнопка PLAY/PAUSE 13. Кнопка SEL 14. Кнопка RPT 15. Кнопка MOD 16. Кнопка...
Page 30 - Intro
30 Случайное воспроизведение Во время воспроизведения трека нажмите на кнопку RDM, чтобы начать случайное воспроизведение всех треков . Нажмите еще раз , чтобы отменить функцию . Функция Intro Вы можете последовательно воспроизводить начало каждого трека в течение 10 секунд . Во время воспроизведени...
Page 35 - LOUD
35 Нажмите и удерживайте кнопку А MS в течение 3 секунд для активации функции автоматического сохранения станций . Найденные станции сохраняются в памяти под цифровыми кнопками (1-6). Примечание : В каждом диапазоне может быть сохранено до 6 станций . Режим LOUD Нажмите и удерживайте в течение 3 сек...
Page 39 - Чистка
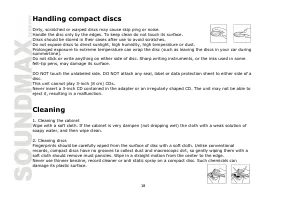
39 • Не подвергайте диски действию прямого солнечного света , повышенной влажности , повышенным температурам или действию пыли . • Продолжительное влияние предельных температур может изогнуть диск ( например , пребывание дисков в автомобиле в летнее время ). • Не царапайте и не пишите что - либо на ...
Page 41 - FM
41 Технические характеристики Технические характеристики могут быть изменены заводом - изготовителем без предварительного уведомления . Указанные масса и геометрические размеры имеют приблизительные значения . Общие Источник питания 12 В , постоянное Максимальная выходная мощность 50 Вт х 4 канала П...