Page 2 - manual for reference in the future.; Table of contents
2 Dear customer! Thank you for purchasing our product. For safety, it is strongly recommended to read this manual carefully before connecting, operating and/or adjusting the product and keep the manual for reference in the future. Table of contents TABLE OF CONTENTS ....................................
Page 3 - Important safeguards
3 Important safeguards Read carefully through the manual to familiarize yours with this high-quality sound system. Disconnect the vehicle's negative battery terminal while mounting and connecting the unit. When replacing the fuse, be sure to use one with an identical amperage rating. Using a fuse wi...
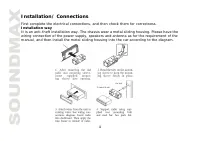
Page 4 - Installation/ Connections; Installation way
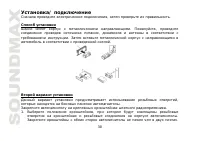
4 Installation/ Connections First complete the electrical connections, and then check them for correctness. Installation way It is an anti-theft installation way. The chassis wear a metal sliding housing. Please have the wiring connection of the power supply, speakers and antenna as for the requirem...
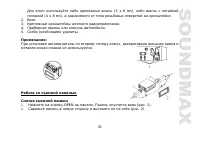
Page 5 - Detaching the control panel
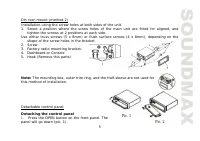
5 Pic. 1 Din rear-mount (method 2)Installation using the screw holes at both sides of the unit. 1. Select a position where the screw holes of the main unit are fitted for aligned, and tighten the screws at 2 positions at each side. Use either truss screws (5 x 8mm) or flush surface screws (4 x 8mm),...
Page 6 - Attaching the control panel
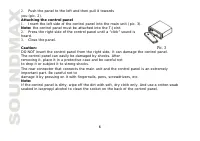
6 2. Push the panel to the left and then pull it towards you (pic. 2). Attaching the control panel 1. Insert the left side of the control panel into the main unit (pic. 3). Note: the control panel must be attached into the T-Joint. 2. Press the right side of the control panel until a “click” sound i...
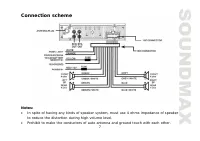
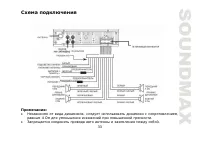
Page 7 - Connection scheme
7 Connection scheme Notes: In spite of having any kinds of speaker system, must use 4 ohms impedance of speakerto reduce the distortion during high volume level.Prohibit to make the conductors of auto antenna and ground touch with each other.
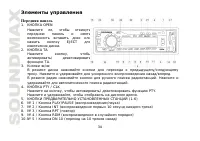
Page 8 - Panel controls; Front panel
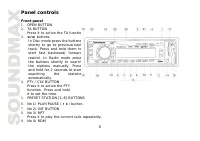
8 Panel controls Front panel 1. OPEN BUTTON 2. TA BUTTON Press it to active the TA function. 3. / buttons In Disc mode press the buttons shortly to go to previous/next track. Press and hold them to start fast backward/ forward rewind. In Radio mode press the buttons shortly to search the stations ma...
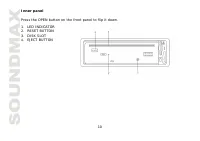
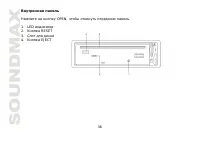
Page 10 - Inner panel; Press the OPEN button on the front panel to flip it down.
10 Inner panel Press the OPEN button on the front panel to flip it down. 1. LED INDICATOR 2. RESET BUTTON 3. DISK SLOT 4. EJECT BUTTON
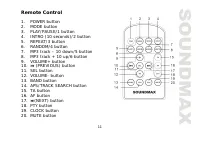
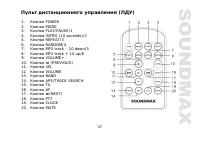
Page 11 - Remote Control
11 Remote Control 1. POWER button 2. MODE button3. PLAY/PAUSE/1 button4. INTRO (10 seconds)/2 button5. REPEAT/3 button 6. RANDOM/4 button7. MP3 track – 10 down/5 button8. MP3 track + 10 up/6 button9. VOLUME+ button 10. (PREVIOUS) button 11. SEL button12. VOLUME- button13. BAND button 14. APS/TRACK S...
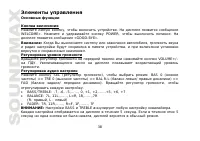
Page 12 - Functions of controls; FAD. Rotate the VOL knob to adjust each mode.
12 Functions of controls General operations Power button Press any button to switch the unit on. The display will show a message “WELCOME”. Press and hold the POWER button to switch the unit off. The display will show a message “GOOD- BYE”. Volume control Rotate the VOL knob (VOL knob / SEL button) ...
Page 13 - Radio operations
13 Mute function Press the MUTE button to cancel the sound. Press it again or VOL +/ - to resume. Subwoofer control Press and hold the BAND/ SUB button to turn the Subwoofer output ON. An external amplifier is required to operate a subwoofer. Beep Sound Off function Press the VOLUME knob / SEL until...
Page 14 - Automatic store, Automatic scan; Select a station by
14 and clear frequency station. Repeat to seek more stations in your listening area with a strong signal. Mono/ Stereo control (in FM radio mode) Press the VOLUME knob / SEL button until the display shows “ST ON” or “ST OFF” (MONO). Turn the VOLUME knob to switch between ON or OFF. Improvement of re...
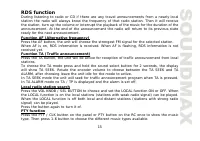
Page 15 - RDS function; ready for the next announcement.; Local radio station search; Press the button again to turn it of.; PTY function
15 RDS function During listening to radio or CD if there are any travel announcements from a nearly local station the radio will always know the frequency of that radio station. Then it will receive the station, turn up the volume or interrupt the playback of the music for the duration of the announ...
Page 16 - program for you to choose.; Function Mask DPI- Mask all; Press the sound select button for 2 seconds.
16 Press the PTY / SLK button twice to show the speech type program. Then press 1-6 button to choose the different speech type program. Each number key will show 3 different speech program for you to choose. Function Mask DPI- Mask all Press the sound select button for 2 seconds. Press the SEL butto...
Page 19 - Intro playback
19 Intro playback You can play the beginning of every track for 10 seconds in sequence. Press the No 2 / INT button to start intro play. The display will show “INT”. Press again to cancel. ID3 Tag function (for MP3/ WMA modes) If a MP3 file has ID3 Tag information it will be displayed on the LCD. If...
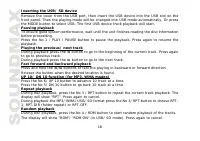
Page 20 - AUX IN; Pres the MODE button to choose AUX.; RCA line out
20 In the USB drive has loose files and folders containing files, it will play the loose sequentially, then it will play the files in the folders sequentially. AUX IN Insert the supplied AUX IN cable’s stereo plug into the AUX IN jack on the panel of the unit. Pres the MODE button to choose AUX. Con...
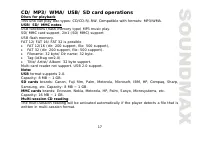
Page 21 - Notes on MP3 and WMA; does not support the MP3 data written by the method of packet write.
21 Notes on MP3 and WMA MP3 is short for MPEG Audio Layer 3 and refers to an audio compression technology standard. This product allows playback of MP3 files on CD-ROM, CD-R or CD-RW discs. The unit can read MP3 files written in the format compliant with ISO 9660. However it does not support the MP3...
Page 22 - Notes on creating your own CD-Rs or CD-RWs containing MP3 files
22 Notes on creating your own CD-Rs or CD-RWs containing MP3 files To enjoy high quality sound, we recommend converting to MP3 files with a sampling frequency of 44.1 kHz and a fixed bit rate o f 128 kbps. DO NOT store more than 256 MP3 files per disc. For ISO 9660 - compliant format, the maximum al...
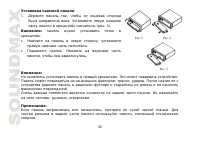
Page 23 - Handling compact discs; Cleaning
23 2. Insert both T-Keys into hole on the front of the set until they lock. 3. Pull out the unit. Handling compact discs Dirty, scratched or warped discs may cause skip ping or noise. Handle the disc only by the edges. To keep clean do not touch its surface. Discs should be stored in their cases aft...
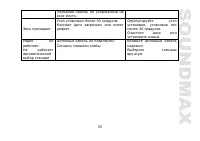
Page 24 - Troubleshooting guide; Cause
24 Troubleshooting guide Symptom Cause Solution GeneralNo power The car ignition is not on. The fuse is blown. If the power supply is properly connected to the car accessory switch the ignition key to “ACC”. Replace the fuse. DiscDisc cannot be loaded. Presence of disc inside the player. Remove the ...
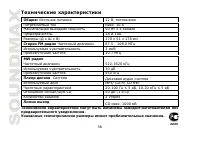
Page 26 - Specification; FM stereo radio Frequency range
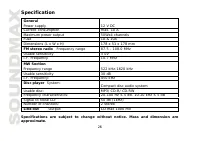
26 Specification Specifications are subject to change without notice. Mass and dimension are approximate. GeneralPower supply 12 V DC Current consumption max. 10 A Maximum power output 50Wx4 channels Fuse 1A & 10A Dimensions (L x W x H) 178 x 51 x 178 mm FM stereo radio Frequency range 87.5 - 10...
Page 31 - OPEN
31 (5 8 ), (4 8 ), . 2. . 3. . 4. . 5. ( ). : , . 1. OPEN . ( . 1). 2. ( . 2).
Page 38 - BASS TREBLE
38 , . WELCOME». POWER, . «GOOD-BYE». : , , . VOLUME+/- . . SEL ( ), : BAS 0 ( ) => TRE 0 ( ) => BAL R-L ( / ) => FAD ( / ). , . BASS/TREBLE: -7, -6, -5,......, 0, +1, +2,......+5, +6, +7 BALANCE: 7L, 11L,......, L=R, 1R,......,7R (R- , L - ) FADER: 7R, 11R,......, R=F, 1F,......, 7F : BASS...
Page 39 - ON
39 MODE, : AUX => RADIO => DISK => USB => CARD ( , ). : USB, CARD, DISK , . VOLUME/SEL , «LOUD OFF». , ON OFF. . MUTE, . VOL+/ -, . BAND/ SUB, . . VOLUME/SEL, “Beep On”. , / . VOLUME/SEL , : CLASS => POP => ROCK => FLAT. PTY/CLK 3 . , .
Page 40 - «ST ON»
40 , – . PTY/CLK . CLK, . B ND / SUB, : FM1, FM2, FM3, AM1, 2. 6 , 30. / , . 2 / , . , . / ( FM ) VOLUME / SEL «ST ON» «ST OFF» ( ). , / . , « », . F / PS 3 . . F/ PS , .
Page 41 - RDS
41 APS , . , APS. 30 (18 FM, 12 AM) . : ( ). / . (1-6) 2 , . : ( ). Preset (1-6), . RDS CD . , . . AF ( ) AF, FM . AF , RDS . «AF» , RDS .
Page 42 - PTY
42 TA ( ) TA, . TA, 2 , TA SEEK. , TA SEEK TA ALARM, . TA SEEK , TA. TA ALARM «TA/TP» , . / SEL, ( ) (LOC). , . , , . PTY PTY / CLK PTY , . 1-6, . PTY , . 1-6, . 3 . Mask DPI- Mask all . SEL, «Mask DPI». , MASK DPI MASK ALL.
Page 43 - SEL
43 . MASK DPI, (AF), , PI, AF. MASK ALL, , , PI, RDS. Retune S/L – Short/ Long TA. SEL 2 «TA SEEK». SEL, «RETUNE_S». VOL+/- «RETUNE_S» «RETUNE_L». «RETUNE_S».
Page 44 - USB
44 CD / SD / USB : CD/CD-R/-RW. : MP3/WMA. USB/ SD/ MMC MP3 USB ( ). SD/ MMC, 2 1 (SD/MMC). USB . FAT 12/ FAT 16/ FAT 32 FAT 12/ 16 ( 200 , 500 ), FAT 32 ( 200 , 500 ). : 32 / : 32 . (id3tag ver 2.0) / / : 32 . . USB 2.0. : USB: USB 2.0. : 8 M ~ 1 . SD: SD : Cannon, Fuji film, Palm, Motorola, Micros...
Page 46 - Intro
46 No 6 / UP 10, 10 . No 5 / DN 10, . No 3 / R , . «RPT». , . MP3/ WMA/ USB/ SD No 3/ RPT, RPT-1, RPT-DIR ( ) RPT-OFF. No 4 / RDM, . «RDM»/ «RDM ON» ( USB/ SD). , . Intro 10 . No 2 / INT, . «INT». , . ID3 Tag ( MP3/ WMA ) MP3 ID3 Tag, . .
Page 48 - RCA
48 AUX IN AUX IN . MODE, AUX. , DVD VCD AUX IN . , . RCA , , ( = , = ). BND / SUB, / .
Page 49 - WMA; MPEG 3
49 3 WMA 3 MPEG 3 . 3 CD-ROM, CD-R CD-RW. 3, , ISO 9660. 3, . 3, , “.mp3”. 3 , “.mp3”, . , “ MP3” ”, PC “ ” “ ” . 8, . 256. . , , 3. 8 VBR, , . VBR: . WMA . ID3 WMA , .