Page 2 - ENGLISH
ENGLISH 3 - 26 Thank you for choosing our product. We advise you to read this manual carefully. It contains all necessary instructions for maintaining unaltered the appearance and functional qualities of the oven.
Page 3 - Contents
Contents 1. INSTRUCTIONS FOR USE ................................................................ 4 2. SAFETY PRECAUTIONS ................................................................... 6 3. ENVIRONMENTAL RESPONSIBILITY ............................................... 8 4. DESCRIPTION OF CONTROLS...
Page 4 - General instructions; INSTRUCTIONS FOR USE
General instructions 1. INSTRUCTIONS FOR USE THIS MANUAL IS AN INTEGRAL PART OF THE APPLIANCE. IT MUST BE KEPT IN ITS ENTIRETY AND IN AN ACCESSIBLE PLACE FOR THE WHOLE WORKING LIFE OF THE HOB. WE ADVISE YOU TO READ THIS MANUAL AND ALL THE INFORMATION IT CONTAINS CAREFULLY BEFORE USING THE HOB. ALSO ...
Page 6 - SAFETY PRECAUTIONS; DO NOT REMOVE THIS PLATE ON THE CASING FOR ANY REASON.
General instructions 2. SAFETY PRECAUTIONS REFER TO THE INSTALLATION INSTRUCTIONS FOR THE SAFETY REGULATIONS FOR ELECTRIC OR GAS APPLIANCES AND VENTILATION FUNCTIONS. IN YOUR INTERESTS AND FOR YOUR SAFETY THE LAW REQUIRES THAT THE INSTALLATION AND SERVICING OF ALL ELECTRICAL APPLIANCES IS CARRIED OU...
Page 7 - DO NOT MODIFY THIS APPLIANCE
General instructions DO NOT LET CHILDREN GO NEAR THE APPLIANCE WHEN IT IS IN OPERATION OR PLAY WITH IT AT ANY TIME. DO NOT INSERT POINTED METAL OBJECTS (CUTLERY OR UTENSILS) INTO THE SLITS IN THE APPLIANCE. DO NOT USE STEAM JETS FOR CLEANING THE APPLIANCE. THE STEAM COULD REACH THE ELECTRONICS, DAMA...
Page 8 - Instructions for disposal; ENVIRONMENTAL RESPONSIBILITY; Our environmental responsibility; Your old appliance also needs to be disposed of correctly.; Important; : hand over your appliance to the local agency authorised for
Instructions for disposal 3. ENVIRONMENTAL RESPONSIBILITY 3.1 Our environmental responsibility Adequate differentiated collection for the subsequent forwarding of the decommissioned product to recycling, processing and ecologically compatible disposal contributes to avoiding possible negative effect...
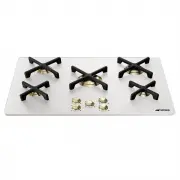
Page 9 - Instructions for the user; DESCRIPTION OF CONTROLS; Control area; CONTROL ZONE; To light the flame, press the knob and, at the same time, turn it
Instructions for the user 4. DESCRIPTION OF CONTROLS 4.1 Control area All the hob controls are grouped together on the front central area. CONTROL ZONE KNOB DESCRIPTION To light the flame, press the knob and, at the same time, turn it anticlockwise to the maximum flame symbol . To adjust the flame, ...
Page 10 - Positioning the racks
Instructions for the user 5. USING THE HOB Do not place anything, e.g. flame tamer, asbestos mat, between pan and pan supports as serious damage to the appliance may result. Do not remove the pan support and enclose the burner with a wok stand as this will concentrate and deflect heat onto the hotpl...
Page 11 - INCORRECT; Lighting the burners using a safety device
Instructions for the user At the ends of the legs of the racks there are silicone rests with a hole that must be centred onto the matching fixing pins on the hob. To position the rack, you first need to centre the fastening pins ( 1 ) and ( 2 ) and then lower it until it is resting on the hob. When ...
Page 12 - Practical tips for using the burners; Pan diameters; BURNERS
Instructions for the user 5.3 Practical tips for using the burners For better burner performance and minimum gas consumption, pans with flat, even bases and with lids should be used, and their size should be in propor tion to the burner (see “5.5 Pan diameters”). During cooking, in order to avoid bu...
Page 13 - CLEANING AND MAINTENANCE; switch off the power supply to the appliance; To clean and preserve the glass and brass surfaces, always use; only; specific; How to use; : pour the product onto a damp cloth and wipe the surface, rinse
Instructions for the user 6. CLEANING AND MAINTENANCE Before performing any operations requiring access to powered parts, switch off the power supply to the appliance 6.1 Cleaning the hob To keep the hob in good condition it should be cleaned regularly after use. Let it cool first. 6.1.1 Ordinary da...
Page 14 - Cleaning parts; The flame-spreader crowns can be removed. Wash them with; completely dry; and
Instructions for the user 6.2 Cleaning parts 6.2.1 Knobs The knobs should be cleaned with a soft cloth dampened with warm water, then dried carefully. For ease of cleaning they can be extracted by pulling upwards. Do not use aggressive products containing alcohol or products for cleaning steel and g...
Page 15 - Instructions for the installer; POSITIONING ON THE HOB TOP; Fixing to the supporting structure; from the rear edge.; c o m b u s t i b l e shelf o r; that may be installed
Instructions for the installer 7. POSITIONING ON THE HOB TOP The following operation requires building and/or carpentry work so must be carried out by a competent tradesman. Installation can be carried out on various materials such as masonry, metal, solid wood or plastic laminated wood as long as t...
Page 16 - Carefully trim the surplus away from edge; to the inside
Instructions for the installer Carefully position the supplied insulating seal on the outer perimeter of the hole made in the counter top as indicated in the figures below, trying to make it stick on the entire surface by applying light pressure on it with your hands. Depending on the hob model to b...
Page 17 - Clearances above and around domestic appliances; REQUIREMENTS
Instructions for the installer 7.2 Clearances above and around domestic appliances Extract from AS5601 REQUIREMENTS 1 Overhead clearances – (Measurement A) Range hoods and exhaust fans shall be installed in accordance with the manufacturer ’s instructions. However, in no case shall the clearance bet...
Page 18 - NOTES; Combustion gas discharge
Instructions for the installer 3 Additional requirements for Freestanding and Elevated Cooking Appliaces – (Measurements D & E) Where D, the distance from the periphery of the nearest burner to a horizontal combustible surface is less than 200 mm, then E shall be 10 mm or more, or the horizontal...
Page 19 - ELECTRICAL CONNECTION; Do not remove this plate for any; Avoid the use of adapters and shunts.
Instructions for the installer 8. ELECTRICAL CONNECTION Make sure that the voltage and capacity of the power line conform to the data shown on the plate located under the casing. Do not remove this plate for any reason . The plug at the end of the supply cable and the wall socket must be of the same...
Page 20 - Gas connection; regulator supplied must be fitted to the gas inlet.
Instructions for the installer 9. GAS CONNECTION 9.1 Gas connection This appliance is suitable for installation with Natural Gas or ULPG (propane/butane). Refer to page 24 for the relevant burner pressure and appropriate injector sizes. When the appliance is to be connected to Natural Gas then the p...
Page 21 - Connection to liquid gas; ph “3.2 Burner and nozzle characteristics table”.; Ventilation in the room containing the appliance
Instructions for the installer 9.2 Connection to liquid gas Use a pressure regulator and make the connection on the gas cylinder following the guidelines set out in the regulations in force. Make sure that the supply pressure complies with the values indicated in the paragra ph “3.2 Burner and nozzl...
Page 22 - ADAPTATION TO DIFFERENT TYPES OF GAS; Removing the hob top; • Take out all the knobs (
Instructions for the installer 10. ADAPTATION TO DIFFERENT TYPES OF GAS Before carrying out the following operations, disconnect the appliance from the power supply The appliance is tested with NG (Natural Gas) at a pressure of 1kPa. If other types of gas are to be used, the nozzles must be replaced...
Page 23 - Replacement of nozzles on the cooker hob
Instructions for the installer 10.2 Replacement of nozzles on the cooker hob Unscrew screw C and push air regulator D as far as it will go. Using a 7-mm wrench, remove nozzle E and replace it with the appropriate nozzle, following the instructions in the tables for the type of gas to be used. The no...
Page 24 - Burner and nozzle characteristics table; Burner
Instructions for the installer 10.3 Burner and nozzle characteristics table Burner ULPG - 2.75 kPa Nominal gas consumption (MJ/h) Injector (1/100 mm) Auxiliary 4.1 54 Semi-Rapid 6.0 67 Medium-Rapid 9.5 85 Large-Rapid 11.5 95 Burner Natural Gas - 1.0 kPa Nominal gas consumption (MJ/h) Injector (1/100...
Page 25 - Primary air adjustment; Refers to distance; Adjusting the minimum for town and natural gas; minimum position
Instructions for the installer 10.4 Primary air adjustment Refers to distance “ X ” in mm. BURNER ULPG 2.75 kPa Natural Gas 1.0 kPa Auxiliary 7 1 Semi-Rapid 2 0.5 Medium-Rapid 2 1 Large-Rapid 10 1.5 To identify the burners on your hob, please refer to the illustrations in “10.7 Arrangement of the bu...
Page 26 - Adjusting the minimum setting for liquid gas; Type of burner; Lubrication of gas taps; This procedure must be carried out by a specialised technician
Instructions for the installer 10.6 Adjusting the minimum setting for liquid gas To adjust the minimum setting with liquid gas, you must tighten the screw inside or next to the tap rod (depending on the model) fully in a clockwise direction. The by-pass diameters for each individual burner are given...
Page 28 - Space for rating plate