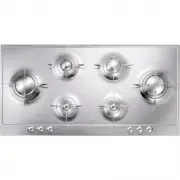
Smeg P106 - User Manual
Smeg P106 Hob – User Manual, read for free online in PDF format. We hope this helps you resolve any issues you may have. If you have further questions, please contact us through the contact form.
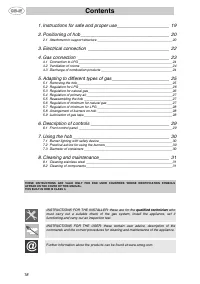
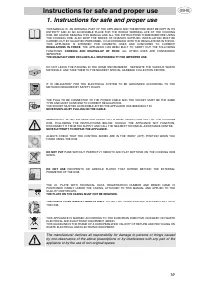
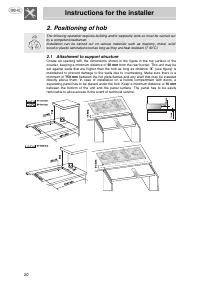
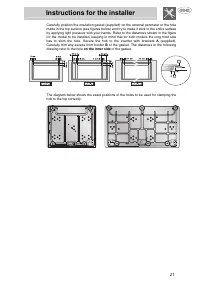
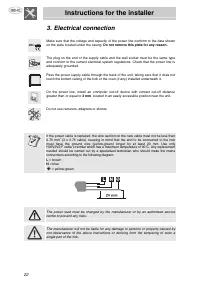
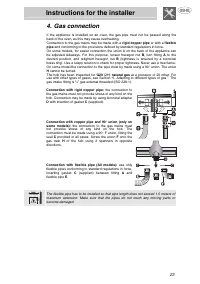
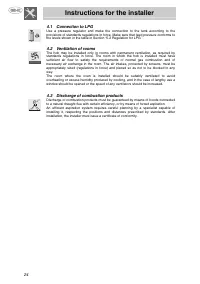
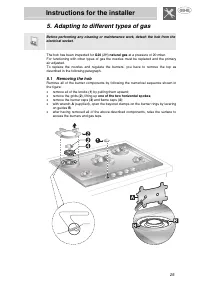
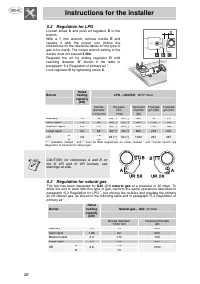
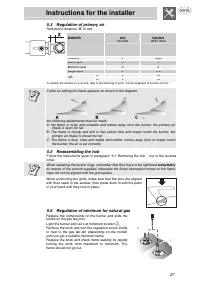
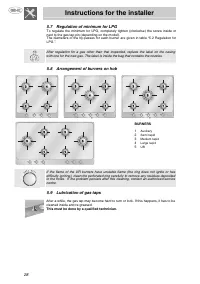
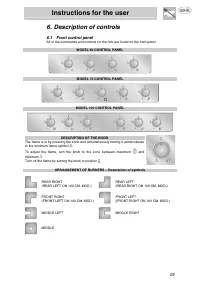
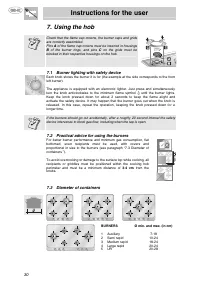
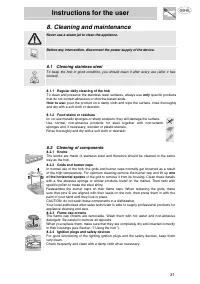
Table of Contents:
- Page 2 – Instructions for safe and proper use
- Page 3 – Instructions for the installer; Positioning of hob; Attachment to support structure
- Page 5 – Electrical connection
- Page 6 – Gas connection
- Page 7 – Connection to LPG
- Page 8 – Adapting to different types of gas; Removing the hob
- Page 9 – Regulation for LPG; Regulation for natural gas
- Page 10 – Regulation of primary air; Reassembling the hob; Regulation of minimum for natural gas
- Page 11 – Regulation of minimum for LPG; Lubrication of gas taps
- Page 12 – Instructions for the user; Description of controls; Front control panel
- Page 13 – Using the hob; Burner lighting with safety device
- Page 14 – Cleaning and maintenance; Cleaning stainless steel; Cleaning of components
Contents
18
1. Instructions for safe and proper use____________________ 19
2. Positioning of hob __________________________________ 20
2.1 Attachment to support structure ________________________________________20
3. Electrical connection _______________________________ 22
4. Gas connection ___________________________________ 23
4.1 Connection to LPG __________________________________________________24
5. Adapting to different types of gas______________________ 25
5.1 Removing the hob___________________________________________________25
5.2 Regulation for LPG __________________________________________________26
5.3 Regulation for natural gas_____________________________________________26
5.4 Regulation of primary air______________________________________________27
5.5 Reassembling the hob _______________________________________________27
5.6 Regulation of minimum for natural gas ___________________________________27
5.7 Regulation of minimum for LPG ________________________________________28
5.8 Arrangement of burners on hob ________________________________________28
5.9 Lubrication of gas taps _______________________________________________28
6. Description of controls ______________________________ 29
6.1 Front control panel __________________________________________________29
7. Using the hob _____________________________________ 30
7.1 Burner lighting with safety device _______________________________________30
8. Cleaning and maintenance___________________________ 31
THESE INSTRUCTIONS ARE VALID ONLY FOR END USER COUNTRIES WHOSE IDENTIFICATION SYMBOLS
APPEAR ON THE COVER OF THIS MANUAL.
THIS BUILT-IN HOB IS CLASS 3.
INSTRUCTIONS FOR THE INSTALLER: these are for the
qualified technician
who
must carry out a suitable check of the gas system, install the appliance, set it
functioning and carry out an inspection test.
INSTRUCTIONS FOR THE USER: these contain user advice, description of the
commands and the correct procedures for cleaning and maintenance of the appliance.
@
Further information about the products can be found at www.smeg.com
.
"Loading the manual" means you need to wait until the file loads and becomes available for online reading. Some manuals are very large, and the time they take to appear depends on your internet speed.
Other Manuals for Smeg P106
Summary
Instructions for safe and proper use 19 1. Instructions for safe and proper use THIS MANUAL IS AN INTEGRAL PART OF THE APPLIANCE AND THEREFORE MUST BE KEPT IN ITS ENTIRETY AND IN AN ACCESSIBLE PLACE FOR THE WHOLE WORKING LIFE OF THE COOKING HOB. WE ADVISE READING THIS MANUAL AND ALL THE INSTRUCTIONS...
Instructions for the installer 20 2. Positioning of hob The following operation requires building and/or carpentry work so must be carried out by a competent tradesman. Installation can be carried out on various materials such as masonry, metal, solid wood or plastic laminated wood as long as they a...
Instructions for the installer 22 3. Electrical connection Make sure that the voltage and capacity of the power line conform to the data shown on the plate located under the casing. Do not remove this plate for any reason. The plug on the end of the supply cable and the wall socket must be the same ...