Page 2 - WARNING
WARNING Some dust created by power sanding, sawing, grind- ing, drilling, and other construction activities con- tains chemicals known to the State of California to cause cancer, birth defects or other reproductive harm. Some examples of these chemicals are: • Lead from lead-based paints. • Crystall...
Page 3 - TABLE OF CONTENTS; USE THE QUICK GUIDE PAGE LABELS TO SEARCH OUT INFORMATION FAST!
TABLE OF CONTENTS PAGE 1. INTRODUCTION ..............................................................................................2 About Your New Sander ............................................................................2Woodstock Service And Support .......................................
Page 4 - INTRODUCTION; About Your New Sander; Woodstock Service And Support
INTRODUCTION -2- INTRODUCTION About Your New Sander Your new SHOP FOX ® W1686 has been specially designed to provide many years of trouble-free service. Close attention to detail, ruggedly built parts and a rigid quality control program assure safe and reli-able operation. The Model W1686 is capable...
Page 5 - Warranty And Returns
INTRODUCTION -3- INTRODUCTION Warranty And Returns Woodstock International, Inc. warrants all SHOP FOX ® machinery to be free of defects from workman- ship and materials for a period of 2 years from the date of original purchase by the original owner. Thiswarranty does not apply to defects due direc...
Page 6 - SAFETY; READ MANUAL BEFORE OPERATING MACHINE.; Standard Safety Instructions; NOTICE
SAFETY -4- SAFETY READ MANUAL BEFORE OPERATING MACHINE. FAILURE TO FOLLOW INSTRUCTIONS BELOW WILL RESULT IN PERSONAL INJURY. Standard Safety Instructions 1. Thoroughly read the instruction manual before operating your machine. Learn the applications, limitations and potential hazards of this machine...
Page 8 - Additional Safety Instructions For Sanders
SAFETY -6- Additional Safety Instructions For Sanders 1. Spindle Rotation: Always brace workpiece against the rotation of the sanding spindle. 2. Finger Safety: Always keep fingertips away from the moving spindle. 3. Sanding Rate: Always use light pressure when holding the workpiece against the sand...
Page 9 - Avoiding Potential Injuries
SAFETY -7- Avoiding Potential Injuries Figure B. Never touch a moving spindle. Figure A. Never sand a workpiece while holding it off the table surface.
Page 10 - ELECTRICAL REQUIREMENTS; Extension Cords
ELECTRICAL -8- ELECTRICAL REQUIREMENTS Figure 1. Typical 110V 3-prong plug and receptacle. Extension Cords When it is necessary to use an extension cord,use the following guidelines: • Use cords rated for Hard Service • Never exceed a length of 100 feet • Use cords with 14 ga. wire or bigger(12 ga.,...
Page 12 - ASSEMBLY INSTRUCTIONS; Unpacking
ASSEMBLY -10- I N S T R U C T I O N M A N U A L M O D E L W 1 6 8 6 
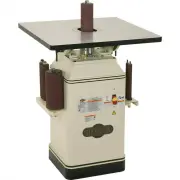
S P I N D L E S A N D E R Phone: 1-360-734-3482 • On-Line Technical Support: [email protected] C O P Y R I G H T © A U G U S T , 2 0 0 2 B Y W O O D S T O C K I N T E R N A T I O N A L , I N C . W A R N I N G : N O P O R...
Page 14 - Clean Up
ASSEMBLY -12- Clean Up The exposed, unpainted surfaces of the machinehave been coated with an oil to prevent rustduring shipment. This oil needs to be removedbefore operation. Use a solvent based degreaserto remove the oil. Never use flammablessuch as gas or other petro-leum-based solvents toclean y...
Page 15 - General
ASSEMBLY -13- General The main components of the SHOP FOX ® W1686 are assembled at the factory; however, someassembly is required. Table/Trunnion To attach the table/trunnion assembly: 1. With the assistance of a helper, carefully liftthe table/trunnion assembly onto the top ofthe sander base. 2. Al...
Page 16 - Dust Port
ASSEMBLY -14- Dust Port Connect a dust collector to the 4" dust port onthe back of the sander as shown in Figure 5 . If you do not have a dust collection system, youcan buy adapters to allow hook-up to a shop vac-uum. Although not as adequate as a dust collec-tor, a shop vacuum will help reduce ...
Page 17 - Sanding Spindle
ASSEMBLY -15- Sanding Spindle The Model W1686 is supplied with ten rubbersanding spindles. Use the larger diameter spin-dles for sanding large sweeping curves and thesmaller spindles for sanding more intricatecurves. When not in use, the spindles are stored onracks located on each side of the machin...
Page 19 - Sanding Sleeve
ASSEMBLY -17- Sanding Sleeve The Model W1686 is supplied with 10 sandingsleeves. Use coarse (low #) grits for fast materi-al removal and a rough finish. Use fine (high #)grits for slower material removal and a smootherfinish. When changing from a coarse sleeve to afiner sleeve on a particular sandin...
Page 20 - Table Insert
ASSEMBLY -18- Table Insert The Model W1686 is supplied with three differ-ent sized table inserts. The inserts are designedto reduce the gap between the spindle and thetable opening. The hole in each insert is oblongto allow clearance when the table is in the tilt-ed position. To install the table in...
Page 21 - ADJUSTMENTS; Positive Stop Bolt
ADJUSTMENTS -19- ADJUSTMENTS Figure 15. Loosen the locking handles on the trunnions. Locking Handle (1 of 2) Retainer Screw Positive Stop Bolt There is a positive stop bolt located under theback right-hand side of the table. When adjust-ed correctly, this stop allows the table to bereturned square t...
Page 23 - OPERATIONS; Test Run
OPERATIONS -21- OPERATIONS Test Run Once assembly is complete, the machine isready for a test run. The purpose of a test run isto identify any unusual noises and vibrations. To test run the machine: 1. Turn the machine on. Be sure to have yourfinger poised to turn the machine off if thereis a proble...
Page 24 - Standard Sanding
OPERATIONS -22- NOTICE Frequent cleaning can go a long way towardsgetting the most life from your sandingsleeves. Refer to the Maintenance section for complete instructions on cleaning sandingsleeves. Figure 18. The Model W1686 is best suited for smoothing the curved cuts made by a band- saw or jigs...
Page 25 - Bevel Sanding
OPERATIONS -23- Bevel Sanding Procedures Adjust the table to the desired angle and secureit into position with the trunnion lock handles asshown in Figure 19 . With the sander turned off, rotate the spindle by hand to ensure it does notmake contact with the table insert. When marking the finish line...
Page 26 - MAINTENANCE; Table And Base
MAINTENANCE -24- MAINTENANCE General Regular periodic maintenance on your ModelW1686 will ensure its optimum performance.Make a habit of inspecting your machine eachtime you use it. Check for the following condi-tions and repair or replace when necessary. 1. Loose mounting bolts. 2. Worn switch. 3. ...
Page 27 - Sanding Sleeves
MAINTENANCE -25- Sanding Sleeves As sanding sleeves are used, they will quicklybecome "loaded" with saw dust. If not removed,this saw dust will harden on the abrasive sur-face, rendering the sleeve useless. Routinelyclean the sanding sleeves with a rubber gumabrasive cleaner ( Figure 21 ) su...
Page 28 - CLOSURE
The following pages contain parts diagrams/listsand a warranty card for your SHOP FOX ® Model W1686. If you need parts or help in assembling yourmachine, or if you need operational informa-tion, we encourage you to call our ServiceDepartment. Our trained service technicians willbe glad to help you. ...
Page 34 - NOTES
Page 37 - WARRANTY CARD
CUT ALONG DOTTED LINE 10. What stationary woodworking tools do you own? Check all that apply. ___Air Compressor ___Panel Saw ___Band Saw ___Planer ___Drill Press ___Power Feeder ___Drum Sander ___Radial Arm Saw ___Dust Collector ___Shaper ___Horizontal Boring Machine ___Spindle Sander ___Jointer ___...