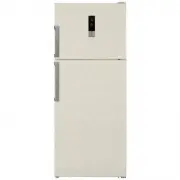
Page 3 - Index
EN -2- Index BEFORE USING THE APPLIANCE ..................................................................... 2 General warnings .........................................................................................................2Old and out-of-order fridges .......................................
Page 4 - General warnings; BEFORE USING THE APPLIANCE
EN -3- PART - 1. General warnings WARNING: Keep ventilation openings, in the appliance en- closure or in the built-in structure, clear of obstruction. WARNING: Do not use mechanical devices or other means to accelerate the defrosting process, other than those recom- mended by the manufacturer. WARNI...
Page 6 - Safety warnings; Disposal of your old appliance
EN -5- Safety warnings • Do not connect your Fridge Freezer to the mains electricity supply using an extension lead. • Do not plug in damaged, torn or old plugs.• Do not pull, bend or damage the cord. • This appliance is designed for use by adults, do not allow children to play with the appliance or...
Page 7 - Installing and operating your fridge; If your refrigerator has a fan condenser:
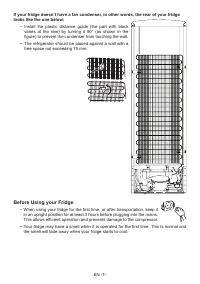
EN -6- Plastic for distance setting • compartment as they can burst as the contents freeze.• Do not place explosive or flammable material in your fridge. Place drinks with high alcohol content vertically in the fridge compartment and make sure that their tops are tightly closed. • When removing ice ...
Page 8 - looks like the one below:; Before Using your Fridge
EN -7- If your fridge doesn’t have a fan condenser, in other words, the rear of your fridge looks like the one below: • Install the plastic distance guide (the part with black vanes at the rear) by turning it 90° (as shown in the figure) to prevent the condenser from touching the wall. • The refrige...
Page 9 - THE VARIOUS FUNCTION AND POSSIBILITIES; Information about New Generation Cooling Technology
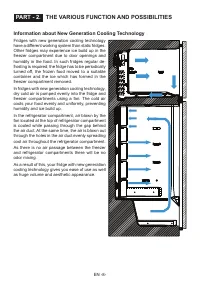
EN -8- PART - 2. THE VARIOUS FUNCTION AND POSSIBILITIES Information about New Generation Cooling Technology Fridges with new generation cooling technology have a different working system than static fridges. Other fridges may experience ice build up in the freezer compartment due to door openings an...
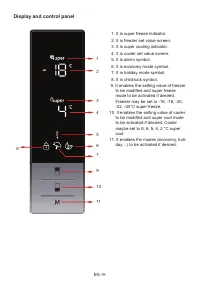
Page 10 - Display and control panel
EN -9- Display and control panel 1. It is super freeze indicator.2. It is freezer set value screen.3. It is super cooling indicator.4. It is cooler set value screen.5. It is alarm symbol.6. It is economy mode symbol.7. It is holiday mode symbol.8. It is child-lock symbol. 9. It enables the setting v...
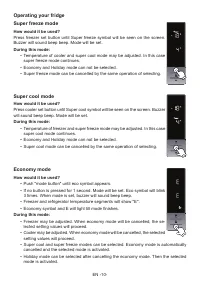
Page 11 - Super cool mode; How would it be used?; Economy mode; How would it be used?
EN -10- Operating your fridgeSuper freeze mode How would it be used? Press freezer set button until Super freeze symbol will be seen on the screen. Buzzer will sound beep beep. Mode will be set. During this mode: • Temperature of cooler and super cool mode may be adjusted. In this case super freeze ...
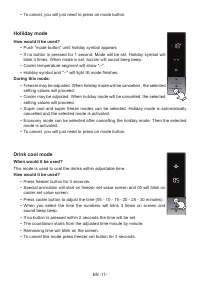
Page 12 - Holliday mode; Drink cool mode; When would it be used?
EN -11- • To cancel, you will just need to press on mode button. Holliday mode How would it be used? • Push "mode button" until holiday symbol appears• If no button is pressed for 1 second. Mode will be set. Holiday symbol will blink 3 times. When mode is set, buzzer will sound beep beep. • ...
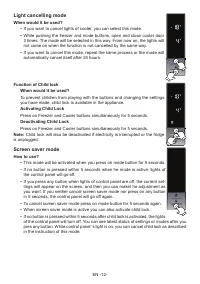
Page 13 - Light cancelling mode; Screen saver mode
EN -12- Light cancelling mode When would it be used? • If you want to cancel lights of cooler, you can select this mode.• While pushing the freezer and mode buttons, open and close cooler door 3 times. The mode will be selected in this way. From now on, the lights will not come on when the function ...
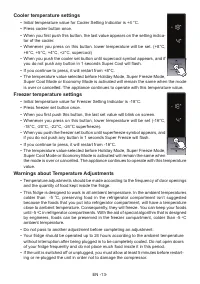
Page 14 - Cooler temperature settings; Freezer temperature settings; Warnings about Temperature Adjustments
EN -13- Cooler temperature settings • Initial temperature value for Cooler Setting Indicator is +4 °C.• Press cooler button once.• When you first push this button, the last value appears on the setting indica - tor of the cooler. • Whenever you press on this button, lower temperature will be set. (+...
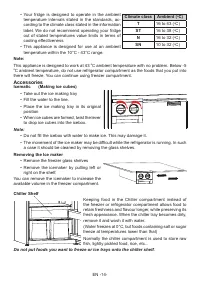
Page 15 - Accessories; Chiller Shelf; Icematic; Removing the Ice maker
EN -14- • Your fridge is designed to operate in the ambient temperature intervals stated in the standards, ac- cording to the climate class stated in the information label. We do not recommend operating your fridge out of stated temperatures value limits in terms of cooling effectiveness. • This app...
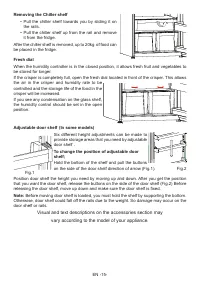
Page 16 - To change the position of adjustable door; Visual and text descriptions on the accessories section may
EN -15- Removing the Chiller shelf • Pull the chiller shelf towards you by sliding it on the rails. • Pull the chiller shelf up from the rail and remove it from the fridge. After the chiller shelf is removed, up to 20kg of food can be placed in the fridge. Fresh dial When the humidity controller is ...
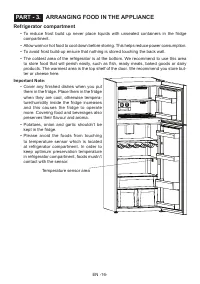
Page 17 - ARRANGING FOOD IN THE APPLIANCE; Refrigerator compartment
EN -16- PART - 3. ARRANGING FOOD IN THE APPLIANCE Refrigerator compartment • To reduce frost build up never place liquids with unsealed containers in the fridge compartment. • Allow warn or hot food to cool down before storing. This helps reduce power consumption.• To avoid frost build-up ensure tha...
Page 18 - Freezer compartment
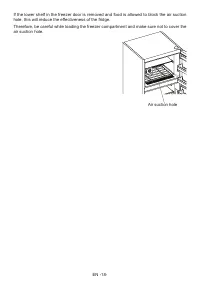
EN -17- Freezer compartment • Use the freezer to store frozen foods for long periods of time and make ice cubes.• To freeze fresh food - ensure that as much of the surface of food to be frozen is in contact with the cooling surface. • Do not put fresh food on either side of frozen food as it can tha...
Page 20 - CLEANING AND MAINTENANCE; • Unplug the fridge before starting to clean it.
EN -19- PART - 4. CLEANING AND MAINTENANCE • Unplug the fridge before starting to clean it. • Do not wash your fridge by pouring water into it. • Wipe the inner and outer sides with a soft cloth or a sponge using warm and soapy water. • Remove the parts individually and clean with soapy water. Do no...
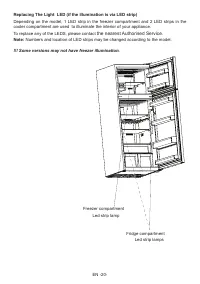
Page 21 - Replacing The Light LED (if the illumination is via LED strip); the nearest Authorised Service
EN -20- Freezer compartment Led strip lamp Fridge compartment Led strip lamps Replacing The Light LED (if the illumination is via LED strip) Depending on the model, 1 LED strip in the freezer compartment and 2 LED strips in the cooler compartment are used to illuminate the interior of your appliance...
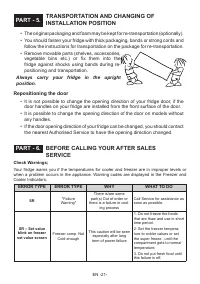
Page 22 - ERROR TYPE; vegetable bins etc.) or fix them into the; Repositioning the door
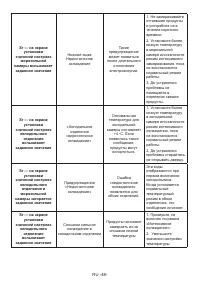
EN -21- PART - 5. TRANSPORTATION AND CHANGING OF INSTALLATION POSITION PART - 6. BEFORE CALLING YOUR AFTER SALES SERVICE Check Warnings; Your fridge warns you if the temperatures for cooler and freezer are in improper levels or when a problem occurs in the appliance. Warning codes are displayed in t...
Page 24 - If humidity builds up inside the fridge
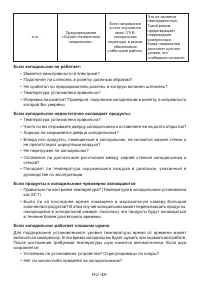
EN -23- Compressor noise • Normal motor noise: This noise means that the compressor operates normally • Compressor may cause more noise for a short time when it is activated. Bubbling noise and splash: This noise is caused by the flow of the refrigerant in the tubes of the system. Water flow noise: ...
Page 25 - Tips for saving energy
EN -24- Tips for saving energy 1– Install the appliance in a cool, well ventilated room, but not in direct sunlight and not near heat sources (radiator, cooker.. etc. ). If you install it near heat sources, use an insulating plate. 2– Allow warm food and drinks to cool down before putting them in th...
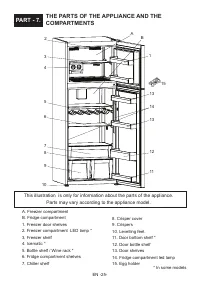
Page 26 - Parts may vary according to the appliance model.
EN -25- PART - 7. THE PARTS OF THE APPLIANCE AND THE COMPARTMENTS A. Freezer compartmentB. Fridge compartment1. Freezer door shelves2. Freezer compartment LED lamp *3. Freezer shelf4. Icematic *5. Bottle shelf / Wine rack *6. Fridge compartment shelves7. Chiller shelf 8. Crisper cover9. Crispers10. ...
Page 27 - Содержание; ПРЕЖДЕ ЧЕМ ЗВОНИТЬ В СЛУЖБУ ПОСЛЕПРОДАЖНОГО
RU -26- Содержание ПЕРЕД ЭКСПЛУАТАЦИЕЙ ИЗДЕЛИЯ ............................................................. 27 Общие предостережения .........................................................................................27 Старые и неисправные холодильники ...........................................
Page 28 - ПЕРЕД ЭКСПЛУАТАЦИЕЙ ИЗДЕЛИЯ; Общие предостережения
RU -27- ЧАСТЬ 1. ПЕРЕД ЭКСПЛУАТАЦИЕЙ ИЗДЕЛИЯ Общие предостережения ПРЕДОСТЕРЕЖЕНИЕ: Вентиляционные отверстия в корпусе у с т р о й с т в а и л и в о в с т р о е н н ы х к о н с т р у к ц и я х н е д ол ж н ы перекрываться. ПРЕДОСТЕРЕЖЕНИЕ: Не используйте механические устройства или другие средства, ...
Page 30 - Старые и неисправные холодильники; Утилизация старого холодильника; Правила техники безопасности
RU -29- Старые и неисправные холодильники • Если ваш старый холодильник оснащен замком, сломайте или демонтируйте его, прежде чем отправлять прибор на утилизацию, поскольку дети могут забраться в камеру и закрыться внутри. • Старые холодильники и морозильные камеры содержат изоляционный материал и х...
Page 31 - Установка и эксплуатация холодильника
RU -30- • Прибор предназначен для использования взрослыми людьми. Не позволяйте детям играть с холодильником или висеть на дверце. • Во избежание поражения электрическим током, не вставляйте и не вытягивайте вилку мокрыми руками! • Не ставьте стеклянные бутылки или жестяные банки для напитков в моро...
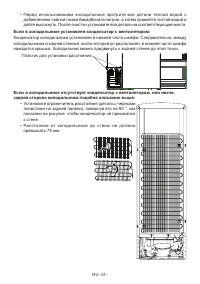
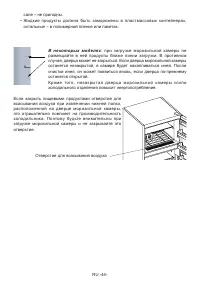
Page 32 - Если в холодильнике установлен конденсатор с вентилятором:; задняя сторона холодильника подобна описанию выше:
RU -31- • Перед использованием холодильника протрите все детали теплой водой с добавлением чайной ложки бикарбоната натрия, а затем промойте чистой водой и дайте высохнуть. После очистки установите все детали на соответствующие места. Если в холодильнике установлен конденсатор с вентилятором: Конден...
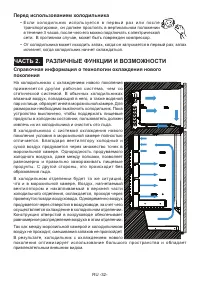
Page 33 - Перед использованием холодильника; РАЗЛИЧНЫЕ ФУНКЦИИ И ВОЗМОЖНОСТИ; Справочная информация о технологии охлаждения нового
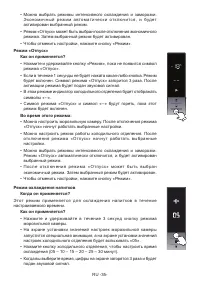
RU -32- Перед использованием холодильника • Е с л и х ол од и л ь н и к и с п ол ь з у ет с я в п е р в ы й р а з и л и п о с л е транспортировки, он должен простоять в вертикальном положении в течение 3 часов, после чего его можно подключать к электрической сети. В противном случае, может быть повр...
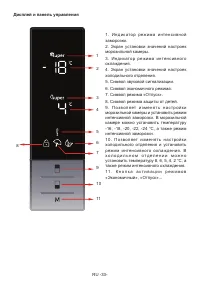
Page 34 - Дисплей и панель управления
RU -33- Дисплей и панель управления 1 2 3 4 5 6 7 9 10 11 8 1 . И н д и к ато р р еж и м а и н те н с и в н о й заморозки.2. Экран установки значений настроек морозильной камеры.3. Индик атор режима интенсивного охлаждения.4. Экран установки значений настроек холодильного отделения.5. Символ звуково...
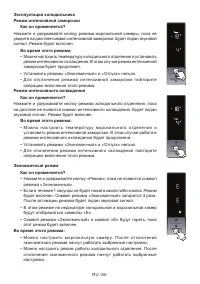
Page 37 - Режим отключения освещения; Когда он применяется?; Функции режима защиты от детей
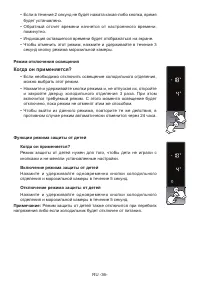
RU -36- • Если в течение 2 секунд не будет нажата какая-либо кнопка, время будет установлено. • Обратный отсчет времени начнется от настроенного времени, поминутно. • Индикация оставшегося времени будет отображаться на экране. • Чтобы отменить этот режим, нажмите и удерживайте в течение 3 секунд кно...
Page 39 - Предупреждения по поводу настройки температуры; Настройки температуры морозильной камеры
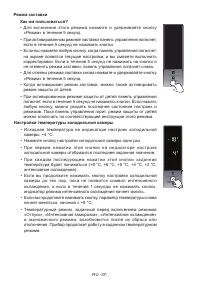
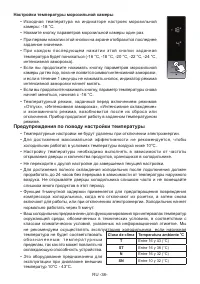
RU -38- Предупреждения по поводу настройки температуры • Температурные настройки не будут удалены при отключении электроэнергии. • Для достижения максимальной эффективности не рекомендуется, чтобы холодильник работал в условиях температуры воздуха ниже 10°C. • Настройку температуры необходимо выполн...
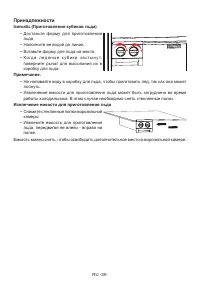
Page 40 - Принадлежности
RU -39- Принадлежности Icematic • Достаньте форму для приготовления льда • Наполните ее водой до линии. • Вставьте форму для льда на место. • К о гд а л е д я н ы е к у б и к и з а с т ы н у т, поверните рычаг для высыпания их в коробку для льда. Примечание. • Не наливайте воду в коробку для льда, ч...
Page 41 - Полка охладителя; Извлечение полки охладителя
RU -40- Полка охладителя Хранение продуктов в отделении охладителя, вместо морозильного или холодильного отделения, позволяет дольше сохранить свежесть и вкус продуктов, сохраняя при этом свежий внешний вид. В случае загрязнения лотка охладителя, извлеките его и промойте водой.(Вода замерзает при 0°...
Page 42 - РАЗМЕЩЕНИЕ ПРОДУКТОВ В ХОЛОДИЛЬНИКЕ; Регулируемая дверная полка
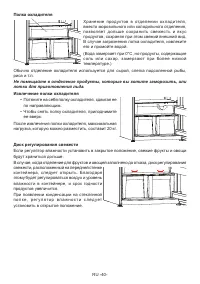
RU -41- рис. 1 ЧАСТЬ 3. РАЗМЕЩЕНИЕ ПРОДУКТОВ В ХОЛОДИЛЬНИКЕ • При нормальных условиях эксплуатации установка значения температуры холодильного отделения холодильника 4°/ +6°C будет достаточной. • Продукты должны помещаться в холодильник в закрытых контейнерах или обернутыми в подходящий материал. • ...
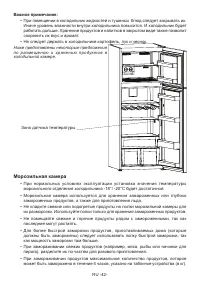
Page 43 - Морозильная камера
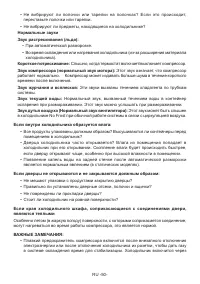
RU -42- Важное примечание: • При помещении в холодильник жидкостей и тушеных блюд следует закрывать их. Иначе уровень влажности внутри холодильника повысится. И холодильник будет работать дольше. Хранение продуктов и напитков в закрытом виде также позволит сохранить их вкус и аромат. • Не следует де...
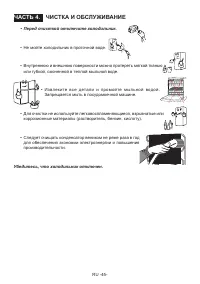
Page 46 - ЧИСТКА И ОБСЛУЖИВАНИЕ
RU -45- ЧАСТЬ 4. ЧИСТКА И ОБСЛУЖИВАНИЕ • Перед очисткой отключите холодильник. • Не мойте холодильник в проточной воде. • Внутреннюю и внешнюю поверхности можно протереть мягкой тканью или губкой, смоченной в теплой мыльной воде. • Извлеките все детали и промойте мыльной водой. Запрещается мыть в по...
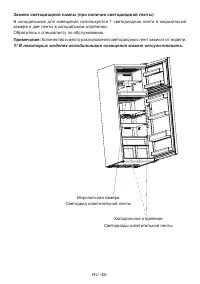
Page 47 - Замена светодиодной лампы (при наличии светодиодной ленты)
RU -46- Замена светодиодной лампы (при наличии светодиодной ленты) В холодильнике для освещения используются 1 светодиодная лента в морозильной камере и две ленты в холодильном отделении.Обратитесь к специалисту по обслуживанию. Примечание: Количество и место расположения светодиодных лент зависит о...
Page 48 - ТРАНСПОРТИРОВКА И ПЕРЕСТАНОВКА; Транспортировка и перестановка холодильника; Перестановка дверцы; ПРЕЖДЕ ЧЕМ ЗВОНИТЬ В СЛУЖБУ ПОСЛЕПРО; Проверьте предупреждения
RU -47- ЧАСТЬ 5. ТРАНСПОРТИРОВКА И ПЕРЕСТАНОВКА Транспортировка и перестановка холодильника • Оригинальную упаковку и пенопласт можно использовать для повторной транспортировки (по желанию). • Зафиксируйте холодильник с помощью прочной упаковки, ремней или крепких веревок. Следуйте инструкциям по тр...
Page 53 - Указания по энергосбережению
RU -52- Указания по энергосбережению 1– Устанавливайте прибор в прохладном, хорошо проветриваемом помещении, в месте, не подвергающемся воздействию прямых солнечных лучей, вдали от источников тепла (радиатора, печи и т. п.). В противном случае воспользуйтесь теплоизоляционными панелями. 2– Горячие б...
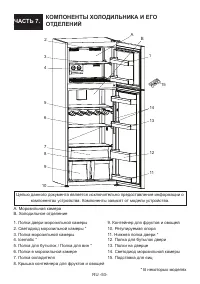
Page 54 - КОМПОНЕНТЫ ХОЛОДИЛЬНИКА И ЕГО
RU -53- * В некоторых моделях ЧАСТЬ 7. КОМПОНЕНТЫ ХОЛОДИЛЬНИКА И ЕГО ОТДЕЛЕНИЙ Целью данного документа является исключительно предоставление информации о компонентах устройства. Компоненты зависят от модели устройства. A. Морозильная камераB. Холодильное отделение1. Полки двери морозильной камеры2. ...