Page 2 - Contents
Contents YOUR VACUUM CLEANER 07 07 Product view08 Carton contents BEFORE USING THE VACUUM CLEANER 09 09 Assemble the handy vacuum, pipe, and 2 in 1 accessory 10 Using the accessories OPERATING CLEANER 11 11 Stowing the power cord12 Operating the On / Off switch13 Operating the Brush bar On / Off swi...
Page 3 - Safety information; SAFETY INFORMATION
English - 03 Safety information SAFETY INFORMATION WARNING Before operating the appliance, please read this manual thoroughly and retain it for your reference. WARNING Because the following operating instructions cover various models, the characteristics of your vacuum cleaner may differ slightly fr...
Page 4 - – TO REDUCE THE RISK OF FIRE, ELECTRIC
English - 04 IMPORTANT SAFETY INSTRUCTIONS When using an electrical appliance, you should always follow these basic precautions: READ ALL INSTRUCTIONS BEFORE USING YOUR UPRIGHT VACCUM WARNING – TO REDUCE THE RISK OF FIRE, ELECTRIC SHOCK, OR INJURY: 1. Do not leave the vacuum cleaner unattended when ...
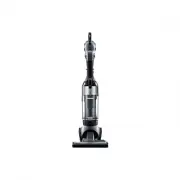
Page 7 - Your vacuum cleaner; PRODUCT VIEW
English - 07 01 Y OUR V ACUUM CLEANER Your vacuum cleaner PRODUCT VIEW Handle Brush bar On/Off Button Power On/Off Button Dust Bin Release Button Carrying Handle (Dust Bin Handle) Dust Bin Brush bar Dust Bin (Handy) Upper Cord Hanger Pipe Lower Cord Hanger Handy Release Button CAUTION Do not plug in...
Page 8 - CARTON CONTENTS
English - 08 CARTON CONTENTS ( 1 ) ( 2 ) ( 3 ) ( 4 ) ( 5 ) ( 6 ) ( 5 ) ( 6 ) • Empty carton. Find the parts shown above before disposing of packing materials.1. Vacuum cleaner body2. Handy Vacuum cleaner3. Pipe4. 2 In 1 Accessory5. Eco Hard Floor(Optional depending on the model)6. Pipe (Connector fo...
Page 9 - ASSEMBLE THE HANDY VACUUM, PIPE, AND 2 IN 1 ACCESSORY; Before using the vacuum cleaner
English - 09 02 BEFORE USING THE VACUUM CLEANER ASSEMBLE THE HANDY VACUUM, PIPE, AND 2 IN 1 ACCESSORY Click Click • Connect the Handy Vacuum cleaner and pipe. • Connect the 2 In 1 Accessory and the pipe. Click • When inserting the handle (the handy vacuum cleaner) into the top of vacuum body, put in...
Page 10 - USING THE ACCESSORIES
English - 10 • Wind the cord around the cord hangers and secure with clip. USING THE ACCESSORIES • Crevice tool • Dusting Brush DJ68-00709C (EN)-05.indd 10 2014. 10. 28. �� 11:41
Page 11 - STOWING THE POWER CORD; Operating cleaner
English - 11 03 O PERA TING CLEANER STOWING THE POWER CORD CAUTION When removing the plug from an electrical outlet, grasp the plug, not the cord. Operating cleaner DJ68-00709C (EN)-05.indd 11 2014. 10. 28. �� 11:41
Page 12 - OPERATING THE ON / OFF SWITCH
English - 12 OPERATING THE ON / OFF SWITCH Handy vacuum cleaner mode 1 2 3 • Push the release button, and then separate the handy vacuum cleaner from the body.• Push the power On/Off switch. "Eco Hard Floor" brush and Pipe(Connector for Eco Hard Floor) should be connected to the tip of Pipe,...
Page 13 - OPERATING THE BRUSH BAR ON / OFF SWITCH; RESETTING THE OVERLOAD PROTECTOR
English - 13 03 O PERA TING CLEANER OPERATING THE BRUSH BAR ON / OFF SWITCH 1 2 3 • Push the power On/Off switch, and then push the brush bar On/Off switch.• The Brush Switch should be in the "On" position for normal carpet cleaning.• Turn the Brush Switch "Off" for bare floor cleani...
Page 17 - Maintenance; EMPTYING THE DUST BIN
English - 17 04 M AINTENANCE Maintenance EMPTYING THE DUST BIN • Empty the dust bin when dust reaches the 'MAX' mark. • Take the dust bin out by pushing the button on the handle. 1 • To empty the dust bin, hold the dust bin over a garbage can, and then push the button near the bottom of the bin. 2 A...
Page 18 - CLEANING THE GRILLE
English - 18 CLEANING THE GRILLE • Push the button. Separate the dust bin from the vacuum's body. 1 • Clean the grille with the dusting brush to remove lint. 2 • To re-attach the dust bin to the vacuum's body, follow steps 3 and 4. 3 4 DJ68-00709C (EN)-05.indd 18 2014. 10. 28. �� 11:41
Page 19 - CLEANING THE PREMOTOR FILTER
English - 19 04 M AINTENANCE CLEANING THE PREMOTOR FILTER • Pull the dust bin cover to open. 1 • Remove the filter from the dust bin. 2 • Shake the filter to remove dust, and then wash the filter. 3 • Leave the filter in the shade until completely dry. 4 DJ68-00709C (EN)-05.indd 19 2014. 10. 28. �� ...
Page 21 - CLEANING THE FILTER
English - 21 04 M AINTENANCE CLEANING THE FILTER • Take the dust bin out by pushing button on the handle. 1 • Remove the filter cover. 2 • Separate the filter from the vacuum's body. 3 • Shake the filter to remove dust. 4 Clean the filter when suction is noticeably and continuously reduced or the va...
Page 23 - CHECKING THE BRUSH
English - 23 04 M AINTENANCE CHECKING THE BRUSH • Turn off and unplug the vacuum. Lie the vacuum down so its bottom is accessible as shown. 1 • Carefully cut off any hair or string caught in the brush. 2 CAUTION Before inspecting the brush bar, turn off the brush bar and unplug the vacuum. DJ68-0070...
Page 24 - CHECKING FOR CLOGS
English - 24 CHECKING FOR CLOGS • Place a foot on the brush, and then tilt the handle back gently to release the lock. 1 • Push the release button on the brush housing, and then pull the hose out. 2 • Check for clogs in the opening of the brush housing and in the hose. 3 • When done, re-attach the h...
Page 25 - EMPTYING THE DUST BIN OF THE HANDY VACUUM CLEANER
English - 25 04 M AINTENANCE EMPTYING THE DUST BIN OF THE HANDY VACUUM CLEANER • Separate the dust bin from the vacuum's body. 1 • Remove the filter and grille. 2 • Empty the dust bin. 3 • Re-assemble the filter and grille. 4 DJ68-00709C (EN)-05.indd 25 2014. 10. 28. �� 11:41
Page 26 - CLEANING THE FILTER OF THE HANDY VACUUM CLEANER
English - 26 • Re-attach the dust bin to the vacuum body. (Align the open lock symbol on the dust bin with the arrow on the body, and then turn the bin counterclockwise so that the closed lock symbol aligns with the arrow.) 5 CLEANING THE FILTER OF THE HANDY VACUUM CLEANER • Separate the dust bin fr...
Page 28 - Troubleshooting
English - 28 Troubleshooting Check this list of possible problems and solutions before bringing your vacuum to a service center. PROBLEM SOLUTION Cleaner won’t run. • Check the electrical plug. Make sure it is fully plugged in.• Press the Power on/off button.• Reset the overload protector. Suction M...
Page 29 - Product fiche
Product fiche [English] According to Commission Regulation (EU) No 665/2013 and No 666/2013 A Supplier Samsung Electronics., Co. Ltd B Model SU10F70SA SU10F70SB SU10F70SD SU10F70SQ SU10F70SR C Energy Efficiency Class B B B A A D Annual Energy Consumption (kWh/yr) 34 34 34 27 27 E Carpet Cleaning Per...
Page 30 - Memo
Memo DJ68-00709C (EN)-05.indd 30 2014. 10. 28. �� 11:41