Page 2 - Refer to the installation manual for; WARNING
2 English Anti-tip device WARNING To reduce the risk of tipping the range, the range must be secured by a properly installed Anti-Tip device. AFTER THE RANGE HAS BEEN INSTALLED, CONFIRM THAT THE ANTI-TIP DEVICE HAS BEEN PROPERLY INSTALLED AND VERIFY THAT THE ANTITIP DEVICE IS PROPERLY ENGAGED. Refer...
Page 3 - Contents; Important safety instructions
English 3 C ontents Contents Important safety instructions 4 Introducing your new range 20 Overview 20What’s included with your range 20 Before you begin 21 Energy saving tips 21 Cooktop cooking 21 About cooktop cooking 21 How to set the appliance for cooktop cooking 23 Using the proper cookware 24 ...
Page 4 - minor; CAUTION; Important safety symbols and precautions; severe
4 English Impor tant saf ety ins truc tions Important safety instructions CAUTION Hazards or unsafe practices that may result in minor personal injury or property damage . CAUTION To reduce the risk of fire, explosion, electric shock, or personal injury when using your oven, follow these basic safet...
Page 5 - CALIFORNIA PROPOSITION 65 WARNING; FOR YOUR SAFETY; Do not enter the oven.
English 5 Impor tant saf ety ins truc tions CALIFORNIA PROPOSITION 65 WARNING WARNING Cancer and Reproductive Harm - www.P65Warnings.ca.gov. FOR YOUR SAFETY When using electrical appliances, you should follow basic safety precautions, including the following: CAUTION • Use this appliance only for it...
Page 6 - Storage in or on the appliance.
6 English Impor tant saf ety ins truc tions Important safety instructions • Storage in or on the appliance. Do not store flammable materials in the oven or near the surface units. Be sure all packing materials are removed from the appliance before operating it. Keep plastics, clothes, and paper away...
Page 7 - SURFACE COOKING UNITS
English 7 Impor tant saf ety ins truc tions • Use care when touching the cooktop. The glass surface of the cooktop will retain heat after the controls have been turned off. • Be careful when placing spoons or other stirring utensils on the glass cooktop surface when it is in use. They may become hot...
Page 8 - ELECTRICAL SAFETY; Glazed cooking utensils.
8 English Impor tant saf ety ins truc tions Important safety instructions ELECTRICAL SAFETY • Proper Installation- Be sure your appliance is properly installed and grounded by a qualified technician. • The appliance should be serviced only by qualified service personnel. Repairs carried out by unqua...
Page 9 - CHILD SAFETY
English 9 Impor tant saf ety ins truc tions WARNING If the surface is cracked, switch off and unplug the appliance to avoid the possibility of electrical shock. Do not use your cooktop until the glass surface has been replaced. WARNING • Ensure that the appliance is switched off before replacing the...
Page 10 - OVEN
10 English Impor tant saf ety ins truc tions Important safety instructions • Use care when opening the door. Let hot air or steam escape before you remove food from or put food into the oven. • Protective liners. Do not use aluminum foil to line the oven bottoms, except as suggested in the manual. I...
Page 11 - Do not use the drawer to dry newspapers.; WARMING DRAWER; Use care when opening the drawer.
English 11 Impor tant saf ety ins truc tions • Do not use the drawer to dry newspapers. If overheated, newspapers can catch on fire. • Do not use aluminum foil to line the drawer. Foil is an excellent heat insulator and will trap heat beneath it. This will upset the performance of the drawer and it ...
Page 12 - VENTILATING HOOD; Clean ventilating hoods frequently.
12 English Impor tant saf ety ins truc tions Important safety instructions • Before operating the self-clean cycle, wipe grease and food soils from the oven. Excessive amounts of grease may ignite, leading to smoke damage to your home. • Do not use any commercial oven cleaner or oven liner protectiv...
Page 13 - CRITICAL INSTALLATION WARNINGS; GLASS/CERAMIC COOKING SURFACES; Do not cook on a broken cooktop.
English 13 Impor tant saf ety ins truc tions CRITICAL INSTALLATION WARNINGS WARNING • This appliance must be installed by a qualified technician or service company. - Failing to have a qualified technician install the range may result in electric shock, fire, an explosion, problems with the product,...
Page 14 - CRITICAL USAGE WARNING
14 English Impor tant saf ety ins truc tions Important safety instructions CRITICAL USAGE WARNING CAUTION • If the appliance is flooded by any liquid, please contact your nearest service center. Failing to do so may result in electric shock or fire. • If the appliance produces a strange noise, a bur...
Page 17 - USAGE CAUTIONS
English 17 Impor tant saf ety ins truc tions • Do not hold food in your bare hands during or immediately after cooking. - Use cooking gloves. The food may be very hot and you could burn yourself. - Use a cooking glove or gloves, Handle and oven surfaces may be hot enough to cause burns after cooking...
Page 19 - CRITICAL CLEANING WARNINGS
English 19 Impor tant saf ety ins truc tions • Do not abruptly cool the door, the inside of the appliance, or a dish by pouring water over it during or just after cooking. - This may result in damage to the appliance. The steam or water spray may result in burns or injury. • Do not operate while emp...
Page 20 - Overview; Introducing your new range
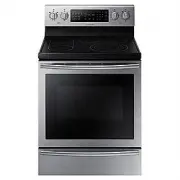
20 English Intr oducing y our ne w rang e Introducing your new range Overview 02 03 01 04 05 07 06 11 08 09 10 01 Oven control panel (See page 26 for more information) 02 Glass surface 03 Oven door 04 Warming drawer 05 * Surface control knobs (See page 22 for more information) 06 Self/steam clean la...
Page 21 - Cooktop cooking; About cooktop cooking; Before you begin; Energy saving tips
English 21 Befor e you begin Cooktop cooking About cooktop cooking CAUTION BEFORE COOKING • Do not use the glass cooktop surface as a cutting board. • Do not place or store items that can melt or catch fire on the glass cooktop, even when it is not being used. • Turn the surface units on only after ...
Page 23 - How to set the appliance for cooktop cooking
English 23 C ookt op c ooking Hot surface indicator • Comes on when the unit is turned on or hot to the touch. • Stays on even after the unit is turned off. • Glows until the unit is cooled to approximately 150 °F. Cooking areas • The cooking areas on your range are identified by permanent circles o...
Page 24 - Using the proper cookware
24 English C ookt op c ooking Cooktop cooking Check for flatness by rotating a ruler across the bottom of the cookware. CORRECT INCORRECT Flat bottom and straight sides. • Tight fitting lids. • Weight of handle does not tilt pan. • Pan is well balanced. • Pan size matches the amount of food to be pr...
Page 25 - Choosing the proper cookware
English 25 C ookt op c ooking • Do not use chlorine bleach, ammonia, or other cleansers not specifically recommended for use on a glass-ceramic surface. Preventing marks and scratches • Do not use glass cookware. It may scratch the cooktop. • Do not place a trivet or wok ring between the cooktop and...
Page 26 - Operating the oven; The oven control panel
26 English Oper ating the o v en Operating the oven 01 DISPLAY : Shows the time of day, oven temperature, whether the oven is in the bake, broil or self-cleaning mode, and the time set for the timer or automatic oven operations. • : When you use the self-cleaning feature, this icon appears in the di...
Page 27 - Timed cooking
English 27 Oper ating the o v en 4. When the set time has elapsed, the oven will beep and the display will show End until you press Timer On/Off pad. You can cancel the timer at any time by pressing Timer On/Off. Timed cooking In timed cooking, the oven turns on immediately and cooks for the length ...
Page 28 - Turning the oven light on and off
28 English Oper ating the o v en Operating the oven Turning the oven light on and off • The oven light turns on automatically when the door is opened. • The oven light turns off automatically when the door is closed. • You can turn the oven light on and off manually by pressing the pad. Minimum and ...
Page 29 - Using the oven racks
English 29 Oper ating the o v en Using the oven racks Oven rack positions 07 06 05 04 03 02 01 Recommended rack position for cooking Type of food Rack Position Broiling hamburgers 7 Broiling meats or Small cuts of poultry, Fish 5-7 Bundt caked, Pound cakes, Frozen pies, Casseroles 4 or 3 Angel food ...
Page 30 - Baking
30 English Oper ating the o v en Operating the oven Baking The oven can be programmed to bake at any temperature from 175 °F to 550 °F.Baking temperature and time will vary depending on the ingredients and the size and shape of the baking pan used. Dark or nonstick coatings may cook faster with more...
Page 31 - Convection roasting
English 31 Oper ating the o v en How to set the oven for convection baking1. Start the convection baking mode. Press Bake . The default temperature is 350 °F. 2. Enter the temperature you want, eg. 400 °F, using the number pad. 3. Press START/SET to begin convection baking. Conv. Bake and the adjust...
Page 32 - Broiling
32 English Oper ating the o v en Operating the oven Broiling Recommendation Guide The size, weight, thickness, starting temperature, and your doneness preference will affect broiling times.This guide is based on meats at refrigerator temperature.Always use a broiler pan and its grid when broiling.Al...
Page 33 - Using the easy cook feature
English 33 Oper ating the o v en Food Doneness Size Thickness Broil setting Rack position Cooking time (Minutes) 1st side 2nd side Chicken pieces Well done 4.5 lbs. ¾”-1” LO 4 18:00- 20:00 16:00- 18:00 Well done 2-2½ lbs. ¾”-1” LO 4 15:00- 18:00 13:00- 16:00 Pork chops Well done 1 lb. ½” HI 5 8:00- ...
Page 34 - Using the keep warm feature; Using the favorite cook feature
34 English Oper ating the o v en Operating the oven How to recall a setting1. Press Favorite Cook the number of times that corresponds to the position in which the recipe setting is stored, eg. for Custom Cook position 2, Press Favorite Cook twice. 2. Start the stored cooking operation. Press START/...
Page 35 - Using the sabbath feature
English 35 Oper ating the o v en Do not to attempt to activate any other program feature except BAKE while the Sabbath feature is active. ONLY the following key pads will function correctly with the Sabbath feature on: NUMBER, BAKE, START/SET and OFF/ CLEAR. ALL OTHER KEYPADS should not be used once...
Page 36 - Extra features
36 English Oper ating the o v en Operating the oven Convection auto conversion feature When you use the auto conversion feature, the convection auto conversion feature will automatically convert entered regular baking temperatures to convection baking temperatures.If this feature is activated, the d...
Page 37 - Using the warming drawer; About the warming drawer
English 37 Using the w arming dr awer Using the warming drawer About the warming drawer The warming drawer will keep hot, cooked food warm. Always start with hot food. Do not use to warm cold food other than bread, crackers, chips, or dry cereal.Allow approximately 25 minutes for the warming drawer ...
Page 38 - Maintaining your appliance; Turning the warming drawer on or off
38 English Maint aining y our applianc e Maintaining your appliance Maintaining your appliance Self-cleaning This self-cleaning oven uses high temperatures (well above cooking temperatures) to burn off leftover grease and residue completely or reduce them to a finely powdered ash that you can wipe a...
Page 41 - Care and cleaning of the oven
English 41 Maint aining y our applianc e 4. Dry and buff with a clean, dry paper towel or soft cloth. 5. Repeat as necessary. NOTE • Do not use a steel-wool pad. It will scratch the surface. • If a mineral oil-based stainless steel appliance cleaner has been used before to clean the appliance, wash ...
Page 42 - Care and cleaning of the glass cooktop
42 English Maint aining y our applianc e Maintaining your appliance Care and cleaning of the glass cooktop Normal daily use cleaning Use only a ceramic cooktop cleaner. Other creams may not be as effective.By following these steps, you can maintain and protect the surface of your glass cooktop. 1. B...
Page 44 - Removing and replacing the oven door
44 English Maint aining y our applianc e Maintaining your appliance about 5° Fig. 1 Fig. 2 3. Firmly grasp both sides of the door at the top. 4. Close the door to the door removal position, which is approximately 5 degrees from vertical (Fig. 1). 5. Lift door up and out until the hinge arm is clear ...
Page 45 - Removing and replacing the warming drawer
English 45 Maint aining y our applianc e 3. Open the door fully. If the door will not open fully, the indentation is not inserted correctly in the bottom edge of the slot. 4. Push the hinge locks up against the front frame of the oven cavity to the locked position. Hinge lock Locked position Unlocke...
Page 46 - Troubleshooting; Changing the oven light
46 English Tr ouble shoo ting Troubleshooting Troubleshooting Troubleshooting Samsung works hard to ensure that you don’t have problems with your new electric range. If you run into unexpected trouble, look first for a solution in the table below. If, after trying the suggested solution, you’re stil...
Page 51 - Information codes
English 51 Tr ouble shoo ting DRAWER Problem Possible cause Solution The Drawer does not slide smoothly or drags. The drawer is out of alignment. Fully extend the drawer and push it all the way in. See the page 45. The drawer is over-loaded or the load is unbalanced. Reduce weight. Redistribute draw...
Page 52 - Warranty
52 English W arranty Warranty During the applicable warranty period, a product will be repaired, replaced, or the purchase price refunded, at the sole option of SAMSUNG. SAMSUNG may use new or reconditioned parts in repairing a product, or replace the product with a new or reconditioned product. Rep...
Page 55 - Memo
Page 57 - Estufa eléctrica; Manual del usuario
Estufa eléctrica Manual del usuario NE59J7650**/NE59J7651**
Page 58 - Dispositivo anti inclinación; DESPUÉS DE INSTALAR LA; ADVERTENCIA; Puede causar que la estufa se incline o vuelque,
2 Español Dispositivo anti inclinación ADVERTENCIA Para reducir el riesgo de inclinación o vuelco de la estufa, ésta debe estar asegurada mediante un Dispositivo Anti Inclinación correctamente instalado. DESPUÉS DE INSTALAR LA ESTUFA, CONFIRME QUE EL DISPOSITIVO ANTI INCLINACIÓN ESTÉ CORRECTAMENTE I...
Page 60 - PRECAUCIÓN; PRECAUCIÓN; Instrucciones de seguridad importantes; Esta guía no cubre todas las situaciones; Símbolos y precauciones de seguridad importantes; Significado de iconos y símbolos en este manual del usuario:; Prácticas peligrosas o inseguras que pueden provocar
4 Español Instruc cione s de seg uridad impor tantes Instrucciones de seguridad importantes PRECAUCIÓN Prácticas peligrosas o inseguras que pueden provocar lesiones leves o daños a la propiedad . PRECAUCIÓN Para reducir el riesgo de incendio, explosión, descarga eléctrica o lesiones personales cuand...
Page 61 - CALIFORNIA PROPOSICIÓN 65 ADVERTENCIA; PARA SU SEGURIDAD
Español 5 Instruc cione s de seg uridad impor tantes CALIFORNIA PROPOSICIÓN 65 ADVERTENCIA ADVERTENCIA Cáncer y Daño Reproductive – www.P65Warnings.ca.gov. PARA SU SEGURIDAD Cuando utilice electrodomésticos, debe seguir precauciones de seguridad básicas, a saber: PRECAUCIÓN • Utilice este electrodom...
Page 62 - Almacenamiento en o sobre el electrodoméstico.
6 Español Instruc cione s de seg uridad impor tantes Instrucciones de seguridad importantes • Almacenamiento en o sobre el electrodoméstico. No almacene materiales inflamables en el horno o cerca de las unidades de superficie. Asegúrese de que todos los materiales de embalaje hayan sido retirados de...
Page 63 - UNIDADES DE SUPERFICIE DE COCCIÓN
Español 7 Instruc cione s de seg uridad impor tantes • Sea precavido al tocar la cubierta. La superficie de vidrio de la cubierta retendrá el calor aún después de que se hayan apagado los controles. • Tenga cuidado cuando coloque cucharas u otros utensilios para revolver sobre la superficie de vidri...
Page 64 - SEGURIDAD ELÉCTRICA; Instalación adecuada-
8 Español Instruc cione s de seg uridad impor tantes Instrucciones de seguridad importantes SEGURIDAD ELÉCTRICA • Instalación adecuada- Asegúrese de que su electrodoméstico sea correctamente instalado y conectado a tierra por un técnico calificado. • El electrodoméstico debe ser reparado únicamente ...
Page 65 - SEGURIDAD DE LOS NIÑOS
Español 9 Instruc cione s de seg uridad impor tantes ADVERTENCIA Si la superficie está rajada, apague y desenchufe el electrodoméstico para evitar la posibilidad de una descarga eléctrica. No utilice su cubierta hasta que la superficie de vidrio haya sido reemplazada. ADVERTENCIA • Asegúrese de que ...
Page 66 - HORNO
10 Español Instruc cione s de seg uridad impor tantes Instrucciones de seguridad importantes • Cuando abra la puerta, hágalo con precaución. Permita la salida del vapor o aire caliente antes de retirar o volver a colocar los alimentos en el horno. • Revestimientos protectores. No utilice papel de al...
Page 67 - No utilice el cajón para secar periódicos.; CAJÓN DE CALENTAMIENTO; Cuando abra el cajón, hágalo con precaución.
Español 11 Instruc cione s de seg uridad impor tantes • No utilice el cajón para secar periódicos. Si se recalientan, pueden arder en llamas. • No utilice papel de aluminio para revestir el cajón. El papel de aluminio es un excelente aislante de calor y el calor quedará atrapado debajo de él. Esto a...
Page 68 - CAMPANAS DE VENTILACIÓN; Limpie con frecuencia las campanas de ventilación.; HORNOS AUTO-LIMPIANTES; No limpie la junta selladora de la puerta.
12 Español Instruc cione s de seg uridad impor tantes Instrucciones de seguridad importantes • Antes de hacer funcionar el ciclo de auto-limpieza, limpie la grasa y los restos de comida del horno. Unas cantidades excesivas de grasa podrían encenderse y generar daños por el humo en su hogar. • No use...
Page 69 - una compañía de servicio calificados.; SUPERFICIES DE COCCIÓN VITRO-CERÁMICAS; No cocine sobre una cubierta quebrada.
Español 13 Instruc cione s de seg uridad impor tantes ADVERTENCIAS FUNDAMENTALES PARA LA INSTALACIÓN ADVERTENCIA • La instalación de este electrodoméstico debe estar a cargo de un técnico o una compañía de servicio calificados. - Si la estufa no es instalada por un técnico calificado, pueden produci...
Page 70 - ADVERTENCIA FUNDAMENTAL PARA EL USO
14 Español Instruc cione s de seg uridad impor tantes Instrucciones de seguridad importantes ADVERTENCIA FUNDAMENTAL PARA EL USO PRECAUCIÓN • Si el electrodoméstico se inunda con cualquier líquido, comuníquese con el centro de servicios más cercano: No hacerlo puede provocar descarga eléctrica o inc...
Page 73 - PRECAUCIONES PARA EL USO
Español 17 Instruc cione s de seg uridad impor tantes • No aplique presión excesiva a la puerta o al interior del electrodoméstico. No golpee la puerta o la parte interior del electrodoméstico. -Colgarse de la puerta puede provocar fallas en el producto y causar lesiones graves. -Si la puerta está d...
Page 76 - Descripción general; Introducción a su nueva estufa
20 Español Intr oduc ción a su nue v a est uf a Introducción a su nueva estufa Descripción general 02 03 01 04 05 07 06 11 08 09 10 01 Panel de control del horno (consulte la página 26 para obtener más información) 02 Superficie de vidrio 03 Puerta del horno 04 Cajón de calentamiento 05 * Perillas d...
Page 77 - Cocción en cubierta; Acerca de la cocción en cubierta; Antes de comenzar; Sugerencias para ahorrar energía
Español 21 Antes de c omenz ar Cocción en cubierta Acerca de la cocción en cubierta PRECAUCIÓN ANTES DE COCINAR • No utilice la superficie de la cubierta de vidrio como tabla para cortar. • No coloque ni almacene sobre la cubierta de vidrio elementos susceptibles de derretirse o prenderse fuego, aun...
Page 79 - Como regular su estufa para la cocción de cubierta
Español 23 C oc ción en cubier ta Indicador de superficie caliente • Se ilumina cuando la unidad se encuentra encendida o caliente al tacto. • Permanece iluminada aún después de que se haya apagado la unidad. • Emite luz hasta que la unidad se haya enfriado hasta aproximadamente 150 °F. Áreas de coc...
Page 80 - Utilización de los recipientes de cocción correctos
24 Español C oc ción en cubier ta Cocción en cubierta Utilización de los recipientes de cocción correctos Utilizar los recipientes de cocción correctos puede evitar muchos problemas, tales como cocción despareja o tiempos de cocción demasiado largos. Utilizar las cacerolas y sartenes adecuadas redun...
Page 81 - Selección de los recipientes de cocción correctos
Español 25 C oc ción en cubier ta • No permita que los derrames permanezcan mucho tiempo en el área de cocción o las terminaciones de la cubierta. • No utilice polvos limpiadores abrasivos, paños abrasivos ni esponjas metálicas, porque producirán rayaduras en la cubierta. • No utilice cloro, amoníac...
Page 82 - Funcionamiento del horno; Panel de control del horno
26 Español Funcionamient o del horno Funcionamiento del horno 01 PANTALLA: Muestra la hora del día, la temperatura del horno, si el horno está en el modo de hornear, asar a la parrilla o auto-limpieza y las horas fijadas para el temporizador o las operaciones automáticas del horno. • : Cuando usa la...
Page 83 - Cocción por temporizador
Español 27 Funcionamient o del horno 4. Cuando haya transcurrido el tiempo fijado, el horno emitirá un sonido agudo y en la pantalla se verá “End” (Fin) hasta que usted presione la tecla Timer On/Off (Activar/Desactivar temporizador). El temporizador se puede desactivar en cualquier momento presiona...
Page 84 - Cómo encender y apagar la luz del horno; Inicio retardado
28 Español Funcionamient o del horno Funcionamiento del horno 8. Presione START/SET (INICIO/CONFIGURAR) . A la hora fijada, se emitirá un breve “bip”. El horno comenzará la cocción. Cómo encender y apagar la luz del horno • La luz del horno se enciende automáticamente cuando se abre la puerta. • La ...
Page 85 - Uso de las parrillas del horno
Español 29 Funcionamient o del horno Uso de las parrillas del horno Posiciones de las parrillas en el horno 07 06 05 04 03 02 01 Posición recomendada de las parrillas para cocción Tipo de alimento Posición de la parrilla Hamburguesas a la parrilla 7 Carnes o cortes pequeños de ave, pescado, a la par...
Page 86 - Hornear; Hornear por convección
30 Español Funcionamient o del horno Funcionamiento del horno PRECAUCIÓN • No use papel de aluminio para cubrir las parrillas ni el fondo del horno. Tales acciones entorpecerían la circulación del calor, crearían problemas en el proceso de horneado y podrían dañar el fondo del horno. • Coloque las p...
Page 87 - Asar por convección
Español 31 Funcionamient o del horno Cómo ajustar el horno para hornear por convección.1. Active el modo de hornear por convección. Presione Bake (Hornear por convección) . La temperatura predeterminada es de 350 °F. 2. Ingrese la temperatura que desea, por ejemplo 400 °F, utilizando las teclas numé...
Page 88 - Asar a la parrilla
32 Español Funcionamient o del horno Funcionamiento del horno Guía de recomendaciones para asar a la parrilla Los tiempos necesarios para asar a la parrilla dependerán del tamaño, peso, espesor, temperatura inicial y su preferencia en cuanto al grado de cocción.Esta guía esta basada en carnes a temp...
Page 89 - Cómo utilizar la función de cocción fácil
Español 33 Funcionamient o del horno Alimento Grado de cocción Tamaño Espesor Ajuste de asado a la parrilla Posición de la parrilla Tiempo de cocción (Minutos) 1er lado 2do lado Presas de pollo Muy hecho 4.5 lbs ¾"-1" BAJA 4 18:00- 20:00 16:00- 18:00 Muy hecho 2-2½ lbs. ¾"-1" BAJA 4 ...
Page 90 - Cómo usar la función de mantener caliente; Cómo utilizar la función de cocción favorita
34 Español Funcionamient o del horno Funcionamiento del horno Cómo recuperar un ajuste1. Presione Favorite cook (Cocción favorita) la cantidad de veces que corresponda a la posición en la cual está almacenado el ajuste, por ejemplo para Cocción personalizada posición 2, presione Favorite Cook (Cocci...
Page 91 - Uso de la función Shabat
Español 35 Funcionamient o del horno No intente activar ninguna otra función de programa excepto BAKE (HORNEAR) mientras la función Shabat está activa. ÚNICAMENTE las siguientes teclas funcionarán correctamente con la función Shabat activada: NÚMERO, BAKE (HORNEAR), START/SET (INICIO/CONFIGURAR) y O...
Page 92 - Funciones adicionales
36 Español Funcionamient o del horno Funcionamiento del horno Función de auto-conversión por convección Cuando se utiliza la función de autoconversión, la función de autoconversión por convección convertirá automáticamente las temperaturas normales ingresadas a las temperaturas correspondientes para...
Page 93 - Uso del cajón de calentamiento; Acerca del cajón de calentamiento
Español 37 Uso del c ajón de c alent amient o Uso del cajón de calentamiento Acerca del cajón de calentamiento El cajón de calentamiento mantendrá comidas cocidas y calientes a temperaturas aptas para servir. Siempre comience con alimentos calientes. No lo utilice para calentar alimentos fríos, exce...
Page 94 - Mantenimiento de su electrodoméstico; Encendido y apagado del cajón de calentamiento
38 Español Mant enimient o de su elec tr odomé stico Mantenimiento de su electrodoméstico Mantenimiento de su electrodoméstico Auto-limpieza Este horno auto-limpiante utiliza altas temperaturas (mucho más altas que las temperaturas de cocción) para eliminar por incineración los restos de grasa y otr...
Page 96 - Limpieza al vapor
40 Español Mant enimient o de su elec tr odomé stico Mantenimiento de su electrodoméstico NOTA Si presiona Steam Clean (Limpieza con vapor) cuando la temperatura del horno se encuentra por encima de los 100 ˚˚F, aparecerá la palabra Hot (Caliente) en la pantalla. Dado que estas funciones producen me...
Page 97 - Cuidado y limpieza del horno
Español 41 Mant enimient o de su elec tr odomé stico 3. Limpie un área pequeña, frotando en la dirección del grano del acero inoxidable, si fuese el caso. 4. Seque y lustre con una toalla de papel seca y limpia o un paño húmedo. 5. Repita en la medida de lo necesario. NOTA • No use una esponja de la...
Page 98 - Cuidado y limpieza de la cubierta de vidrio
42 Español Mant enimient o de su elec tr odomé stico Mantenimiento de su electrodoméstico Cuidado y limpieza de la cubierta de vidrio Limpieza en el uso normal diario Use solo un producto de limpieza para superficies de cocción cerámicas. Otras cremas podrían resultar menos efectivas.Seguir estos pa...
Page 100 - Cómo retirar y volver a colocar la puerta del horno
44 Español Mant enimient o de su elec tr odomé stico Mantenimiento de su electrodoméstico alrededor de 5° Fig. 1 Fig. 2 3. Sujete firmemente ambos lados de la puerta en su extremo superior. 4. Cierre la puerta hasta la posición de remoción, que es a aproximadamente 5 grados de la posición vertical (...
Page 101 - Cómo retirar y volver a colocar el cajón de calentamiento
Español 45 Mant enimient o de su elec tr odomé stico 3. Abra la puerta por completo. Si la puerta no se abre completamente, la muesca no se encuentra correctamente insertada en el borde inferior de la ranura. 4. Empuje las trabas de bisagra hacia arriba contra el marco frontal de la cavidad del horn...
Page 102 - Resolución de problemas; Recambio de la luz del horno
46 Español R esolución de pr oblemas Resolución de problemas Resolución de problemas Resolución de problemas Samsung hace grandes esfuerzos para asegurar que usted no experimente problemas con su nueva estufa eléctrica. Si se encuentra con problemas inesperados, como primera medida busque la solució...
Page 107 - Códigos de información
Español 51 R esolución de pr oblemas CAJÓN Problema Causa posible Solución El cajón no se desliza con suavidad o se arrastra con fricción. El cajón se encuentra desalineado. Jale el cajón hacia afuera completamente y empújelo totalmente hacia adentro. Consulte la página 45. El cajón está sobrecargad...
Page 108 - Garantía
52 Español Garantía Garantía Durante el periodo de garantía aplicable, el producto se reparará o se reemplazará, o se devolverá el importe de compra, a la entera discreción de SAMSUNG. SAMSUNG podrá usar piezas nuevas o reacondicionadas para la reparación del producto, o reemplazar el producto por u...
Page 111 - Notas
Page 113 - Cuisinière électrique; Manuel d’utilisation
Cuisinière électrique Manuel d’utilisation NE59J7650**/NE59J7651**
Page 114 - Dispositif anti-basculement; APRÈS AVOIR INSTALLÉ LA CUISINIÈRE,; AVERTISSEMENT; L’appareil
2 Français Dispositif anti-basculement AVERTISSEMENT Afin d’éviter tout risque de basculement de la cuisinière, fixez-la correctement à l’aide d’un dispositif anti-basculement. APRÈS AVOIR INSTALLÉ LA CUISINIÈRE, CONFIRMEZ QUE LE DISPOSITIF ANTI-BASCULEMENT EST BIEN INSTALLÉ ET VÉRIFIEZ QUE CE DERNI...
Page 116 - ATTENTION; ATTENTION; Suivez scrupuleusement les consignes.; Consignes de sécurité importantes; Le présent guide ne couvre pas toutes les; Symboles de sécurité importants et précautions; Signification des icônes et des symboles utilisés dans ce manuel :
4 Français C onsigne s de sécurit é impor tantes Consignes de sécurité importantes ATTENTION Risques ou manipulations dangereuses susceptibles d’entraîner des blessures légères ou des dégâts matériels. ATTENTION Afin de réduire les risques d’incendie, d’explosion, d’électrocution ou de blessures lor...
Page 117 - CALIFORNIA PROPOSITION 65 AVERTISSEMENT; POUR VOTRE SÉCURITÉ
Français 5 C onsigne s de sécurit é impor tantes CALIFORNIA PROPOSITION 65 AVERTISSEMENT AVERTISSEMENT Cancer et Troubles de l’appareil reproducteur – www.P65Warnings.ca.gov. POUR VOTRE SÉCURITÉ Lorsque vous utilisez des appareils électriques, respectez les consignes de sécurité de base suivantes : ...
Page 118 - Portez les vêtements appropriés.
6 Français C onsigne s de sécurit é impor tantes Consignes de sécurité importantes • Stockage à l'intérieur ou sur le dessus de l'appareil. N'entreposez aucun matériau inflammable dans ou à proximité du four. Retirez tous les éléments d'emballage de l'appareil avant de l'utiliser. Maintenez tout obj...
Page 119 - TABLES DE CUISSON
Français 7 C onsigne s de sécurit é impor tantes • Soyez prudent lorsque vous touchez la table de cuisson. La surface vitrée restera chaude quelques minutes même après l’arrêt de la cuisson. • Posez les ustensiles de cuisine sur la table de cuisson avec précaution, surtout lorsque celle-ci fonctionn...
Page 120 - SÉCURITÉ ÉLECTRIQUE
8 Français C onsigne s de sécurit é impor tantes Consignes de sécurité importantes SÉCURITÉ ÉLECTRIQUE • Bonne installation - Assurez-vous que votre appareil est correctement installé et mis à la terre par un technicien qualifié. • L’entretien de cet appareil doit impérativement être effectué par un...
Page 121 - SÉCURITÉ ENFANTS
Français 9 C onsigne s de sécurit é impor tantes AVERTISSEMENT Si la surface est fendue, éteignez et débranchez l’appareil afin d’éviter tout risque d’électrocution. N’utilisez pas la table de cuisson tant que la surface vitrée n’a pas été remplacée. AVERTISSEMENT • Afin d’éviter tout risque d’élect...
Page 122 - FOUR
10 Français C onsigne s de sécurit é impor tantes Consignes de sécurité importantes • Soyez prudent lorsque vous ouvrez la porte. Laissez l’air chaud ou la vapeur s’échapper avant de retirer les aliments du four ou de les placer à l’intérieur. • Couches protectrices. N’utilisez pas de papier d’alumi...
Page 123 - N’utilisez pas le tiroir pour sécher des journaux.; Soyez prudent à l’ouverture du tiroir.
Français 11 C onsigne s de sécurit é impor tantes • N’utilisez pas le tiroir pour sécher des journaux. En cas de surchauffe, les journaux risquent de s’enflammer. • N’utilisez pas de papier d’aluminium pour tapisser le tiroir. Le papier d’aluminium est un excellent isolant thermique et aurait pour c...
Page 124 - HOTTE D’ASPIRATION; Nettoyez fréquemment la hotte d’aspiration.; FOURS AUTO-NETTOYANTS; Ne nettoyez jamais le joint de la porte.
12 Français C onsigne s de sécurit é impor tantes Consignes de sécurité importantes • Procédez uniquement au cycle d’auto-nettoyage des parties mentionnées dans le manuel. Avant de procéder à l’auto-nettoyage du four, retirez la plaque de séparation, la grille, les ustensiles et tous les aliments. •...
Page 125 - SURFACES DE CUISSON EN VITROCÉRAMIQUE; Ne faites rien cuire sur une table de cuisson brisée.
Français 13 C onsigne s de sécurit é impor tantes AVERTISSEMENTS IMPORTANTS RELATIFS À L’INSTALLATION AVERTISSEMENT • Cet appareil doit être installé par un technicien qualifié ou une société de dépannage. - Le non-respect de cette consigne peut provoquer une électrocution, un incendie, une explosio...
Page 132 - Présentation; Accessoires fournis; Présentation de votre nouvelle cuisinière
20 Français Pr ésent ation de v o tr e nouv elle cuisinièr e Présentation de votre nouvelle cuisinière Présentation 02 03 01 04 05 07 06 11 08 09 10 01 Tableau de commande du four (Voir page 26 pour plus d’informations) 02 Surface vitrée 03 Porte du four 04 Tiroir chauffe-plat 05 * Boutons de comman...
Page 133 - Cuisiner sur la table de cuisson; À propos de la cuisine sur la table de cuisson; Avant de commencer; Conseils pour économiser de l’énergie
Français 21 A v ant de c ommenc er Cuisiner sur la table de cuisson À propos de la cuisine sur la table de cuisson ATTENTION AVANT LA CUISSON • N’utilisez pas la table de cuisson vitrée comme planche à découper. • Ne placez et ne rangez rien qui soit susceptible de fondre ou de s’enflammer sur la su...
Page 135 - Comment régler la cuisinière pour utiliser la table de cuisson ?
Français 23 Cuisiner sur la t able de cuis son Témoin de surface chaude • S’allume lorsque la surface est allumée ou est chaude au toucher. • Reste allumé même après la mise hors tension du foyer. • Reste allumé jusqu’à ce que la surface descende à environ 150 °F. Zones de cuisson • Les zones de cui...
Page 136 - Utilisation des ustensiles de cuisine appropriés
24 Français Cuisiner sur la t able de cuis son Cuisiner sur la table de cuisson Utilisation des ustensiles de cuisine appropriés L’utilisation de l’ustensile de cuisine approprié permet d’éviter de nombreux problèmes tels qu’une cuisson inégale ou un temps de cuisson trop long. Utiliser une casserol...
Page 137 - Choix des ustensiles de cuisine appropriés
Français 25 Cuisiner sur la t able de cuis son • N’utilisez pas d’agent de blanchiment chloré, d’ammoniac ou de nettoyant non recommandé pour une utilisation sur une surface en vitrocéramique. Prévention des traces et des rayures • N’utilisez pas d’ustensiles en verre. Ils pourraient rayer la table ...
Page 138 - Utilisation du four; Tableau de commande du four
26 Français Utilisation du f our Utilisation du four 01 ÉCRAN : indique l’heure, la température du four, si le four est en mode Cuisson, Gril ou Auto-nettoyage et le temps réglé pour la minuterie ou le fonctionnement automatique. • : Lorsque vous utilisez la fonction d’auto-nettoyage, cette icône ap...
Page 139 - Cuisson minutée; Réglage de l’horloge; Réglage de la minuterie
Français 27 Utilisation du f our 3. Lancez la minuterie. Appuyez sur Timer On/Off (Activation/Désactivation de la minuterie). 4. Une fois le temps réglé écoulé, le four émet un signal sonore et le message End (Fin) reste affiché jusqu’à ce que vous appuyiez sur Timer On/Off (Activation/Désactivation...
Page 140 - Activation et désactivation de l’éclairage du four; Départ différé
28 Français Utilisation du f our Utilisation du four 8. Appuyez sur START/SET (DÉMARRAGE/RÉGLAGE). À l’heure réglée, un court signal sonore retentit. Le four commence alors à chauffer. Activation et désactivation de l’éclairage du four • L’éclairage du four s’allume automatiquement à l’ouverture de ...
Page 141 - Utilisation des grilles du four
Français 29 Utilisation du f our Utilisation des grilles du four Hauteurs de grille 07 06 05 04 03 02 01 Position recommandée de la grille pour la cuisson Type d’aliment Hauteur de grille Cuisson d’hamburgers au gril 7 Cuisson au gril de viandes ou de petits morceaux de volaille, poisson 5-7 Couronn...
Page 142 - Cuisson; Cuisson par convection
30 Français Utilisation du f our Utilisation du four Cuisson Le four peut être programmé pour cuire à toute température comprise entre 175 °F et 550 °F. La température et le temps de cuisson varient en fonction des ingrédients, ainsi que de la taille et de la forme du plat de cuisson utilisé. Les re...
Page 143 - Rôtissage par convection
Français 31 Utilisation du f our Comment régler le four pour la cuisson par convection ? 1. Lancez le mode de cuisson par convection. Appuyez sur Bake (Cuisson traditionnelle). La température par défaut est de 350 °F. 2. Saisissez la température de votre choix (ex. : 400 °F) à l’aide du pavé numériq...
Page 144 - Cuisson au gril
32 Français Utilisation du f our Utilisation du four Guide de recommandations concernant la cuisson au gril Les temps de cuisson au gril dépendent de la taille, du poids, de l’épaisseur, de la température de départ ainsi que de vos préférences de cuisson.Ce guide se base sur des viandes sortant du r...
Page 145 - Utilisation de la fonction Cuisson facile
Français 33 Utilisation du f our Aliment Cuisson Dimensions Épaisseur Réglage du gril Hauteur de grille Temps de cuisson (minutes) 1er côté 2ème côté Morceaux de poulet Bien cuit 4,5 li. ¾” à 1” FAIBLE 4 18:00 à 20:00 16:00 à 18:00 Bien cuit 2-2½ lbs. ¾” à 1” FAIBLE 4 15:00 à 18:00 13:00 à 16:00 Côt...
Page 146 - Utilisation de la fonction de maintien au chaud; Utilisation de la fonction Cuisson favorite
34 Français Utilisation du f our Utilisation du four 5. Vous pouvez mémoriser une recette dans l’une des trois positions de cuisson favorite. Appuyez sur Favorite Cook (Cuisson favorite) le nombre de fois correspondant à la position à laquelle vous souhaitez mémoriser le paramètre. Par exemple, pour...
Page 147 - Utilisation de la fonction Shabbat
Français 35 Utilisation du f our Il est déconseillé d’activer un programme autre que la fonction BAKE (CUISSON) pendant que la fonction Shabbat est activée. Seules les touches suivantes fonctionnent correctement en parallèle avec la fonction Shabbat : PAVÉ NUMÉRIQUE, BAKE (CUISSON TRADITIONNELLE), S...
Page 148 - Fonctions complémentaires
36 Français Utilisation du f our Utilisation du four Fonction de convection par conversion automatique Lorsque vous utilisez la fonction de conversion automatique, la fonction de convection par conversion automatique permet de convertir automatiquement les températures de la cuisson classique en tem...
Page 149 - Utilisation du tiroir chauffe-plat; À propos du tiroir chauffe-plat
Français 37 Utilisation du tir oir chauf fe-plat Utilisation du tiroir chauffe-plat À propos du tiroir chauffe-plat Le tiroir chauffe-plat conserve les aliments cuits au chaud. Les aliments doivent être déjà chauds. Ne l’utilisez pas pour faire chauffer des aliments froids, à l’exception du pain, de...
Page 150 - Entretien de votre appareil; Activation ou désactivation du tiroir chauffe-plat
38 Français Entr etien de v o tr e appar eil Entretien de votre appareil Entretien de votre appareil Auto-nettoyage Ce four auto-nettoyant utilise des températures élevées (bien supérieures aux températures de cuisson) pour brûler complètement les résidus de graisse ou les réduire en fine poudre qu’...
Page 152 - Nettoyage vapeur
40 Français Entr etien de v o tr e appar eil Entretien de votre appareil REMARQUE Si vous appuyez sur Steam Clean (Nettoyage vapeur) alors que la température du four est supérieure à 100 °F, l’indication Hot (Chaud) s’affiche à l’écran. Pour assurer des résultats optimaux, il est préférable de démar...
Page 153 - Entretien et nettoyage du four
Français 41 Entr etien de v o tr e appar eil 3. Nettoyez une petite zone, en frottant si possible l’inox dans le sens du grain. 4. Séchez et lustrez à l’aide de papier absorbant ou d’un torchon doux propre et sec. 5. Répétez l’opération si nécessaire. REMARQUE • N’utilisez pas de tampon à récurer mé...
Page 154 - Entretien et nettoyage de la table de cuisson vitrée
42 Français Entr etien de v o tr e appar eil Entretien de votre appareil Entretien et nettoyage de la table de cuisson vitrée Nettoyage après une utilisation quotidienne Utilisez uniquement un nettoyant céramique pour la table de cuisson. L’utilisation d’autres crèmes n’a pas la même efficacité.En r...
Page 156 - Retrait et remise en place de la porte du four
44 Français Entr etien de v o tr e appar eil Entretien de votre appareil environ 5° Fig. 1 Fig. 2 3. Saisissez fermement les deux côtés de la porte par le haut. 4. Fermez la porte jusqu’à la position de retrait de la porte, soit à environ 5 degrés de la position verticale (Fig. 1). 5. Soulevez et re...
Page 157 - Retrait et remise en place du tiroir chauffe-plat
Français 45 Entr etien de v o tr e appar eil 3. Ouvrez la porte au maximum. Si la porte ne s’ouvre pas complètement, c’est que la partie creuse n’est pas correctement insérée dans la partie inférieure du logement. 4. Poussez les verrous de la charnière vers le haut contre le cadre de la cavité du fo...
Page 158 - Dépannage; Remplacement de l’ampoule du four
46 Français Dépannag e Dépannage Dépannage Dépannage Samsung veille à ce que vous ne rencontriez pas de problèmes lors de l’utilisation de votre nouvelle cuisinière électrique. En cas de problème inattendu, recherchez en premier lieu une solution dans le tableau ci-dessous. Si, après avoir essayé la...
Page 163 - Codes d’information
Français 51 Dépannag e TIROIR Problème Cause possible Solution Le tiroir ne glisse pas correctement ou se bloque. Le tiroir n'est pas correctement aligné. Ouvrez complètement le tiroir et repoussez-le au maximum. Voir page 45. Le tiroir est surchargé ou sa charge est mal répartie. Réduisez-en le poi...
Page 164 - Garantie
52 Français Garantie Garantie Pendant la période de garantie applicable, le produit sera réparé, remplacé ou remboursé à la valeur de son prix d’achat, à la seule discrétion de SAMSUNG. SAMSUNG peut être amenée à utiliser des pièces neuves ou reconditionnées lors de la réparation du produit, ou à re...
Page 167 - Notes