Prolux x8pro - User Manual
Prolux x8pro Vacuum – User Manual, read for free online in PDF format. We hope this helps you resolve any issues you may have. If you have further questions, please contact us through the contact form.


Table of Contents:
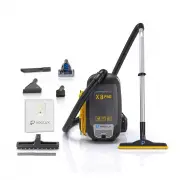
- Page 2 – Prolux X8 Backpack Vacuum
- Page 3 – Table of Contents; Assembly
- Page 4 – Quick Assembly; you can find them at the link below, or scan the QR code to go to our
- Page 5 – Specifications; Lightweight – Canister only weighs 10lbs
- Page 6 – WARRANTY; LIFETIME
- Page 7 – Read the owner's manual in its entirety before using this product.; WARNING
- Page 8 – SAFETY CONTINUED; Never immerse the appliance in water or other liquids.
- Page 9 – Strangulation by cord.
- Page 10 – Description of Parts; Squeegee Floor Tool
- Page 12 – ASSEMBLING YOUR VACUUM; Important; accessories; NOTE
- Page 15 – USING THE ATTACHMENTS; This tool is not a grooming tool and should not be used on animals.
- Page 16 – CONNECTING THE ATTACHMENTS TO YOUR WAND; provided with your Backpack Vacuum Cleaner.; Tool Storage
- Page 18 – VACUUM CLEANING; place the unit could fall off your back causing damage or injury.
- Page 19 – Removing & Replacing HEPA Dust Bag; For best performance; DO NOT; use the vacuum without all filters, cloth dust bag, or; HEPA; and filter each time the HEPA dust bag is replaced.
- Page 20 – Cleaning the Cloth Dust Bag Used with the HEPA Bag:; Replace with the clean cloth dust bag and close the canister lid.; Cleaning the HEPA Pre-Motor Filter; The HEPA pre-motor filter will stop most of the tiniest dust; Cleaning the Exhaust Filter
- Page 21 – Frequently Asked Questions; Vacuum bag is full. Open top of the unit and check bag capacity.; Can I use an electric powerhead with this model?
- Page 22 – Troubleshooting
- Page 23 – Why do I have to register my warranty within 90 days to get my; Great question! Do you know what normally kills a vacuum cleaner?; To register for your Lifetime Warranty, go to; scan below with your phone
- Page 24 – LIFETIME LIMITED WARRANTY; What is Not Covered by the Prolux Warranty - Warranty Exclusions:; This limited warranty does not extend to and expressly excludes:
"Loading the manual" means you need to wait until the file loads and becomes available for online reading. Some manuals are very large, and the time they take to appear depends on your internet speed.
Summary
Prolux X8 Backpack Vacuum For your safety please read the owner’s manual in its entirety before use. Congratulations on purchasing your very own Prolux X8 Pro Backpack Vacuum Cleaner. This high-end kit is designed to cut cleaning time in half without breaking the bank. Keep your floors clean, and pro...
Table of Contents Quick Assembly 4 Specifications 5 Warranty 6 Safety Precautions 7-9 Description of Parts 10-11 Unpacking and Assembling Assembly 12-14 Operation Using Accessories and Tools 15-17 Vacuum Cleaning 18 Maintenance Replacing the HEPA Dust Bag 19 Replacing the Cloth Bag and Filters 20 Fr...
Quick Assembly To view some videos on unboxing, assembling and using your new vacuum you can find them at the link below, or scan the QR code to go to our YouTube page to see all of our videos: https://proluxcleaners.com/pages/prolux-x8-how-to-video-s 4