Prolux 19prolux2.0a - User Manual
Prolux 19prolux2.0a Vacuum – User Manual, read for free online in PDF format. We hope this helps you resolve any issues you may have. If you have further questions, please contact us through the contact form.


Table of Contents:
- Page 4 – Table of contents
- Page 5 – Specifications; Dust Receptacle Capacity
- Page 6 – OPTIONAL ACCESSORIES
- Page 7 – IMPORTANT SAFETY INSTRUCTIONS
- Page 8 – Cord Connection; Children
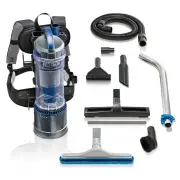
- Page 9 – GETTING TO KNOW YOUR BACKPACK VACUUM
- Page 10 – ASSEMBLY AND OPERATING INSTRUCTIONS; ATTACHING THE FLEXIBLE HOSE & TELESCOPIC WAND TO THE
- Page 12 – USING THE ATTACHMENTS
- Page 13 – CONNECTING THE ATTACHMENTS TO YOUR WAND
- Page 14 – PROPER VACUUMING TECHNIQUE WITH THE PROLUX 2.0 FLOOR TOOL
- Page 16 – HOW TO EMPTY THE DUST CONTAINER; HOW TO CLEAN AND REPLACE THE Vortex & HEPA FILTERS
- Page 18 – Troubleshooting
- Page 20 – Product Warranty Registration; Environmental tips
"Loading the manual" means you need to wait until the file loads and becomes available for online reading. Some manuals are very large, and the time they take to appear depends on your internet speed.
Summary
Table of contents Specifications 3 Optional Accessories 4 Safety Precautions 5 Assembly 7 Getting To Know Your Vacuum 7 Using The Accessories & Tools 10 Operation Operating Instructions/Adjusting The Harness 13 Maintenance Emptying The Dust/Dirt Container 14 Changing/Cleaning The Intake Vortex F...
Specifications ● Lightweight – Only weighs 9 lbs. ● Powerful 1400 Watt, 12 amp motor ● Amazing 125 Cubic Feet per Minute of Airflow! (Most vacuums only have 80 CFM) ● 95 Inches of Water Lift ● Motor Bypass valve, which adds years of life to the Motor ● 5 Year motor Warranty and 3 Year body Warranty....
OPTIONAL ACCESSORIES The Prolux 2.0 Power Nozzle attachment – This attachment is great for areas where the majority of the flooring is carpet or rugs. With its electrically powered spinning brush-roll, this is the perfect attachment to deep clean any carpeted surface. - 4 -