Page 2 - CAUTION; IMPORTANT
The exclamation point within an equilateral triangle is intended to alert the user to the presence of important operating and maintenance (servicing) instructions in the literature accompanying the appliance. The lightning flash with arrowhead symbol, within an equilateral triangle, is intended toal...
Page 3 - Operating Environment
Information for users on collection and disposal of old equipment and used batteries These symbols on the products, packaging, and/or accompanying documents mean that used electrical and electronic products and batteries should not be mixed with general household waste. For proper treatment, recover...
Page 4 - Contents; 1 Before you start; Bluetooth
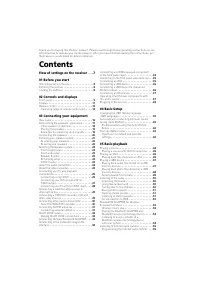
Thank you for buying this Pioneer product. Please read through these operating instructions so you will know how to operate your model properly. After you have finished reading the instructions, put them away in a safe place for future reference. Contents Flow of settings on the receiver . . .7 01 B...
Page 5 - 6 Listening to your system
English Français Deutsch Nederlands Italiano Español 06 Listening to your system Auto playback . . . . . . . . . . . . . . . . . . . . . . . . 57 Listening in surround sound . . . . . . . . . . . . . . 57 Standard surround sound . . . . . . . . . . . . . . 57 Using the Advanced surround effects . . ...
Page 6 - 2 Additional information
12 Additional information Troubleshooting . . . . . . . . . . . . . . . . . . . . . . 108 Power . . . . . . . . . . . . . . . . . . . . . . . . . . . . 108 No sound . . . . . . . . . . . . . . . . . . . . . . . . . 109 Other audio problems . . . . . . . . . . . . . . . . 110 Video . . . . . . . . . ...
Page 7 - Flow of settings on the receiver; procedure below to make the connections and; (When using connections other than the
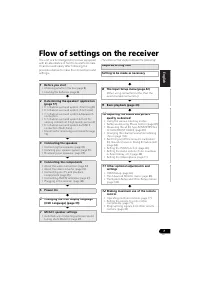
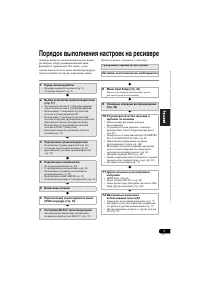
7 En English Français Deutsch Nederlands Italiano Español Flow of settings on the receiver The unit is a full-fledged AV receiver equipped with an abundance of functions and terminals. It can be used easily after following the procedure below to make the connections and settings. The colors of the s...
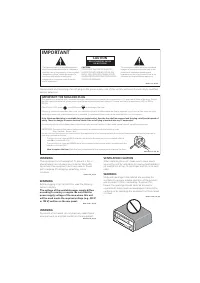
Page 8 - Before you start; Checking what’s in the box; Warranty card; Installing the receiver; WARNING
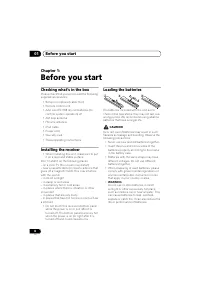
Before you start 01 8 En Chapter 1: Before you start Checking what’s in the box Please check that you’ve received the following supplied accessories: • Setup microphone (cable: 5 m)• Remote control unit• AAA size IEC R03 dry cell batteries (to confirm system operation) x2 • AM loop antenna• FM wire ...
Page 9 - English; Controls and displays; Front panel; Switching the speaker terminals
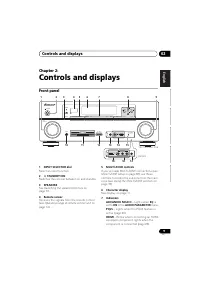
Controls and displays 02 9 En English Français Deutsch Nederlands Italiano Español Chapter 2: Controls and displays Front panel 1 INPUT SELECTOR dial Select an input function. 2 STANDBY/ON Switches the receiver between on and standby. 3 SPEAKERS See Switching the speaker terminals on page 73. 4 Re...
Page 11 - Display
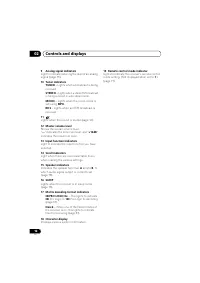
Controls and displays 02 11 En English Français Deutsch Nederlands Italiano Español Display 1 SIGNAL indicators Light to indicate the currently selected input signal. AUTO lights when the receiver is set to select the input signal automatically (page 61). 2 Program format indicators Light to indicat...
Page 13 - Remote control; RECEIVER
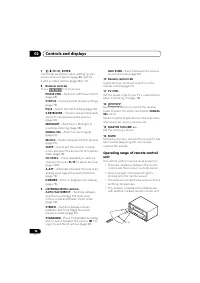
Controls and displays 02 13 En English Français Deutsch Nederlands Italiano Español Remote control This section explains how to operate the remote control for the receiver. The remote has been conveniently color-coded according to component control using the following system: • White – Receiver cont...
Page 15 - Connecting your equipment; Important; Rear panel
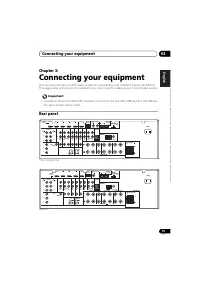
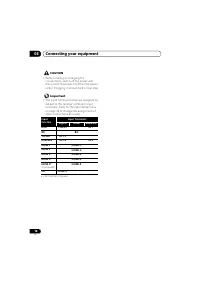
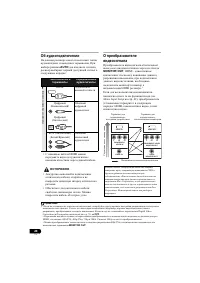
Connecting your equipment 03 15 En English Français Deutsch Nederlands Italiano Español Chapter 3: Connecting your equipment This receiver provides you with many connection possibilities, but it doesn’t have to be difficult. This page explains the kinds of components you can connect to make up your ...
Page 18 - Speaker System setting: ZONE 2; Speaker System; Speaker; Other speaker connections; Automatically conducting optimum
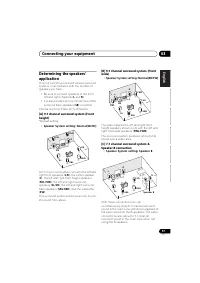
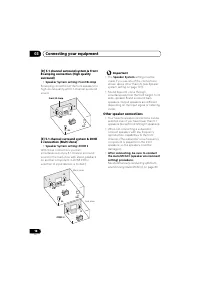
Connecting your equipment 03 18 En [D] 5.1 channel surround system & Front Bi-amping connection (High quality surround) • Speaker System setting: Front Bi-Amp Bi-amping connection of the front speakers for high sound quality with 5.1-channel surround sound. [E] 5.1 channel surround system & ...
Page 19 - Placing the speakers
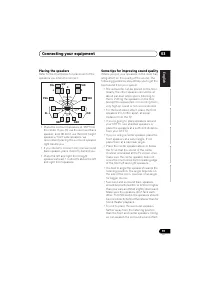
Connecting your equipment 03 19 En English Français Deutsch Nederlands Italiano Español Placing the speakers Refer to the chart below for placement of the speakers you intend to connect. • Place the surround speakers at 120º from the center. If you, (1) use the surround back speaker, and, (2) don’t ...
Page 20 - HAZARDOUS LIVE voltage; Bare wire connections; Twist exposed wire strands together.
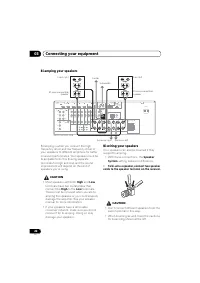
Connecting your equipment 03 20 En Connecting the speakers Each speaker connection on the receiver comprises a positive (+) and negative (–) terminal. Make sure to match these up with the terminals on the speakers themselves. CAUTION • These speaker terminals carry HAZARDOUS LIVE voltage . To preven...
Page 21 - Installing your speaker system
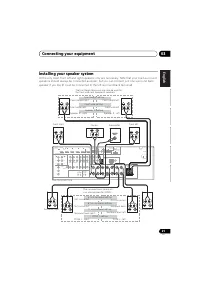
Connecting your equipment 03 21 En English Français Deutsch Nederlands Italiano Español Installing your speaker system At the very least, front left and right speakers only are necessary. Note that your main surround speakers should always be connected as a pair, but you can connect just one surroun...
Page 22 - Bi-amping your speakers; Bi-wiring your speakers
Connecting your equipment 03 22 En Bi-amping your speakers Bi-amping is when you connect the high frequency driver and low frequency driver of your speakers to different amplifiers for better crossover performance. Your speakers must be bi-ampable to do this (having separate terminals for high and l...
Page 23 - Selecting the Speaker system; Front height setup
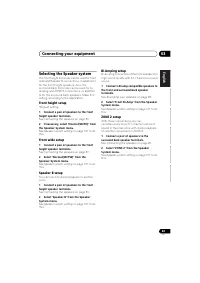
Connecting your equipment 03 23 En English Français Deutsch Nederlands Italiano Español Selecting the Speaker system The front height terminals can be used for front wide and Speaker B connections, in addition to for the front height speakers. Also, the surround back terminals can be used for bi- am...
Page 24 - AUTO; About the video converter; MONITOR OUT; The Input Setup; Sound signal priori
Connecting your equipment 03 24 En About the audio connection There are several types of audio input and output terminals on this receiver. The receiver selects the first available signal in the following order when you choose AUTO as the input signal: • With an HDMI cable, video and audio signals c...
Page 25 - Connecting your TV and playback components; Connecting using HDMI; BD; Control with HDMI function
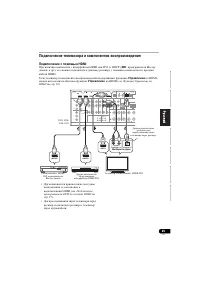
Connecting your equipment 03 25 En English Français Deutsch Nederlands Italiano Español Connecting your TV and playback components Connecting using HDMI If you have an HDMI or DVI (with HDCP) equipped component ( BD : Blu-ray disc player, etc.), you can connect it to this receiver using a commercial...
Page 26 - About HDMI; Control
Connecting your equipment 03 26 En About HDMI 1 The HDMI connection transfers uncompressed digital video, as well as almost every kind of digital audio that the connected component is compatible with, including DVD- Video, DVD-Audio, SACD, Dolby Digital Plus, Dolby TrueHD, DTS-HD Master Audio (see b...
Page 27 - Connecting your DVD player with no HDMI output; input you connected the DVD player to (see
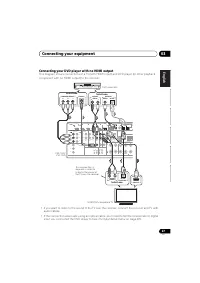
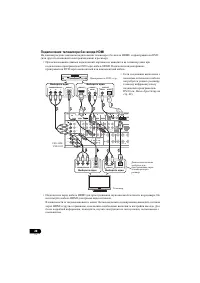
Connecting your equipment 03 27 En English Français Deutsch Nederlands Italiano Español Connecting your DVD player with no HDMI output This diagram shows connections of a TV (with HDMI input) and DVD player (or other playback component with no HDMI output) to the receiver. • If you want to listen to...
Page 28 - Connecting your TV with no HDMI input; Please refer to the operating instructions; supplied with your component; for more information.; • If the connection was made
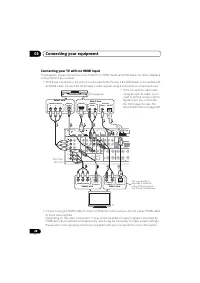
Connecting your equipment 03 28 En Connecting your TV with no HDMI input This diagram shows connections of a TV (with no HDMI input) and DVD player (or other playback component) to the receiver. • With these connections, the picture is not output to the TV even if the DVD player is connected with an...
Page 29 - The Input Setup menu
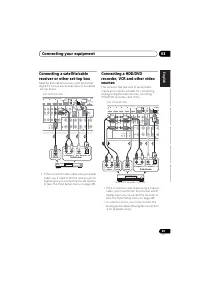
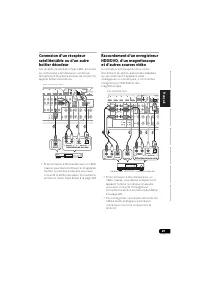
Connecting your equipment 03 29 En English Français Deutsch Nederlands Italiano Español Connecting a satellite/cable receiver or other set-top box Satellite and cable receivers, and terrestrial digital TV tuners are all examples of so-called ‘set-top boxes’. • If the connection was made using a coax...
Page 30 - CD; About the WMA9 Pro decoder
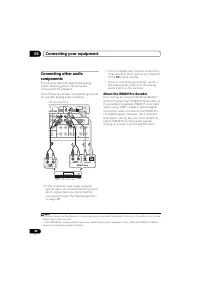
Connecting your equipment 03 30 En Connecting other audio components This receiver has both digital and analog inputs, allowing you to connect audio components for playback.One of these inputs have corresponding outputs for use with analog audio recorders. • If the connection was made using an optic...
Page 31 - Connecting AM/FM antennas; Connecting external antennas
Connecting your equipment 03 31 En English Français Deutsch Nederlands Italiano Español Connecting AM/FM antennas Connect the AM loop antenna and the FM wire antenna as shown below. To improve reception and sound quality, connect external antennas (see Connecting external antennas below). 1 Pull off...
Page 32 - remote or front panel controls.; Making MULTI-ZONE connections; for; MULTI-ZONE listening options; Connect a separate amplifier to the; Sub Zone Input functions available; USB
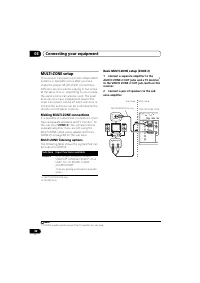
Connecting your equipment 03 32 En MULTI-ZONE setup This receiver can power up to two independent systems in separate rooms after you have made the proper MULTI-ZONE connections.Different sources can be playing in two zones at the same time or, depending on your needs, the same source can also be us...
Page 33 - Connect a pair of speakers to the; Connecting Optional; Switch the receiver into standby and; ADAPTER to the
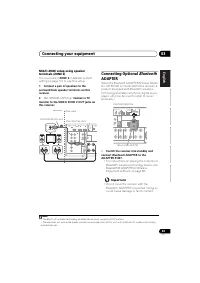
Connecting your equipment 03 33 En English Français Deutsch Nederlands Italiano Español MULTI-ZONE setup using speaker terminals (ZONE 2) You must select ZONE 2 in Speaker system setting on page 101 to use this setup. 1 Connect a pair of speakers to the surround back speaker terminals on this receiv...
Page 34 - Network Setup menu; LAN terminal specifications
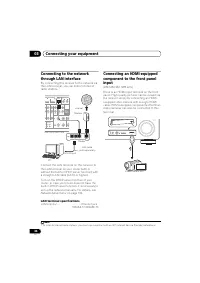
Connecting your equipment 03 34 En Connecting to the network through LAN interface By connecting this receiver to the network via the LAN terminal, you can listen to Internet radio stations. 1 Connect the LAN terminal on this receiver to the LAN terminal on your router (with or without the built-in ...
Page 35 - INPUT SELECTOR; Connecting an iPod; Switch the receiver into standby then use
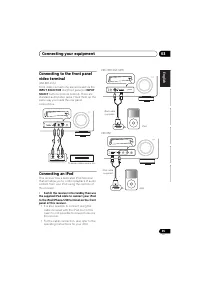
Connecting your equipment 03 35 En English Français Deutsch Nederlands Italiano Español Connecting to the front panel video terminal (VSX-920 only) Front video connections are accessed via the INPUT SELECTOR dial (front panel) or INPUT SELECT buttons (remote control). There are standard audio/video ...
Page 36 - Input Setup
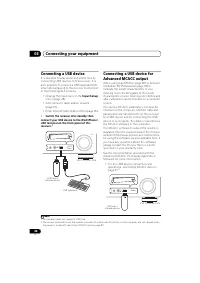
Connecting your equipment 03 36 En Connecting a USB device It is possible to play audio and photo files by connecting USB devices to this receiver. It is also possible to connect a USB keyboard (US- international layout) to the receiver to enter text in the following GUI screens. • Change the input ...
Page 37 - Connecting an IR receiver; Operating other Pioneer
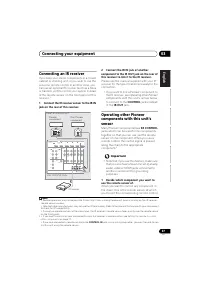
Connecting your equipment 03 37 En English Français Deutsch Nederlands Italiano Español Connecting an IR receiver If you keep your stereo components in a closed cabinet or shelving unit, or you wish to use the sub zone remote control in another zone, you can use an optional IR receiver (such as a Ni...
Page 38 - Connect the CONTROL OUT jack of that; Plugging in the receiver; Plug the supplied power cord into the AC
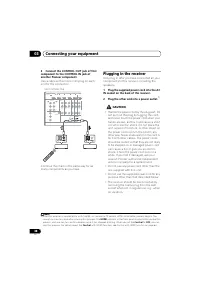
Connecting your equipment 03 38 En 2 Connect the CONTROL OUT jack of that component to the CONTROL IN jack of another Pioneer component. Use a cable with a mono mini-plug on each end for the connection. Continue the chain in the same way for as many components as you have. Plugging in the receiver O...
Page 39 - Basic Setup; Playing a source
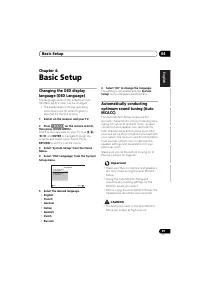
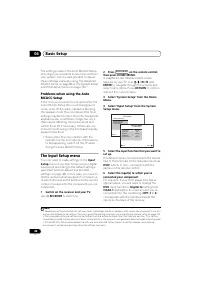
Basic Setup 04 39 En English Français Deutsch Nederlands Italiano Español Chapter 4: Basic Setup Changing the OSD display language (OSD Language) The language used on the Graphical User Interface (GUI) screen can be changed. • The explanations in these operating instructions are for when English is ...
Page 40 - THX
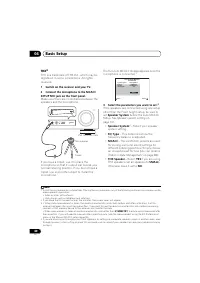
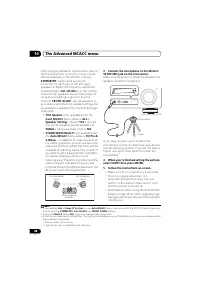
Basic Setup 04 40 En THX ® THX is a trademark of THX Ltd., which may be registered in some jurisdictions. All rights reserved. 1 Switch on the receiver and your TV. 2 Connect the microphone to the MCACC SETUP MIC jack on the front panel. Make sure there are no obstacles between the speakers and the ...
Page 41 - Problems when using the Auto
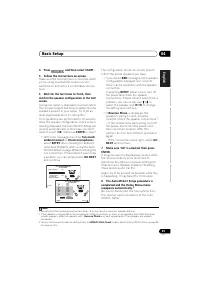
Basic Setup 04 41 En English Français Deutsch Nederlands Italiano Español 4 Press and then select START. 5 Follow the instructions on-screen. Make sure the microphone is connected, and if you’re using a subwoofer, make sure it is switched on and set to a comfortable volume level. 6 Wait for the test...
Page 43 - Input Terminals
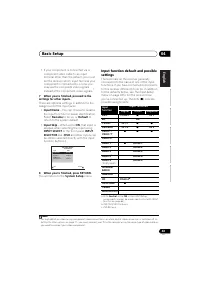
Basic Setup 04 43 En English Français Deutsch Nederlands Italiano Español • If your component is connected via a component video cable to an input terminal other than the default, you must tell the receiver which input terminal your component is connected to, or else you may see the composite video ...
Page 44 - Basic playback; Listening to your system
Basic playback 05 44 En Chapter 5: Basic playback Playing a source Here are the basic instructions for playing a source (such as a DVD disc) with your home theater system. 1 Switch on your system components and receiver. Start by switching on the playback component (for example a DVD player), your T...
Page 45 - Setting the; Playing an iPod; Playing back files stored on an iPod
Basic playback 05 45 En English Français Deutsch Nederlands Italiano Español Playing a source with HDMI connection • Use INPUT SELECT to select the HDMI input you’ve connected to (for example, HDMI 1). You can also perform the same operation by using the INPUT SELECTOR dial on the front panel or by ...
Page 46 - Finding what you want to play; Basic playback controls; Tip
Basic playback 05 46 En Finding what you want to play When your iPod is connected to this receiver, you can browse songs stored on your iPod by playlist, artist name, album name, song name, genre or composer, similar to using your iPod directly. 1 Use / to select ‘Music’ from the iPod top menu. 2 ...
Page 47 - Playing a USB device; Connecting a USB device
Basic playback 05 47 En English Français Deutsch Nederlands Italiano Español Playing a USB device It is possible to play files 1 using the USB interface on the front of this receiver. 1 Switch on the receiver and your TV. See Connecting a USB device on page 36. 2 2 Press iPod USB on the remote contr...
Page 48 - To return to the previous level any time, press; Displays the previous photo content.; DISP; Displays the photo information.
Basic playback 05 48 En Playing back photo files stored on a USB memory device 1 1 Use / to select ‘Photos’ from the USB Top menu. 2 Use / to select a folder, then press ENTER to browse that folder. • To return to the previous level any time, press RETURN . 3 Continue browsing until you arrive a...
Page 49 - About playable file formats; Music files; Category
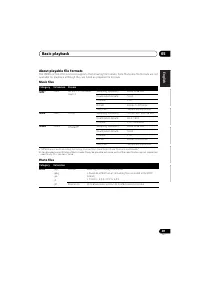
Basic playback 05 49 En English Français Deutsch Nederlands Italiano Español About playable file formats The USB function of this receiver supports the following file formats. Note that some file formats are not available for playback although they are listed as playable file formats. Music files Ph...
Page 50 - Tuning directly to a; Improving FM sound; Auto Surround, ALC and Stream Direct with; Tuning directly to a station
Basic playback 05 50 En Listening to the radio The following steps show you how to tune in to FM and AM radio broadcasts using the automatic (search) and manual (step) tuning functions. If you already know the frequency of the station you want, see Tuning directly to a station below. Once you are tu...
Page 51 - Listening to the radio; Naming station presets; Listening to station presets; Saving station presets
Basic playback 05 51 En English Français Deutsch Nederlands Italiano Español Saving station presets If you often listen to a particular radio station, it’s convenient to have the receiver store the frequency for easy recall whenever you want to listen to that station. This saves the effort of manual...
Page 52 - An introduction to RDS; Searching for RDS programs
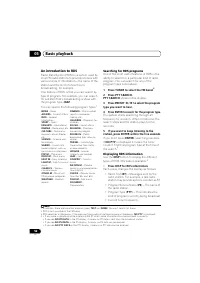
Basic playback 05 52 En An introduction to RDS Radio Data System (RDS) is a system used by most FM radio stations to provide listeners with various kinds of information—the name of the station and the kind of show they’re broadcasting, for example.One feature of RDS is that you can search by type of...
Page 53 - ® ADAPTER for; Wireless music play; Remote control operation; Pairing the; ADAPTER and; wireless technology; then; This
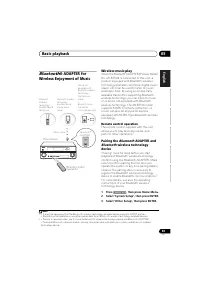
Basic playback 05 53 En English Français Deutsch Nederlands Italiano Español Bluetooth ® ADAPTER for Wireless Enjoyment of Music Wireless music play When the Bluetooth ADAPTER (Pioneer Model No. AS-BT100) is connected to this unit, a product equipped with Bluetooth wireless technology (portable cell...
Page 54 - Listening to music contents of a
Basic playback 05 54 En 4 Select ‘Pairing Bluetooth Device’, then press ENTER. 5 Select the ‘Passcode’ setting you want. Select the same passcode as the Bluetooth wireless technology device you wish to connect. • 0000 / 1234 / 8888 – Select the passcode from these options. These are the passcodes th...
Page 55 - Programming with the GUI screen
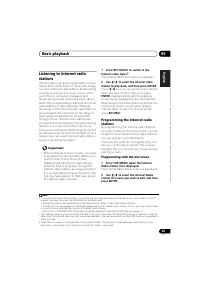
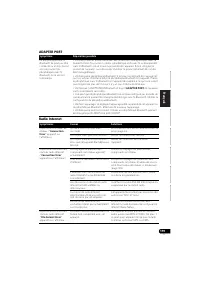
Basic playback 05 55 En English Français Deutsch Nederlands Italiano Español Listening to Internet radio stations Internet radio is an audio broadcasting service transmitted via the Internet. 1 There are a large number of Internet radio stations broadcasting a variety of services from every corner o...
Page 56 - Programming on the computer screen
Basic playback 05 56 En 3 Use / to select “Edit“. • If you select “Delete” , information regarding the Internet radio stations programmed into the currently selected memory will be deleted. 4 Enter the URL of the Internet radio station you wish to program. 1 Use / to select a letter and / to m...
Page 57 - Auto playback; Using Neural Surround; Standard surround sound
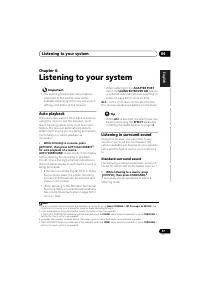
Listening to your system 06 57 En English Français Deutsch Nederlands Italiano Español Chapter 6: Listening to your system Important • The listening modes and many features described in this section may not be available depending on the current source, settings and status of the receiver. Auto playb...
Page 58 - With two channel sources
Listening to your system 06 58 En • If the source is Dolby Digital, DTS, or Dolby Surround encoded, the proper decoding format will automatically be selected and shows in the display. 1 With two channel sources , you can select from: • 2 Pro Logic IIx MOVIE – Up to 7.1 channel (surround back) sound,...
Page 59 - Using the Advanced surround effects; Listening in stereo
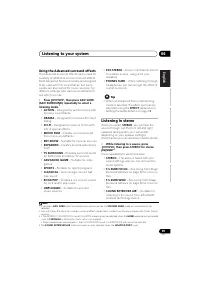
Listening to your system 06 59 En English Français Deutsch Nederlands Italiano Español Using the Advanced surround effects The Advanced surround effects can be used for a variety of additional surround sound effects. Most Advanced Surround modes are designed to be used with film soundtracks, but som...
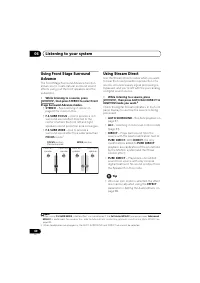
Page 60 - Using Stream Direct
Listening to your system 06 60 En Using Front Stage Surround Advance The Front Stage Surround Advance function allows you to create natural surround sound effects using just the front speakers and the subwoofer. • While listening to a source, press , then press STEREO to select Front Stage Surround ...
Page 61 - Selecting MCACC presets; Data Management; Choosing the input signal
Listening to your system 06 61 En English Français Deutsch Nederlands Italiano Español Selecting MCACC presets • Default setting: MEMORY 1 If you have calibrated your system for different listening positions 1 , you can switch between settings to suit the kind of source you’re listening to and where...
Page 62 - Press
Listening to your system 06 62 En Better sound using Phase Control This receiver’s Phase Control feature uses phase correction measures to make sure your sound source arrives at the listening position in phase, preventing unwanted distortion and/or coloring of the sound.Phase Control technology prov...
Page 65 - Before using synchronization
Control with HDMI function 07 65 En English Français Deutsch Nederlands Italiano Español Before using synchronization Once you have finished all connections and settings, you must: 1 Put all components into standby mode. 2 Turn the power on for all components, with the power for the TV being turned ...
Page 68 - Using other functions; Setting
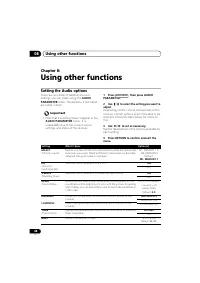
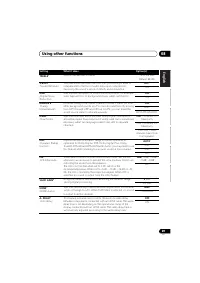
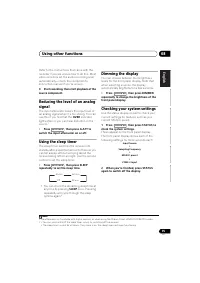
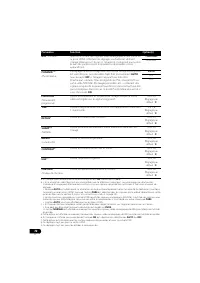
Using other functions 08 68 En Chapter 8: Using other functions Setting the Audio options There are a number of additional sound settings you can make using the AUDIO PARAMETER menu. The defaults, if not stated, are listed in bold. Important • Note that if a setting doesn’t appear in the AUDIO PARAM...
Page 71 - Setting the Video options; Converts video signals for output from the
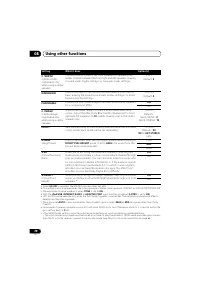
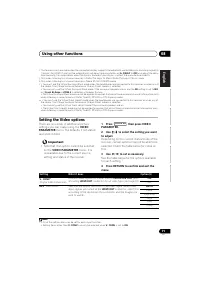
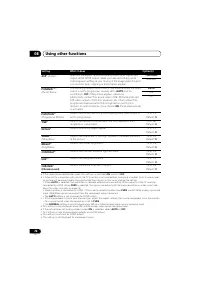
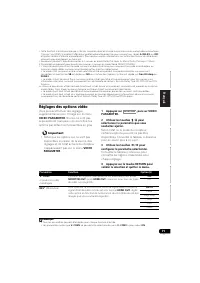
Using other functions 08 71 En English Français Deutsch Nederlands Italiano Español Setting the Video options There are a number of additional picture settings you can make using the VIDEO PARAMETER menu. The defaults, if not stated, are listed in bold. Important • Note that if an option cannot be s...
Page 72 - NORMAL
Using other functions 08 72 En ASP c (Aspect) Specifies the aspect ratio when analog video input signals are output at the HDMI output. Make your desired settings while checking each setting on your display (if the image doesn’t match your monitor type, cropping or black bands appear). THROUGH NORMA...
Page 73 - Speaker system; Using the MULTI-ZONE controls; controls
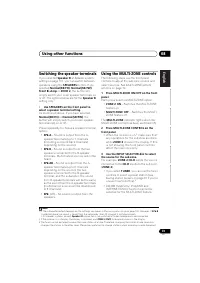
Using other functions 08 73 En English Français Deutsch Nederlands Italiano Español Switching the speaker terminals If you selected Speaker B at Speaker system setting on page 101, you can switch between speakers using the SPEAKERS button. If you selected Normal(SB/FH) , Normal(SB/FW) , Front Bi-Amp...
Page 74 - MULTI-ZONE remote controls; Button; MUTE
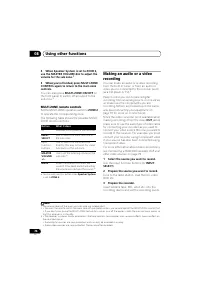
Using other functions 08 74 En 4 When Speaker System is set to ZONE 2, use the MASTER VOLUME dial to adjust the volume for the sub zone. 1 5 When you’re finished, press MULTI-ZONE CONTROL again to return to the main zone controls. You can also press MULTI-ZONE ON/OFF on the front panel to switch off...
Page 75 - Using the sleep timer
Using other functions 08 75 En English Français Deutsch Nederlands Italiano Español Refer to the instructions that came with the recorder if you are unsure how to do this. Most video recorders set the audio recording level automatically—check the component’s instruction manual if you’re unsure. 4 St...
Page 76 - Default system settings; Input function default and possible settings
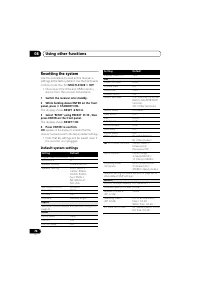
Using other functions 08 76 En Resetting the system Use this procedure to reset all the receiver’s settings to the factory default. Use the front panel controls to do this. Set MULTI-ZONE to OFF . • Disconnect the iPod and USB memory device from the receiver beforehand. 1 Switch the receiver into st...
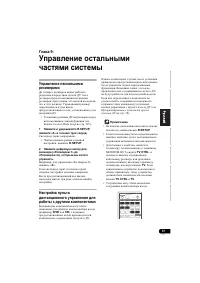
Page 77 - Controlling the rest of your system; Operating multiple receivers; Remote
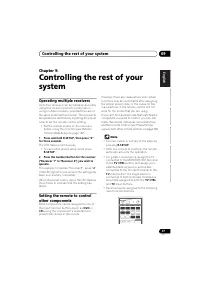
Controlling the rest of your system 09 77 En English Français Deutsch Nederlands Italiano Español Chapter 9: Controlling the rest of your system Operating multiple receivers Up to four receivers can be operated discretely using this receiver’s remote control when using multiple receivers, provided t...
Page 78 - Preset code list
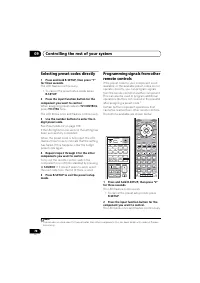
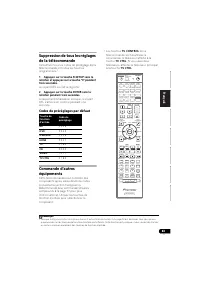
Controlling the rest of your system 09 78 En Selecting preset codes directly 1 Press and hold R.SETUP, then press “1” for three seconds. The LED flashes continuously. • To cancel the preset setup mode press R.SETUP . 2 Press the input function button for the component you want to control. When assig...
Page 80 - Press and hold the input function button; Direct function; On
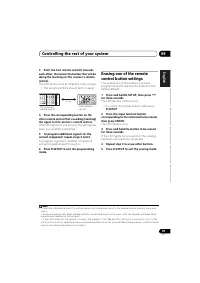
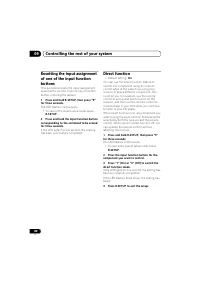
Controlling the rest of your system 09 80 En Resetting the input assignment of one of the input function buttons This procedure resets the input assignment preset at the remote control’s input function button, restoring the default. 1 Press and hold R.SETUP, then press “9” for three seconds. The LED...
Page 81 - Multi operation and System off; Programming
Controlling the rest of your system 09 81 En English Français Deutsch Nederlands Italiano Español Multi operation and System off The Multi operation feature allows you to program a series of up to 5 commands for the components in your system. • Be sure to call up the preset codes of devices or perfo...
Page 82 - Using multi operations
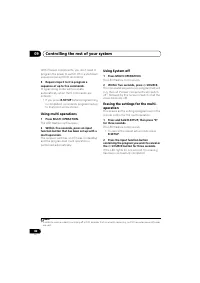
Controlling the rest of your system 09 82 En With Pioneer components, you don’t need to program the power to switch off in a shutdown sequence (except DVD recorders). 5 Repeat steps 3 to 4 to program a sequence of up to five commands. Programming mode will terminate automatically when the 5 commands...
Page 83 - Press and hold the ENTER button for; Default preset codes; Controlling components; TV CONTROL; Preset code
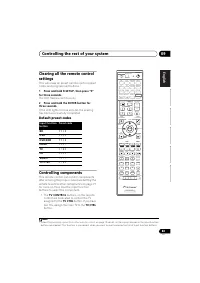
Controlling the rest of your system 09 83 En English Français Deutsch Nederlands Italiano Español Clearing all the remote control settings This will erase all preset remote control preset codes and programmed buttons. 1 1 Press and hold R.SETUP, then press “0” for three seconds. The LED flashes cont...
Page 85 - LD; numerics
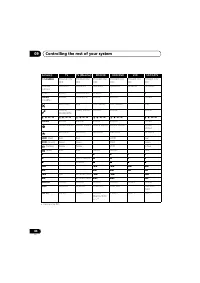
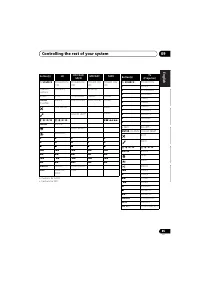
Controlling the rest of your system 09 85 En English Français Deutsch Nederlands Italiano Español b. Controls for SACD. c. Controls for MD. Button(s) LD CD/CD-R/ SACD MD/DAT TAPE SOURCE POWER ON/OFF POWER ON/OFF POWER ON/OFF POWER ON/OFF Number buttons numerics numerics numerics - • (dot) +10 >...
Page 86 - The Advanced MCACC menu; Automatically
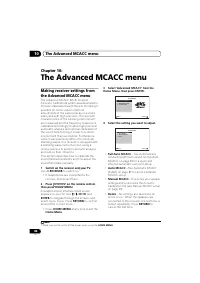
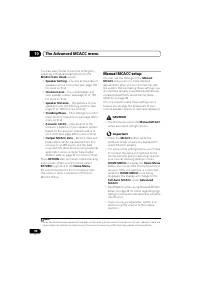
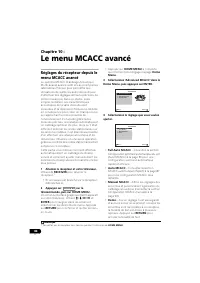
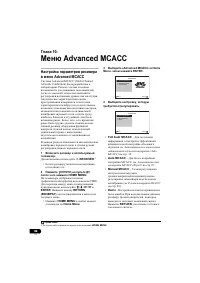
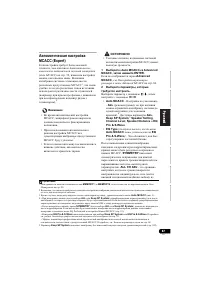
The Advanced MCACC menu 10 86 En Chapter 10: The Advanced MCACC menu Making receiver settings from the Advanced MCACC menu The Advanced MCACC (Multi Channel ACoustic Calibration) system was developed in Pioneer’s laboratories with the aim of making it possible for home users to perform adjustments o...
Page 90 - Output; Manual MCACC setup
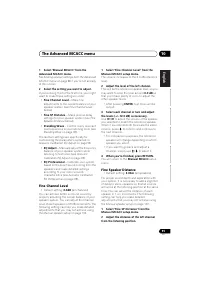
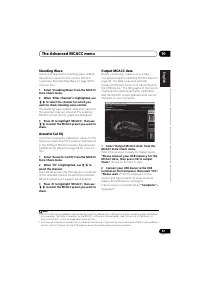
The Advanced MCACC menu 10 90 En You can also choose to view the settings by selecting individual parameters from the MCACC Data Check screen: • Speaker Setting – The size and number of speakers you’ve connected (see page 102 for more on this) • Channel Level – The overall balance of your speaker sy...
Page 91 - Fine Channel Level
The Advanced MCACC menu 10 91 En English Français Deutsch Nederlands Italiano Español 1 Select ‘Manual MCACC’ from the Advanced MCACC menu. See Making receiver settings from the Advanced MCACC menu on page 86 if you’re not already at this screen. 2 Select the setting you want to adjust. If you’re do...
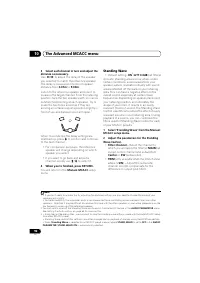
Page 92 - Standing Wave; (only available when the filter channel
The Advanced MCACC menu 10 92 En 3 Select each channel in turn and adjust the distance as necessary. Use / to adjust the delay of the speaker you selected to match the reference speaker. The delay is measured in terms of speaker distance from 0.01m to 9.00m . Listen to the reference speaker and us...
Page 93 - Acoustic Calibration EQ Adjust; Automatic; Acoustic Calibration EQ Professional
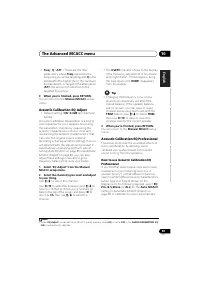
The Advanced MCACC menu 10 93 En English Français Deutsch Nederlands Italiano Español • Freq / Q / ATT – These are the filter parameters where Freq represents the frequency you will be targeting and Q is the bandwidth (the higher the Q, the narrower the bandwidth, or range) of the attenuation ( ATT ...
Page 94 - Using Acoustic Calibration EQ Professional; without
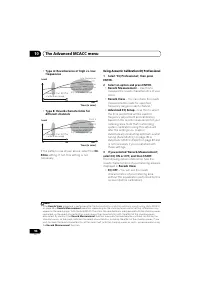
The Advanced MCACC menu 10 94 En • Type A: Reverberance of high vs. low frequencies • Type B: Reverb characteristics for different channels If the pattern is as shown above, select the 30- 50ms setting. If not, this setting is not necessary. Using Acoustic Calibration EQ Professional 1 Select ‘EQ Pr...
Page 95 - with
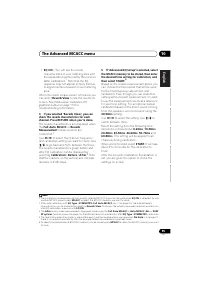
The Advanced MCACC menu 10 95 En English Français Deutsch Nederlands Italiano Español • EQ ON – You will see the reverb characteristics of your listening area with the equalization performed by this receiver (after calibration). 1 Note that the EQ response may not appear entirely flat due to adjustm...
Page 97 - Acoustic Cal EQ; Acoustic
The Advanced MCACC menu 10 97 En English Français Deutsch Nederlands Italiano Español Standing Wave Use this to display the standing wave related adjustment values for the various MCACC memories. See Standing Wave on page 92 for more on this. 1 Select ‘Standing Wave’ from the MCACC Data Check menu. ...
Page 98 - Renaming MCACC presets
The Advanced MCACC menu 10 98 En 3 When you’re finished, press RETURN. You will return to the MCACC Data Check menu. Continue with other operations in the MCACC Data Check menu if necessary. Press RETURN again to exit the MCACC Data Check menu. Data Management This system allows you to store up to s...
Page 99 - Clearing MCACC presets
The Advanced MCACC menu 10 99 En English Français Deutsch Nederlands Italiano Español 3 Select the MCACC preset you’ll be copying the settings ‘From’, then specify where you want to copy them (‘To’). Make sure you don’t overwrite an MCACC preset you’re currently using (this can’t be undone). 4 Selec...
Page 101 - The System Setup and Other Setup menus
The System Setup and Other Setup menus 11 101 En English Français Deutsch Nederlands Italiano Español 1 Select ‘Manual SP Setup’, then press ENTER. See Making receiver settings from the System Setup menu above if you’re not already at this screen. 2 Select the setting you want to adjust. If you are ...
Page 103 - Channel Level; Speaker Distance
The System Setup and Other Setup menus 11 103 En English Français Deutsch Nederlands Italiano Español • SW – LFE signals and bass frequencies of channels set to SMALL are output from the subwoofer when YES is selected. Choose the PLUS setting if you want the subwoofer to output bass sound continuous...
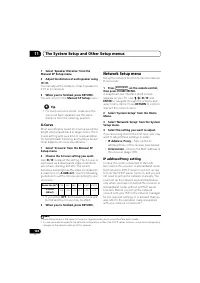
Page 104 - IP address/Proxy setting
The System Setup and Other Setup menus 11 104 En 1 Select ‘Speaker Distance’ from the Manual SP Setup menu. 2 Adjust the distance of each speaker using / . You can adjust the distance of each speaker in 0.01 m increments. 3 When you’re finished, press RETURN. You will return to the Manual SP Setup...
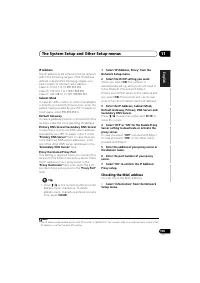
Page 105 - Checking the MAC address
The System Setup and Other Setup menus 11 105 En English Français Deutsch Nederlands Italiano Español IP Address The IP address to be entered must be defined within the following ranges. If the IP address defined is beyond the following ranges, you cannot listen to Internet radio stations. Class A: ...
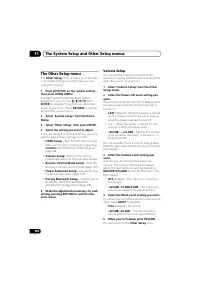
Page 106 - HDMI Setup; Volume Setup
The System Setup and Other Setup menus 11 106 En The Other Setup menu The Other Setup menu is where you can make customized settings to reflect how you are using the receiver. 1 Press on the remote control, then press HOME MENU. A Graphical User Interface (GUI) screen appears on your TV. Use ///...
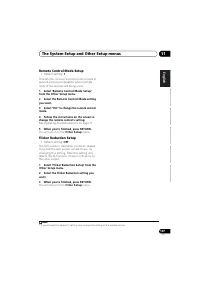
Page 107 - Remote Control Mode Setup; Flicker Reduction Setup
The System Setup and Other Setup menus 11 107 En English Français Deutsch Nederlands Italiano Español Remote Control Mode Setup • Default setting: 1 This sets this receiver’s remote control mode to prevent erroneous operation when multiple units of the receiver are being used. 1 1 Select ‘Remote Con...
Page 108 - Additional information; Troubleshooting; Power; Symptom
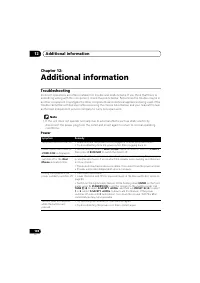
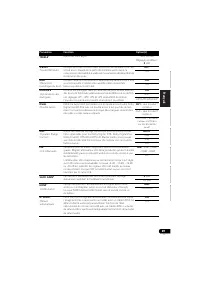
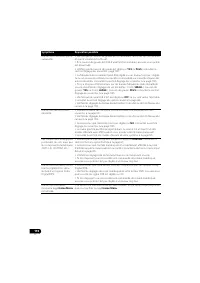
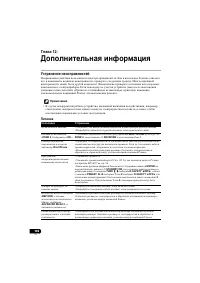
Additional information 12 108 En Chapter 12: Additional information Troubleshooting Incorrect operations are often mistaken for trouble and malfunctions. If you think that there is something wrong with this component, check the points below. Sometimes the trouble may lie in another component. Invest...
Page 109 - No sound
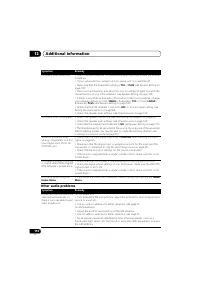
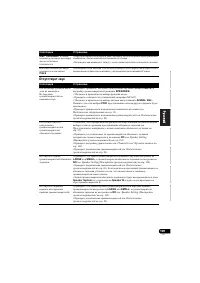
Additional information 12 109 En English Français Deutsch Nederlands Italiano Español No sound AMP ERR blinks in the display, then the power automatically switches off. The ADVANCED MCACC blinks and the power does not turn on. • The receiver may have a serious problem. Do not try switching the recei...
Page 110 - Other audio problems
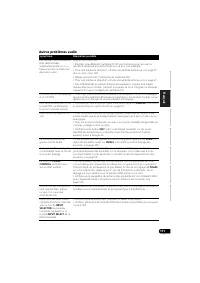
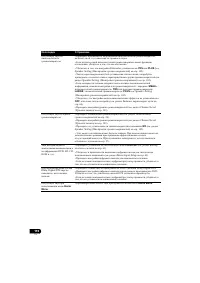
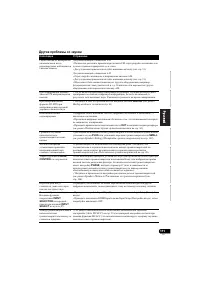
Additional information 12 110 En Other audio problems No sound from subwoofer. • Check that the subwoofer is connected properly, switched on and the volume turned up.• If your subwoofer has a sleep function, make sure it is switched off.• Make sure that the Subwoofer setting is YES or PLUS (see Spea...
Page 112 - Video
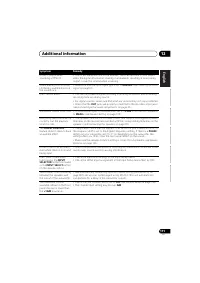
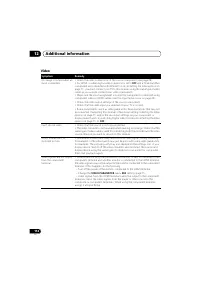
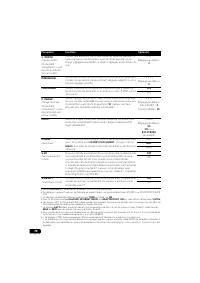
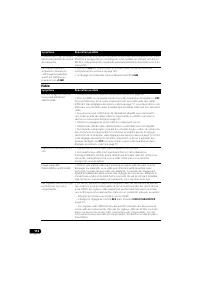
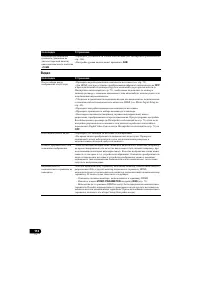
Additional information 12 112 En Video Symptom Remedy No image is output when an input is selected. • Check the video connections of the source component (see page 29).• For HDMI, or when digital video conversion is set to OFF and a TV and another component are connected with different cords (in Set...
Page 113 - Settings; Problems when using the Auto MCACC Setup
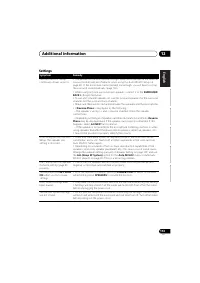
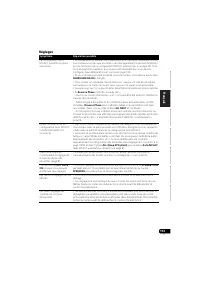
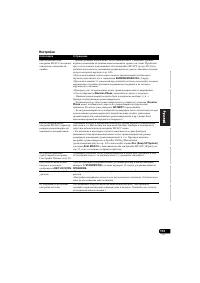
Additional information 12 113 En English Français Deutsch Nederlands Italiano Español Settings Symptom Remedy The Auto MCACC Setup continually shows an error. • The ambient noise level may be too high. Keep the noise level in the room as low as possible (see also Problems when using the Auto MCACC S...
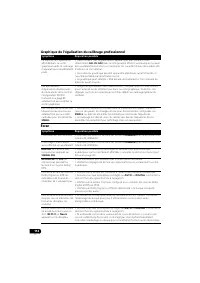
Page 114 - Professional Calibration EQ graphical output
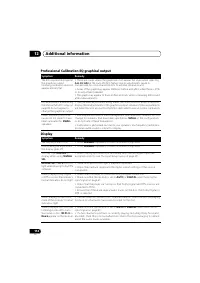
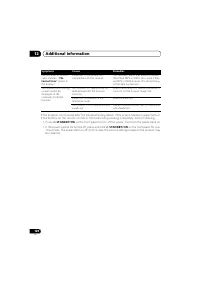
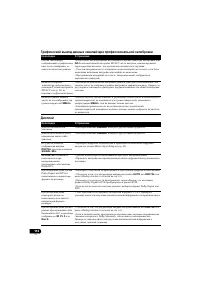
Additional information 12 114 En Professional Calibration EQ graphical output Display Symptom Remedy The EQ response displayed in the graphical output following calibration does not appear entirely flat. • There are cases where the graph does not appear flat (even when selecting ALL CH ADJ in the Au...
Page 115 - PCM
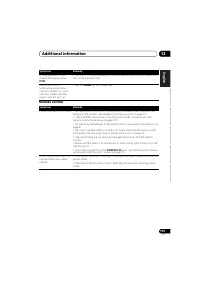
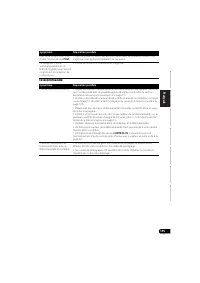
Additional information 12 115 En English Français Deutsch Nederlands Italiano Español Remote control During playback of DVD- Audio, the display shows PCM . • This will occur when playing DVD-Audio material over the HDMI connection. This is not a malfunction. The power turns off automatically and som...
Page 117 - Important information regarding the HDMI connection; Configuration A; Configuration B; Control Mode
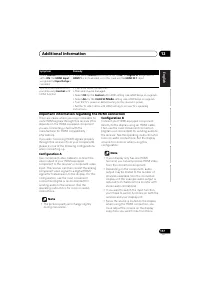
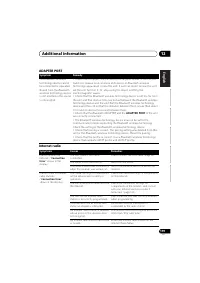
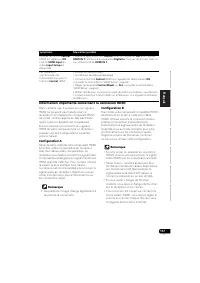
Additional information 12 117 En English Français Deutsch Nederlands Italiano Español Important information regarding the HDMI connection There are cases where you may not be able to route HDMI signals through this receiver (this depends on the HDMI-equipped component you are connecting–check with t...
Page 118 - USB interface; Symptoms
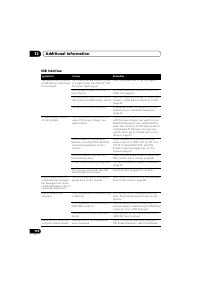
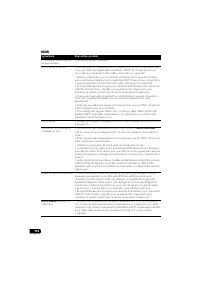
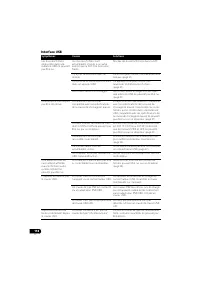
Additional information 12 118 En USB interface Symptoms Causes Remedies The folders/files stored on a USB memory device are not displayed. The folders/files are currently stored in a region other than the FAT (File Allocation Table) region. Store the folders/files in the FAT region. The number of le...
Page 120 - • Press
Additional information 12 120 En If the problem is not solved after the troubleshooting above, if the screen freezes unexpectedly or if the buttons on the remote control or front panel stop working completely, do the following: • Press STANDBY/ON on the front panel to turn off the power, then turn...
Page 121 - About iPod; Dolby
Additional information 12 121 En English Français Deutsch Nederlands Italiano Español About iPod “Made for iPod” means that an electronic accessory has been designed to connect specifically to iPod and has been certified by the developer to meet Apple performance standards.“Works with iPhone” means ...
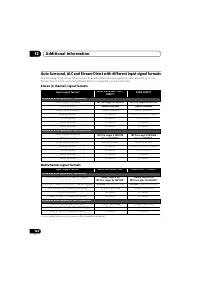
Page 122 - Multichannel signal formats; Input signal format
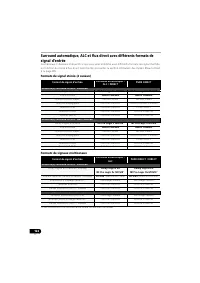
Additional information 12 122 En Auto Surround, ALC and Stream Direct with different input signal formats The following charts show what you will hear with different input signal formats, depending on the Stream Direct mode (see Using Stream Direct on page 60) you have selected. Stereo (2 channel) s...
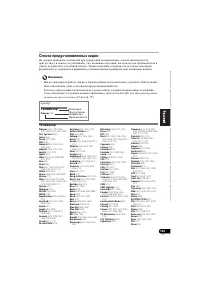
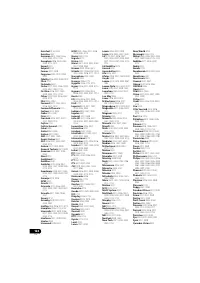
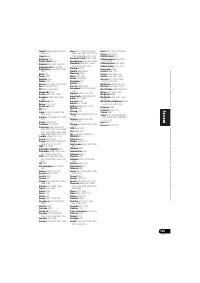
Page 123 - Manufacturer
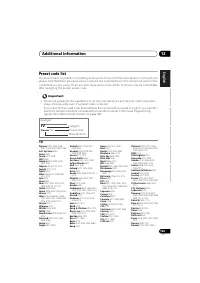
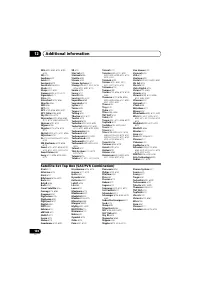
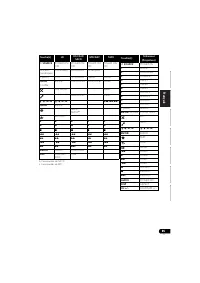
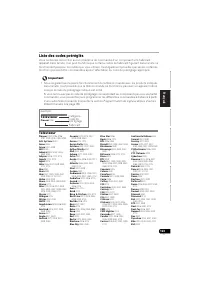
Additional information 12 123 En English Français Deutsch Nederlands Italiano Español Preset code list You should have no problem controlling a component if you find the manufacturer in this list, but please note that there are cases where codes for the manufacturer in the list will not work for the...
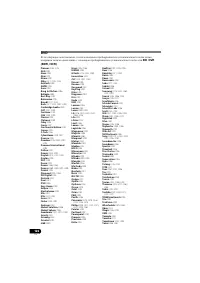
Page 126 - DVD
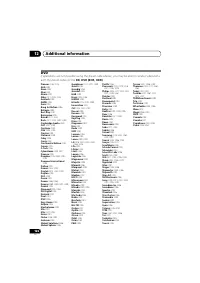
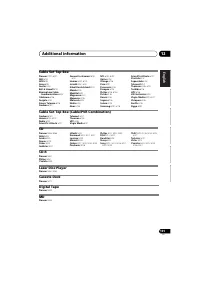
Additional information 12 126 En DVD If operations are not possible using the preset codes below, you may be able to conduct operations with the preset codes for the BD , DVR (BDR, HDR) . Pioneer 2246, 2215 AEG 2093 Aiwa 2054 Akai 2001 Akura 2091 Alba 2027, 2038, 2048 Amitech 2093 AMW 2094 Awa 2094 ...
Page 127 - VCR
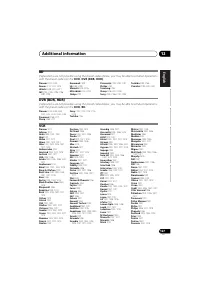
Additional information 12 127 En English Français Deutsch Nederlands Italiano Español BD If operations are not possible using the preset codes below, you may be able to conduct operations with the preset codes for the DVD , DVR (BDR, HDR) . Pioneer 2247, 2248 Denon 2212, 2213, 2214 Hitachi 2209, 221...
Page 128 - Satellite Set Top Box
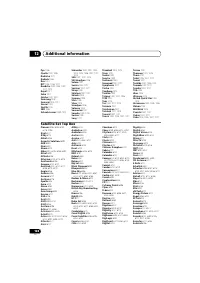
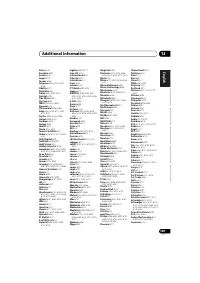
Additional information 12 128 En Pye 1006 Quelle 1000, 1006 Radialva 1017 Radiola 1006 Rex 1001 RFT 1004, 1006, 1017 Roadstar 1003, 1005, 1007, 1017, 1018 Royal 1017 Saba 1001 Saisho 1002, 1007 Samsung 1008 Samurai 1004, 1017 Sansui 1001 Saville 1018 SBR 1006 Schaub Lorenz 1000, 1001 Schneider 1000,...
Page 133 - Cleaning the unit
Additional information 12 133 En English Français Deutsch Nederlands Italiano Español Cleaning the unit • Use a polishing cloth or dry cloth to wipe off dust and dirt. • When the surface is dirty, wipe with a soft cloth dipped in some neutral cleanser diluted five or six times with water, and wrung ...
Page 134 - ATTENTION
Ce point d’exclamation, placé dans un triangle équilatéral, a pour but d’attirer l’attention de l’utilisateur sur la présence, dans les documents qui accompagnentl’appareil, d’explications importantes du point de vue de l’exploitation ou del’entretien. Ce symbole de l’éclair, placé dans un triangle ...
Page 136 - s’y référer ultérieurement.; Table des matières; 1 Avant de commencer; 4 Configuration de base
Nous vous remercions pour cet achat d’un produit Pioneer. Nous vous demandons de lire soigneusement ce mode d’emploi ; vous serez ainsi à même de faire fonctionner l’appareil correctement. Après avoir bien lu le mode d’emploi, le ranger dans un endroit sûr pour pouvoir s’y référer ultérieurement. Ta...
Page 137 - 7 Fonction Control HDMI
English Français Deutsch Nederlands Italiano Español Nommer des stations préréglées . . . . . . . . . 51 Pour écouter les stations préréglées . . . . . . 51 Présentation du système RDS . . . . . . . . . . . 51 ADAPTATEUR Bluetooth ® pour profiter de la musique sans fil . . . . . . . . . . . . . . . ...
Page 138 - 2 Informations complémentaires
11 Configuration du système et autres réglages Réglages du récepteur depuis le menu System Setup . . . . . . . . . . . . . . . . . . . . . . . 100 Réglage manuel des enceintes . . . . . . . . . . . 100 Configuration du Speaker System . . . . . . . 101 Réglage des enceintes . . . . . . . . . . . . . ...
Page 139 - Organigramme des réglages sur le récepteur; Les couleurs des étapes ont la signification suivante :; (Si vous voulez effectuer d’autres liaisons que
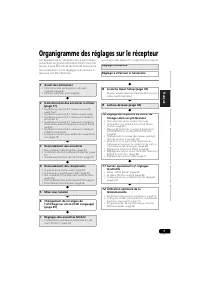
7 Fr English Français Deutsch Nederlands Italiano Español Organigramme des réglages sur le récepteur Cet appareil est un récepteur AV à part entière présentant un grand nombre de fonctions et de prises. Il peut être utilisé facilement lorsque les raccordements et les réglages mentionnés ci-dessous o...
Page 140 - Avant de commencer; Installation du récepteur; AVERTISSEMENT
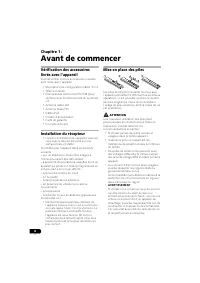
8 Fr Chapitre 1 : Avant de commencer Vérification des accessoires livrés avec l’appareil Veuillez vérifier que les accessoires suivants sont livrés avec l’appareil : • Microphone de configuration (câble : 5 m)• Télécommande• Piles à anode sèche AAA IEC R03 (pour vérifier le bon fonctionnement du sys...
Page 141 - Commandes et affichages; Panneau frontal
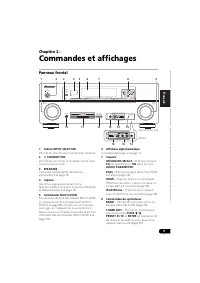
9 Fr English Français Deutsch Nederlands Italiano Español Chapitre 2 : Commandes et affichages Panneau frontal 1 Cadran INPUT SELECTOR Permet de sélectionner une fonction d’entrée. 2 STANDBY/ON Permet de commuter le récepteur entre mise sous tension et veille. 3 SPEAKERS Consultez Commutation des ...
Page 143 - Affichage
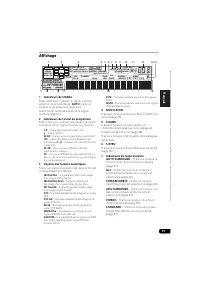
11 Fr English Français Deutsch Nederlands Italiano Español Affichage 1 Indicateurs de SIGNAL S’allument pour indiquer le signal d’entrée sélectionné actuellement. AUTO s’allume lorsque le récepteur est réglé pour sélectionner automatiquement le signal d’entrée (page 61). 2 Indicateurs de format de p...
Page 145 - Télécommande
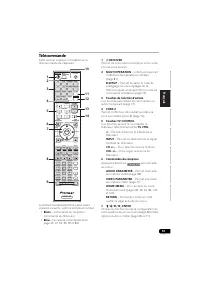
13 Fr English Français Deutsch Nederlands Italiano Español Télécommande Cette section explique l’utilisation de la télécommande de l’appareil. La télécommande présente les deux codes couleurs suivants, selon le composant utilisé : • Blanc – Commande du récepteur, Commande du téléviseur • Bleu – Les ...
Page 146 - Portée de la télécommande
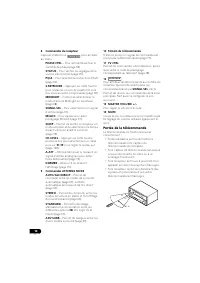
14 Fr 8 Commandes du récepteur Appuyez d’abord sur pour accéder au menu : PHASE CTRL – Pour activer/désactiver le contrôle de phase (page 62). STATUS – Pour vérifier les réglages de la source sélectionnée (page 75). PQLS – Pour sélectionner la fonction PQLS (page 66). S.RETRIEVER – Appuyez sur cette...
Page 147 - Panneau arrière
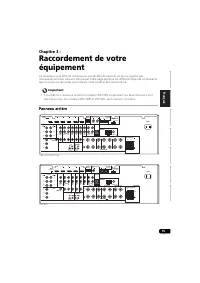
15 Fr English Français Deutsch Nederlands Italiano Español Chapitre 3 : Raccordement de votre équipement Ce récepteur vous offre de nombreuses possibilités de liaisons, ce qui ne signifie pas nécessairement que cela soit compliqué. Cette page explique les différents types de composants que vous pouv...
Page 150 - Configuration du
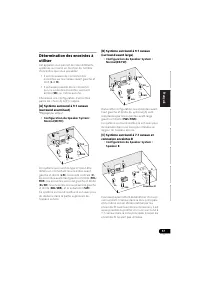
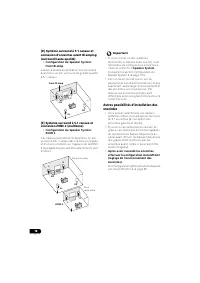
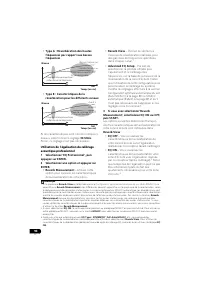
18 Fr [D] Système surround à 5.1 canaux et connexion d’enceintes avant Bi-amping (surround haute qualité) • Configuration du Speaker System : Front Bi-Amp Liaison à double amplification des enceintes avant pour un son surround de grande qualité à 5.1 canaux. [E] Système surround à 5.1 canaux et conn...
Page 151 - Installation des enceintes
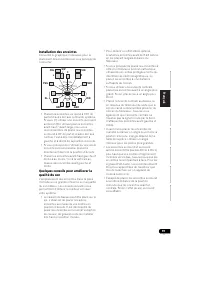
19 Fr English Français Deutsch Nederlands Italiano Español Installation des enceintes Consultez le graphique ci-dessous pour le placement des enceintes que vous prévoyez de connecter. • Placez les enceintes surround à 120° de part et d’autre de l’axe central du système. Si vous, (1) utiliser une enc...
Page 152 - Raccordement des enceintes; Branchement des fils nus; Bornes d’enceintes A :
20 Fr Raccordement des enceintes Pour chaque enceinte le récepteur comporte une borne positive (+) et une borne négative (–). Prenez soin de les faire correspondre avec les bornes situées sur les enceintes. ATTENTION • Les bornes des haut-parleurs sont sous une tension DANGEREUSE . Pour éviter tout ...
Page 153 - Installation de votre système d’enceintes
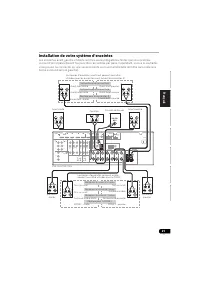
21 Fr English Français Deutsch Nederlands Italiano Español Installation de votre système d’enceintes Les enceintes avant gauche et droite sont les seules obligatoires. Notez que vos enceintes surround principales doivent toujours être raccordées par paire. Cependant, si vous le souhaitez, vous pouve...
Page 154 - Double amplification des enceintes; Double câblage de vos enceintes
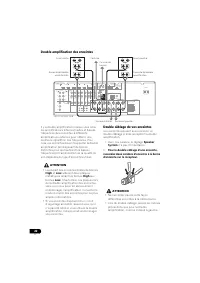
22 Fr Double amplification des enceintes Il y a double amplification lorsque vous reliez les amplificateurs internes hautes et basses fréquences des enceintes à différents amplificateurs externes pour obtenir une meilleure répartition des fréquences. Pour cela, vos enceintes doivent supporter la dou...
Page 155 - Sélection d’un Speaker System; Configuration enceintes avant-haut
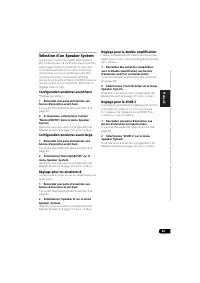
23 Fr English Français Deutsch Nederlands Italiano Español Sélection d’un Speaker System Les bornes d’enceintes avant-haut peuvent être utilisées pour la connexion des enceintes avant-large et des enceintes B, en plus des enceintes avant-haut. En outre, les bornes d’enceintes surround arrière peuven...
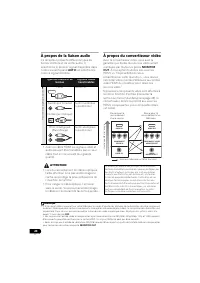
Page 156 - À propos de la liaison audio; À propos du convertisseur vidéo; MONITOR; Le menu Input Setup; ri
24 Fr À propos de la liaison audio Ce récepteur présente différents types de bornes d’entrée et de sortie audio. Il sélectionne le premier signal disponible dans l’ordre suivant quand AUTO est sélectionné comme signal d’entrée : • Avec un câble HDMI les signaux vidéo et audio peuvent être transférés...
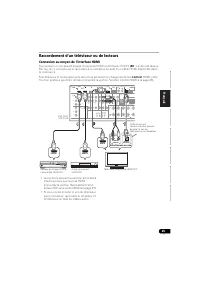
Page 157 - Raccordement d’un téléviseur ou de lecteurs; Connexion au moyen de l’interface HDMI; Fonction Control HDMI
25 Fr English Français Deutsch Nederlands Italiano Español Raccordement d’un téléviseur ou de lecteurs Connexion au moyen de l’interface HDMI Si vous avez un composant équipé d’une prise HDMI ou DVI (avec HDCP) ( BD : Lecteur de disque Blu-ray, etc.), vous pouvez le raccorder à ce récepteur à l’aide...
Page 158 - À propos de HDMI; Fonction
26 Fr À propos de HDMI 1 La liaison HDMI transfère des signaux vidéo numériques non compressés de même que la plupart des signaux audio compatibles avec le composant raccordé, par exemple les signaux des DVD-Vidéo, DVD-Audio, SACD, Dolby Digital Plus, Dolby TrueHD, DTS-HD Master Audio (voir ci-desso...
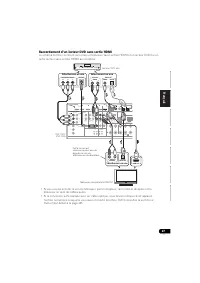
Page 159 - Raccordement d’un lecteur DVD sans sortie HDMI; autre lecteur sans entrée HDMI) au récepteur.
27 Fr English Français Deutsch Nederlands Italiano Español Raccordement d’un lecteur DVD sans sortie HDMI Le schéma montre comment raccorder un téléviseur (avec entrée HDMI) et un lecteur DVD (ou un autre lecteur sans entrée HDMI) au récepteur. • Si vous voulez écouter le son du téléviseur par le ré...
Page 160 - Raccordement d’un téléviseur sans entrée HDMI; Veuillez vous reporter au mode d’emploi; Le
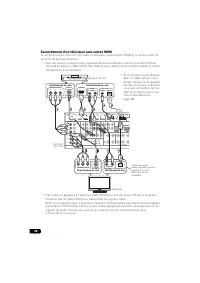
28 Fr Raccordement d’un téléviseur sans entrée HDMI Le schéma montre comment raccorder un téléviseur (sans entrée HDMI) et un lecteur DVD (ou un autre lecteur) au récepteur. • Avec ces liaisons, le signal vidéo n’est pas transmis au téléviseur même si le lecteur DVD est raccordé à l’aide d’un câble ...
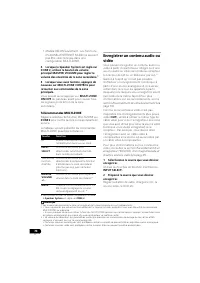
Page 162 - À propos du décodeur WMA9 Pro
30 Fr Raccordement d’autres appareils audio Ce récepteur est pourvu d’entrées numériques et analogiques, ce qui permet de raccorder des composants audio pour la lecture.Il existe des sorties correspondantes à l’une d’entres elles pour l’utilisation d’un enregistreur audio. • Si la connexion a été ré...
Page 163 - Connexion d’antennes extérieures
31 Fr English Français Deutsch Nederlands Italiano Español Raccordement des antennes AM/FM Raccordez l’antenne cadre AM et l’antenne filaire FM comme indiqué ci-dessous. Pour améliorer la réception et la qualité du son, raccordez les antennes externes (voir la section Connexion d’antennes extérieure...
Page 164 - Configuration MULTI-ZONE; Options d’écoute MULTI-ZONE; Raccordez un second amplificateur aux; Fonctions d’entrée disponibles
32 Fr Configuration MULTI-ZONE Ce récepteur peut alimenter jusqu’à deux systèmes indépendants se trouvant dans des pièces séparées une fois que vous avez procédé aux raccordements MULTI-ZONE adéquats.Vous pouvez lire des sources différentes dans deux zones en même temps ou bien, en fonction de vos b...
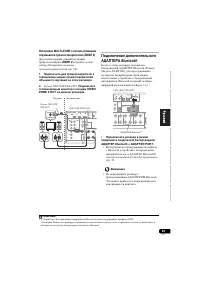
Page 165 - Raccordez une paire d’enceintes aux; Raccordement de l’ADAPTATEUR; Mettez l’appareil en mode veille et; à la
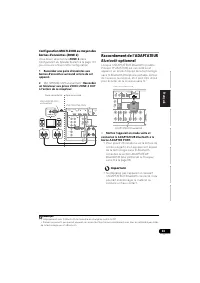
33 Fr English Français Deutsch Nederlands Italiano Español Configuration MULTI-ZONE au moyen des bornes d’enceintes (ZONE 2) Vous devez sélectionner ZONE 2 dans Configuration du Speaker System à la page 101 pour pouvoir utiliser cette configuration. 1 Raccordez une paire d’enceintes aux bornes d’enc...
Page 166 - Spécifications des connecteurs LAN
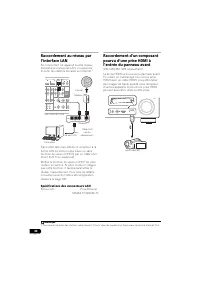
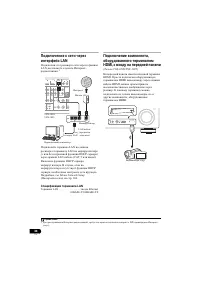
34 Fr Raccordement au réseau par l’interface LAN En connectant cet appareil à votre réseau domestique via la prise LAN, vous pouvez écouter les stations de radio sur Internet. 1 Raccordez la borne LAN de ce récepteur à la borne LAN de votre routeur (avec ou sans fonction de serveur DHCP) par un câbl...
Page 167 - Connexion d’un iPod; Mettez ce récepteur en veille et utilisez le
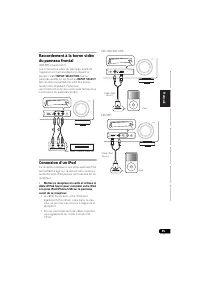
35 Fr English Français Deutsch Nederlands Italiano Español Raccordement à la borne vidéo du panneau frontal (VSX-920 uniquement) Les connexions vidéo du panneau avant de l’appareil sont accessibles en utilisant le bouton rotatif INPUT SELECTOR (sur le panneau avant) ou les touches INPUT SELECT (de l...
Page 168 - Raccordement d’un appareil USB; Exportation des données MCACC
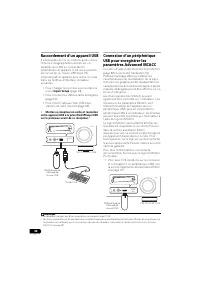
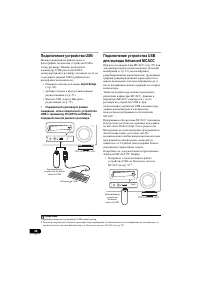
36 Fr Raccordement d’un appareil USB Il est possible de lire un contenu audio et des fichiers d’images/photos stockés sur un périphérique USB en connectant le périphérique à l’appareil. Il est aussi possible de connecter un clavier USB (type US- international) à l’appareil pour entrer du texte dans ...
Page 169 - Raccordez le capteur du récepteur; Fonctionnement
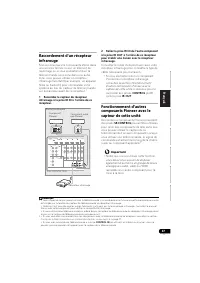
37 Fr English Français Deutsch Nederlands Italiano Español Raccordement d’un récepteur infrarouge Si vous conservez vos composants stéréo dans une armoire fermée ou sur un élément de rayonnage ou si vous souhaitez utiliser la télécommande sous-zone dans une autre zone, vous pouvez utiliser un récept...
Page 170 - Branchement du récepteur
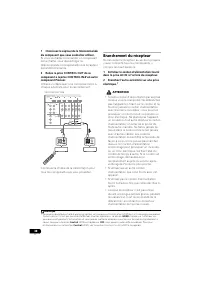
38 Fr 1 Choisissez le capteur de la télécommande du composant que vous souhaitez utiliser. Si vous souhaitez commander un composant de la chaîne, vous devez diriger la télécommande correspondante vers le capteur de la télécommande. 2 Reliez la prise CONTROL OUT de ce composant à la prise CONTROL IN ...
Page 171 - Configuration de base; Lecture d’une source
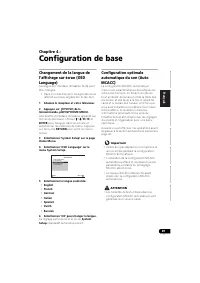
39 Fr English Français Deutsch Nederlands Italiano Español Chapitre 4 : Configuration de base Changement de la langue de l’affichage sur écran (OSD Language) La langue de l’interface utilisateur (IUG) peut être changée. • Dans ce mode d’emploi, les explications se réfèrent au menu anglais de l’écran...
Page 173 - Problèmes lors de l’utilisation de la
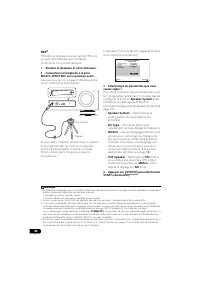
41 Fr English Français Deutsch Nederlands Italiano Español 5 Suivez les instructions affichées à l’écran. Assurez-vous que le microphone est connecté et, si vous utilisez un caisson de graves, que celui-ci est allumé et réglé sur un volume agréable. 6 Attendez la fin des tonalités de test, puis conf...
Page 175 - Le menu Input; Prises d’entrée
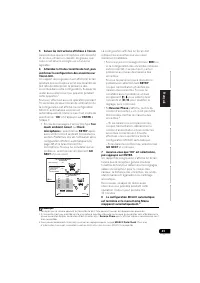
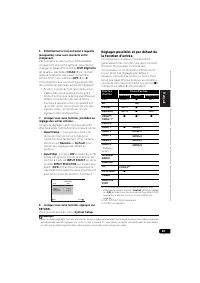
43 Fr English Français Deutsch Nederlands Italiano Español 6 Sélectionnez la (les) entrée(s) à laquelle (auxquelles) vous avez connecté votre composant. Par exemple, si votre lecteur DVD possède uniquement une sortie optique, vous devrez changer le paramètre d’entrée DVD Digital In de la valeur par ...
Page 176 - Lecture de base; Écoute de
44 Fr Chapitre 5 : Lecture de base Lecture d’une source Voici les instructions de base pour lire une source (telle qu’un DVD) avec votre système home cinéma. 1 Allumez les composants de votre système et votre récepteur. Allumez en premier lieu l’équipement de lecture (par exemple, un lecteur DVD), v...
Page 177 - Réglage; Lecture à partir d’un iPod
45 Fr English Français Deutsch Nederlands Italiano Español Lecture d’une source avec une liaison HDMI • Utilisez INPUT SELECT pour sélectionner l’entrée HDMI que vous avez raccordée (par exemple, HDMI 1). Vous pouvez aussi utiliser la molette INPUT SELECTOR sur le panneau avant ou appuyer plusieurs ...
Page 178 - Recherche des morceaux à écouter; Commandes de lecture de base; Astuce
46 Fr Recherche des morceaux à écouter Lorsque votre iPod est raccordé à ce récepteur, vous pouvez localiser les chansons enregistrés sur votre iPod en fonction de la liste d’écoute, du nom d’auteur, du nom d’album, du nom de la chanson, du genre ou du compositeur, comme sur l’iPod proprement dit. 1...
Page 180 - Affiche la photo précédente.; Affiche les informations de la photo.
48 Fr Lecture des fichiers photo enregistrés sur l’appareil USB 1 1 Utilisez / pour sélectionner ‘Photos’ sur le menu USB Top. 2 Utilisez / pour sélectionner un dossier, puis appuyez sur ENTER pour naviguer dans ce dossier. • Pour revenir à tout moment au niveau précédent, appuyez sur RETURN . 3...
Page 181 - À propos des formats de fichiers lisibles; Fichiers de musique; Catégorie
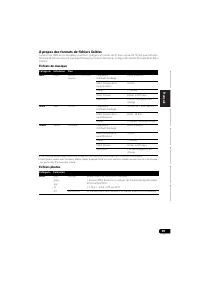
49 Fr English Français Deutsch Nederlands Italiano Español À propos des formats de fichiers lisibles La fonction USB de ce récepteur prend en charge les formats de fichiers suivants. Notez que certains formats de fichiers ne sont pas disponibles pour la lecture bien qu’ils figurent comme formats de ...
Page 182 - Pour écouter la radio; Amélioration du son FM
50 Fr Pour écouter la radio Les étapes suivantes décrivent la façon de régler les bandes FM et AM à l’aide de la recherche automatique et des fonctions de réglage manuel. Si vous connaissez déjà la fréquence de la station que vous souhaitez écouter, consultez la section Réglage direct d’une station ...
Page 183 - Nommer des stations préréglées; Pour écouter les stations; Pour écouter les stations préréglées; Mémorisation; Présentation du système RDS
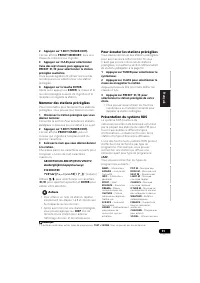
51 Fr English Français Deutsch Nederlands Italiano Español 2 Appuyez sur T.EDIT (TUNER EDIT). L’écran affiche PRESET MEMORY , puis une classe de mémoire qui clignote. 3 Appuyez sur CLASS pour sélectionner l’une des sept classes, puis appuyez sur PRESET / pour sélectionner la station préréglée souh...
Page 185 - ADAPTATEUR; Lecture de musique sans fil; Fonctionnement par télécommande; Appairage de l’ADAPTATEUR; Appuyez sur
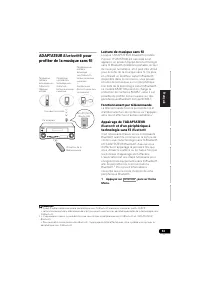
53 Fr English Français Deutsch Nederlands Italiano Español ADAPTATEUR Bluetooth ® pour profiter de la musique sans fil Lecture de musique sans fil Lorsque l’ADAPTATEUR Bluetooth (modèle Pioneer nº AS-BT100) est raccordé à cet appareil, un produit équipé de la technologie sans fil Bluetooth (téléphon...
Page 188 - Programmation depuis un ordinateur
56 Fr 2 Utilisez les touches / pour sélectionner la liste des stations de radio Internet que vous souhaitez éditer, puis appuyez sur ENTER. 3 Utilisez les touches / pour sélectionner “Edit“ (éditer). • Si vous sélectionnez “Delete” (supprimer), les informations concernant les stations de radio I...
Page 189 - Lecture en mode Auto; Utilisation de Neural Surround; Son surround standard
57 Fr English Français Deutsch Nederlands Italiano Español Chapitre 6 : Écoute de sources à l’aide de votre système Important • Les modes d’écoute et de nombreuses fonctions décrites dans la présente section peuvent ne pas être disponibles en fonction de la source, des paramètres et de l’état actuel...
Page 191 - Écoute en mode stéréo
59 Fr English Français Deutsch Nederlands Italiano Español Utilisation des effets surround avancés Les effets Advanced surround peuvent être utilisés pour une large gamme d’effets sonores surround supplémentaires. La plupart des modes Advanced surround ont été conçus pour les bandes sonores de films...
Page 193 - Gestion des données; Choix du signal d’entrée
61 Fr English Français Deutsch Nederlands Italiano Español Sélection des préréglages MCACC • Réglage par défaut : MEMORY 1 Si vous avez calibré votre système pour différentes positions d’écoute 1 , vous pouvez passer d’un réglage à l’autre en fonction du type de source écoutée et de votre position d...
Page 194 - Sur le panneau avant, l’indicateur; PHASE
62 Fr Un meilleur son grâce à la fonction Phase Control La fonction de contrôle de phase de ce récepteur utilise les mesures de correction de phase pour garantir que votre source sonore arrive en phase en position d’écoute, empêchant ainsi toute déformation et/ou coloration indésirable du son.La tec...
Page 196 - Menu “HDMI Setup”
64 Fr 1 à 3), la fonction Control HDMI peut seulement être utilisée avec un maximum de trois lecteurs de disque DVD ou Blu-ray ou trois enregistreurs de disque DVD ou Blu-ray. Menu “HDMI Setup” Pour utiliser la fonction Control HDMI, il est nécessaire de régler les paramètres de cet appareil et des ...
Page 197 - Avant la synchronisation
65 Fr English Français Deutsch Nederlands Italiano Español 8 Lorsque vous avez terminé, appuyez sur HOME MENU. Vous revenez alors au Home Menu . Avant la synchronisation Une fois que tous les raccordements et réglages sont terminés, vous devez : 1 Mettez tous les équipements en mode veille. 2 Mettez...
Page 198 - Réglage de la fonction PQLS
66 Fr À propos des connexions avec un équipement d’une autre marque prenant en charge la fonction Control HDMI Les opérations synchronisées ci-après sont possibles lorsque l’appareil est connecté à un téléviseur d’une autre marque prenant en charge la fonction Control HDMI. (Toutefois, selon le télé...
Page 200 - Utilisation d’autres fonctions; Paramètre; Met en ou hors service les effets de EQ Pro.
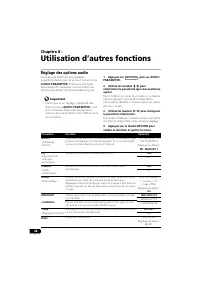
68 Fr Chapitre 8 : Utilisation d’autres fonctions Réglage des options audio Vous pouvez effectuer des réglages supplémentaires pour le son sur le menu des AUDIO PARAMETER . Si elles ne sont pas expressément marquées comme telles, les options par défaut sont présentées en gras. Important • Notez que ...
Page 203 - Réglages des options vidéo; Convertit les signaux vidéo avant de les transmettre aux prises
71 Fr English Français Deutsch Nederlands Italiano Español Réglages des options vidéo Vous pouvez effectuer des réglages supplémentaires pour l’image sur le menu VIDEO PARAMETER . Si elles ne sont pas expressément marquées comme telles, les options par défaut sont présentées en gras. Important • Not...
Page 206 - Télécommandes MULTI-ZONE; Raccordement de votre équipement; Touche
74 Fr • Modèle VSX-920 seulement : Les fonctions iPod/USB et INTERNET RADIO ne peuvent pas être sélectionnées dans une configuration MULTI-ZONE. 4 Lorsque le Speaker System est réglé sur ZONE 2, utilisez le bouton de volume principal MASTER VOLUME pour régler le volume des enceintes de la zone secon...
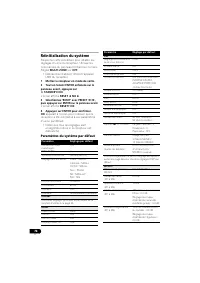
Page 208 - Réinitialisation du système; Paramètres du système par défaut; Réglages possibles et par défaut de la; Réglage des options
76 Fr Réinitialisation du système Respectez cette procédure pour rétablir les réglages d’usine du récepteur. Utilisez les commandes du panneau frontal pour ce faire. Réglez MULTI-ZONE sur OFF . • Débranchez d’abord l’iPod et l’appareil USB du récepteur. 1 Mettez le récepteur en mode de veille. 2 Tou...
Page 209 - Réglage du mode de la télécommande
77 Fr English Français Deutsch Nederlands Italiano Español Chapitre 9 : Commander le reste de votre système Exploitation de plusieurs récepteurs Jusqu’à quatre appareils peuvent être commandés individuellement à l’aide de la télécommande de cet appareil, à conditions qu’ils soient du même modèle que...
Page 210 - Liste des codes préréglés
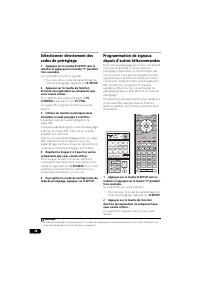
78 Fr Sélectionner directement des codes de préréglage 1 Appuyez sur la touche R.SETUP sans la relâcher et appuyez sur la touche “1” pendant trois secondes. Le voyant DEL se met à clignoter. • Pour annuler le mode de paramétrage du code de préréglage, appuyez sur R.SETUP . 2 Appuyez sur la touche de...
Page 212 - Fonction Source directe
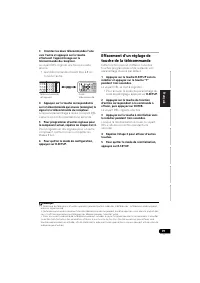
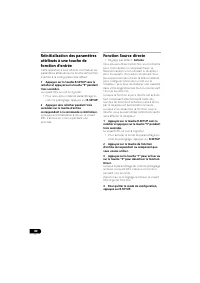
80 Fr Réinitialisation des paramètres attribués à une touche de fonction d’entrée Cette opération a pour effet de réinitialiser les paramètres attribués à une touche de fonction d’entrée à la configuration par défaut. 1 Appuyez sur la touche R.SETUP sans la relâcher et appuyez sur la touche “9” pend...
Page 213 - Programmation de; Programmation d’une séquence; Pour la fonction Multi operation
81 Fr English Français Deutsch Nederlands Italiano Español Fonctions Multi operation et System off La fonction Multi operation vous permet de programmer jusqu’à 5 commandes pour les équipements de votre système. • Veillez à entrez les codes de préréglage des équipements ou à envoyer les signaux de p...
Page 214 - Utilisation des opérations multiples
82 Fr 3 Si besoin, appuyez sur la touche de fonction d’entrée pour le composant dont vous souhaitez entrer la commande. Cette opération n’est nécessaire que si la commande est destinée à un nouveau composant (fonction d’entrée). 4 Sélectionnez la touche pour la commande que vous souhaitez entrer. Le...
Page 215 - Codes de préréglages par défaut; Configurer la
83 Fr English Français Deutsch Nederlands Italiano Español Suppression de tous les réglages de la télécommande Cela efface tous les codes de préréglage de la télécommande et toutes les touches programmées. 1 1 Appuyez sur la touche R.SETUP sans la relâcher et appuyez sur la touche “0” pendant trois ...
Page 217 - numériques
85 Fr English Français Deutsch Nederlands Italiano Español b. Commandes de SACD. c. Commandes de MD. Touche(s) LD CD/CD-R/ SACD MD/DAT TAPE SOURCE POWER ON/OFF POWER ON/OFF POWER ON/OFF POWER ON/OFF Touches numériques numériques numériques numériques - • (point) +10 >10/CLEAR CLEAR c CLEAR ENTE...
Page 218 - Le menu MCACC avancé; Configuration MCACC manuelle
86 Fr Chapitre 10 : Le menu MCACC avancé Réglages du récepteur depuis le menu MCACC avancé Le système MCACC (Calibrage Acoustique Multicanaux) avancé a été mis au point par les laboratoires Pioneer pour permettre aux utilisateurs de systèmes audio domestiques d’effectuer des réglages de haute précis...
Page 223 - Réglage précis du niveau de canal
91 Fr English Français Deutsch Nederlands Italiano Español • Fine Channel Level – Permet des ajustements précis de l’équilibre général du système d’enceintes (consultez la section Réglage précis du niveau de canal ci-dessous). • Fine SP Distance – Permet des réglages de retard précis pour le système...
Page 224 - Ondes stationnaires; (disponible uniquement si le canal du
92 Fr 1 Sélectionnez ‘Fine SP Distance’ sur le menu Manual MCACC.2 Ajustez la distance du canal gauche à partir de la position d’écoute.3 Sélectionnez tour à tour chaque canal et ajustez la distance si besoin. Utilisez / pour régler la distance de l’enceinte sélectionnée pour qu’elle corresponde à...
Page 225 - Configuration optimale
93 Fr English Français Deutsch Nederlands Italiano Español • Freq / Q / ATT – Ce sont les paramètres du filtre : Freq représente la fréquence visée et Q , la bande passante (plus Q est élevé, plus la bande passante ou la portée est restreinte) de l’atténuation ( ATT représente la réduction de la fré...
Page 227 - Graphique de l’égalisation
95 Fr English Français Deutsch Nederlands Italiano Español Lorsque la mesure de la réverbération est terminée, vous pouvez sélectionner Reverb View pour visualiser les résultats à l’écran. Consultez la section Graphique de l’égalisation du calibrage professionnel à la page 114 pour obtenir des infor...
Page 228 - Vérification des données MCACC; Réglage des enceintes
96 Fr Vérification des données MCACC Lors de la procédure de Configuration optimale automatique du son (Auto MCACC) à la page 39, celle de MCACC automatique (Expert) à la page 87 ou après le réglage fin dans Configuration MCACC manuelle à la page 90, vous pouvez vérifier les réglages obtenus après l...
Page 229 - Égalisation du calibrage acoustique; Réglage de l’égalisation du calibrage acoustique; Vérification des
97 Fr English Français Deutsch Nederlands Italiano Español 1 Sélectionnez ‘Speaker Distance’ sur le menu MCACC Data Check. 2 Lorsque ‘MCACC’ est surligné, utilisez / pour sélectionner le préréglage MCACC que vous voulez vérifier. La distance pour les différents canaux réglés lors de la configurati...
Page 231 - Renommer les préréglages MCACC; Configuration MCACC
99 Fr English Français Deutsch Nederlands Italiano Español Renommer les préréglages MCACC Si vous utilisez plusieurs préréglages MCACC, il se peut que vous souhaitiez les renommer pour les identifier plus facilement. 1 Sélectionnez ‘Memory Rename’ sur le menu Data Management. 2 Sélectionnez le préré...
Page 232 - Réglage manuel des enceintes
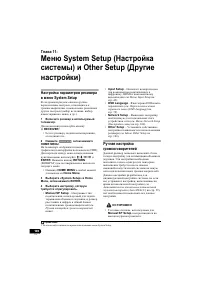
100 Fr Chapitre 11 : Configuration du système et autres réglages Réglages du récepteur depuis le menu System Setup La section suivante décrit les changements manuels des réglages d’enceintes ainsi que d’autres réglages (sélection de l’entrée, sélection de la langue de l’affichage sur écran, etc.). 1...
Page 234 - Configuration
102 Fr Réglage des enceintes Utilisez ce réglage pour préciser la configuration de vos enceintes (taille, nombre d’enceintes et fréquence de croisement). Il est conseillé de vous assurer que les réglages obtenus avec la fonction de Configuration optimale automatique du son (Auto MCACC) à la page 39,...
Page 235 - Niveau des canaux
103 Fr English Français Deutsch Nederlands Italiano Español • SW – Les signaux LFE et les basses fréquences des canaux réglés sur SMALL sont générés par le caisson de graves lorsque YES est sélectionné. Choisissez le réglage PLUS si vous souhaitez que le caisson de graves émette les basses en contin...
Page 236 - Distance des enceintes
104 Fr Distance des enceintes Pour obtenir une profondeur sonore et un détachement parfaits de votre système, vous devez préciser la distance qu’il y a entre vos enceintes et la position d’écoute. Le récepteur pourra alors ajouter le délai nécessaire pour l’obtention d’un son surround optimal. 1 Sél...
Page 237 - Menu de configuration réseau; Configuration de l’adresse IP/Proxy
105 Fr English Français Deutsch Nederlands Italiano Español Menu de configuration réseau Ce menu permet de configurer les paramètres réseau sur l’appareil afin d’écouter la radio Internet. 1 Appuyez sur de la télécommande, puis sur HOME MENU. Un écran à interface graphique (GUI) apparaît sur votre t...
Page 238 - Affichage de l’adresse MAC; Le menu Other Setup; Menu
106 Fr 1 Sélectionnez ‘IP Address, Proxy’ sur le menu Network Setup. 2 Sélectionnez le réglage DHCP souhaité. Si vous sélectionnez l’option ON , le réseau est configuré automatiquement et vous n’avez pas besoin d’effectuer l’étape 3. Passez directement à l’étape 4.Si vous avez sélectionné l’option O...
Page 239 - Configuration du volume; Exploitation de plusieurs récepteurs
107 Fr English Français Deutsch Nederlands Italiano Español Configuration du volume Vous pouvez spécifier le volume de l’appareil lors de la mise sous tension / volume maximum ou un niveau de volume plus faible, selon vos préférences. 1 Sélectionnez ‘Volume Setup’ sur le menu Other Setup. 2 Sélectio...
Page 240 - Informations complémentaires; Guide de dépannage; réparer le composant.; Alimentation; Symptôme
108 Fr Chapitre 12 : Informations complémentaires Guide de dépannage Une utilisation incorrecte de l’appareil est souvent interprétée comme un problème ou un dysfonctionnement. Si vous êtes convaincu que cet appareil ne fonctionne pas correctement, contrôlez les points ci-dessous. Quelquefois, le pr...
Page 241 - Pas de son
109 Fr English Français Deutsch Nederlands Italiano Español Pas de son Le voyant bleu (au centre de l’appareil) clignote et l’appareil se met hors tension. • Il y a un problème au niveau du bloc d’alimentation du récepteur. Le récepteur peut connaître un grave problème. Débranchez le récepteur et co...
Page 243 - Autres problèmes audio
111 Fr English Français Deutsch Nederlands Italiano Español Autres problèmes audio Symptôme Réparation possible Les stations radio ne peuvent être sélectionnées automatiquement ou il y a beaucoup de bruit dans les émissions radio. Pour les émissions FM • Étendez complètement l’antenne fil FM, positi...
Page 244 - Vidéo
112 Fr Vidéo Il semble qu’il y ait un retard entre les enceintes et la sortie du subwoofer. • Reportez-vous à la section Configuration optimale automatique du son (Auto MCACC) à la page 39 pour reconfigurer votre système en utilisant la fonction MCACC (cela permet de compenser automatiquement le ret...
Page 245 - Réglages; Problèmes
113 Fr English Français Deutsch Nederlands Italiano Español Réglages Symptôme Réparation possible La configuration Auto MCACC présente toujours une erreur. • Le niveau de bruit ambiant de la pièce peut être trop élevé. Maintenez le bruit à un niveau aussi bas que possible (consultez également la sec...
Page 249 - Information importante concernant la connexion HDMI
117 Fr English Français Deutsch Nederlands Italiano Español Information importante concernant la connexion HDMI Dans certains cas, il se peut que les signaux HDMI ne puissent pas transiter par ce récepteur (ceci dépend du composant HDMI raccordé ; vérifiez auprès du fabricant dans quelle mesure l’ap...
Page 250 - Interface USB; Symptômes
118 Fr Interface USB Symptômes Causes Solutions Les dossiers/fichiers enregistrés dans une mémoire USB ne peuvent pas être lus. Les dossiers/fichiers sont actuellement stockés à un autre endroit que la FAT (File Allocation Table). Stockez les dossiers/fichiers dans la FAT. Il y a plus de 8 niveaux d...
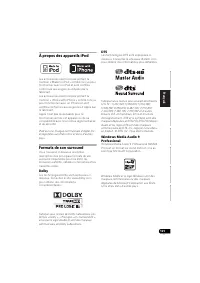
Page 253 - À propos des appareils iPod; DTS
121 Fr English Français Deutsch Nederlands Italiano Español À propos des appareils iPod Les accessoires électroniques portant la mention « Made for iPod » ont été conçus pour fonctionner avec un iPod et sont certifiés conformes aux exigences d’Apple par le fabricant.Les accessoires électroniques por...
Page 254 - Utilisation des modes Stream Direct; Formats de signaux multicanaux
122 Fr Surround automatique, ALC et flux direct avec différents formats de signal d’entrée Les tableaux ci-dessous indiquent ce que vous allez entendre avec différents formats de signal d’entrée, en fonction du mode à flux direct sélectionné (consultez la section Utilisation des modes Stream Direct ...
Page 259 - Magnétoscope
127 Fr English Français Deutsch Nederlands Italiano Español BD Si les commandes ne fonctionnent pas avec les codes de préréglage ci-dessous, essayez d’utiliser les codes de préréglages indiqués pour les produits DVD , DVR (BDR, HDR) . Pioneer 2247, 2248 Denon 2212, 2213, 2214 Hitachi 2209, 2210, 221...
Page 260 - Décodeur satellite
128 Fr Solavox 1004 Sonneclair 1017 Sonoko 1003, 1018 Sontec 1005 Sony 1011 Standard 1003, 1018 Stern 1018 Sunkai 1002 Sunstar 1000 Suntronic 1000 Sunwood 1007, 1017 Symphonic 1017 Taisho 1002 Tandberg 1018 Tashiko 1000 Tatung 1000, 1001, 1006 TCM 1002 Teac 1018 Tec 1004, 1017, 1018 Teleavia 1001 Te...
Page 263 - Lecteur de disque laser
131 Fr English Français Deutsch Nederlands Italiano Español CD-R Pioneer 5067 Philips 5054 Yamaha 5055 Lecteur de disque laser Pioneer 5062, 5063 Platine à cassette Pioneer 5070 Platine à cassette numérique Pioneer 5069 MD Pioneer 5068 VSX-1025_SYXCN_Fr.book 131 ページ 年 月 7日 水曜日 午後 時 分
Page 264 - Spécifications
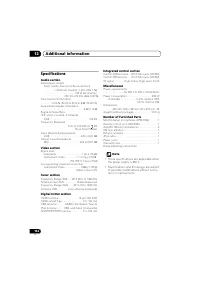
132 Fr Spécifications Section audio Puissance nominale de sortie Avant, Centrale, Surround, Arrière surround . . . . . . . . . . 140 W par canal (1 kHz, 6 Ω , 1 %) . . . . . . . . . . . . . . . . . . . . . . . . .100 W par canal (20 Hz à 20 kHz, 8 Ω , 0,09 %) Distorsion harmonique totale . . . . . ....
Page 265 - Nettoyage de l’appareil
133 Fr English Français Deutsch Nederlands Italiano Español Nettoyage de l’appareil • Utilisez un chiffon à lustrer ou un chiffon sec et doux pour éliminer toute trace de poussière et de saleté. • Lorsque la surface de l’appareil est sale, essuyez-la en utilisant un tissu doux préalablement trempé d...
Page 273 - ZONE
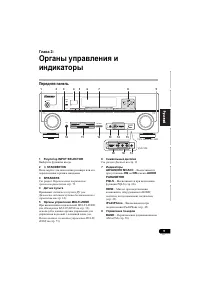
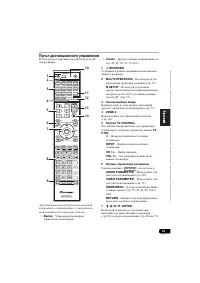
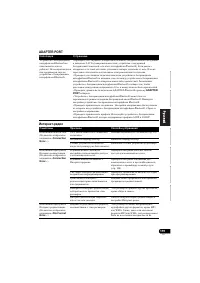
9 Ru English Français Deutsch Nederlands Italiano Español 2: 1 Pery INPUT SELECTOR . 2 STANDBY/ON . 3 SPEAKERS . . 73. 4 ( . . 14). 5 MULTI-ZONE MULTI-ZONE ( . MULTI-ZONE . 32), ( . MULTI- ZONE . 73). 6 . . 11. 7 ADVANCED MCACC – EQ ON AUDIO PARAMETER . PQLS – PQLS ( . 66). HDMI – , HDMI; , ( . 25...
Page 275 - Auto Surround
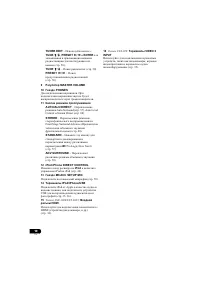
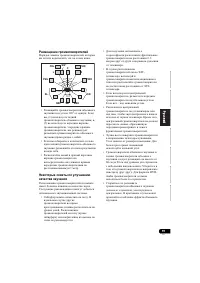
11 Ru English Français Deutsch Nederlands Italiano Español 1 SIGNAL . AUTO , ( . 61). 2 , . L / R – / C – SL / SR – / LFE – ( (( )) , ) XL / XR – , XC – , , 3 , . 2 DIGITAL – Dolby Digital. 2 DIGITAL PLUS – Dolby Plus. 2 TrueHD – Dolby TrueHD. DTS – DTS. DTS HD – DTS-HD. 96/24 – DTS 96/24. WMA9 Pro ...
Page 276 - FM
12 Ru 9 ( . 75). 10 TUNED – . STEREO – FM . MONO – , MPX . RDS – RDS. 11 ( . 14). 12 . « --- » , « +12dB » . 13 . 14 , . 15 , A / B , ( . 73). 16 SLEEP , ( . 75). 17 2 PRO LOGIC IIx – 2 Pro Logic II / 2 Pro Logic IIx ( . 57). Neo:6 – Neo:6 , Neo:6 ( . 57). 18 . 19 . ( 1 .) ( . 77) VSX-1025_SYXCN_Ru....
Page 277 - Home Menu
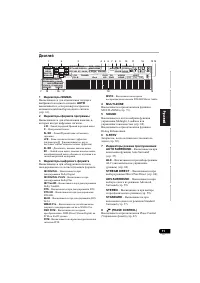
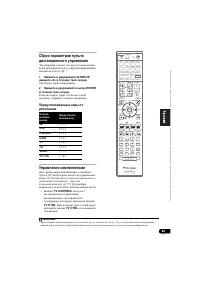
13 Ru English Français Deutsch Nederlands Italiano Español . : • – , • – ( . . 45, 47, 50, 53, 55 83.) 1 RECEIVER . 2 MULTI OPERATION – ( . 81). R.SETUP – ( . 77). 3 ( . 77). 4 ZONE 2 ( . 74). 5 K TV CONTROL Э , TV CTRL . – / . INPUT – . CH +/– – . VOL +/– – . 6 : AUDIO PARAMETER – ( . 68). VIDE...
Page 282 - Amp; ZONE 2; Speaker System: ZONE 2
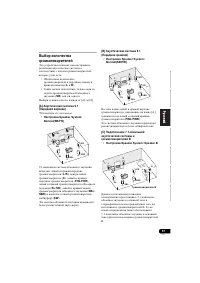
18 Ru [D] 5.1- ( ) • Speaker System: Front Bi- Amp 5.1- . [E] 5.1- ZONE 2 (Multi Zone) • Speaker System: ZONE 2 5.1- ZONE 2. ( .) • Speaker System , , [A] ( . Speaker system setting ( ) . 101). • , , B . , . • , 5.1- ( / ). • , . ( , .) • , MCACC ( ). C . А (Auto MCACC) . 39 L R SL SW C SR Front Bi-...
Page 283 - Audio
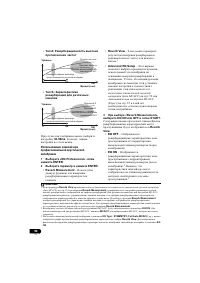
19 Ru English Français Deutsch Nederlands Italiano Español , , . . • 120° . , (1) , , (2) / , . • , . • 1 . P . . • . . ( ) . • 2–3 . • Э - , Э - . • , . – . • , . , , . • . . . • 60 o 90 . , . DVD- Audio . • , . . L SW C FHL FWL SL SBL SBR SB SR FWR R FHR 30 30 60 60 60 120 120 VSX-1025_SYXCN_Ru.bo...
Page 287 - «Speaker B»; «ZONE 2»
23 Ru English Français Deutsch Nederlands Italiano Español • , , , . B, . ZONE 2, . . * 1 / . . . 20. 2 , «Normal(SB/FH)» Speaker System. . Speaker system setting ( ) . 101. 1 / . . . 20. 2 «Normal(SB/FW)» Speaker System. . Speaker system setting ( ) . 101. . 1 / . . . 20. 2 «Speaker B» Speaker Syst...
Page 293 - Input
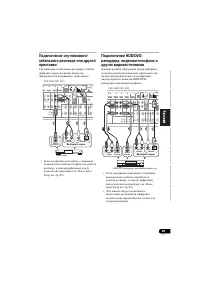
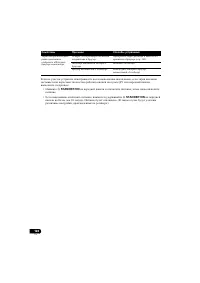
29 Ru English Français Deutsch Nederlands Italiano Español / , « ». • , , ( . Input Setup . 42). HDD/DVD- , / , , HDD/DVD- . • , , ( . Input Setup . 42). • ( ). ASSIGNABLE ASSIGNABLE (DVD) (DVR/BDR) R FRONT CENTER SURROUND SURROU L R L R DVR/BDR DVD OUT IN CD-R/TAPE OUT IN IN CD IN TV/SAT IN VIDEO I...
Page 294 - WMA9 Pro; Windows MediaTM Audio 9 Professional
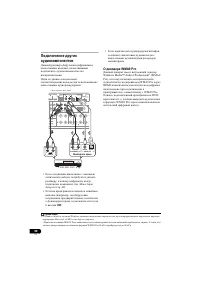
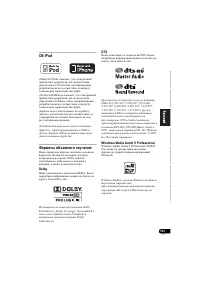
30 Ru , . . • , , ( . Input Setup . 42). • ( , ), CD . • / , / . WMA9 Pro Windows Media™ Audio 9 Professional 1 (WMA9 Pro), WMA9 Pro HDMI, , WMA9 Pro. , DVD, . . WMA9 Pro . ASSIGNABLE ASSIGNABLE (DVD) (DVR/BDR) R FRONT CENTER SURROUND SURROUND L R L R CD-R/TAPE OUT IN CD IN TV/SAT IN VIDEO IN (OUTPU...
Page 295 - AM; AM; AM
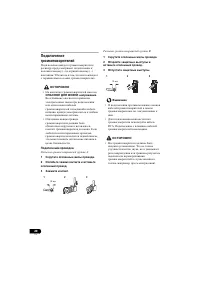
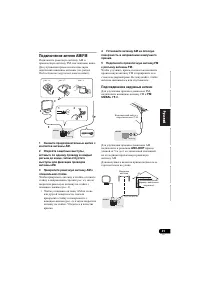
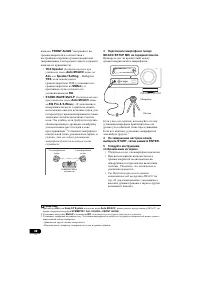
31 Ru English Français Deutsch Nederlands Italiano Español AM/FM FM, . ( . e). 1 AM. 2 , , AM. 3 AM . , ( . ), ( . ). • AM , ( . ), . . 4 AM . 5 FM FM. , FM . , . FM, FM FM UNBAL 75 Ω . AM AM LOOP 5 6 , AM. . AM LOOP FM UNBAL 75 ANTENNA 3 4 5 рис. а рис. б рис. в 1 2 AM LOOP FM UNBAL 75 ANTENNA 75 Ω...
Page 296 - AUDIO ZONE 2 OUT
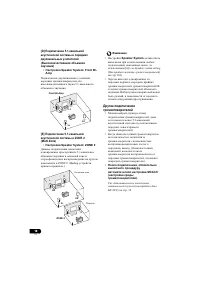
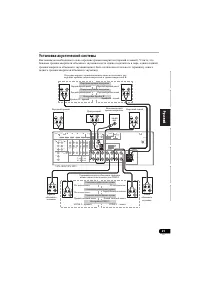
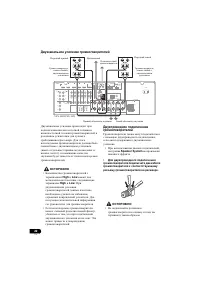
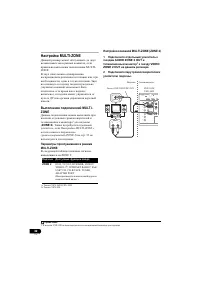
32 Ru MULTI-ZONE , MULTI- ZONE. , , . ( , ), . MULTI- ZONE 1 ( ZONE 2 ). , MULTI-ZONE (ZONE 2) . 33 . MULTI-ZONE , ZONE 2: MULTI-ZONE (ZONE 2) 1 AUDIO ZONE 2 OUT 1 VIDEO ZONE 2 OUT . 2 . 1 VSX-920 . ZONE 2 DVD, TV/SAT, DVR/BDR, VIDEO a , VIDEO1/2 b , INTERNET RADIO a , iPod/ USB a , CD, CD-R/TAPE, T...
Page 298 - Network Setup; LAN; Ethernet
34 Ru LAN LAN, - . 1 LAN LAN ( DHCP ) LAN (CAT 5 ). DHCP . , DHCP , . , . Network Setup ( ) . 104. LAN LAN . . . . . . . . . . . . . . . . Ethernet 10BASE-T/100BASE-TX , HDMI, ( VSX-1020/VSX-1025) HDMI. HDMI HDMI, . , , HDMI. 1 - , ISP ( ). ASSIGNABLE (DVD) R FRONT CENTE L D CD-R/TAPE OUT IN CD IN T...
Page 301 - Niles; Pioneer
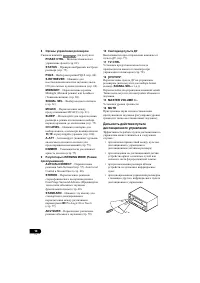
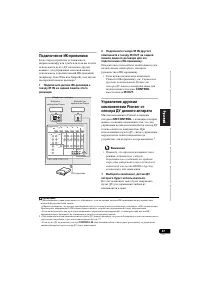
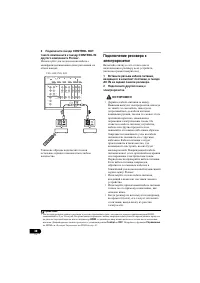
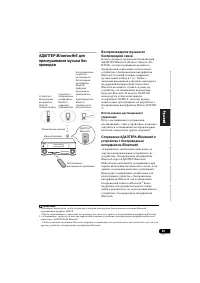
37 Ru English Français Deutsch Nederlands Italiano Español - , - ( , Niles Xantech), . 1 1 - IR IN . 2 IR IN IR OUT - . , , , - . • Pioneer - , . Pioneer CONTROL IR OUT . Pioneer Pioneer SR CONTROL , , . , , . 2 • , , , HDMI . 1 , . . 1 • , - . • , , - . - . • ( ), - . HDMI ASSIGNABLE P B P R ASSIGN...
Page 307 - Digital
43 Ru English Français Deutsch Nederlands Italiano Español • , , , , . 1 7 , . , : • Input Name – . Rename , Default . • Input Skip – ON , INPUT SELECT INPUT SELECTOR . ( DVD .) 8 RETURN. System Setup . . , , ( ), , , . Input Setup . 42. ( ) . 1 ( ) ( . . 71), , . 4b.Input Setup A/V RECEIVER E x i...
Page 312 - Slideshow
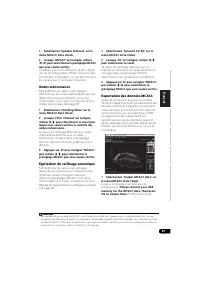
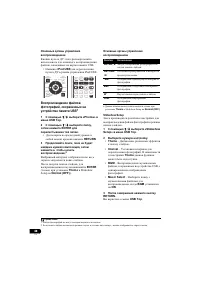
48 Ru , USB. • iPod USB iPod/USB. , USB 1 1 / «Photos» USB Top. 2 / , ENTER . • RETURN . 3 , , . 2 . , ENTER ( Theme Slideshow Setup Normal (OFF) ). Slideshow Setup . 1 / «Slideshow Setup» USB Top. 2 . • Theme – . • Interval – . Theme . • BGM – , USB, . • Music Select – , BGM ON . 3 RETURN. ...
Page 313 - WAV; LPCM; WMA; JPEG
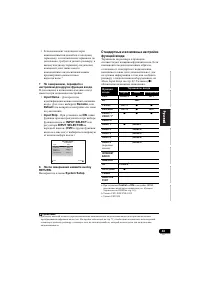
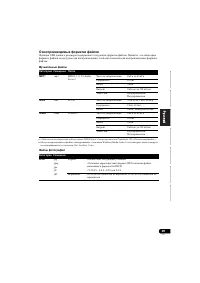
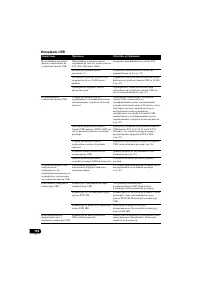
49 Ru English Français Deutsch Nederlands Italiano Español USB . , , . MP3 a .mp3 MPEG-1, 2, 2.5 Audio Layer-3 8 48 16 2- . 8 / 320 / VBR/CBR / WAV .wav LPCM 32 , 44,1 , 48 8 , 16 2- ., WMA .wma WMA8/9 b 8 48 16 2- . 8 / 320 / VBR/CBR / a. « MPEG Layer-3 Fraunhofer IIS Thomson multimedia. » b. , Win...
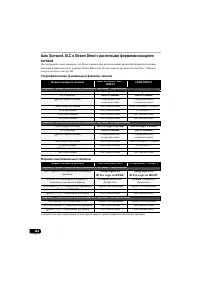
Page 314 - Auto Surround, ALC
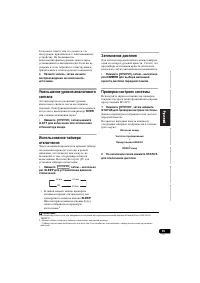
50 Ru FM AM ( ) ( ) . , , . , . . . 1 TUNER . 2 BAND (FM AM). FM . 3 . Э , . – TUNE / . , . . – TUNE / . – TUNE / . . FM TUNED STEREO FM , MPX . , . Neural Surround Neural Surround™ FM. • FM, AUTO/ALC/DIRECT Neural Surround. . Auto Surround, ALC Stream Direct . 122. NEURAL SURROUND STANDARD . ...
Page 315 - RDS
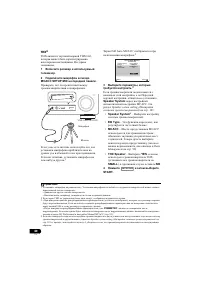
51 Ru English Français Deutsch Nederlands Italiano Español 2 T.EDIT (TUNER EDIT). PRESET MEMORY , . 3 CLASS , PRESET / . . 4 ENTER. ENTER , . , . 1 , . , . . 2 T.EDIT (TUNER EDIT). PRESET NAME , . 3 . , . ABCDEFGHIJKLMNOPQRSTUVWXYZ abcdefghijklmnopqrstuvwxyz 0123456789 !”#$%&’() ∗ +,–./:;<=...
Page 318 - «Pairing Bluetooth Device»,; Others; CONNECTED
54 Ru 1 , Home Menu. 2 «System Setup», ENTER. 3 «Other Setup», ENTER. 4 «Pairing Bluetooth Device», ENTER. 5 «Passcode». - , Bluetooth , . • 0000 / 1234 / 8888 – - . Э - , . • Others – , - , . 6 Others 5, - . / / . 7 , , c Bluetooth . Bluetooth , , «c ». 8 , Bluetooth Bluetooth . Bluetooth: CONN...
Page 319 - NET RADIO
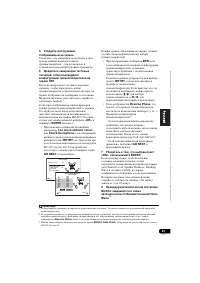
55 Ru English Français Deutsch Nederlands Italiano Español - - - , . 1 - , . , , - . , OTA ( ), , , - , , - , . - , . • - - , ( , , . - ). - , . , . 1 NET RADIO - . 2 - . 2 / - ENTER. / . ENTER . - , - . RETURN . 3 - - , , - . 24 . : , . 1 TOP MENU, - . - . 1 • - . 56 K ISDN , - . • - . . • - , ...
Page 321 - Auto
57 Ru English Français Deutsch Nederlands Italiano Español 6: • , , , . , Auto Surround. , , . 1 • , AUTO/ ALC/DIRECT 2 . AUTO SURROUND . . • Dolby Digital, DTS Dolby Surround, , . • FM, Neural Surround ( , . Neural Surround . 50). • ADAPTER PORT , SOUND RETRIEVER AIR ( , . . 59). ALC – (ALC), . • A...
Page 323 - Advanced
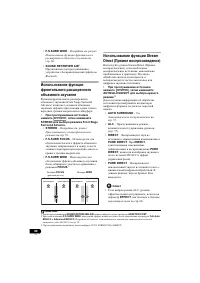
59 Ru English Français Deutsch Nederlands Italiano Español • – . Э . Advanced Surround , . , , . • , ADV SURR (ADV SURROUND) . 1 • ACTION – • DRAMA – , • SCI-FI – • MONO FILM – • ENT.SHOW – • EXPANDED – 2 • TV SURROUND – • ADVANCED GAME – • SPORTS – • CLASSICAL – , • ROCK/POP – « » - • UNPLUGGED – •...
Page 324 - Stream
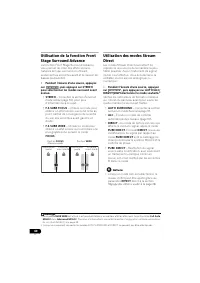
60 Ru • F.S.SURR WIDE – . . 60. • SOUND RETRIEVER AIR 1 – Bluetooth . (Front Stage Surround Advance) . • , STEREO Front Stage Surround Advance. • STEREO – . . 59. • F.S.SURR FOCUS – , , . • F.S.SURR WIDE – FOCUS . 2 Stream Direct ( ) Stream Direct ( ), , . , . • , AUTO/ALC/DIRECT . 3 . • AUTO SURROU...
Page 326 - Phase Control; PHASE CONTROL
62 Ru Phase Control ( ) Phase Control , , / . Phase Control 1 . , Phase Control ( ) . • , PHASE CTRL (PHASE CONTROL) . PHASE CONTROL . 1 • . « », , , . , « » . • PHASE CONTROL . • , « » (+) ( 0°). , PHASE CONTROL ON , . . . • . , . • , PHASE CONTROL . • PHASE CONTROL ON : – PURE DIRECT . – HDMI THRO...
Page 333 - TREBLE; SACD GAIN
69 Ru English Français Deutsch Nederlands Italiano Español TREBLE c . –6 o +6 ( ) : 0 ( ) S.RTRV ( ) , DSP , . OFF d ON DNR ( ) , ( , ). OFF ON DIALOG E ( ) . UP1 UP2 UP3 UP4, , . OFF FLAT UP1/UP2/UP3/UP4 e DUAL ( ) , Dolby Digital. Э , , , . CH1 – 1 CH2 – 2 CH1 CH2 – DRC ( ) , Dolby Digital, DTS, D...
Page 334 - EFFECT; DOLBY PLIIz HEIGHT; MID; HIGH
70 Ru C. WIDTH j ( - ) ( Э ) , , ( ) ( ). 0 o 7 : 3 DIMENSION j , ( ) ( ). –3 o +3 : 0 PANORAMA j , « ». OFF ON C. IMAGE k ( ) ( Э ) . 0 ( ) 10 ( ). 0 o 10 : Neo:6 MUSIC: 3 Neo:6 CINEMA: 10 EFFECT Advanced Surround ALC ( ). 10 o 90 : 50 ( 90 EXT.STEREO ) H.GAIN ( ) DOLBY PLIIz HEIGHT . HIGH , . LOW ...
Page 335 - VIDEO PARAMETER; RES; PURE
71 Ru English Français Deutsch Nederlands Italiano Español , VIDEO PARAMETER . , , . • , VIDEO PARAMETER , , - , . 1 , VIDEO PARAMETER. 2 / , . / . . . 3 / . , . 1 4 RETURN . h. • HDMI Audio . • HDMI , , . . . 65. i. , / (« ») HDMI. , , A. DELAY OFF . , . j. 2- Dolby Pro Logic IIx Music/Dolby Pr...
Page 344 - Direct
80 Ru Э , , . 1 R.SETUP, «9» . . • , R.SETUP . 2 , . , . Direct • : . , , - , , - . , ( ) , . , . 1 R.SETUP, «5» . . • , R.SETUP . 2 , . 3 «1» ( ) «0» ( ) . , . , . 4 R.SETUP . VSX-1025_SYXCN_Ru.book 80 ページ 年 月 8日 木曜日 午前 時 6分
Page 345 - Multi operation
81 Ru English Français Deutsch Nederlands Italiano Español (Multi operation) (System off) Multi operation 5 . • ( . 78). . MULTI OPERATION DVD : 1. . 2. DVD. 3. , . System Off, , . 1 System off. MULTI OPERATION SOURCE : 1. , . 2. Pioneer, ( DVD ). , / , Pioneer. 2 ( Pioneer, , , Pioneer.) , System...
Page 346 - SOURCE
82 Ru Э , ( ). 4 , . . • . Э . Pioneer, ( DVD). 5 3 4 , . 5 . • R.SETUP , , , . 1 MULTI OPERATION. . 2 , , . ( ), . 1 MULTI OPERATION. . 2 , SOURCE. , Pioneer, , 1 ( ). Э , . 1 R.SETUP, «8» . . • , R.SETUP . 2 , , , SOURCE . , . 1 DVD DVD . VSX-1025_SYXCN_Ru.book 82 ページ 年 月 8日 木曜日 午前 時 6分
Page 350 - Advanced MCACC; Advanced MCACC (Multi Channel
86 Ru 10: Advanced MCACC Advanced MCACC Advanced MCACC (Multi Channel ACoustic Calibration) Pioneer , . , , , , . , , , . . 1 . RECEIVER . 1 • , . 2 , HOME MENU. ( ). /// ENTER . RETURN ( ) . • HOME MENU Home Menu . 3 «Advanced MCACC» Home Menu, ENTER. 4 , . • Full Auto MCACC – . А (Auto MCACC...
Page 356 - Standing Wave Control
92 Ru 2 . 3 . / . 0.01m o 9.00m . . . , , . 1 , . • , , . • / . 4 RETURN. Manual MCACC . Standing Wave • : ON 2 / ATT 0.0dB ( ) , , . Э , . , , (« ») . Standing Wave Control . , Standing Wave Control MCACC. 3 1 «Standing Wave» Manual MCACC. 2 Standing Wave Control. • Filter Channel – , ( ): MA...
Page 364 - System Setup
100 Ru 11: System Setup ( ) Other Setup ( ) System Setup , , ( , , .). 1 . RECEIVER . 1 • , . 2 , HOME MENU. ( ). /// ENTER . RETURN ( ) . • HOME MENU Home Menu . 3 «System Setup» Home Menu, ENTER. 4 , . • Manual SP Setup – , , , ( . ). • Input Setup – , HDMI ( . Input Setup . 42). • OSD Langu...
Page 365 - Speaker system setting (
101 Ru English Français Deutsch Nederlands Italiano Español 1 «Manual SP Setup», ENTER. . System Setup . 100, . 2 , . , : • Speaker System – , ( . ). • Speaker Setting – ( . 102). • Channel Level – ( . 103). • Speaker Distance – ( . 104). • X-Curve – ( . 104). 3 RETURN. Speaker system setting ( ) • ...
Page 368 - IP
104 Ru • , , CH LEVEL , / . 1 Speaker Distance ( ) . , . 1 «Speaker Distance» Manual SP Setup. 2 / . 0,01 . 3 RETURN. Manual SP Setup . • , . X-Curve , , . X-Curve , . 2 1 «X-Curve» Manual SP Setup. 2 X-Curve. / . X-Curve , 2 . ( –3.0dB/ oct ). X-Curve : • OFF , , X-Curve . 3 , RETURN. Network...
Page 369 - IP Address
105 Ru English Français Deutsch Nederlands Italiano Español • Information – MAC- ( . 106). IP Address/Proxy LAN ( DHCP ), DHCP , . , DHCP . , . . 1 IP Address IP- . IP- , - . A: 10.0.0.1 10.255.255.254 : 172.16.0.1 172.31.255.254 : 192.168.0.1 192.168.255.254 Subnet Mask xDSL , , . , 255.255.255.0. ...
Page 370 - Other Setup
106 Ru 5 - . 6 - . 7 «OK» IP Address/Proxy. MAC- MAC- . • «Information» Network Setup. Other Setup Other Setup , . 1 , HOME MENU. ( ). /// ENTER . RETURN ( ) . 2 «System Setup» Home Menu. 3 «Other Setup», ENTER. 4 , . , : • HDMI Setup – Pioneer, HDMI ( . HDMI Setup . 64). • Volume Setup – ( . )....
Page 385 - «Made for iPod»; Windows Media Audio 9 Professional
121 Ru English Français Deutsch Nederlands Italiano Español iPod «Made for iPod» , iPod Apple. «Works with iPhone» , iPhone Apple. Apple . iPod Apple Inc., ША . iPhone Apple Inc. , DVD, , , . Dolby Dolby. www.dolby.com. Dolby Laboratories. , Pro Logic, Surround EX D Dolby Laboratories. DTS DTS. www....
Page 386 - Auto Surround, ALC Stream Direct
122 Ru Auto Surround, ALC Stream Direct , Stream Direct ( . Stream Direct ( ) . 60). (2- ) Auto Surround / ALC / DIRECT PURE DIRECT ( ) ( ) : Dolby Digital Surround 2 Pro Logic llx MOVIE 2 Pro Logic llx MOVIE DTS Surround Neo:6 CINEMA Neo:6 CINEMA ANALOG DIRECT ( ) PCM DIRECT DVD-A SACD ( ) ( ) : Do...
Page 397 - Pioneer Corporation.
133 Ru English Français Deutsch Nederlands Italiano Español • . • , , , , , . . • , , , . Pioneer Corporation. © Pioneer Corporation, 2010. . Э FontAvenue ® , NEC Corporation. FontAvenue - NEC Corporation. VSX-1025_SYXCN_Ru.book 133 ページ 年 月 8日 木曜日 午前 時 6分
Page 400 - Discover the benefits of registering your product online at; PIONEER CORPORATION; PIONEER EUROPE NV
<5707-00000-322-0S> Printed in China Imprimé en Chine Discover the benefits of registering your product online at http://www.pioneer.co.uk (or http://www.pioneer.eu ) Découvrez les nombreux avantages offerts en enregistrant votre produit en ligne maintenant sur http://www.pioneer.fr (ou http:/...