Page 2 - Contents
IMPORTANT SAFETY INSTRUCTIONS . . . . . . . . . . . . . . . . . . . . . . . . . . . . . . . . . 4 Guide to the refrigerator . . . . . . . . . . . . . . . . . . . . . . . . . . . . . . . . . . . . . . . . . . . . 7 Before use . . . . . . . . . . . . . . . . . . . . . . . . . . . . . . . . . . . . . ....
Page 4 - Electrical Safety; IMPORTANT SAFETY INSTRUCTIONS
When using the appliance, followbasic safety precautions, includingthe following: Read all instructions beforeinstallation and use to preventaccidents and machine damage. This appliance is intended forresidential use only. Use only asdescribed in this Operating manual. Only use the appliance for its...
Page 6 - Disposal of your old appliance
~ Do not block the ventilation gaps in the plinth or the top of the appliancehousing unit, as this can impair theefficiency of the appliance, increase theelectricity consumption and causedamage to the appliance. ~ Never use a steam cleaner to clean the appliance. Pressurized steam coulddamage electr...
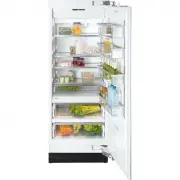
Page 7 - Guide to the refrigerator
a Hinged door shelf b Shelves (height adjustable) c Door shelves (height adjustable) d Deli drawer e Control panel f Main switch g Humidity filters h SmartFresh drawers Guide to the refrigerator 7
Page 8 - Control panel
Control panel a Access button " p " activates the control panel b Refrigerator c Upper SmartFresh drawer d Lower SmartFresh drawer e Temperature display X colder; Y warmer Allows you to set the desiredtemperature in the refrigerator f Food type(s) to be stored in theSmartFresh drawers(left: ...
Page 9 - Before use
Before using for the first time ^ Clean the inside of the appliance andthe accessories with a mild solutionof warm water and liquid dish soap.Dry with a soft cloth. If the appliance was transported orlaid horizontally for any reason, allowit to stand vertical for at least 8 hoursbefore turning it on...
Page 10 - Using the settings; Settings
Using the settings This appliance is operated with the useof touch keys activated by a finger. – An available button will appear white. – A selected button will appear yellow. ^ Touch the access button " p " so it turns yellow. On the control panel you will now seethe sensor buttons for the ...
Page 11 - Custom settings; Function
Custom settings In the custom settings mode you canselect and change functions. Thefunction possibilities are described inthe respective chapters of this manual. Function Display text Temperature unit°C - °F(see "Setting thetemperature") † RemoteVisionModule settings(optional accessory) ; Bu...
Page 13 - Temperature alarm; Turning the temperature alarm Off; Door alarm; Turning the door alarm Off; Temperature and door alarm
The appliance is equipped with analarm system, to ensure that thetemperature does not rise unnoticedbecause of energy loss or an opendoor. The alarm system is alwaysoperational, it does not need to beswitched on. Temperature alarm If the temperature becomes too warm,an alarm sounds, the "alarm&#...
Page 14 - Temperature display; required; Setting the temperature
Setting the temperature in therefrigerator ^ Touch the access button " p " so it turns yellow. ^ Touch the sensor button for therefrigerator so it turns yellow. ^ Use the X and Y buttons next to the temperature display to set thetemperature warmer or colder. Tap the X and Y sensor buttons to...
Page 16 - Place the food in the drawer.; SmartFresh drawers
The SmartFresh drawers provide theright combination of temperature andhumidity. The result is freshness up tothree times longer than in the otherzones of the refrigerator. Storage temperatures For fresh foods that are not adverselyaffected by cold, the best range is32° - 37°F (0° - 3°C). This helps ...
Page 18 - Different storage zones; Warmest area; Using the refrigerator efficiently
Different storage zones Due to the natural circulation of air inthe appliance, there are differenttemperature zones in the refrigerator.Cold, heavy air sinks to the lowestsection of the appliance. Make use ofthese different zones when placingfood in the appliance. This appliance uses a dynamiccoolin...
Page 19 - SuperCool
When the SuperCool function isactivated, the appliance is cooled ascold and quickly as possible (to afactory-preset temperature). The SuperCool function is ideal for therapid cooling of drinks and forrefrigerating large quantities of foods. Switching on SuperCool ^ Touch the sensor button for theref...
Page 20 - Automatic defrost
Refrigerator and SmartFreshdrawers The refrigerator and SmartFreshdrawers defrost automatically. During normal operation, condensateand frost can form on the rear wall ofthe refrigerator and drawers.You do not need to remove thisbuild-up, it will defrost and evaporateautomatically with the heat gene...
Page 21 - Moving the shelves; Deli drawer; Replacing the drawer; Adjusting the interior fittings
Moving the shelves The shelves can be adjusted accordingto the height of the food. ^ Using both hands, grasp the shelffrom underneath and lift slightly sothat the rear of the shelf is slightlyabove the mountings. ^ Pull the shelf forward. ^ Move the shelf to the desired height,then insert the (rear)...
Page 22 - SmartFresh drawer
SmartFresh drawer These drawers are set on telescopictracks. They can be pulled in and outfor loading and unloading, or removedfor cleaning. ^ Open the drawer. On the hinged side of the door is asafety lock, which must be turned to ahorizontal position before the drawercan be removed. ^ Using a suit...
Page 23 - Adjusting the door shelves; Removing a door shelf
Adjusting the door shelves For easier loading, unloading, andcleaning, the door shelves can beshifted or completely removed. ^ Using both hands, grasp the doorshelf by the frame and tip it slightlyforward. ^ Slide the tipped shelf up or downalong the slide-rails, and click it intoplace with the lowe...
Page 24 - do not; Cleaning and care
To reduce the risk of electricalshock, disconnect the appliancefrom the power supply by shuttingoff the power main, tripping thecircuit breaker or unplugging thepower cord before maintenance. Never use cleaning agentscontaining abrasive substancessuch as sand, soda, acids, chloridesor chemical solve...
Page 25 - Before cleaning; Aluminum frames
Before cleaning ^ Use the main switch to turn theappliance off completely. The main switch is located on theright-side underneath the control panel. ^ Unplug the power cord. ^ Remove any food from the applianceand store it in a cool place. ^ Take out any removable parts,e.g., shelves, drawers. Clean...
Page 26 - Humidity filters
Humidity filters The two humidity filters, located abovethe SmartFresh drawers, must beremoved for cleaning. ^ Remove the SmartFresh drawer. ^ Unhook the filter cover a in each side of the drawer and remove themalong with the filters downwardsstarting from b . ^ Remove the filter mat. ^ Clean the fi...
Page 28 - Changing the light bulb; Upper lighting
Changing the light bulb The lighting automatically switches offafter the door has been open forapprox. 5 minutes. This is not a fault. After the bulb has cooled for a shorttime it will turn on again. If the light does not come on when thedoor is opened briefly, the light bulbshould be changed. ^ Use...
Page 29 - Side lighting
Side lighting ^ Turn the light cover counterclockwiseand pull out. Never touch a halogen bulb withbare fingers.When inserting a glass halogenbulb, always hold with a soft cloth. ^ Pull the defective light bulb from thesocket. ^ Place the new bulb in the socket.Halogen bulb type:5 W/12 V/socket G 4. ...
Page 30 - Frequently asked questions
With the aid of the following guide minor problems can be corrected without a ser-vice call. Repairs should only be carried out by a qualified and trained person in strictaccordance with local and national safety regulations. Unauthorized repairscould cause personal injury or machine damage and may ...
Page 33 - MieleCare; MieleCare; MieleCare; After sales service
In the event of a fault which you cannoteasily fix yourself, please contact theMiele Technical Service Department atthe address on the back of this booklet. When contacting the Technical Servicedepartment, please quote the modeland serial number of your appliancegiven on the data plate inside theapp...
Page 35 - Installation instructions; before
Installation instructions Information is subject to change. Please refer to our website to obtain the mostcurrent product specification, technical & warranty information. To prevent accidentsand machine damageread these instructions before installation or use.
Page 36 - Caring for the environment
Disposal of packing materials The cardboard box and packingmaterials are biodegradable andrecyclable. Please recycle. Ensure that any plastic wrappings,bags, etc., are disposed of safely andkept out of the reach of babies andyoung children. Danger of suffocation! Disposal of an old appliance Old app...
Page 37 - Installation site; Installation
Have the appliance installed by aqualified technician, according tothe enclosed installation instructions. WARNINGThis appliance is top-heavy andmust be secured to prevent it fromtipping forward.Keep the door closed until theappliance is completely installedand secured as per the installationinstruc...
Page 40 - from; more than 6; Side panels
Installation with partition using the"Merging Kit" The minimum thickness of the partitionis 5 / 8 " (16 mm). If there is a partition with a thickness from 5 / 8 " (16 mm) to 6 5 / 16 " (160 mm) between the adjacent appliances, theneach appliance should be individuallyinstalled wi...
Page 42 - Dimensions
Door dimensions (open min. 90°) *The dimensions of the door fronts andhandles will vary according to eachindividual kitchen. 3 / 8 " (10 mm) A B C K 18X1 Vi 32 5 / 8 " (829 mm) Door front max. 1 1/2" (38 mm) Door handle* K 19X1 Vi 38 11 / 16 " (982 mm) Door front max. 1 1/2" (38 ...
Page 43 - Niche dimensions
Niche dimensions Niche width (A) K 18X1 Vi 30" (762 mm) K 19X1 Vi 36" (915 mm) Dimensions 43
Page 45 - Before you begin; Tools needed for installation; Installing the appliance
Before you begin Read these instructions completelyand carefully.Have the appliance installed by aqualified technician, according tothe enclosed installation instructions. To reduce the risk of injury ordamage to the product, two peopleshould be used for installation. These installation instructions...
Page 49 - Mounting Accessories
Mounting Accessories The mounting accessories needed forinstalling the appliance into the nicheare included in the packaging. Severalplastic bags are included which arenumbered alphabetically. The bag needed for each step will bemarked with its respective letter. ^ Use the included Torx screwdriver ...
Page 50 - In a cabinet with a back wall
^ Drill pilot holes: – 1 / 8 " (3 mm) for the 5 x 60 mm wood screws – 1 / 16 " (2 mm) for the 4 x 15 mm wood screws. ^ Tightly secure the anti-tip brackets inthe niche. Be certain the screws penetratethrough the flooring and into the wallplate a minimum of 3 / 4 " (19 mm). If the include...
Page 53 - Aligning the appliance
Aligning the appliance ^ Align the appliance with the customfront. The installation aids e on the appliance door have been designed forcustom door thicknesses of 3/4"(19 mm) and 1 1/2" (38 mm). The height-adjustable feet at the frontand rear can all be adjusted from thefront: – Front feet: A...
Page 56 - Preparing the custom door
Preparing the custom door ^ Open the appliance door. ^ Unscrew the installation supports n from the appliance door. ^ Loosen the remaining screws fromthe strips o on each side of the door, then remove. ^ Set aside the screws and side strips o - you will need them again later. ^ Remove the light swit...
Page 57 - only
^ Mark the distance X on the back-side of the custom door. ^ Also calculate and mark the center ofthe custom door Y . ^ Remove the mounting frame from theappliance door and position itaccording to the markings on thecustom door. ^ Pre-drill the holes. ^ Tightly screw on the bracket usingthe pre-dril...
Page 59 - Attaching the fixing brackets; Attaching the covers
Attaching the fixing brackets (Only for appliances using the "Frontpanel gap kit".) The fixing brackets are used to securethe custom door front to the bottom ofthe appliance door. ^ Open the appliance door all the way. ^ Slightly loosen the screw (1.). ^ Position the fixing bracket on theapp...
Page 60 - Attaching the toe-kick cover
^ Insert the cover strip into the spacebetween the appliance and thewooden panel.For side-by-side combinations, thecover strips (on both sides of theappliance) are applied to theoutermost spaces only. ^ Attach the light switch cover. Attaching the toe-kick cover The maximum height of the toe-kickcov...
Page 61 - Mounting the air separator
^ Remove the foil from the adhesivestrips. ^ Attach the toe-kick cover to theplinth. Mounting the air separator The air separator keeps the supply andexhaust air separate. This preventswarm exhaust air from flowing into themachine, optimizing the energyperformance of the unit. ^ If necessary, shorte...
Page 62 - Electrical connection
, Avoid the risk of electrical shock- Plug into a grounded 3-prongoutlet.- Do not move the ground plug.- Do not use an adapter.- Do not use an extension cord. Failure to follow these instructionscan result in death, fire, or electricalshock. Improper connection of theequipment grounding conductormay...
Page 65 - MasterCool control panel options for RemoteVision; Status indicators Description of function
MasterCool control panel options for RemoteVision Status indicators Description of function Flashing ; ~ Module booting phase Flashing ; ‡ Not connected to network Flashing ; | Connection to network established, no IP addressassigned Solid ; # Connected to network Flashing ; < In Ad-Hoc Mode, not...