Page 2 - Contents
IMPORTANT SAFETY INSTRUCTIONS . . . . . . . . . . . . . . . . . . . . . . . . . . . . . . . . . 4 Guide to the freezer . . . . . . . . . . . . . . . . . . . . . . . . . . . . . . . . . . . . . . . . . . . . . . . . 8 Control panel for freezer . . . . . . . . . . . . . . . . . . . . . . . . . . . . ....
Page 4 - Electrical safety; IMPORTANT SAFETY INSTRUCTIONS
When using the appliance, followbasic safety precautions, includingthe following: Read all instructions beforeinstallation and use to preventaccidents and machine damage. This appliance is intended forresidential use only. Use only asdescribed in this Operating manual. This appliance is for househol...
Page 5 - Installation; Do not
Installation This appliance is top-heavy andmust be secured to prevent thepossibility of tipping forward.Keep the door closed until theappliance is completely installedand secured per installationinstructions. ~ Before installing the appliance, check for externally visible damage. Do not operate a d...
Page 6 - Use
Use ~ Persons who lack physical, sensory or mental abilities, or experience withthe machine should not use it withoutsupervision or instruction by aresponsible person. ~ To reduce the risk of injury, do not allow children to play in, on or near theappliance, especially in the door hingearea. ~ After...
Page 7 - Disposal of your old appliance
Disposal of your old appliance ~ Before disposing of an old appliance, first make the door latch orlock unusable. ~ Take off the door. ~ Leave the shelves in place so that children may not easily climb inside. ~ Consult with your municipal policy on recycling. ~ Be careful not to damage any part of ...
Page 8 - Guide to the freezer
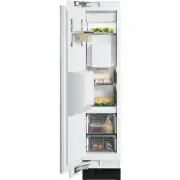
a Interior lighting b Door shelf c Ice cube maker d Ice cube container e Interior shelf f Control panel for the Freezer g Main switch to turn the applianceOn/Off h Freezer basket i Water filter j Ice / Water Dispenser k Control panel for Ice / WaterDispenser l Dispenser m Drip tray with cover Guide ...
Page 9 - Control panel for freezer
Control panel for freezer a Access button " p " activates the control panel b Temperature display X colder; Y warmer Allows you to set the desiredtemperature in the freezer c On/Off sensor button for theSuperCool function Control panel for Ice/WaterDispenser a Lighting sensor button b Water ...
Page 10 - Before use
Before using for the first time ^ Clean the inside of the appliance andthe accessories with a mild solutionof warm water and liquid dish soap.Dry with a soft cloth. After installing the appliance, wait atleast 30 minutes before switchingthe appliance on. During transport,fluids in the freezer system...
Page 11 - Using the settings; Custom settings; Function; Settings
Using the settings When a sensor button has beenselected with a finger touch, it willappear yellow.A de-selected button will appear white. ^ Touch the access button " p " so it turns yellow. On the control panel you will seeadditional sensor buttons to operate theappliance. These button allo...
Page 14 - Temperature alarm; Turning the temperature alarm Off; Door alarm; Turning the door alarm Off; Alarm
The appliance is equipped with analarm system, to ensure that thetemperature does not rise unnoticedbecause of energy loss or an opendoor. The alarm system is alwaysoperational, it does not need to beswitched on. Temperature alarm If the temperature becomes too warm,an alarm sounds and the "alar...
Page 15 - desired; Setting the temperature
Setting the temperature ^ Touch the access button " p " so it turns yellow. ^ Use the X and Y buttons next to the temperature display to set thetemperature warmer or colder. Tap the X and Y sensor buttons to raise/lower the temperature 1°, or holdit down to move through thetemperature range ...
Page 17 - Freezing food; Before placing food in the freezer; Using the freezer efficiently
Freezing food Fresh food should be frozen as quicklyas possible. This helps maintain thenutritional value, vitamin content,appearance and taste of the food. Never refreeze partially or fullydefrosted food. Consume defrostedfood as soon as possible, it will lose itsnutritional value and spoil if left...
Page 18 - Defrosting; Poultry; Cooling drinks quickly
Defrosting Frozen food can be defrosted indifferent ways: – in a microwave oven, – at room temperature, – in the refrigerator (the cold given off by the frozen food helps to keep theother food cold), – in a steam oven. Poultry It is especially important to observe proper hygiene whendefrosting poult...
Page 20 - Switching on SuperCool; SuperCool
When the SuperCool function isactivated, the appliance is cooled ascold as possible (to a factory-presettemperature). SuperCool The SuperCool function is ideal forfreezing large quantities of unfrozenfood. Ideally the function should beswitched on 4 - 6 hours before the foodis placed in the freezer....
Page 22 - Dispensing water
^ Turn on the Ice/Water dispenser witha finger touch to the control panel orby passing your hand under thedispenser to activate it via the lightsensor. All of the touch controls for theIce/Water Dispenser should nowappear white.If this is not the case, the Safety Lock isactivated i.e. "lock"...
Page 25 - Safety lock; Lighting
Safety lock The Ice/Water dispenser can be lockedto prevent unwanted use. ^ Touch the "lock" button so it turnsyellow. The Ice/Water dispenser buttons arenow locked. To unlock the buttons: ^ Touch the "lock" button so it turnswhite. Lighting In order to turn the Ice/Water dispenserli...
Page 26 - Entering the settings mode; Anti-condensation heater
Settings The following settings on the Ice/Waterdispenser can be adjusted: Entering the settings mode ^ Touch and hold the "lock" button(appears white). ^ At the same time tap the "light"button. ^ Hold the "lock" button for approx. 4seconds until the "lock" and "l...
Page 27 - Button sound; Exiting the settings mode
Anti-clumping The anti-clumping feature ensures thatcrushed ice or ice cubes do not freezetogether. A noise will be heardperiodically to indicate that the featureis working. If the sound disturbs you,the feature can be turned off. Note: Disabling the anti-clumpingfeature can result in the formation ...
Page 28 - Automatic defrost
The freezer defrosts automatically. The moisture generated in theappliance collects in the evaporator. Itis automatically defrosted anddissipated by the condenserperiodically. This automatic defrosting systemenables the freezer to remainpermanently ice-free, while ensuringthat the food stored in the...
Page 29 - Moving the shelves; Door shelf; Adjusting the interior fittings
Moving the shelves The shelves can be adjusted accordingto the height of the food. ^ Using both hands, grasp the shelffrom underneath and lift slightly sothat the rear of the shelf is slightlyabove the mountings. ^ Pull the shelf forward. ^ Move the shelf to the desired height,then insert the (rear)...
Page 30 - Freezer baskets; Replacing the freezer basket
Freezer baskets For easier loading, unloading, andcleaning, the freezer baskets can beshifted or completely removed. ^ Pull the basket forward untilresistance is felt. On the hinged-side of the door is asafety lock, which must be turned to ahorizontal position before the drawercan be removed. ^ Usin...
Page 31 - Before cleaning; Cleaning and care
To reduce the risk of electricalshock, disconnect the appliancefrom the power supply by shuttingoff the power main, tripping thecircuit breaker or unplugging thepower cord before maintenance. Never use cleaning agentscontaining abrasive substancessuch as sand, soda, acids, chloridesor chemical solve...
Page 32 - Drip tray
Aluminum frames The frames of the door bins andshelves are made of aluminum. ^ Clean with a mild solution of warmwater and liquid dish soap. Aluminum is susceptible toscratches and nicks, treat with care. The aluminum frames may becomediscolored or otherwise altered ifsoiling is not cleaned awayprom...
Page 35 - Side lighting; Ice/Water Dispenser lighting
Side lighting ^ Turn the light cover counterclockwiseand pull out. Never touch a halogen bulb withbare fingers.When inserting a glass halogen bulbalways hold with a soft cloth. ^ Pull the defective light bulb from thesocket. ^ Place the new bulb in the socket.Halogen bulb type:5 W/12 V/socket G 4. ^...
Page 36 - Water filter
The water filter improves the taste andsmell of ice cubes by removing chlorineand other substances from theincoming tap water. It is important to change the waterfilter regularly. To avoid serious illness or death, donot use water that ismicrobiologically or chemicallyunsafe or of unknown quality wi...
Page 37 - Exchanging the water filter
Exchanging the water filter ^ Push in and rotate the filter cap onthe base panel of your appliancecounterclockwise 180°, 1 . ^ Pull the used filter cartridge out of theappliance, 2 . ^ Remove the cap from the used filter, 3 . ^ Take a new filter cartridge out of thepackaging and remove the protectiv...
Page 38 - Re-setting the filter indicator
Re-setting the filter indicator The filter indicator still flashes in thedisplay. ^ Touch the access button " p " so it turns yellow. ^ Note the position of the button X , but do not touch. ^ Touch the access button " p " again so it turns white. Only the access button " p " ...
Page 39 - Deactivating the water filter
^ Tap the X button until ^ - appears in the display. ^ Touch the access button " p ". ^ Tap the X button until ; appears in the display. ^ Touch the access button " p ". You have left the Custom settingsmode. The "filter" indicator is no longer visibleon the control panel. Wh...
Page 40 - Filter Performance Data Sheet
Filter Performance Data Sheet 40 State of California Department of Public Health Water Treatment Device Certificate Number Date Issued: March 10, 2006 T rademark /M odel D esignation R eplacement E lements Date Revised: April 3, 2008 1775 06 - 9000 077095 9000 077104 Miele 07134220 07134220 M anufac...
Page 42 - Frequently asked questions
With the aid of the following guide minor problems can be corrected without a ser-vice call. Repairs should only be carried out by a qualified and trained person in strictaccordance with local and national safety regulations. Unauthorized repairscould cause personal injury or machine damage and may ...
Page 48 - MieleCare; MieleCare; After sales service
In the event of a fault which you cannoteasily fix yourself, please contact theMiele Technical Service Department atthe address on the back of this booklet. When contacting the Technical ServiceDepartment, please quote the modeland serial number of your appliancegiven on the data plate inside theapp...
Page 49 - Installation instructions; before
Installation instructions To prevent accidentsand machine damageread these instructions before installation or use.
Page 50 - Caring for the environment
Disposal of packing materials The cardboard box and packingmaterials are biodegradable andrecyclable. Please recycle. Ensure that any plastic wrappings,bags, etc., are disposed of safely andkept out of the reach of babies andyoung children. Danger of suffocation! Disposal of an old appliance Old app...
Page 51 - Installation site
Have the appliance installed by aqualified technician, according tothe enclosed installation instructions. The manufacturer is not liable fordamage to property due to anincorrect installation or waterconnection. WARNINGThis appliance is top-heavy andmust be secured to prevent it fromtipping forward....
Page 54 - Side panels
. . . with partition The minimum thickness of the partitionis 5 / 8 " (16 mm). If there is a partition between theadjacent appliances, then eachappliance is to be individually installedwithin its own niche. A heating mat must only be installed ifthe partition wall is less than 6"(160 mm) wid...
Page 55 - Niche dimensions; Dimensions
Niche dimensions Niche width (A) F 1471 Vi 18" (457 mm) Dimensions 55
Page 58 - Before you begin; Tools needed for installation; Installing the appliance
Before you begin Read these instructions completelyand carefully.Have the appliance installed by aqualified technician, according tothe enclosed installation instructions. To reduce the risk of injury ordamage to the product, two peopleshould be used for installation. These installation instructions...
Page 59 - not
Check the installation niche To ensure a safe, trouble-freeinstallation and the best possiblecosmetic result, check to be surethat the installation space complieswith the installation requirements. ^ Check the base (see "Installation"). ^ Check the dimensions of the cavity. ^ Check that the ...
Page 65 - Aligning the appliance
Aligning the appliance ^ Align the appliance with the customfront. The installation aids e have been designed for the following totalthicknesses of custom doors: – 3 / 4 " (19 mm) – 1 1 / 2 " (38 mm) Be sure to take into account thepossible differing thicknesses of thecustom door that is to ...
Page 68 - Preparing the custom door
Preparing the custom door ^ Open the appliance door. ^ Unscrew the installation supports n from the appliance door. ^ Loosen the remaining screws fromthe strips o on each side of the door, then remove. ^ Set aside the screws and side strips o - you will need them again later. ^ Remove the light swit...
Page 70 - Attaching the covers
^ Adjust the custom door to adjacentfurniture/fixtures. ^ Align the custom door with thedouble-threaded bolts. ^ Tighten the nuts on the adjusting rail.This will correct the side alignment ofthe door. ^ Put the side strips (15) back intoplace and screw them completelydown on both sides of the applia...
Page 71 - Attaching the toe-kick panel
^ Insert the cover strip into the spacebetween the appliance and the sidepanel.For side-by-side combinations, thecover strips (on both sides of theappliance) are applied to theoutermost spaces only. ^ Attach the light switch cover. Attaching the toe-kick panel The maximum height of the toe-kickpanel...
Page 72 - Mounting the air separator
Mounting the air separator The air separator on the inside of thefreezer door keeps the supply andexhaust air separate. This preventswarm exhaust air from flowing into themachine, optimizing the energyperformance of the unit. ^ If necessary, shorten the three partsof the air separator. ^ Insert the ...
Page 76 - Plumbing
All plumbing work should be carriedout by a suitably qualified andcompetent person, in accordancewith all applicable local and nationalregulations.The manufacturer is not liable fordamage to property due to anincorrect installation or waterconnection. The water quality must conform tocountry require...
Page 77 - Preparing the water connection
Preparing the water connection The connection to the householdwater supply must be installedbefore the appliance is installed. ^ Turn off the main water valve to preventdamage caused by leaking water. ^ Attach the connecting pipe to theshut-off valve, according to theinstructions supplied by themanu...
Page 78 - Connecting the water supply
Connecting the water supply When connecting the water pipe tothe solenoid valve of the appliance,follow the instructions supplied bythe manufacturer of the ice cubemaker installation kit. When bending the water pipe, be surenot to kink it, otherwise there is a risk ofleaks and water damage.Use bendi...
Page 79 - Electrical connection
, Avoid the risk of electrical shock- Plug into a grounded 3-prongoutlet.- Do not move the ground plug.- Do not use an adapter.- Do not use an extension cord. Failure to follow these instructionscan result in death, fire, or electricalshock. Improper connection of theequipment grounding conductormay...
Page 80 - RemoteVision
The Miele RemoteVision system isdesigned to send messages directly toMiele and/or your PC. For information on set-up andinstallation of the RemoteVision modulesee the "Installation" section of thismanual. Be sure your wireless system meets thefollowing requirements – Windows XP ® or newer op...
Page 82 - MasterCool control panel options for RemoteVision; Selectable
MasterCool control panel options for RemoteVision Selectable options Description of function ; - Back ; 2 Reboot the module ; 3 Reset the module to factory settings ; 4 Enter Ad-Hoc Mode Note: If you cannot select any option (other than ; - "back"), the module has not been installed correctl...