Page 4 - nstallatIon
4 W e k n o w y o u a r e e a g e r t o h e a r y o u r ElectroMotion ESL (EM- ESL) speakers, so this sec- tion is provided to allow fast and easy set up. Once you have them operational, please take the time to read, in depth, the rest of the information in this manual. It will give you perspective ...
Page 5 - Step 5: Listen and Enjoy; ntroductIon
5 cannot discern a tight, coherent image, you may need to reverse the (+) and (–) leads on one side to bring the system into proper polarity. For detailed setup instructions, please turn to the Speaker Level Connection section (page 6) of this manual for more details. Step 5: Listen and Enjoy Now, y...
Page 7 - lacement; Near-field reflections can also occur from your
7 Be consistent when connecting the speaker cables to the signal input terminals. Take care to assign the same color cable lead to the (+) terminal on both the left and right channel speakers. If bass is nonexistent and you cannot discern a tight, coherent image, you may need to reverse the (+) and ...
Page 8 - the WALL BehIND the SPeAkeRS
8 2x x >24” (>61cm) >24” (>61cm) x Fig. 4 back wall (the wall behind the listening position). If your listening position is close to the back wall, these reflections can cause problems and confuse imaging quality. It is better for the wall behind you to be absorptive than to be reflectiv...
Page 9 - Imaging; FINAL PLACemeNt
9 If the entire front wall consists of heavy drapery, your system can sound dull. You may hear muted music with little ambience. Harder surfaces will actually help in this case. The front surface ideally should be one long wall without any doors or openings. If you have openings, the reflection and ...
Page 11 - YouR Room; ESL; teRmINoLoGY; Standing Waves; the extRA “tWeAk”; Distance from the front wall (in front of the; oom
11 YouR Room This is one of those areas that requires both a little background to understand and some time and experimentation to obtain the best performance from your system. Your room is actually a component and an important part of your system. It can dramatically add to, or subtract from, a grea...
Page 12 - RuLeS oF thumB; Hard vs. Soft Surfaces; DIPoLAR SPeAkeRS AND YouR Room; SoLID FootING; After living and experimenting with your EM-
12 Resonant Surfaces and Objects All of the surfaces and objects in your room are subject to the frequencies generated by your system. Much like an instrument, they will vibrate and “carry on” in syncopation with the music, and contribute in a negative way to the music. Ringing, boominess, and even ...
Page 13 - CoNtRoLLeD hoRIzoNtAL DISPeRSIoN; thRee mAjoR tYPeS oF DISPeRSIoN
13 consequently, bass will tighten and imaging will become more coherent and detailed. It is best not to use the spikes, however, until you are secure in the positioning, as the spikes can damage the floor if the speaker is moved. Exposing the Spikes Remove the rubber bumpers to expose the spikes (s...
Page 14 - ome; rce
14 Figure 7–8. As can be seen here, point source concepts invite a great deal of room interaction. While deliv-ering good frequency response to a large listening audience, imaging is consequently confused and blurred. Figure 9–10. Even though they suffer from “venetian blind” effect, angled multiple...
Page 15 - lectrostatIc
15 real. The following list and descriptions will give you only a brief outline of the responsibilities and demands placed on each speaker. Front Left and Front Right If these speakers will be the same two used for your stereo playback, they should be of very high quality and able to play loudly (ov...
Page 18 - VACuum BoNDING
18 T h e c r o s s o v e r p h a s e a b e r r a t i o n s t h a t a r e associated with traditional tweeter, midrange, and woofer systems are eliminated. The result is a dramatic improvement in imaging and staging performance due to the minutely accurate phase relationship of the full-range panel w...
Page 19 - Rice and Kellogg
19 I n t h e l a t e 1 8 0 0 ’ s , a n y l o u d s p e a k e r w a s considered exotic. Today, most of us take the wonders of sound reproduction for granted. It was 1880 before Thomas Edison had invented the first phonograph. This was a horn-loaded diaphragm that was excited by a playback stylus. In...
Page 20 - These developments
20 Due to Rice and Kellogg’s enthusiasm, they d e v o t e d a c o n s i d e r a b l e a m o u n t o f t i m e researching the electrostatic design. However, they soon encountered the same difficulties that even present designers face; planar speakers require a very large surface area to reproduce th...
Page 21 - requently; How do I clean my speakers?
21 due to its incredible accuracy. However, in actual use, the Quad had a few problems. It could not be played very loud, it had poor bass performance, it presented a difficult load that some amplifiers did not like, its dispersion was very directional and its power handling was limited to around 70...
Page 23 - How do I vacuum my MartinLogan speakers?
23 each speaker three or four times a year. See the vacuuming FAQ. A problem has recently developed with my MartinLogan speakers. The right speaker seems to be hissing even when the amplifier and such are not connected. I was wondering if this sounds like any problem you have encoun-tered previously...
Page 24 - rouBlesHootIng
24 No Output • Check that all your system components are turned on. • Check your speaker wires and connections.• Check all interconnecting cables.• Try hooking up a different set of speakers. The lack of output could point to a problem with other equipment in your system (amp, pre-amp, processor, et...
Page 25 - *Specifications are subject to change without notice.; WARRANtY AND ReGIStRAtIoN; SeRIAL NumBeR; SeRVICe; The appointed MartinLogan distributor for
25 g eneral I nformatIon SPeCIFICAtIoNS* System Frequency Response 42–22,000 Hz ± 3db Dispersion Horizontal: 30 Degrees Vertical: 34” (86.4 cm) line sou rce High-Frequency Driver XStat™ CLS™ electrostatic transducerPanel dimensions: 34” x 8.6”(86.4 x 21.8cm)Radiating area: 292 in 2 (1884 cm 2 ) Sens...
Page 26 - If, after owning your speakers for six months,; ImensIonal
26 seek to have repairs performed by the nearest MartinLogan distributor, subject to that distributor’s local servicing policies, but all cost of repairs (parts, labor, transportation) must be born by the owner of the MartinLogan product. 3 If, after owning your speakers for six months, you relocate...
Page 29 - W h i t e n o i s e .
transducer. Any of various devices that transmit energy from one system to another, sometimes one that converts the energy in form. Loudspeaker t r a n s d u c e r s c o n v e r t e l e c t r i c a l e n e r g y i n t o mechanical motion. transient. Applies to that which lasts or stays but a short t...
Page 30 - L e g r a n d f a b r i c a n t d ’ e n c e i n t e s a m é r i c a i n; m a n u e l d e l ’ u t i l i s a t e u r
30 L e g r a n d f a b r i c a n t d ’ e n c e i n t e s a m é r i c a i n m a n u e l d e l ’ u t i l i s a t e u r ®
Page 33 - Étape 2 : positionnement; ÉTAPE 4 : RACCORD DU SIGNAL
33 Nous savons que vous êtes impatient d’entendre vos enceintes ElectroMotion ESL (EM- ESL ); par conséquent, cette section est destinée à vous permettre de les installer de façon rapide et facile. Une fois les enceintes prêtes à fonctionner, veuillez prendre le temps de lire attentivement le reste ...
Page 35 - accords; RACCoRD Du SIGNAL
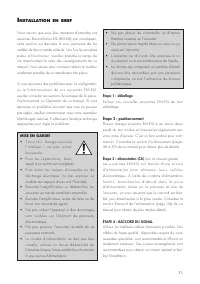
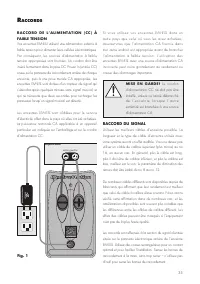
35 r accords R A C C o R D D e L ’ A L I m e N t A t I o N ( C C ) à FAIBLe teNSIoN Vos enceintes EM- ESL utilisent une alimentation externe à faible tension pour alimenter leurs cellules électrostatiques. Par conséquent, les sources d’alimentation à faible tension appropriées sont fournies. Un cord...
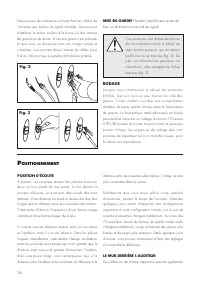
Page 36 - RoDAGe; osItIonnement; PoSItIoN D’éCoute; Des réflexions de champ rapproché peuvent également
36 Faites preuve de cohérence en branchant les câbles de l’enceinte aux bornes du signal d’entrée. Assurez-vous d’attribuer la même couleur à la borne (+) des canaux de gauche et de droite. Si aucune grave n’est présente et que vous ne discernez pas une image serrée et cohérente, vous pourriez devoi...
Page 37 - Orientation
37 provenir de votre mur arrière (le mur derrière la position d’écoute). Si votre position d’écoute est située près du mur arrière, ces réflexions peuvent causer des problèmes et nuire à la qualité de l’image. Il est préférable que le mur derrière vous soit absorbant plutôt que réfléchissant. Si vou...
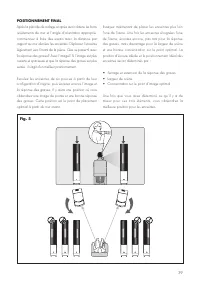
Page 39 - PoSItIoNNemeNt FINAL
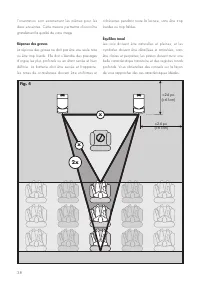
39 Fig. 5 PoSItIoNNemeNt FINAL Après la période de rodage et après avoir obtenu les bons revêtements de mur et l’angle d’orientation approprié, commencez à faire des essais avec la distance par rapport au mur derrière les enceintes. Déplacez l’enceinte légèrement vers l’avant de la pièce. Que se pas...
Page 40 - Ondes stationnaires; mISe Au PoINt SuPPLémeNtAIRe; pour déterminer la distance à partir; coustIque
40 VotRe PIèCe C’est l’un des domaines qui requièrent un certain bagage pour comprendre, et un peu de temps et d’expérimentation pour obtenir le meilleur rendement p o s s i b l e d e v o t r e s y s t è m e . L a p i è c e e s t u n e composante et une partie intégrale de votre système. Cette compo...
Page 41 - RèGLeS PRAtIqueS; Surfaces dures c. surfaces molles; eNCeINteS DIPoLAIReS et VotRe PIèCe; BASe SoLIDe
41 Surfaces et objets résonnants Toutes les surfaces et tous les objets de votre pièce sont assujettis aux fréquences générées par votre système. Comme pour un instrument, elles vibreront et « continueront » en syncope avec la musique, en plus de contribuer de façon négative à la musique. Un tinteme...
Page 42 - exPoSeR LeS CRAmPoNS; assurez-vous que vos mains et les; DISPeRSIoN hoRIzoNtALe CoNtRôLée; DISPeRSIoN VeRtICALe CoNtRôLée; tRoIS PRINCIPAux tYPeS De DISPeRSIoN; nteractIons
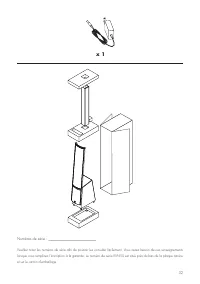
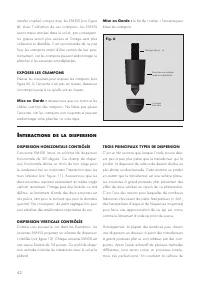
42 transfer coupler) compris avec les EM- ESL (voir figure 6). Avec l’utilisation de ces crampons, les EM- ESL seront mieux ancrées dans le sol et, par conséquent, les graves seront plus serrées et l’image sera plus cohérente et détaillée. Il est recommandé de ne pas fixer les crampons avant d’être ...
Page 43 - Inéma
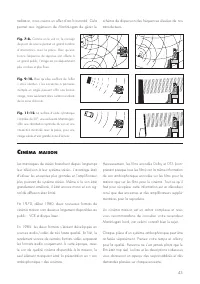
43 Fig. 7–8. Comme on le voit ici, le concept de point de source permet un grand nombre d’interactions avec la pièce. Bien qu’une bonne fréquence de réponse soit offerte à un grand public, l’image est conséquemment plus confuse et plus floue. Fig. 9–10. Bien qu’elles souffrent de l’effet « store vén...
Page 44 - vantages
44 Avant gauche et avant droite Si ces enceintes seront les deux mêmes que vous utilisez pour la lecture stéréo, elles doivent être de très haute qualité et capables de jouer fort (plus de 102 dB) et de reproduire des graves sous 80 Hz. Canal central C’est l’enceinte la plus importante dans un systè...
Page 46 - PLAGe ComPLète De FoNCtIoNNemeNt; MartinLogan ElectroMotion; Haut-parleur conventionnel
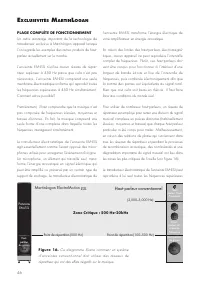
46 e xclusIvItés m artIn l ogan PLAGe ComPLète De FoNCtIoNNemeNt Un autre avantage important de la technologie de transducteur exclusive à MartinLogan apparaît lorsque l’on regarde les exemples des autres produits de haut-parleur actuellement sur le marché. L’enceinte EM- ESL n’utilise aucun réseau ...
Page 47 - CoLLAGe SouS VIDe
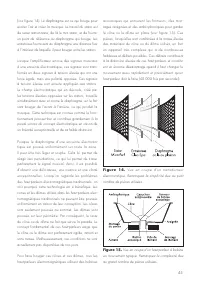
47 à 500 Hz simultanément. Dans un transducteur, vous avez la capacité de traiter simplement les fréquences critiques au-dessus de 500 Hz. Les aberrations de la phase de répartiteur liées avec les systèmes de fréquences aigües, moyennes et graves traditionnels sont supprimées. Le résultat est une im...
Page 48 - Rice et kellogg ont
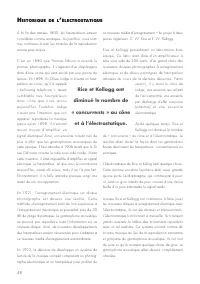
48 À la fin des années 1800, les haut-parleurs étaient considérés comme exotiques. Aujourd’hui, nous som-mes nombreux à tenir les miracles de la reproduction sonore pour acquis. C’est en 1880 que Thomas Edison a inventé le premier phonographe. Il s’agissait d’un diaphragme doté d’une corne qui était...
Page 50 - Comment nettoyer mes enceintes?
50 distorsion ne sont pas plus grands que les dispositifs électroniques qui les poussent. En 1956, Walker a appuyé ses articles en lançant un produit de consommation, le désormais célèbre Quad ESL. Cette enceinte a immédiatement établi une norme de rendement pour l’industrie de l’audio en raison de ...
Page 53 - éPannage
53 Aucun signal de sortie • Vérifiez que toutes les composantes du système sont allumées. • Vérifiez les câbles de l’enceinte et les raccords.• Vérifiez tous les câbles interconnectés. • E s s a y e z d e b r a n c h e r u n a u t r e e n s e m b l e d’enceintes. L’absence de sortie peut être due à ...
Page 54 - Réponse de fréquence du système :; GARANtIe et eNReGIStRemeNt
54 r enseIgnements généraux SPéCIFICAtIoNS* Réponse de fréquence du système : 42–22,000 Hz ± 3db Dispersion : Horizontale : 30 degrés Verticale : 34 po (86,4 cm) source linéaire Haut-parleur haute fréquence : transducteur électrostatique XStat™ CLS; dim. du panneau : 34 x 8,6 po (86,4 x 21,8cm); Zon...
Page 55 - Si, après avoir possédé l’enceinte pendant six mois,
55 MartinLogan le plus proche, sous réserve des politiques de service locales de ce distributeur, mais tous les coûts des réparations (pièces, main-d’œuvre et transport) seront assumés par le propriétaire du produit MartinLogan. 3 Si, après avoir possédé l’enceinte pendant six mois, vous déménagez d...
Page 59 - otes