Page 2 - SPECIFICATIONS; REMOVE ADJUSTING KEYS AND WRENCHES.
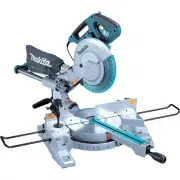
2 ENGLISH (Original instructions) SPECIFICATIONS Model LS1018 / LS1018L Blade diameter 255 mm (10") Hole diameter 15.88 mm (5/8") Max. Cutting capacities (H x W) Bevel angle Miter angle 45° (left) 0° 45° (right) 50 mm x 305 mm 91 mm x 305 mm 31 mm x 305 mm 0° (2" x 12") (3-5/8" x...
Page 3 - ADDITIONAL SAFETY RULES; Wear eye protection.
3 lubricating and changing accessories. 15. DISCONNECT TOOLS before servicing; when changing accessories such as blades, bits, cutters, and the like. 16. REDUCE THE RISK OF UNINTENTIONAL STARTING. Make sure switch is in off position before plugging in. 17. USE RECOMMENDED ACCESSORIES. Consult the ow...
Page 4 - Use only flanges specified for this tool.; SAVE THESE INSTRUCTIONS.
4 6. Turn off tool and wait for saw blade to stop before moving workpiece or changing settings. 7. Unplug tool before changing blade or servicing. 8. To reduce the risk of injury, return carriage to the full rear position after each crosscut operation. 9. Always secure all moving portions before car...
Page 5 - INSTALLATION; Bench mounting; FUNCTIONAL DESCRIPTION; Blade guard
5 WARNING: MISUSE or failure to follow the safety rules stated in this instruction manual may cause serious personal injury. USB098-2 ADDITIONAL SAFETY RULES FOR THE LASER CAUTION: • LASER RADIATION DO NOT STARE INTO BEAM. • AVOID EXPOSURE - LASER RADIATION IS EMITTED FROM APERTURE. • USE OF CONTROL...
Page 6 - DO NOT DEFEAT OR REMOVE GUARD.; Positioning kerf board; Correct; Maintaining maximum cutting capacity
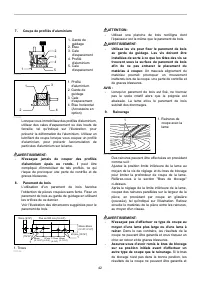
6 If the see-through blade guard becomes dirty, or sawdust adheres to it in such a way that the blade and/or workpiece is no longer easily visible, unplug the saw and clean the guard carefully with a damp cloth. Do not use solvents or any petroleum-based cleaners on the plastic guard because this ma...
Page 7 - If a blade makes; Stopper arm; turn base
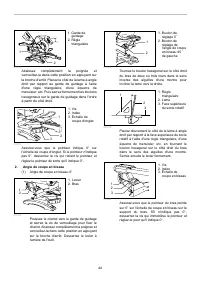
7 1 2 010298 2 1 3 001540 First, unplug the tool. Push the carriage toward the guide fence fully and lower the handle completely. Use the hex. wrench to turn the adjusting bolt until the periphery of the blade extends slightly below the top surface of the turn base at the point where the front face ...
Page 8 - Slide lock adjustment; To lock the slide pole, turn the locking screw clockwise.; Switch action; Operating a tool with; Electric brake
8 Tilt the saw blade until the pointer points to the desired angle on the bevel scale. Then tighten the lever clockwise firmly to secure the arm. 1 011337 When tilting the carriage to the right, tilt the carriage to the left slightly after loosening the lever and press the releasing button. With the...
Page 9 - Laser beam action; When not in use, be sure to turn off the laser; Replacing the dry cells for laser unit; Screw holding the laser unit box
9 switch trigger is released, have the tool serviced at a Makita service center. CAUTION: • The blade brake system is not a substitute for the blade guard. Never use tool without a functioning blade guard. An unguarded blade may result in serious personal injury. Electronic function Soft start featu...
Page 10 - ASSEMBLY; Failure to; Installing or removing saw blade; Accidental start up of the tool may result in
10 Do not use solvents or any petroleum-based cleaners on the lens. NOTE: • When laser line is dim and almost or entirely invisible because of the direct sunlight in the indoor or outdoor window-by work, relocate the work area to a place not exposed to the direct sunlight. ASSEMBLY WARNING: • Always...
Page 11 - Securing workpiece; Failure to do so
11 1 2 4 3 5 001786 To install the blade, mount it carefully onto the spindle, making sure that the direction of the arrow on the surface of the blade matches the direction of the arrow on the blade case. Install the outer flange and hex bolt, and then use the socket wrench to tighten the hex bolt (...
Page 12 - If the tool or blade makes contact with the; Vertical vise; If the workpiece is not
12 and raising the handle in any position and while moving the carriage through its full range of travel. If the tool or blade makes contact with the fence this may result in kickback or unexpected movement of the material and serious personal injury. 1 010472 CAUTION: • When performing bevel cuts, ...
Page 13 - If the workpiece is; Holders; Proper workpiece support will help; OPERATION; Press cutting (cutting small workpieces)
13 005232 By flipping the vise nut counterclockwise, the vise is released, and rapidly moves in and out. To grip the workpiece, push the vise knob forward until the vise plate contacts the workpiece and flip the vise nut clockwise. Then turn the vise knob clockwise to secure the workpiece. The maxim...
Page 16 - In the case of right bevel cut
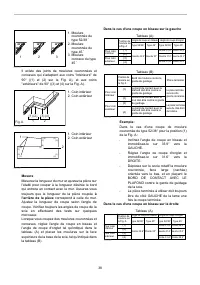
16 M ol d i ng posi t io n i n Fi g . A M ol d i ng edge aga i n s t g ui de fen c e ( 1 ) C e ili ng co nta c t edge s h oul d b e aga i n s t g ui de fen c e . C e ili ng co nta c t edge s h oul d b e aga i n s t g ui de fen c e . Fo r ou t si de co rner Fi n is hed pi e c e will b e o n the L eft...
Page 17 - Wall to Crown Molding Angle: 52/38 degrees; Compound Miter Saw
17 5 2° 38° C e ili ng W a ll 3 0 . 1 29.7 29.4 29. 0 28.7 28.3 28. 0 27.6 27.2 26.9 26. 5 26. 1 2 5 .8 2 5 .4 2 5 . 0 24.7 24.3 23.9 23.6 23.2 22.8 22. 5 22. 1 2 1 .7 2 1 .3 2 1 . 0 2 0 .6 2 0 .2 1 9.8 1 9. 5 1 9. 1 1 8.7 1 8.3 1 7.9 1 7.6 1 7.2 1 6.8 1 6.4 1 6. 0 15 .6 26.9 26. 5 26. 1 2 5 .7 2 5 ...
Page 18 - Wall to Crown Molding Angle: 45 degrees
18 26.726.426. 1 2 5 .8 2 5 . 5 2 5 .2 24.924.624.223.923.623.323. 0 22.722.322. 0 2 1 .7 2 1 .4 2 1 . 0 2 0 .7 2 0 .4 2 0 . 0 1 9.7 1 9.4 1 9. 1 1 8.7 1 8.4 1 8. 1 1 7.7 1 7.4 1 7. 1 1 6.7 1 6.4 1 6. 0 15 .7 15 .4 15 . 0 1 4.7 1 4.3 1 4. 0 3 0 .2 29.829.428.928. 5 28. 1 27.627.226.826.32 5 .9 2 5 ....
Page 19 - cutting
19 7. Cutting aluminum extrusion 1 2 3 4 5 010404 1 2 3 4 010469 When securing aluminum extrusions, use spacer blocks or pieces of scrap as shown in the figure to prevent deformation of the aluminum. Use a cutting lubricant when cutting the aluminum extrusion to prevent build-up of the aluminum mate...
Page 20 - Carrying tool; The use of the stopper pin for; MAINTENANCE; Failure to unplug; Adjusting the cutting angle; angle
20 Carrying tool 011411 Make sure that the tool is unplugged. Secure the blade at 0° bevel angle and the turn base at the full right miter angle position. Secure the slide poles so that the lower slide pole is locked in the position of the carriage fully pulled to operator and the upper poles are lo...
Page 22 - After use; ACCESSORIES; MAKITA LIMITED ONE YEAR WARRANTY; Warranty Policy
22 12 010412 After replacing brushes, plug in the tool and break in brushes by running tool with no load for about 10 minutes. Then check the tool while running and electric brake operation when releasing the switch trigger. If the electric brake is not working correctly, have the tool repaired by a...
Page 23 - SPÉCIFICATIONS
23 FRANÇAIS (Mode d’emploi original) SPÉCIFICATIONS Modèle LS1018 / LS1018L Diamètre de la lame 255 mm (10") Diamètre de l'orifice 15,88 mm (5/8") Capacités de coupe maximales (H x P) Angle de coupe en biseau Angle de coupe d'onglet 45° (Gauche) 0° 45° (droite) 50 mm x 305 mm 91 mm x 305 mm ...
Page 25 - Le fonctionnement
25 Tableau 1. Gabarit minimum du cordon Intensité nominale Volts Longueur totale du cordon en pieds 120 V 25 pi 50 pi 100 pi 150 pi Plus de Pas plus de Calibre américain des fils 0 6 18 16 16 14 18 16 14 12 6 10 10 12 16 16 14 12 12 16 14 12 Non recommandé 000173 USB036-3 RÈGLES DE SÉCURITÉ SUPPLÉME...
Page 26 - Évitez les clous. Avant de travailler votre pièce,
26 mouvement. 17. Pour votre sécurité, retirez les copeaux et autres petites pièces présentes sur la table avant de commencer le travail. 18. Évitez les clous. Avant de travailler votre pièce, inspectez-la et retirez-en tous les clous. 19. Assurez-vous que le blocage de l'arbre est libéré avant de m...
Page 27 - Pose; Montage du banc
27 CAUTION / PRECAUCIÓN LASER RADIATION DO NOT STARE INTO BEAM Maximum Output < 1mW, Wavelength : 650 nmCLASS LASER PRODUCT RADIACIÓN LÁSER NO DIRIJA LA VISTA HACIA EL RAYO LÁSER COMPLIES WITH 21CFR 1040.10 AND 1040.11AVOID EXPOSURE – LASER RADIATIONS IS EMITTED FROM THIS APERTURECONFORME A 21CFR...
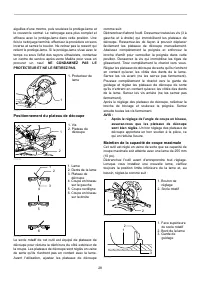
Page 28 - Positionnement du plateau de découpe
28 aiguilles d'une montre, puis soulevez le protège-lame et le couvercle central. Le nettoyage sera plus complet et efficace avec le protège-lame dans cette position. Une fois le nettoyage terminé, effectuez la procédure en sens inverse et serrez le boulon. Ne retirez pas le ressort qui retient le p...
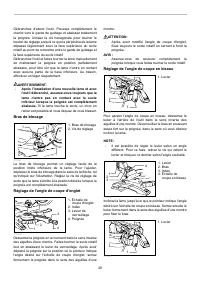
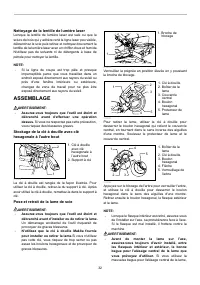
Page 29 - Bras de blocage; coupe en biseau
29 Débranchez d'abord l'outil. Poussez complètement le chariot vers le garde de guidage et abaissez totalement la poignée. Utilisez la clé hexagonale pour tourner le boulon de réglage jusqu'à ce que la périphérie de la lame dépasse légèrement sous la face supérieure du socle rotatif au point de renc...
Page 30 - OFF; Frein électrique
30 Lors de l'inclinaison du chariot vers la droite, inclinez le chariot légèrement vers la gauche après avoir desserré le levier et appuyez sur le bouton de déblocage. Tout en appuyant sur le bouton de déblocage, inclinez le chariot vers la droite. 1 2 3 011353 Inclinez la lame jusqu'à ce que le poi...
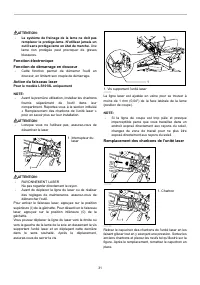
Page 31 - Une; Action du faisceau laser; Pour le modèle LS1018L uniquement; Remplacement des charbons de l'unité laser; laser
31 ATTENTION: • Le système de freinage de la lame ne doit pas remplacer le protège-lame. N'utilisez jamais un outil sans protège-lame en état de marche. Une lame non protégée peut provoquer de graves blessures. Fonction électronique Fonction de démarrage en douceur • Cette fonction permet de démarre...
Page 32 - Nettoyage de la lentille de lumière laser; ASSEMBLAGE; Pose et retrait de la lame de scie
32 Nettoyage de la lentille de lumière laser Lorsque la lentille de lumière laser est sale ou que la sciure de bois qui y adhère rend la ligne laser peu visible, débranchez la scie puis retirez et nettoyez doucement la lentille de la lumière laser avec un chiffon doux et humide. N'utilisez pas de so...
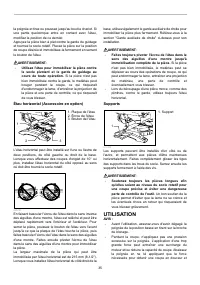
Page 33 - Immobilisation de la pièce
33 vous risquez de mal monter cette dernière, ce qui la ferait bouger et beaucoup trembler, et risquerait de provoquer une perte de contrôle et de graves blessures. 1 2 3 4 010244 1 2 4 3 5 001786 Pour installer la lame, montez-la soigneusement sur l'axe en vous assurant que le sens indiqué par la f...
Page 34 - guidage
34 1 2 001549 Réglage du garde de guidage (GARDES COULISSANTS composés de gardes supérieurs et inférieurs) 1 2 010480 AVERTISSEMENT: • Avant d'utiliser l'outil, assurez-vous que l'ergot coulissant est fermement fixé. • Avant le biseautage, assurez-vous qu'aucune partie de l'outil, et particulièremen...
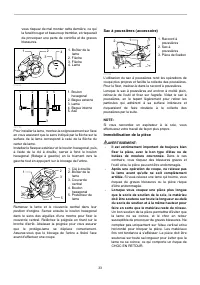
Page 35 - Supports; Un bon soutien de la; UTILISATION
35 la poignée et tirez ou poussez jusqu'au bout le chariot. Si une partie quelconque entre en contact avec l'étau, modifiez la position de ce dernier. Appuyez la pièce bien à plat contre le garde de guidage et tournez le socle rotatif. Placez la pièce sur la position de coupe désirée et immobilisez-...
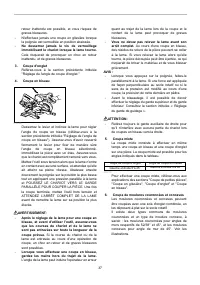
Page 36 - Coupe sous presse (coupe de petites pièces)
36 sans décélération excessive de la lame. • Abaissez doucement la poignée pour effectuer la coupe. Si la poignée est abaissée avec force ou si une force latérale lui est appliquée, la lame vibrera et laissera une marque (trace de scie) dans la pièce, et la précision de la coupe sera affectée. • Lor...
Page 37 - Coupe en biseau; Si la course du chariot ou de la; mixte; Coupe de moulures couronnées et concaves
37 retour inattendu est possible, et vous risquez de graves blessures. • N'effectuez jamais une coupe en glissière lorsque la poignée est verrouillée en position abaissée. • Ne desserrez jamais la vis de verrouillage immobilisant le chariot lorsque la lame tourne. Cela risquerait de provoquer un cho...
Page 38 - correspond à celle du mur.; Dans le cas d'une coupe en biseau sur la gauche; Dans le cas d'une coupe en biseau sur la droite
38 1 2 3 001555 Il existe des joints de moulures couronnées et concaves qui s'adaptent aux coins "intérieurs" de 90° ((1) et (2) sur la Fig. A), et aux coins "extérieurs" de 90° ((3) et (4) sur la Fig. A). (1) (2) (3) (4) 1 2 Fig.A 001556 2 (1) (2) (1) (2) (2) (1) (2) (1) (1) (2) (3)...
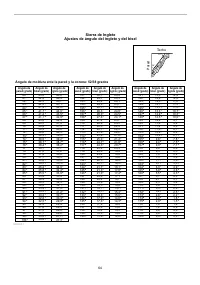
Page 40 - Angle de mur à la moulure couronnée: 52/38 degrés
40 52° 38° Plafond Mur 30,1 29,7 29,4 29,0 28,7 28,3 28,0 27,6 27,2 26,9 26,5 26,1 25,8 25,4 25,0 24,7 24,3 23,9 23,6 23,2 22,8 22,5 22,1 21,7 21,3 21,0 20,6 20,2 19,8 19,5 19,1 18,7 18,3 17,9 17,6 17,2 16,8 16,4 16,0 15,6 26,9 26,5 26,1 25,7 25,3 24,9 24,5 24,1 23,7 23,3 22,9 22,6 22,2 21,8 21,4 21...
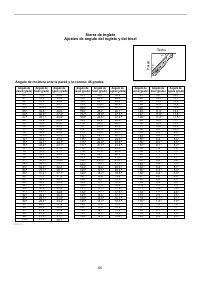
Page 41 - Angle de mur à la moulure couronnée: 45 degrés
41 45° 45° Plafond Mur 26,726,426,125,825,525,224,924,624,223,923,623,323,022,722,322,021,721,421,020,720,420,019,719,419,118,718,418,117,717,417,116,716,416,015,715,415,014,714,314,0 30,229,829,428,928,528,127,627,226,826,325,925,525,124,724,323,823,423,022,622,221,821,421,020,620,219,819,419,018,6...
Page 43 - Transport de l'outil; ENTRETIEN; Réglage de l'angle de coupe
43 vous risquez un choc en retour et de graves blessures. ATTENTION: • Assurez-vous d'avoir remis le bras de blocage sur sa position initiale avant d'effectuer un autre type de coupe que le rainurage. Transport de l'outil 011411 Assurez-vous que l'outil est débranché. Fixez la lame à un angle de cou...
Page 45 - ACCESSOIRES
45 (2) Angle de coupe en biseau 45° 1 2 011381 Ne réglez l'angle de biseau 45° qu'après avoir réglé l'angle de biseau 0°. Pour régler l'angle de biseau 45° gauche, desserrez le levier et inclinez la lame complètement vers la gauche. Assurez-vous que le pointeur du bras pointe sur 45° sur l'échelle d...
Page 46 - GARANTIE LIMITÉE D’UN AN MAKITA; Politique de garantie; Cette garantie ne s’applique pas dans les cas où:
46 • Ensemble étau (étau horizontal) • Étau vertical • Clé à douille avec clé hexagonale à l'autre bout • Support • Sac à poussières • Coude • Règle triangulaire GARANTIE LIMITÉE D’UN AN MAKITA Politique de garantie Chaque outil Makita est inspecté rigoureusement et testé avant sa sortie d’usine. No...
Page 47 - ESPECIFICACIONES
47 ESPAÑOL (Instrucciones originales) ESPECIFICACIONES Modelo LS1018 / LS1018L Especificaciones eléctricas en México 120 V 13 A 50/60 Hz Diámetro del disco 255 mm (10") Diámetro interno 15,88 mm (5/8") Capacidades de corte máximas (Al x An) Ángulo de bisel Ángulo de inglete 45° (Izquierdo) 0...
Page 49 - Utilice protección para los ojos.; La operación de
49 Tabla 1. Calibre mínimo para el cable Volts Longitud total del cable en metros 120 V~ 7,6 m (25 ft) 15,2 m (50 ft) 30,4 m (100 ft) 45,7 m (150 ft) Más de No más de Calibre del cable (AWG) 0 A 6 A 18 16 16 14 18 16 14 12 6 A 10 A 10 A 12 A 16 16 14 12 12 A 16 A 14 12 No se recomienda Amperaje nomi...
Page 51 - INSTALACIÓN; Montaje en un banco de trabajo
51 CAUTION / PRECAUCIÓN LASER RADIATION DO NOT STARE INTO BEAM Maximum Output < 1mW, Wavelength : 650 nmCLASS LASER PRODUCT RADIACIÓN LÁSER NO DIRIJA LA VISTA HACIA EL RAYO LÁSER COMPLIES WITH 21CFR 1040.10 AND 1040.11AVOID EXPOSURE – LASER RADIATIONS IS EMITTED FROM THIS APERTURECONFORME A 21CFR...
Page 52 - NO INHABILITE NI RETIRE EL PROTECTOR.; Posicionamiento del panel de corte; El ajuste correcto de los paneles; Manteniendo la máxima capacidad de corte; izquierdo
52 Si el disco se ensucia y requiere limpiarse para un funcionamiento adecuado, siga las siguientes indicaciones: Con la herramienta apagada y desconectada, use la llave de tubo incluida para aflojar el perno hexagonal que sujeta la cubierta central. Afloje el perno hexagonal girándole en dirección ...
Page 54 - Usar una herramienta con un
54 Para ajustar el ángulo de bisel, afloje la palanca de la parte trasera de la herramienta en el sentido contrario a las agujas del reloj. Desbloquee el brazo empujando la empuñadura enérgicamente en la dirección que quiera inclinar el disco. NOTA: • La palanca puede ser ajustada a un ángulo de pal...
Page 55 - Sólo para el modelo LS1018L
55 1 2 3 010237 ADVERTENCIA: • No use un candado con un grosor menor de 6.35 mm (1/4") de diámetro. Un candado de un tamaño inadecuado, o el uso de un cable podría no bloquear la herramienta adecuadamente ocasionando un activación accidental que podría causar graves lesiones personales. • NUNCA ...
Page 56 - ENSAMBLE; No; Instalación o extracción del disco de sierra.; El encendido accidental de la
56 1 010473 La línea láser se ajusta en fábrica de forma que está posicionada en 1 mm (0,04") desde la superficie lateral del disco (posición de corte). NOTA: • Cuando la línea del láser aparezca tenue y sea difícil de verse debido a la luz directa del sol, cambie el área de trabajo a un lugar d...
Page 58 - Aseguramiento de la pieza
58 Bolsa recolectora de polvo (accesorio) 1 2 3 011339 El uso de la bolsa recolectora de polvo hace que las operaciones de corte sean más limpias, y facilita la recolección del polvo. Para instalar la bolsa recolectora de polvo, encájela en la boquilla para el polvo. Cuando la bolsa esté llena por l...
Page 60 - Si la pieza; Soportes; Un apoyo; OPERACIÓN; jalando la clavija de retención.; Corte con prensa (corte de piezas pequeñas); Tornillo de sujeción
60 con la pieza de trabajo y gire la tuerca de la prensa en dirección de las agujas del reloj. Luego gire la perilla de la prensa también en el mismo sentido para fijar la pieza de trabajo. La anchura máxima de la pieza de trabajo que puede fijarse por la prensa horizontal es de 215 mm (8-1/2")....
Page 61 - en
61 prensa adecuado. Encienda la herramienta sin que el disco haga contacto alguno y espere a que éste adquiera velocidad completa antes de bajar la empuñadura. Luego baje lentamente la empuñadura a la posición máxima inferior para realizar el corte en la pieza de trabajo. Cuando se haya finalizado e...
Page 62 - compuesto; Medición; sea igual al largo de la pared. Ajuste el
62 corte, apague la herramienta y ESPERE HASTA QUE EL DISCO SE HAYA DETENIDO POR COMPLETO antes de regresarlo a la posición máxima superior. ADVERTENCIA: • Tras ajustar el disco para un corte de bisel, antes de usar la herramienta asegure que el carro y el disco puedan desplazarse libremente a travé...
Page 64 - Ángulo de moldura ente la pared y la corona: 52/38 grados; Sierra de Inglete
64 52° 38° Techo Pared 30,1 29,7 29,4 29,0 28,7 28,3 28,0 27,6 27,2 26,9 26,5 26,1 25,8 25,4 25,0 24,7 24,3 23,9 23,6 23,2 22,8 22,5 22,1 21,7 21,3 21,0 20,6 20,2 19,8 19,5 19,1 18,7 18,3 17,9 17,6 17,2 16,8 16,4 16,0 15,6 26,9 26,5 26,1 25,7 25,3 24,9 24,5 24,1 23,7 23,3 22,9 22,6 22,2 21,8 21,4 21...
Page 65 - Ángulo de moldura ente la pared y la corona: 45 grados
65 26,726,426,125,825,525,224,924,624,223,923,623,323,022,722,322,021,721,421,020,720,420,019,719,419,118,718,418,117,717,417,116,716,416,015,715,415,014,714,314,0 30,229,829,428,928,528,127,627,226,826,325,925,525,124,724,323,823,423,022,622,221,821,421,020,620,219,819,419,018,618,217,917,517,116,7...
Page 67 - Intentar realizar un corte; Transporte de la herramienta; El uso de la clavija de retención para; MANTENIMIENTO; Intentar; Ajuste del ángulo de corte; inglete; hexagonal
67 • Asegúrese de retornar el brazo de retención a la posición original al realizar un tipo de corte que no sea de ranura. Intentar realizar un corte con el brazo de retención en la posición incorrecta podría ocasionar resultados inesperados en el corte, así como retrocesos bruscos que resulten en g...
Page 68 - bisel; ajuste a 0
68 1 2 011412 Baje la empuñadura por completo y bloquéela en esa posición al presionar la clavija de retención. Empareje el costado del disco con la cara de la línea (guía) de corte mediante una escuadra o similar. Luego fije con firmeza y en orden comenzando con los pernos de entrada hexagonal sobr...
Page 69 - Luego del uso; El uso de cualquier otro accesorio o
69 (2) Ángulo bisel de 45° 1 2 011381 Ajuste el ángulo bisel de 45° sólo después de haber hecho el ajuste del ángulo bisel de 0°. Para ajustar el ángulo bisel de 45°, afloje la palanca e incline el disco a la izquierda por completo. Asegúrese de que el apuntador en el brazo apunte hacia 45° en la es...
Page 70 - Política de garantía; Esta garantía no será aplicable cuando:
70 Discos de ingletadora Para cortes limpios y precisos en varios materiales. Combinación Disco de uso general para cortes al hilo,transversales e ingletes rápidos y limpios. Corte transversal Para cortes a contrahilo más suaves. Rebanadoslimpiamente a contrahilo. Corte fino transversal Para cortes ...
Page 72 - Makita Corporation
72 Some dust created by power sanding, sawing, grinding, drilling, and otherconstruction activities contains chemicals known to the State of Californiato cause cancer, birth defects or other reproductive harm. Some examplesof these chemicals are:• lead from lead-based paints,• crystalline silica fro...