Page 2 - TABLE OF CONTENTS
TABLE OF CONTENTS This manual may contain images or content different from the model you purchased. This manual is subject to revision by the manufacturer. SAFETY INSTRUCTIONS .............................................................. 3 IMPORTANT SAFETY INSTRUCTIONS ................................
Page 3 - SAFETY INSTRUCTIONS; IMPORTANT SAFETY INSTRUCTIONS
3 EN SAFETY INSTRUCTIONS READ AND SAVE THESE INSTRUCTIONS The following safety guidelines are intended to prevent unforeseen risks or damage from unsafe or incorrect operation of the appliance. The guidelines are separated into ‘WARNING’ and ‘CAUTION’ as described below. This symbol is displayed to ...
Page 4 - Installation
4 EN Installation • Do not install the appliance on an uneven or inclined surface. • Do not install the appliance in an area exposed to direct sunlight or near heat-generating equipment. • Do not install the product in a place where combustible gas may leak or industrial oil or metallic particulates...
Page 5 - Operation
5 EN Operation • If the appliance is immersed in water, stop using it and contact the LG Electronics Customer Information Center. • If there is a gas leakage (isobutane, propane, LNG, etc.), do not touch the product or power plug and ventilate the area immediately. • Do not clean the appliance with ...
Page 10 - INSTALLATION; Parts and Specifications; Front View
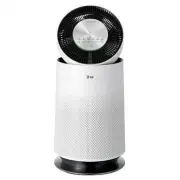
10 EN INSTALLATION • The appearance or components of the appliance may differ depending on the model. Parts and Specifications Front View a Air outlet/Clean booster • Discharges purified air through the filter. • Control the airflow so that it reaches every corner of the room. b Air quality light • ...
Page 11 - Rear View; Specifications
11 EN Rear View a Smart Diagnosis speaker • In the event of a malfunction or failure, you can use the Smart Diagnosis option to help you troubleshoot the appliance. b PM1.0 (particles with a diameter between 1.0 and 2.5 micrometers) sensor • Detects the concentration of particulates in the air. c Od...
Page 12 - Filter System; Components
12 EN Filter System a Deodorizing Care filter • Minimizes odors from the bathroom, cigarettes, food and other common sources. b True HEPA filter • Minimizes PM1.0 and cigarette smoke from the air. c Ultra-fine filter • Minimizes large particles floating in the air. d Filter handle • Helps when remov...
Page 13 - Unpacking the Appliance; Removing the Filter Packaging
13 EN Unpacking the Appliance Unpack the appliance and remove any packing tape or vinyl before using the appliance. Removing the Filter Packaging 1 Remove the rear cover by gently pulling the top of the cover at the sides until it separates from the appliance. Lift the cover to remove it from the ba...
Page 14 - Installation Location; Transportation; Transporting the Appliance
14 EN Installation Location Requirements Installation Location Allow a 3 1/4 ft (1 m) clearance between the appliance and surrounding surfaces or objects. The air inlet needs space to function properly. 1 m The performance of the appliance may differ depending on surrounding conditions such as tempe...
Page 15 - Control Panel; Control Panel Features; OPERATION
15 EN • The appearance or components of the appliance may differ depending on the model. Control Panel Control Panel Features OPERATION a Power Button b Mode Button Sets the operating mode. • Press and hold the button for 3 seconds to turn on/off the air quality light. c Speed Button Adjusts the fan...
Page 16 - Status Display Panel
16 EN Status Display Panel a Display of air quality A Overall air quality (color) B Particulate matter (color) C Concentration of particles or sleep timer time D Concentration of odor (color) b Displays operating mode c Displays speed and booster speed G Speed : Displays the air purifier’s fan speed...
Page 17 - Remote Controller; Remote Controller Features
17 EN Remote Controller Remote Controller Features a Power Button b Speed Button Adjusts the fan speed of the product. c Sleep Timer Button Schedules an automatic turn off time for the appliance. d Booster Speed Button Adjusts the fan speed of the clean booster. e Light Button Turns the air quality ...
Page 18 - Getting Started; Turning the Appliance On/Off; Using Operating Modes; Smart Mode
18 EN Getting Started Turning the Appliance On/Off Press the Power button to turn the appliance on/ off. NOTE • The first time the appliance is turned on, it is set to Booster mode. • If you experience a power outage, when power is restored the appliance starts in the last operating mode set. • Afte...
Page 19 - Booster Mode; Normal Mode; Adjusting Fan Speeds; Air Purifier Fan Speed
19 EN Booster Mode Select this mode to quickly clean the air and circulate it as far as possible.Press the Mode button to choose the Booster mode. NOTE • If you happen to unplug the power cord from the outlet before the clean booster closes completely, plug in the cord again. The clean booster will ...
Page 20 - Clean Booster Fan Speed; Using Extra Functions; Setting the Sleep Timer
20 EN Clean Booster Fan Speed To adjust the fan speed of the clean booster, press the Booster Speed button while the appliance is in Booster mode. • Each time you press the button, the speed changes in the following order:Auto ~ Low ~ Middle ~ High ~ Turbo. Booster Speed Display The booster fan spee...
Page 21 - Locking the Control Panel
21 EN Locking the Control Panel Lock the control panel if you want to prevent accidental operation or keep children from changing the settings.Press the Sleep Timer button for at least 3 seconds while the appliance is operating. • k (Lock) is displayed on the status display panel. NOTE • Turn the Lo...
Page 22 - Checking Air Quality; Overview of the Air Quality
22 EN Checking Air Quality The overall air quality is indicated by the color of the air quality light and in the status display panel. Overview of the Air Quality The overall air quality is calculated based on the concentrations of odors and particulates in the air and is categorized into 4 levels d...
Page 24 - Checking Particulate Levels
24 EN Checking Particulate Levels To check the particulate matter concentration by particulate size, press the Indicator button while the appliance is operating. • Press the button repeatedly to see the PM levels displayed in the following order: PM10 ~ PM2.5 ~ PM1.0 • The concentration for the sele...
Page 25 - SMART FUNCTIONS; LG ThinQ Application; LG ThinQ Application Features; Before using LG ThinQ
25 EN SMART FUNCTIONS LG ThinQ Application The LG ThinQ application allows you to communicate with the appliance using a smartphone. LG ThinQ Application Features Smart Diagnosis If you experience a problem while using the appliance, this smart diagnosis feature will help you diagnose the problem. S...
Page 27 - Using LG ThinQ to Diagnose
27 EN Smart Diagnosis This feature is only available on models with the c or d logo. Use this feature to help you diagnose and solve problems with your appliance. NOTE • For reasons not attributable to LGE’s negligence, the service may not operate due to external factors such as, but not limited to,...
Page 28 - Maintaining the Appliance; Scheduled Maintenance; Alerts on the Status Display; Storage; CAUTION; MAINTENANCE; WARNING
28 EN Maintaining the Appliance Scheduled Maintenance Component Cleaning Frequency Replacement Frequency Filter Only ultra-fine filter Clean filter as needed The whole filter 1 year PM1.0 sensor Every 2 months - NOTE • The operating environment and operation hours may affect the cleaning frequency. ...
Page 29 - Cleaning the Appliance; Cleaning the Exterior; Cleaning the Particulate Sensor
29 EN Cleaning the Appliance Cleaning the Exterior 1 Remove dust from the air inlet and outlet using a vacuum cleaner. 2 Wipe the exterior with a soft cloth. NOTE • If you find it difficult to clean the front and rear covers, disassemble them first and wash with water. Then, dry them completely out ...
Page 30 - Maintaining the Filter; Cleaning the Filter
30 EN Maintaining the Filter Cleaning the Filter 1 Separate the cover from the appliance. 2 Remove dust from the ultra-fine filter with a vacuum cleaner or soft brush. Replacing the Filter 1 Place a newspaper or cloth on the floor by the appliance. Remove the cover from the appliance and slide the o...
Page 31 - TROUBLESHOOTING; Before Calling for Service
31 EN TROUBLESHOOTING Before Calling for Service Please check the following before you contact the service center. If the problem persists, contact your local service center. Operation Symptoms Possible Causes & Solution The appliance does not operate. The power plug is unplugged from the outlet...
Page 33 - Odor
33 EN Odor Symptoms Possible Causes & Solution A strange odor comes out from the air outlet as well as the filter. Appliance is new. • The odor of activated charcoal is not harmful. This is similar to the odor you may experience in a brand new car. The odor should dissipate after 1-2 weeks of us...
Page 38 - MEMO
Page 39 - MANUAL DEL PROPIETARIO; PURIFICADOR DE AIRE; Por favor mantenga la garantía en un lugar seguro.
www.lg.com MANUAL DEL PROPIETARIO Copyright © 2020 - 2023 LG Electronics Inc. Todos los derechos reservados PURIFICADOR DE AIRE Para una utilización segura y fácil del producto, por favor, de leer el manual antes de usar. Por favor mantenga la garantía en un lugar seguro. Este aparato es un aparato ...
Page 40 - TABLA DE CONTENIDOS
TABLA DE CONTENIDOS Este manual puede contener imágenes o contenido diferente al modelo que compró. Este manual está sujeto a revisión por parte del fabricante. INSTRUCCIONES DE SEGURIDAD .............................................. 3 INSTRUCCIONES IMPORTANTES DE SEGURIDAD ...........................
Page 41 - INSTRUCCIONES DE SEGURIDAD; INSTRUCCIONES IMPORTANTES DE SEGURIDAD
3 ES INSTRUCCIONES DE SEGURIDAD LEA Y GUARDE ESTAS INSTRUCCIONES Las siguientes pautas de seguridad tienen como objetivo prevenir riesgos o daños imprevistos a causa de un funcionamiento imprudente o incorrecto del aparato. Las pautas se dividen en “ADVERTENCIA” y “PRECAUCIÓN” como se describe a con...
Page 42 - Instalación
4 ES Instalación • No instale el aparato sobre una superficie desnivelada ni inclinada. • No instale el aparato en un área expuesta a la luz solar directa o cerca de equipos que generen calor. • No instale el producto en un lugar donde pudiera haber fugas de gas combustible o donde haya presente ace...
Page 43 - Funcionamiento
5 ES Funcionamiento • Si el aparato se sumerge en agua, deje de utilizarlo y comuníquese con el centro de información al cliente de LG Electronics. • Si hay una fuga de gas (isobutano, propano, GNL, etc.), no toque el producto ni el cable de alimentación y ventile el área de inmediato. • No limpie e...
Page 48 - INSTALACIÓN; Piezas y especificaciones; Vista frontal
10 ES INSTALACIÓN • El aspecto o los componentes del aparato pueden variar según el modelo. Piezas y especificaciones Vista frontal a Salida de aire/Potenciador de limpieza • Descarga el aire purificado a través del filtro. • Controla el flujo de aire de modo que llegue a todos los rincones del ambi...
Page 49 - Vista trasera; Especificaciones
11 ES Vista trasera a Parlante de Smart Diagnosis • En caso de mal funcionamiento o falla, puede utilizar la opción Smart Diagnosis para que lo ayude a resolver el problema del aparato. b Sensor de PM1.0 (partículas con un diámetro entre 1.0 y 2.5 micrómetros) • Detecta la concentración de partícula...
Page 50 - Sistema de filtro; Componentes
12 ES Sistema de filtro a Filtro de protección desodorizante • Minimiza los olores del baño, cigarrillo, alimentos y otras fuentes comunes. b Filtro True HEPA • Minimiza el PM1.0 y el humo del cigarrillo del aire. c Filtro ultrafino • Minimiza las partículas grandes que flotan en el aire. d Mango de...
Page 51 - Desempaque del aparato; Retiro del embalaje del filtro
13 ES Desempaque del aparato Desempaque el aparato y retire la cinta o el vinilo del empaque antes de usarlo. Retiro del embalaje del filtro 1 Retire la cubierta trasera tirando con suavidad de la parte superior de la cubierta desde los laterales hasta que se separe del aparato. Levante la cubierta ...
Page 52 - Ubicación de la instalación; Requisitos de transporte; Transporte del aparato
14 ES Requisitos de ubicación de la instalación Ubicación de la instalación Deje un espacio de 3 1/4 pies (1 m) entre el aparato y las superficies u objetos circundantes. La entrada de aire necesita espacio para funcionar adecuadamente. 1 m El desempeño del aparato podría diferir según las condicion...
Page 53 - Panel de Control; Funciones del panel de control; FUNCIONAMIENTO
15 ES • El aspecto o los componentes del aparato pueden variar según el modelo. Panel de Control Funciones del panel de control FUNCIONAMIENTO a Botón de Encendido b Botón de Modo Configura el modo de funcionamiento. • Mantenga presionado el botón durante 3 segundos para encender/apagar la luz de ca...
Page 54 - Panel de la pantalla de estado
16 ES Panel de la pantalla de estado a Pantalla de calidad del aire A Calidad general del aire (color) B Material particulado (color) C Concentración de partículas u hora del temporizador de desconexión D Concentración de olores (color) b Muestra el modo de funcionamiento c Muestra la velocidad y la...
Page 55 - Control remoto; Funciones del control remoto
17 ES Control remoto Funciones del control remoto a Botón de Encendido b Botón de Velocidad Ajusta la velocidad del ventilador del producto. c Botón del Temporizador de Desconexión Programa la hora de apagado automático para el aparato. d Botón Potenciador de Velocidad Ajusta la velocidad del ventil...
Page 56 - Primeros pasos; Encendido/apagado del aparato; Uso de los modos de; Modo inteligente
18 ES Primeros pasos Encendido/apagado del aparato Presione el botón de Encendido para encender/ apagar el aparato. NOTA • La primera vez que se enciende el aparato está configurado en modo Potenciador . • Si experimenta un corte de suministro eléctrico, cuando se restablezca la energía el aparato s...
Page 57 - Modo potenciador; Modo normal; Ajuste de las velocidades; Velocidad del ventilador del
19 ES Modo potenciador Seleccione este modo para limpiar rápidamente el aire y hacerlo circular lo más lejos posible. Presione el botón de Modo para elegir el modo Potenciador . NOTA • Si desenchufa el cable de alimentación del enchufe antes de que el potenciador de limpieza se cierre por completo, ...
Page 58 - Uso las funciones extra; Configuración del temporizador
20 ES Velocidad del ventilador del potenciador de limpieza Para ajustar la velocidad del ventilador del potenciador de limpieza, presione el botón de Velocidad del potenciador mientras el aparato está en modo Potenciador . • Cada vez que presione el botón, la velocidad cambia en el siguiente orden:A...
Page 59 - Bloqueo del panel de control
21 ES Bloqueo del panel de control Bloquee el panel de control, si desea prevenir el funcionamiento accidental o evitar que los niños cambien las configuraciones.Presione el botón Temporizador de desconexión durante 3 segundos, como mínimo, mientras el aparato está en funcionamiento. • k (Bloqueo) s...
Page 60 - Comprobación de la calidad del aire; Generalidades de la calidad del aire
22 ES Comprobación de la calidad del aire La calidad general del aire se indica con el color de la luz de la calidad del aire y el panel de la pantalla de estado. Generalidades de la calidad del aire La calidad general del aire se calcula según las concentraciones de olores y las partículas en el ai...
Page 63 - FUNCIONES INTELIGENTES; Aplicación LG ThinQ; Funciones de la aplicación LG; Antes de usar la aplicación LG
25 ES FUNCIONES INTELIGENTES Aplicación LG ThinQ La aplicación LG ThinQ le permite comunicarse con el aparato mediante un teléfono inteligente. Funciones de la aplicación LG ThinQ Smart Diagnosis Si experimenta un problema a utilizar el electrodoméstico, la función de diagnóstico inteligente lo ayud...
Page 65 - Uso de LG ThinQ para diagnosticar
27 ES Smart Diagnosis Esta característica solo está disponible en el modelo con el logo c o d . Utilice esta función como ayuda para diagnosticar y resolver problemas con su electrodoméstico. NOTA • Por motivos no atribuibles a la negligencia de LGE, es posible que el servicio no pueda funcionar deb...
Page 66 - Mantenimiento del aparato; Mantenimiento programado; Alertas en el panel de la pantalla; Almacenamiento; PRECAUCIÓN; MANTENIMIENTO; ADVERTENCIA
28 ES Mantenimiento del aparato Mantenimiento programado Componente Frecuencia de limpieza Frecuencia de reemplazo Filtro Solo filtro ultrafino Limpie el filtro según sea necesario Todo el filtro 1 año Sensor de PM1.0 Cada 2 meses - NOTA • El entorno operativo y los horarios de funcionamiento podría...
Page 67 - Limpieza del aparato; Limpieza del exterior; Limpieza del sensor de material
29 ES Limpieza del aparato Limpieza del exterior 1 Utilice una aspiradora para quitar la suciedad de la entrada y salida de aire. 2 Limpie el exterior con un paño suave. NOTA • Si le resulta difícil limpiar las cubiertas delantera y trasera, quítelas primero y después lávelas con agua. Luego, séquel...
Page 68 - Mantenimiento del filtro; Limpieza del filtro
30 ES Mantenimiento del filtro Limpieza del filtro 1 Separe la cubierta del aparato. 2 Quite la suciedad del filtro ultrafino con una aspiradora o cepillo suave. Reemplazo del filtro 1 Coloque un periódico o paño en el piso junto al aparato. Extraiga la cubierta del aparato y deslice el filtro usado...
Page 69 - RESOLUCIÓN DE PROBLEMAS; Antes de llamar al servicio
31 ES RESOLUCIÓN DE PROBLEMAS Antes de llamar al servicio Compruebe lo siguiente antes de comunicarse con el centro de servicio. Si el problema persiste, comuníquese con su centro de servicio local. Funcionamiento Síntomas Causas posibles y solución El aparato no funciona. El cable de alimentación e...
Page 71 - Olor
33 ES Olor Síntomas Causas posibles y solución Un olor extraño emana de la salida de aire, así como del filtro. El aparato es nuevo. • El olor del carbón activado no es perjudicial. Es similar al olor que podría experimentar en un auto nuevo. El olor debe disiparse después de 1 a 2 semanas de uso. E...
Page 76 - MEMORÁNDUM