Page 2 - Table of Contents; ENGLISH
Table of Contents This manual is produced for a group of products and may contain images or content different from the model you purchased.This manual is subject to revision by the manufacturer. Important Safety Instructions .....03 Unpacking .......................................09 Parts.............
Page 3 - Important Safety Instructions; READ AND SAVE THESE INSTRUCTIONS; WARNING; Warning; CHILDREN IN THE HOUSEHOLD
03 ENGLISH Important Safety Instructions READ AND SAVE THESE INSTRUCTIONS . This guide contains many important safety messages. Always read and obey all safety messages. This is the safety alert symbol. It alerts you to safety messages that inform you of hazards that can kill or hurt you or others, ...
Page 4 - INSTALLATION; Install the product near an easily accessible electrical outlet.; POWER; Unplug the product before cleaning it or replacing the filter.
04 ENGLISH INSTALLATION • Install the product near an easily accessible electrical outlet. • Do not install the product on an uneven or inclined surface. • Do not install the product in a damp area and keep away from splashing rain or water. • Do not install the product in an area exposed to direct ...
Page 5 - Do not extend the length of the power cable or alter it.; USE
05 ENGLISH • Do not bend the power cable excessively or place a heavy object on top of it. • Do not extend the length of the power cable or alter it. • Do not use several devices on a multi-socket extension outlet. • Unplug the product before cleaning or attempting any user maintenance. Turning the ...
Page 6 - DISPOSAL
06 ENGLISH • Do not use the product near an open flame. Do not use or store combustible or flammable substances near the product, such as ether, benzene, alcohol, drugs, propane, butane, combustible sprays, insecticide, air freshener, cosmetics, candles, and lamps. • Do not place the power cord unde...
Page 7 - Caution
07 ENGLISH Caution To reduce the risk of fire, electric shock, or personal injury when using the product, follow basic safety precautions, including the following: INSTALLATION • Do not tilt the product while moving or transporting it. • This product is not designed for maritime use or for mobile in...
Page 9 - Parts; Unpacking
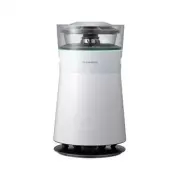
09 ENGLISH Parts Air Purifier Remote Control / Battery (CR2025, 1 Unit) Owner’s Manual • The appearance or components of the product may differ depending on the model. • The shape of the power plug differs depending on the country. Unpacking Owner’s Manual
Page 10 - Removing Packing
10 ENGLISH Removing Packing Materials Unpack the product and remove any packing tape or protective vinyl before using the product. 1 Pull out the product from the packaging and remove the packing tape attached to the product. 2 Grab the top end of the back cover and gently pull it. • You will see &#...
Page 12 - Remote Control Setup
12 ENGLISH Warning • A button/coin-shaped battery is used in the remote. • Do not swallow the battery. It may cause injury, including damage to internal organs, or death. • If the battery is swallowed, consult a physician immediately. Damage to internal organs, or in severe cases death, may occur wi...
Page 13 - Installation; Transporting or Moving the; Installing the Product
13 ENGLISH Installation Transporting or Moving the Product Caution Transport the product in a well-secured and upright position. Impacts may cause product damage. The product is heavy. Use two people when moving it. • Dropping the product may cause personal injury or product malfunction. • Do not ho...
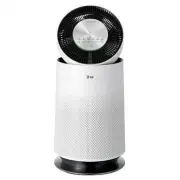
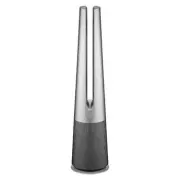
Page 14 - Product Overview; Front; Operation
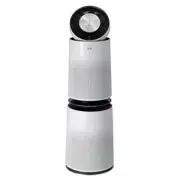
14 ENGLISH Product Overview Front Upper Section Clean Booster Lower Section Upper Air Outlet/Clean Booster • Discharges purified air through the upper filter. • Controls the direction of the air so that it reaches every corner of the room. Air Quality Indicator Light Changes color to indicate the ai...
Page 16 - Filter System
16 ENGLISH Total Deodorizing Care Filter Removes unpleasant everyday odors from sources such as diapers, cigarette smoke, and strong-smelling foods. True HEPA filter Removes super ultra-fine particles, such as fine sand and cigarette ash, from the air. Ultra-fine Filter This prefilter on the outside...
Page 17 - Control Panel
17 ENGLISH Control Panel Start/Stop Button Press to start or stop the air purifier. Mode Button Press to set the operating mode. • Press and hold the button for 3 seconds to turn on/off the overall air quality indicator light. (See Turning the Indicator Light On/Off. ) Speed Button Press repeatedly ...
Page 18 - Status Display Panel
18 ENGLISH Air Quality Status Display ① Overall air quality (color) ② PM particle size and density (color) ③ PM density or Sleep Timer delay time ④ Odor level (color) Operating Mode Display Fan Speed and Booster Speed Display Speed: Displays the air purifier's fan speed. Booster Speed: Displays the ...
Page 19 - Remote Control
19 ENGLISH Remote Control Start/Stop Button Press to start or stop the air purifier. Speed Button Press to adjust the fan speed. Sleep Timer Button Press repeatedly to schedule a delay time until the air purifier turns off automatically. Booster Speed Button Press to adjust the fan speed of the Clea...
Page 20 - Starting the Air Purifier; Using Smart Mode
20 ENGLISH Starting the Air Purifier Press the Start/Stop button to turn the air purifier on or off. Note • The product defaults to Booster mode when used for the first time. • The operating mode defaults to the last mode selected, even after a power failure. • The air purifier sensor takes 30 secon...
Page 21 - Using Booster Mode; Using Dual Mode
21 ENGLISH Using Booster Mode The Clean Booster purifies air and then uses the fan to quickly circulate it throughout the room.Press the Mode button to choose the Booster mode. • Each time you press the button, the operating mode changes in the following order: Smart → Booster → Dual → Single . Caut...
Page 22 - Using Single Mode; Adjusting the Purifier Fan; Purifier Fan Speed Display
22 ENGLISH Using Single Mode Single mode uses the lower section of the air purifier to purify the air. Press the Mode button to choose Single mode. • Each time you press the button, the operating mode changes in the following order: Smart → Booster → Dual → Single . Note For best performance, the fa...
Page 23 - Adjusting the Clean; Booster Fan Speed Display; Rotating the Clean Booster
23 ENGLISH Adjusting the Clean Booster Fan Speed Press the Booster Speed button to adjust the Clean Booster fan speed. The Clean Booster fan speed can only be adjusted when the air purifier is in Booster mode. • Each time you press the button, the speed changes in the following order: Auto → Low → M...
Page 24 - Checking the Air Quality Using; Checking the Air Quality; Understanding the Overall Air Quality Level
24 ENGLISH Checking the Air Quality Using the Indicator Light The color of the overall air quality indicator light provides an easy way to gauge the overall air quality. Upper Overall Air Quality Indicator Light Lower Overall Air Quality Indicator Light Note During the initial PM sensor stabilizatio...
Page 25 - Checking Air Quality on the; Checking the PM Density Levels
25 ENGLISH Checking Air Quality on the Status Display Panel The status display panel shows the overall air quality, PM density, and odor level. • Overall air quality : The color of the overall air quality icon in the status display panel shows the overall air quality level. • PM density : The PM den...
Page 27 - Setting the Sleep Timer; Locking the Control Panel
27 ENGLISH Setting the Sleep Timer Press the Sleep Timer button on the control panel or the remote while the air purifier is running to turn it off automatically after a set time delay. • Press the button repeatedly to select from among preset time delays: After 2 hours→ After 4 hours → After 8 hour...
Page 28 - LG ThinQ Application; LG ThinQ Application Features; Smart Diagnosis; Before using LG ThinQ; Smart Functions
28 ENGLISH LG ThinQ Application The LG ThinQ application allows you to communicate with the appliance using a smartphone. LG ThinQ Application Features Smart Diagnosis If you experience a problem while using the appliance, this smart diagnosis feature will help you diagnose the problem. Settings All...
Page 29 - Installing the LG ThinQ
29 ENGLISH • The surrounding wireless environment can make the wireless network service run slowly. • The appliance cannot be registered due to problems with the wireless signal transmission. Unplug the appliance and wait about a minute before trying again. • If the firewall on your wireless router ...
Page 30 - FCC RF Radiation Exposure Statement; Using LG ThinQ to Diagnose
30 ENGLISH FCC RF Radiation Exposure Statement This equipment complies with FCC radiation exposure limits set forth for an uncontrolled environment. This transmitter must not be co-located or operating in conjunction with any other antenna or transmitter.This equipment should be installed and operat...
Page 31 - Using Audible Diagnosis to
31 ENGLISH Using Audible Diagnosis to Diagnose Issues Follow the instructions below to use the audible diagnosis method. • Launch the LG ThinQ application and select the Smart Diagnosis feature in the menu. Follow the instructions for audible diagnosis provided in the LG ThinQ application. 1 Press a...
Page 32 - Maintenance; Scheduled Maintenance; Alerts on the Status Panel
32 ENGLISH Maintenance Caution • Turn off and unplug the product before cleaning it or replacing the filter. • Do not spray water directly on the product. • After cleaning the product or replacing the filter, assemble the product in the reverse order of disassembly. • To help you distinguish between...
Page 33 - Cleaning the Exterior
33 ENGLISH Caution • Do not attempt to disassemble the Clean Booster. • If the Clean Booster cover comes loose, snap the 3 retaining hooks back into place before using the product. • Do not unscrew the 2 screws fixing the Clean Booster grille on the back of the product. Cleaning the Exterior 1 Remov...
Page 34 - Cleaning the Filter; Replacing the Filter; Resetting the Upper Filter
34 ENGLISH Cleaning the Filter 1 Separate the cover from the product. • For more information on how to remove and reassemble the cover, please see Removing Packing Materials . 2 Remove dust from the ultra-fine filter using a vacuum cleaner with a crevice tool or soft brush attachment. Caution • Do n...
Page 35 - Resetting the Lower Filter; Cleaning the PM Sensor
35 ENGLISH Resetting the Lower Filter Replacement Alert Press and hold the Indicator and Sleep Timer buttons simultaneously for 3 seconds. • The (Lower Filter Replacement Alert) is reset. Cleaning the PM Sensor Clean the PM1.0 super ultra-fine dust sensor lens regularly. The sensor is used to detect...
Page 36 - Storage
36 ENGLISH 4 Close the sensor cover and reassemble the rear cover. Note To avoid product failure, do not use any fluids other than water to clean the sensor. Storage If the product is not used for a long period of time, store it in a dry place out of direct sunlight. 1 Operate the product in Dual mo...
Page 37 - Before Calling for Service
37 ENGLISH If the product malfunctions, check the following before contacting the LG Customer Information Center. Symptom Cause Solution The product does not operate. Power plug is unplugged or loose in the outlet. • Insert the power plug into the outlet properly. The fan is noisy even on Low speed....
Page 41 - Product Specifications
41 ENGLISH Product Specifications Height Width Depth The external appearance and dimensions of the product are subject to change without prior notice. Model AS560DWR0 Power 115 V~, 60 Hz Exterior dimensions (Width X Height X Depth) Without the Clean Booster running:14.7 in. x 42.2 in. x 14.7 in. (37...
Page 46 - MEMO