Page 2 - ENGLISH; How to forcibly eject a disc; IMPORTANT FOR LASER PRODUCTS
2 ENGLISH How to forcibly eject a disc If a disc cannot be recognized by the receiver or cannot be ejected, ejects the disc as follows. “NO EJECT?” (or “EJECT OK?”) and “EMERGENCY EJECT?” appear on the monitor.Press 5 / ∞ repeatedly to select “EMERGENCY EJECT?”, then press ENT. • If this does not wo...
Page 3 - Caution on volume setting:; Characters shown on the monitor; Cautions on the monitor:
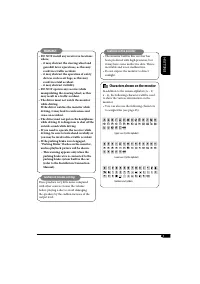
3 ENGLISH Caution on volume setting: Discs produce very little noise compared with other sources. Lower the volume before playing a disc to avoid damaging the speakers by the sudden increase of the output level. WARNINGS: • DO NOT install any receiver in locations where;– it may obstruct the steerin...
Page 4 - Discs you can play; DVD Audio; Discs cannot be played back; Caution for DualDisc playback; Introduction—Playable discs
4 ENGLISH Discs you can play You can play back the following discs—12 cm and 8 cm —on this receiver:• DVD Video: Recorded in PAL color system with Region Code “5” (see below). – DVD-R/DVD-RW recorded in the DVD- Video format can also be played. • DVD Audio • Video CD (VCD)/audio CD • MP3/WMA/WAV/JPE...
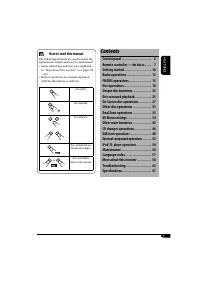
Page 5 - Contents; How to read this manual
5 ENGLISH Contents Control panel ............................... 6Remote controller — RM-RK240 ....... 7 Getting started ............................. 10Radio operations .......................... 12FM RDS operations ........................ 15Disc operations ............................. 18Unique d...
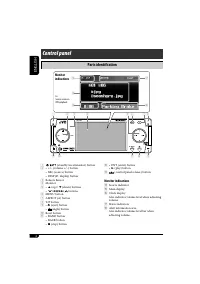
Page 6 - Monitor indications; Parts identification; Control panel
6 ENGLISH SRC D MENU 7 / BACK KD-AVX2 DISP A ENT BAND ASPECT T/P r t y u i 1 7 2 5 8 9 p q e 4 6 w 3 1 (standby/on attenuator) button 2 • +/– (volume +/–) button • SRC (source) button • DISP (D: display) button 3 Remote Sensor 4 Monitor 5 • 5 (up) / ∞ (down) buttons • 4 / ¢ buttons 6 MENU button 7 A...
Page 7 - Remote controller —; Installing the lithium coin battery; Before using the remote controller:; How to detach/attach the control panel; Do not insert your finger behind the control panel.
7 ENGLISH Remote controller — RM-RK240 Installing the lithium coin battery (CR2025) Before using the remote controller: • Aim the remote controller directly at the remote sensor on the receiver. Make sure there is no obstacle in between. • Do not expose the remote sensor to strong light (direct sunl...
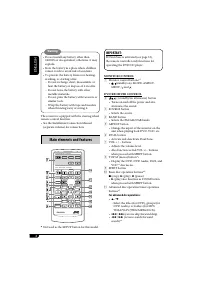
Page 8 - MONITOR CONTROL; Main elements and features
8 ENGLISH IMPORTANT: If Dual Zone is activated (see page 33), the remote controller only functions for operating the DVD/CD player. MONITOR CONTROL 1 Monitor control buttons* 1 • (standby/on), MODE, ASPECT, MENU, and . DVD/RECEIVER CONTROL 2 (standby/on attenuator) button • Turns on and off the powe...
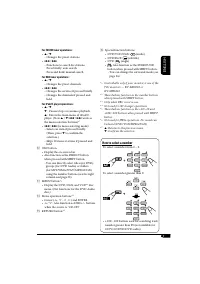
Page 9 - For DAB tuner operations:; How to select a number
9 ENGLISH For FM/AM tuner operations: • 5 / ∞ – Changes the preset stations. • 4 / ¢ – Functions to search for stations. Press briefly: auto search Press and hold: manual search For DAB tuner operations: • 5 / ∞ – Changes the preset channels. • 4 / ¢ – Changes the services if pressed briefly. – Chan...
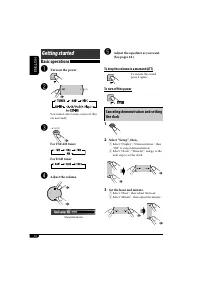
Page 10 - For DAB tuner; To turn off the power; Basic operations; Set the hour and minute.; Getting started
10 ENGLISH ~ Turn on the power. Ÿ You cannot select some sources if they are not ready. ! For FM/AM tuner For DAB tuner ⁄ Adjust the volume. @ Adjust the equalizer as you want. (See pages 42.) To drop the volume in a moment (ATT) To restore the sound, press it again. To turn off the power Basic oper...
Page 11 - Finish the procedure.; Basic procedure of AV Menu operation
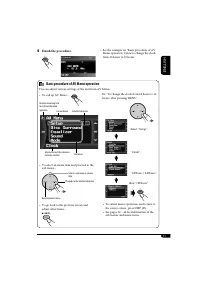
11 ENGLISH 4 Finish the procedure. ENT Basic procedure of AV Menu operation You can adjust various settings of the unit from AV Menu. • To call up AV Menu... MENU • To select an menu item and proceed to the sub menu... • To go back to the previous screen and adjust other items... Selects a sub menu ...
Page 12 - To restore the stereo effect,; Start searching for a station.; To tune in to a station manually; Radio operations
12 ENGLISH When an FM stereo broadcast is hard to receive 1 2 Select “Mode”, “Mono”, then “On”. 3 Finish the procedure. Lights up when monaural mode is activated. Reception improves, but stereo effect will be lost. To restore the stereo effect, repeat the same procedure to set “Mono” to “Off”. The M...
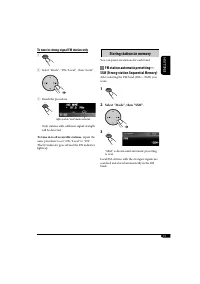
Page 13 - To tune in strong-signal FM station only; To tune in to all receivable stations,; Storing stations in memory; FM station automatic presetting —
13 ENGLISH To tune in strong-signal FM station only 1 2 Select “Mode”, “DX / Local”, then “Local”. 3 Finish the procedure. Lights up when “Local” mode is activated. Only stations with sufficient signal strength will be detected. To tune in to all receivable stations, repeat the same procedure to set...
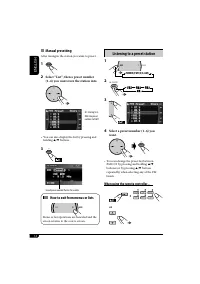
Page 14 - Manual presetting; Select “List”, then a preset number; How to exit from menus or lists; Listening to a preset station; or
14 ENGLISH Manual presetting After tuning in the station you want to preset... 1 2 Select “List”, then a preset number (1–6) you want store the station into. • You can also display the list by pressing and holding 5 / ∞ buttons. 3 Stored preset number flashes for a while. How to exit from menus or l...
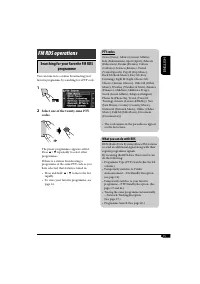
Page 15 - FM RDS operations; Searching for your favorite FM RDS; Select one of the twenty-nine PTY; PTY codes; What you can do with RDS
15 ENGLISH FM RDS operations Searching for your favorite FM RDS programme You can tune in to a station broadcasting your favorite programme by searching for a PTY code. 1 2 Select one of the twenty-nine PTY codes. The preset programmes appears at first. Press 5 / ∞ repeatedly to select other program...
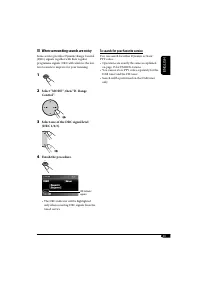
Page 16 - Storing your favorite programmes; Select a PTY code you want to store.; Using the standby receptions; TA Standby Reception; To activate TA Standby Reception
16 ENGLISH Storing your favorite programmes You can store six favorite programme types. 1 2 Select a PTY code you want to store. 3 4 Select a preset number (1–6) you want. 5 Finish the procedure. Using the standby receptions TA Standby Reception TA Standby Reception allows the receiver to switch tem...
Page 17 - PTY Standby Reception; To activate PTY Standby Reception,; Tracking the same programme—
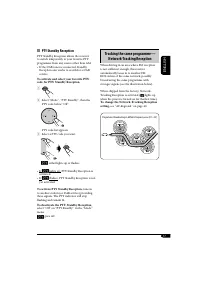
17 ENGLISH PTY Standby Reception PTY Standby Reception allows the receiver to switch temporarily to your favorite PTY programme from any source other than AM.• If the DAB tuner is connected, Standby Reception also works to search for a DAB service. To activate and select your favorite PTY code for P...
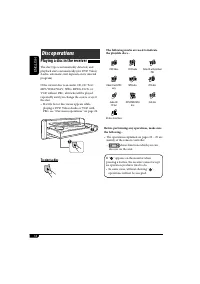
Page 18 - Disc operations; Playing a disc in the receiver; To eject a disc; DVD; MPEG; DivX
18 ENGLISH Before performing any operations, make sure the following... • The operations explained on pages 20 – 25 are mainly of the remote controller. – shows functions which you can also use on the unit. If “ ” appears on the monitor when pressing a button, the receiver cannot accept an operation...
Page 19 - When inserting a VCD:
19 ENGLISH • When inserting a DVD video/DVD Audio disc: Video/picture playback starts automatically on the monitor when the parking brake is applied.• The screen such as below appears when pressing DISP (D). When an DVD is playing back When a DVD Audio disc is playing back • To return to playback, p...
Page 20 - Operations; To stop playback; Frame by frame playback
20 ENGLISH Basic operations Operations Monitor indication and/or next operation To stop playback When you start playback again, playback starts from where it has been stopped (Resume play). To stop play temporarily Playback is paused. A still picture appears. A Frame by frame playback B Slow motion ...
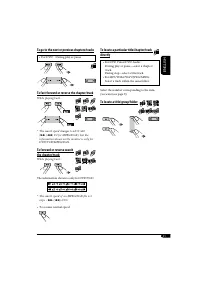
Page 21 - To go to the next or previous chapters/tracks; To fast-forward or reverse the chapter/track
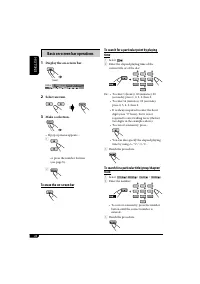
21 ENGLISH To locate a particular title/chapter/track directly • For DVD Video/DVD Audio: During play or pause—select a chapter/track. During stop—select a title/track. • For MP3/WMA/WAV/JPEG/MPEG: Select a track within the same folder. Select the number corresponding to the item you want (see page ...
Page 22 - To adjust the screen shape on the unit
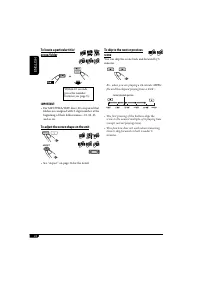
22 ENGLISH To adjust the screen shape on the unit • See “Aspect” on page 36 for the detail. A A S PECT MPEG MPEG Audio DVD A S PECT To skip to the next or previous scene You can skip the scene back and forward by 5 minutes. Ex.: when you are playing a 24-minute MPEG file and the elapsed playing time...
Page 23 - Selecting subtitles; Selecting multi-angle views; Selecting audio languages; Unique disc functions
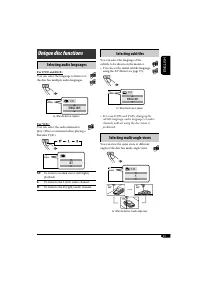
23 ENGLISH Selecting subtitles You can select the language of the subtitle to be shown on the monitor.• You can set the initial subtitle language using the AV Menu (see page 37). Ex.: When the disc has 3 options • For some DVDs and VCDs, changing the subtitle language, audio language (or audio chann...
Page 24 - Canceling the PBC playback; To resume the PBC function; Zoom in; While playing a DVD/DivX; Select the item you want on the menu.; While playing a VCD; To return to the previous menus; JPEG
24 ENGLISH Canceling the PBC playback 1 2 Select a track to start normal playback using the number buttons (see page 9). To resume the PBC function Zoom in 1 For JPEG disc (effective only when pausing): 2 Move the zoomed-in position. • For JPEG files: You cannot move the zoomed-in position when the ...
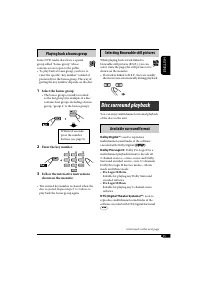
Page 25 - Selecting Browsable still pictures; Playing back a bonus group; Select the bonus group.; Available surround format; Pro Logic II Movie; Disc surround playback
25 ENGLISH Selecting Browsable still pictures While playing back a track linked to browsable still pictures (B.S.P.), you can select (turn the page) the still picture to be shown on the monitor.• If a track is linked to B.S.P., they are usually shown in turn automatically during playback. Audio DVD ...
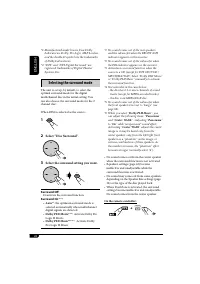
Page 26 - Selecting the surround mode; Select “Disc Surround”.; Surround Off; On the remote controller:
26 ENGLISH *1: Manufactured under license from Dolby Laboratories. Dolby, Pro Logic, MLP Lossless, and the double-D symbol are the trademarks of Dolby Laboratories. *2: “DTS” and “DTS Digital Surround” are registered trademarks of Digital Theater Systems, Inc. Selecting the surround mode The unit is...
Page 27 - On-Screen disc operations; Operations using the on-screen bar
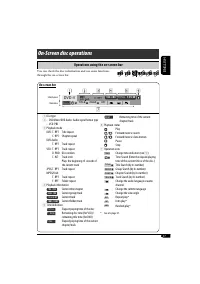
27 ENGLISH On-Screen disc operations Operations using the on-screen bar Information Operation DVD -V T 02 -C 03 TOTAL 1:25:58 TIME TITLE CHAP RPT C. RPT On-screen bar 1 Disc type 2 • DVD Video/DVD Audio: Audio signal format type • VCD: PBC 3 Playback mode DVD: T. RPT: Title repeat C. RPT: Chapter re...
Page 28 - Basic on-screen bar operations; To erase the on-screen bar
28 ENGLISH Basic on-screen bar operations 1 Display the on-screen bar. 2 Select an item. 3 Make a selection. • If pop-up menu appears.... 1 or press the number buttons (see page 9). 2 To erase the on-screen bar (twice) DVD -V T 02 -C 03 TOTAL 1:25:58 TIME TITLE CHAP RPT C. RPT To search for a partic...
Page 29 - To select a track; Basic control screen operations; Control screen
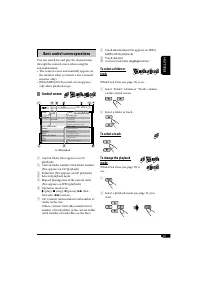
29 ENGLISH 8 Track information (Not appears on JPEG/ MPEG/DivX playback) 9 Track (file) list p Current track (file) (highlighted bar) To select a folder or track While Dual Zone (see page 33) is on.... 1 Select “Folder” column or “Track” column on the control screen. 2 Select a folder or track. To s...
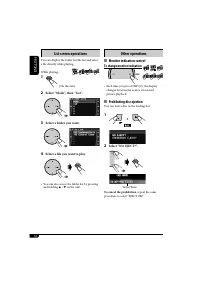
Page 30 - Display the folder list.; To go back to the folder list; Select a track on the list.; List screen operations; Folder/track list screens; Folder list
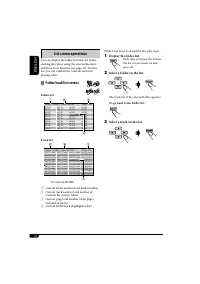
30 ENGLISH While Dual Zone is on and the disc play stops... 1 Display the folder list. Each time you press the button, the list screen comes on and goes off. 2 Select a folder on the list. The track list of the selected folder appears. To go back to the folder list 3 Select a track on the list. List...
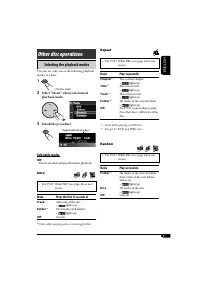
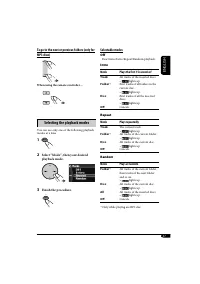
Page 31 - Selecting the playback modes; Select “Mode”, then your desired; Other disc operations; Repeat; Random; Selectable modes; Intro
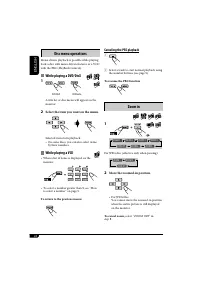
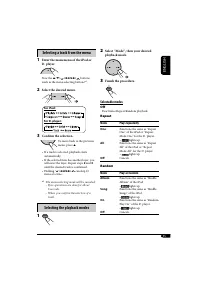
31 ENGLISH Selecting the playback modes You can use only one of the following playback modes at a time. 1 2 Select “Mode”, then your desired playback mode. 3 Finish the procedure. Other disc operations Playback mode indicator appears. Repeat • For VCD: While PBC (see page 24) is not in use. Mode Pla...
Page 32 - Other operations; Monitor indication control; To change monitor indication; Prohibiting disc ejection; Select; To cancel the prohibition; Select a folder you want.
32 ENGLISH Other operations Monitor indication control To change monitor indication • Each time you press DISP (D), the display changes between the source screen and picture playback. Prohibiting disc ejection You can lock a disc in the loading slot. 1 2 Select “NO EJECT?”. To cancel the prohibition...
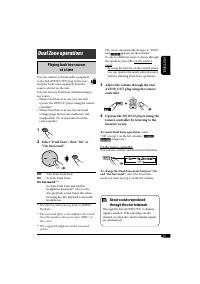
Page 33 - Adjust the volume through the 2nd; To cancel Dual Zone operations,; Dual Zone operations; Playing back two sources; Select “Dual Zone”, then “On” or; About sounds reproduced
33 ENGLISH The source automatically changes to “DISC” and appears on the monitor. To select a different source to listen through the speakers, press SRC on the control panel.• By using the buttons on the control panel, you can operate the newly selected source without affecting Dual Zone operations....
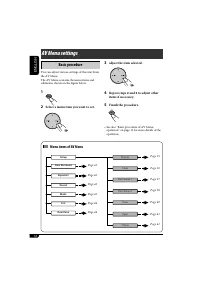
Page 34 - AV Menu settings; Basic procedure; Menu items of AV Menu
34 ENGLISH List S etup Disc S urround Equalizer S ound Mode Dual Zone Input Display Clock Disc S etup 1 Disc S etup 2 Tuner Others AV Menu settings Basic procedure You can adjust various settings of this unit from the AV Menu. The AV Menu contains the menu items and submenus shown on the figure belo...
Page 35 - Indications; Display; AV Menu items
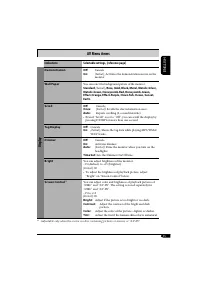
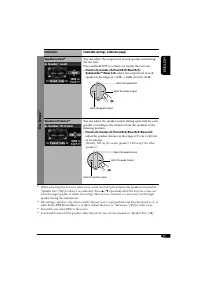
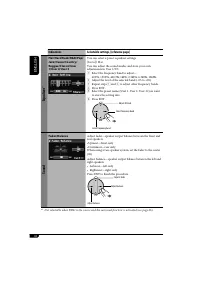
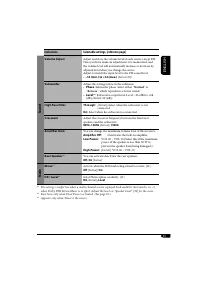
35 ENGLISH Indications Selectable settings, [reference page] Display Demonstration Off : Cancels. On: [Initial]; Activates the demonstration movie on the monitor. Wall Paper You can select the background picture of the monitor. Standard [Initial] , Rose, Gold, Black, Metal, Metalic-Silver, Metalic-G...
Page 36 - Aspect; Clock; Time Set
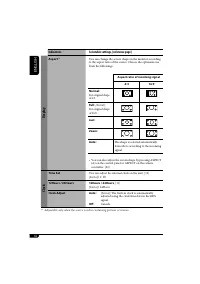
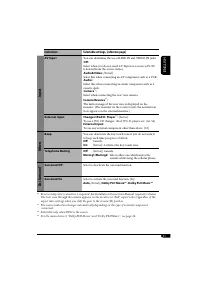
36 ENGLISH Indications Selectable settings, [reference page] Display Aspect *1 You can change the screen shape on the monitor according to the aspect ratio of the source. Choose the optimum one from the followings. Aspect ratio of incoming signal 4:3 16:9 Normal: For original shape of 4:3 Full: [Ini...
Page 37 - Disc Setup 1
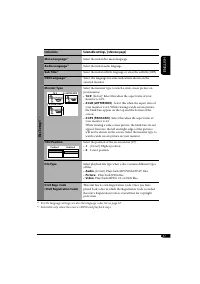
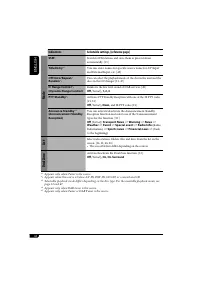
37 ENGLISH Indications Selectable settings, [reference page] Disc Setup 1 * 2 Menu Language *1 Select the initial disc menu language. Audio Language *1 Select the initial audio language. Sub Title *1 Select the initial subtitle language or erase the subtitle (OFF). OSD Language *1 Select the languag...
Page 38 - Disc Setup 2
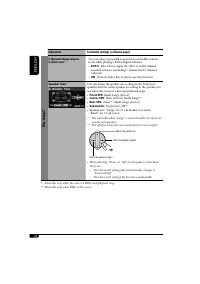
38 ENGLISH Indications Selectable settings, [reference page] Disc Setup 2 * 2 D. (Dynamic) Range Compres.(Compression) * 1 You can enjoy a powerful sound at low or middle volume levels while playing a Dolby Digital software.• AUTO : Select this to apply the effect to multi-channel encoded software (...
Page 40 - Tuner; TA Volume; IF Band Width; DAB AF
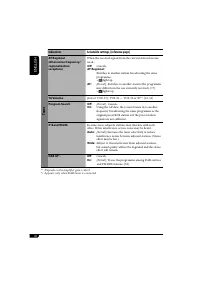
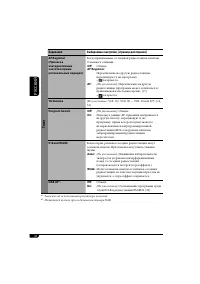
40 ENGLISH Indications Selectable settings, [reference page] Tuner AF Regional(Alternative frequency/regionalization reception) When the received signals from the current station become weak... Off : Cancels. AF Regional: Switches to another station broadcasting the same programme. • light up. AF: [...
Page 41 - Input
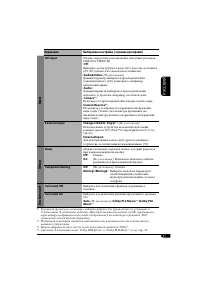
41 ENGLISH Indications Selectable settings, [reference page] Input AV Input You can determine the use of LINE IN and VIDEO IN jacks. Off : Select when you do not need AV-Input as a source (AV-IN is deleted from the source items). Audio&Video: [Initial] Select this when connecting an AV component...
Page 42 - Equalizer
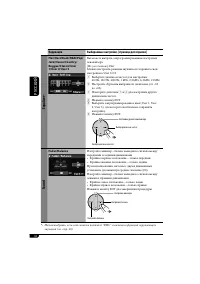
42 ENGLISH Indications Selectable settings, [reference page] Equalizer * 1 Flat/Hard Rock/R&B/Pop/Jazz/Dance/Country/Reggae/Classic/User 1/User 2/User 3 You can select a preset equalizer settings. [Initial]; Flat You can adjust the sound modes and store your own adjustments in User 1/2/3. 1 Sele...
Page 43 - Sound; Normal; Mode
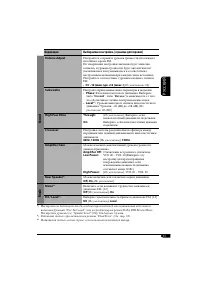
43 ENGLISH Indications Selectable settings, [reference page] Sound Volume Adjust Adjust and store the volume level of each source except FM.Once you have made an adjustment, it is memorized, and the volume level will automatically increase or decrease by adjusted level when you change the source.Adj...
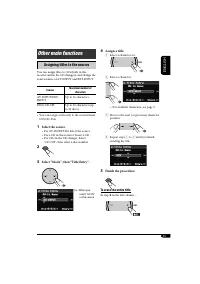
Page 45 - Assigning titles to the sources; Sources; To erase the entire title; Other main functions
45 ENGLISH Assigning titles to the sources You can assign titles to CDs (both in this receiver and in the CD changer), and change the source names of AV-INPUT and EXT-INPUT. Sources Maximum number of characters AV-INPUT/EXT-INPUT Up to 16 characters DISC/CD-CH Up to 32 characters (up to 30 discs) • ...
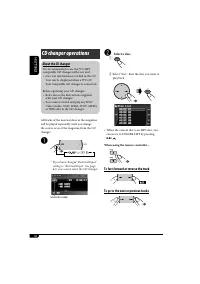
Page 46 - To fast-forward or reverse the track; CD changer operations
46 ENGLISH ~ * If you have changed “External Input” setting to “External Input” (see page 41), you cannot select the CD changer. To fast-forward or reverse the track To go to the next or previous tracks Ÿ Select a disc. 1 2 Select “List”, then the disc you want to play back. • When the current disc ...
Page 48 - Listening to the DAB tuner; Start searching for an ensemble.; To stop searching; To tune in to an ensemble manually; DAB tuner operations
48 ENGLISH Listening to the DAB tuner 1 2 3 Start searching for an ensemble. When an ensemble is received, searching stops. To stop searching , press the same button again. 4 Select a service (either primary or secondary) to listen to. SRC D DISP 7 / BACK BAND To tune in to an ensemble manually In s...
Page 49 - When surrounding sounds are noisy; Select one of the DRC signal level; To search for your favorite service
49 ENGLISH When surrounding sounds are noisy Some service provides Dynamic Range Control (DRC) signals together with their regular programme signals. DRC will reinforce the low level sounds to improve for your listening. 1 2 Select “MODE”, then “D. Range Control”. 3 Select one of the DRC signal leve...
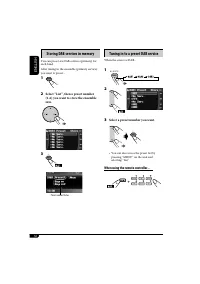
Page 50 - Tuning in to a preset DAB service; Select a preset number you want.; Storing DAB services in memory
50 ENGLISH Tuning in to a preset DAB service When the source is DAB... 1 2 or 3 Select a preset number you want. • You can also access the preset list by pressing “MENU” on the unit and selecting “List”. When using the remote controller... ENT 7 / BACK BAND Storing DAB services in memory You can pre...
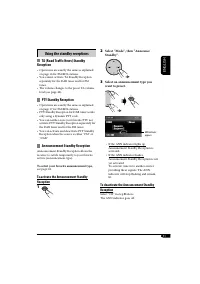
Page 51 - Select “Mode”, then “Announce; Reception; To select your favorite announcement type,
51 ENGLISH 2 Select “Mode”, then “Announce Standby”. 3 Select an announcement type you want to preset. • If the ANN indicator lights up, Announcement Standby Reception is activated. • If the ANN indicator flashes, Announcement Standby Reception is not yet activated. To activate, tune in to another s...
Page 52 - Tracing the same programme—; While receiving a DAB service:; While receiving an FM RDS station:
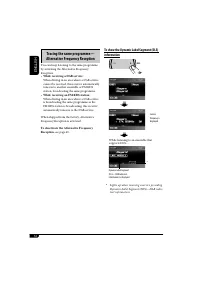
52 ENGLISH To show the Dynamic Label Segment (DLS) information * Lights up when receiving a service providing Dynamic Label Segment (DLS)—DAB radio text information. Tracing the same programme— Alternative Frequency Reception You can keep listening to the same programme by activating the Alternative...
Page 53 - Playing an external component; Adjust the equalizer as you want. (See
53 ENGLISH Playing an external component You can connect an external component to LINE IN plug and VIDEO IN plug on the rear, or to the CD changer jack on the rear using the KS-U57 Line Input Adapter (not supplied) or KS-U58 AUX Input Adapter (not supplied). • For connection, see Installation/Connec...
Page 54 - Interface adapter for iPod; Adjust the equalizer as you want.
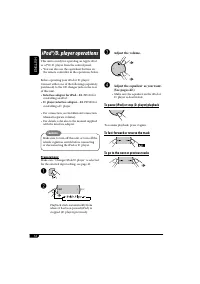
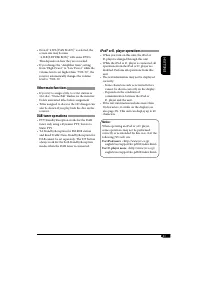
54 ENGLISH iPod®/D. player operations This unit is ready for operating an Apple iPod or a JVC D. player from the control panel.• You can also use the equivalent buttons on the remote controller in the operations below. Before operating your iPod or D. player:Connect either one of the following (sepa...
Page 55 - Selecting a track from the menu; Enter the main menu of the iPod or; Mode Plays
55 ENGLISH Selecting a track from the menu 1 Enter the main menu of the iPod or D. player. Now the 5 / ∞ / 4 / ¢ buttons work as the menu selecting buttons * 1 . 2 Select the desired menu. For iPod: For D. player: 3 Confirm the selection. To move back to the previous menu, press 5 . • If a track is ...
Page 56 - To keep discs clean; Do not use the following discs:; How to clean the connectors; Moisture condensation; When storing a disc into its case,; Maintenance
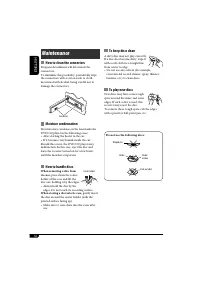
56 ENGLISH To keep discs clean A dirty disc may not play correctly. If a disc does become dirty, wipe it with a soft cloth in a straight line from center to edge.• Do not use any solvent (for example, conventional record cleaner, spray, thinner, benzine, etc.) to clean discs. To play new discs New d...
Page 57 - Language codes
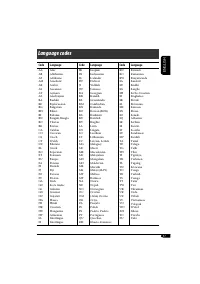
57 ENGLISH Code Language Code Language Code Language AAABAFAMARASAYAZBABEBGBHBIBNBOBRCACOCSCYDZELEOETEUFAFIFJFOFYGAGDGLGNGUHAHIHRHUHYIAIE AfarAbkhazianAfrikaansAmeharicArabicAssameseAymaraAzerbaijaniBashkirByelorussianBulgarianBihariBislamaBengali, BanglaTibetanBretonCatalanCorsicanCzechWelshBhutani...
Page 58 - More about this receiver
58 ENGLISH Basic operations Turning on the power • By pressing SRC on the receiver, you can also turn on the power. Selecting the sources • When no disc is loaded in the receiver and Dual Zone is off, “DISC” cannot be selected. • Without connecting to the CD changer or the DAB tuner, “CD-CH” or “DAB...
Page 59 - Playing a Recordable/Rewritable disc
59 ENGLISH Playing a Recordable/Rewritable disc • Use only “finalized” discs.• This receiver can play back either MP3/ WMA/WAV files, JPEG files, or MPEG/DivX files if a disc includes any of the files. Set the playback file type on AV Menu (page 37) before playing back a disc containing files of dif...
Page 60 - Playing an MPEG disc; AV Menu; Playing a JPEG disc
60 ENGLISH Playing an MPEG disc • This receiver can play back MPEG 1/2 files with the extension code <.mpg>. • Audio stream should conform to MPEG1 Audio Layer 2. Playing an DivX disc • This receiver can play back DivX files with the extension code <.divx>, <.div>, or <.avi> ...
Page 61 - iPod® or D. player operations
61 ENGLISH iPod® or D. player operations • When you turn on this unit, the iPod or D. player is charged through this unit. • While the iPod or D. player is connected, all operations from the iPod or D. player are disabled. Perform all operations from this unit. • The text information may not be disp...
Page 62 - On-screen guide icons; Sound modes (preset frequency level settings); Sound mode
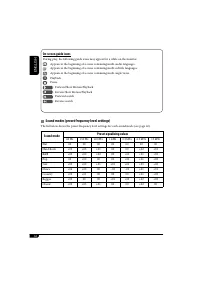
62 ENGLISH On-screen guide icons During play, the following guide icons may appear for a while on the monitor. : Appears at the beginning of a scene containing multi-audio languages. : Appears at the beginning of a scene containing multi-subtitle languages. : Appears at the beginning of a scene cont...
Page 63 - Symptoms; General; Troubleshooting
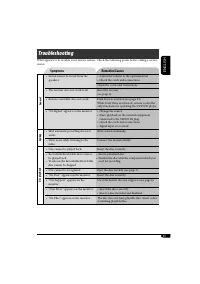
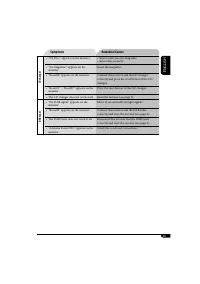
63 ENGLISH What appears to be trouble is not always serious. Check the following points before calling a service center. Symptoms Remedies/Causes General • Sound cannot be heard from the speakers. • Adjust the volume to the optimum level.• Check the cords and connections. Check the cords and connect...
Page 64 - Disc playback
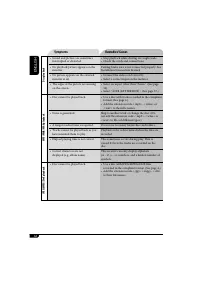
64 ENGLISH Symptoms Remedies/Causes Disc playback • Sound and picture are sometimes interrupted or distorted. • Stop playback while driving on rough roads.• Check the cords and connections. • No playback picture appears on the monitor. Parking brake wire is not connected properly. See Installation/C...
Page 65 - CD changer
65 ENGLISH Symptoms Remedies/Causes CD changer • “No Disc” appears on the monitor. • Insert a disc into the magazine.• Insert disc correctly. • “No Magazine” appears on the monitor. Insert the magazine. • “Reset08” appears on the monitor. Connect this receiver and the CD changer correctly and press ...
Page 67 - Specifications; AUDIO AMPLIFIER SECTION
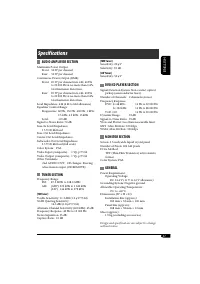
67 ENGLISH Specifications AUDIO AMPLIFIER SECTION Maximum Power Output: Front: 50 W per channel Rear: 50 W per channel Continuous Power Output (RMS): Front: 20 W per channel into 4 Ω , 40 Hz to 20 000 Hz at no more than 0.8% total harmonic distortion. Rear: 20 W per channel into 4 Ω , 40 Hz to 20 00...
Page 68 - РУCCKИЙ; Принудительное извлечение; Как перенастроить Ваше; ВАЖНО ДЛЯ ЛАЗЕРНОЙ АППАРАТУРЫ
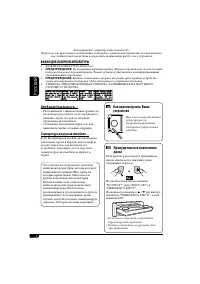
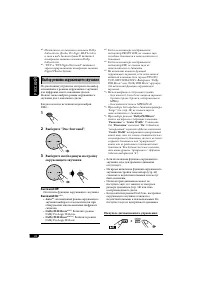
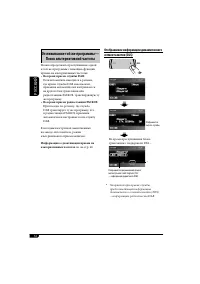
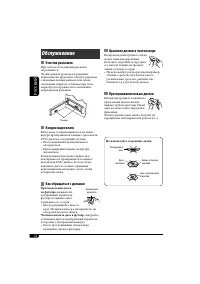
2 РУCCKИЙ Принудительное извлечение диска Если диск не распознается приемником или не извлекается, извлеките диск следующим образом. На дисплее появляются надписи “NO EJECT?” (или “EJECT OK?”) и “EMERGENCY EJECT?”.Несколько раз нажмите 5 / ∞ для выбора параметра “EMERGENCY EJECT?”, затем нажмите ENT...
Page 69 - Символы, отображаемые на
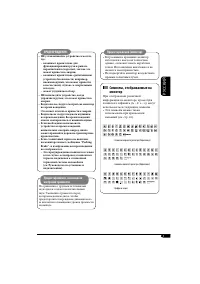
3 РУCCKИЙ Предостережение, касающееся настройки громкости: По сравнению с другими источниками звука диски создают незначительный шум. Уменьшите громкость перед воспроизведением диска, чтобы предотвратить повреждение динамиков из-за внезапного повышения уровня громкости на выходе. ПРЕДУПРЕЖДЕНИЯ: • Н...
Page 70 - Типы воспроизводимых дисков; Неподдерживаемые диски; Введение—поддерживаемые диски
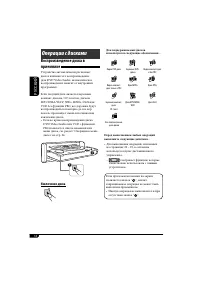
4 РУCCKИЙ Типы воспроизводимых дисков На данном приемнике можно воспроизводить диски—12 см и 8 см—следующих типов: • Видео DVD-диск: Запись в системе кодирования цвета PAL с кодом региона “5” (см. ниже). – Также могут быть воспроизведены диски DVD-R/DVD-RW, записанные в формате DVD-Video. • Звуковые...
Page 71 - Содержание; Операции с диском с помощью
5 РУCCKИЙ Содержание Панель управления .................... 6Пульт дистанционного управления — RM-RK240 .............................. 7 Начало работы ............................ 10Операции с радиоприемником ... 12Операции с FM RDS ...................... 15Операции с дисками .................... 18...
Page 72 - Индикация монитора; Расположение кнопок; Панель управления
6 РУCCKИЙ SRC D MENU 7 / BACK KD-AVX2 DISP A ENT BAND ASPECT T/P r t y u i 1 7 2 5 8 9 p q e 4 6 w 3 1 Кнопка (резервный/ работающий аттенюатор) 2 • Кнопка +/– (громкость +/–) • Кнопка SRC (источник звука) • Кнопка DISP (D: дисплей) 3 Телеметрический датчик 4 Монитор 5 • Кнопки 5 (вверх) / ∞ (вниз) ...
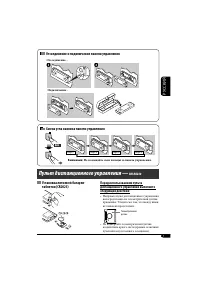
Page 73 - Пульт дистанционного управления —; Установка литиевой батареи-; Отсоединение и подключение панели управления; Не помещайте свои пальцы за панель управления.; Смена угла наклона панели управления
7 РУCCKИЙ Пульт дистанционного управления — RM-RK240 Установка литиевой батареи- таблетки (CR2025) Перед использованием пульта дистанционного управления выполните следующие действия: • Направьте пульт дистанционного управления непосредственно на телеметрический датчик приемника. Убедитесь в том, что...
Page 74 - Основные элементы и функции
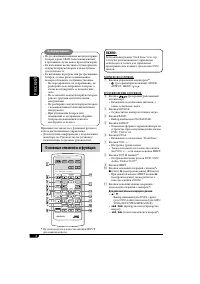
8 РУCCKИЙ ВАЖНО: Если включен режим “Dual Zone” (см. стр. 33) пульт дистанционного управления используется только для управления проигрывателем компакт-дисков или DVD- дисков. MONITOR CONTROL 1 Кнопки управления монитором * 1 • (резервный/работающий), MODE, ASPECT, MENU, и . DVD/RECEIVER CONTROL 2 К...
Page 75 - Выбор номера
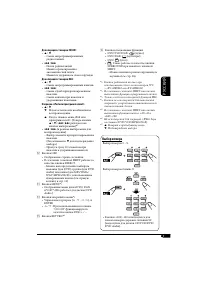
9 РУCCKИЙ Для операций с тюнером FM/AM: • 5 / ∞ – Смена запрограммированных радиостанций. • 4 / ¢ – Поиск радиостанций. Нажать кратковременно: автоматический поиск Нажать и удерживать: поиск вручную Для операций с тюнером DAB: • 5 / ∞ – Смена запрограммированных каналов. • 4 / ¢ – Смена служб при кр...
Page 76 - Основные операции; Для тюнера DAB; Выключение питания; Отмена демонстрации и установка; Установите час, минуту и формат; Начало работы
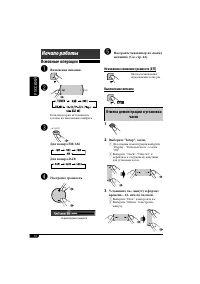
10 РУCCKИЙ Основные операции ~ Включение питания. Ÿ Если некоторые источники не готовы, их невозможно выбрать. ! Для тюнера FM/AM Для тюнера DAB ⁄ Настройте громкость. @ Настройте эквалайзер по своему желанию. (См. стр. 42). Мгновенное снижение громкости (ATT) Для восстановления звука нажмите еще ра...
Page 77 - Основные процедуры работы с меню AV
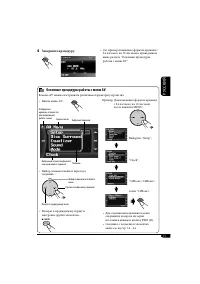
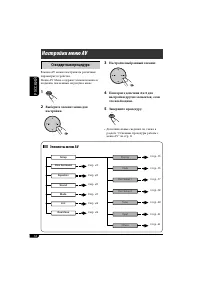
11 РУCCKИЙ 4 Завершите процедуру. ENT Основные процедуры работы с меню AV В меню AV можно настраивать различные параметры устройства. • Вызов меню AV... MENU • Выбор элемента меню и переход к подменю... • Возврат к предыдущему экрану и настройке других элементов... Выбор подменю или элемента меню Пе...
Page 78 - Для восстановления стереоэффекта; Начните поиск радиостанции.; Чтобы остановить поиск,; Настройка на радиостанцию вручную
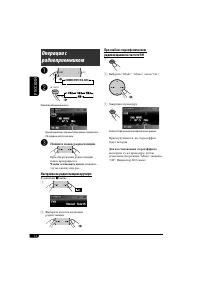
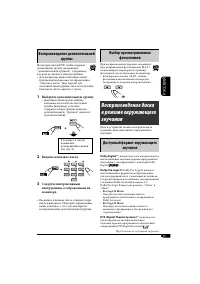
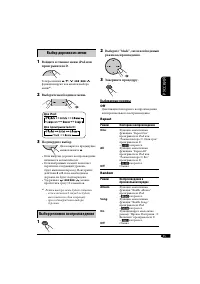
12 РУCCKИЙ При слабом стереофоническом радиовещании на частоте FM 1 2 Выберите “Mode”, “Mono”, затем “On”. 3 Завершите процедуру. Загорается при включении монофонического режима. Прием улучшается, но стереоэффект будет потерян. Для восстановления стереоэффекта повторите ту же процедуру, чтобы устано...
Page 79 - Сохранение радиостанций; Автоматическое программирование
13 РУCCKИЙ Настройка на радиостанцию FM только с сильным уровнем сигнала 1 2 Выберите “Mode”, “DX / Local”, затем “Local”. 3 Завершите процедуру. Загорается при активации режима “Local”. Будут обнаружены только радиостанции с достаточно сильным уровнем сигнала. Для настройки на все принимаемые радио...
Page 80 - Прослушивание; Выберите необходимый; или; Программирование вручную; Выберите “List”, затем; Выход из меню или списков
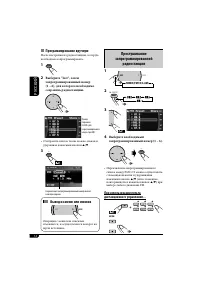
14 РУCCKИЙ Прослушивание запрограммированной радиостанции 1 2 3 4 Выберите необходимый запрограммированный номер (1 – 6). • Переключение запрограммированного списка между FM1/2/3 можно осуществлять с помощью нажатия и удерживания нажатыми кнопок 5 / ∞ (или с помощью повторяющегося нажатия кнопок 5 /...
Page 81 - Операции с FM RDS; Поиск любимой программы FM RDS; Выберите один из двадцати девяти; Коды PTY; Что можно делать с помощью RDS
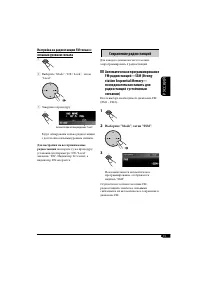
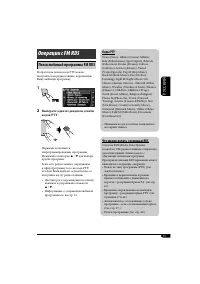
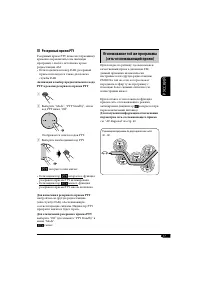
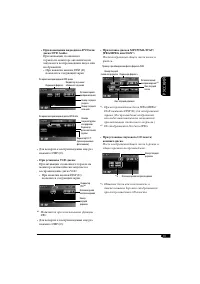
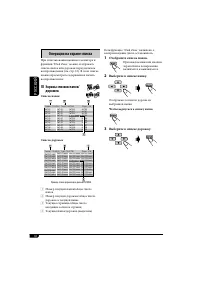
15 РУCCKИЙ Операции с FM RDS Поиск любимой программы FM RDS Посредством поиска кода PTY можно настроиться на радиостанцию, передающую Вашу любимую программу. 1 2 Выберите один из двадцати девяти кодов PTY. Первыми появляются запрограммированные программы. Нажимайте повторно 5 / ∞ для выбора других п...
Page 82 - Сохранение любимых программ; Выберите код PTY, который; Использование функции; Резервный прием TA
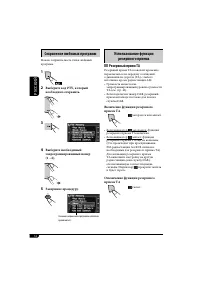
16 РУCCKИЙ Сохранение любимых программ Можно сохранить шесть типов любимых программ. 1 2 Выберите код PTY, который необходимо сохранить. 3 4 Выберите необходимый запрограммированный номер (1 – 6). 5 Завершите процедуру. Использование функции резервного приема Резервный прием TA Резервный прием TA по...
Page 83 - Резервный прием PTY; Для включения резервного приема PTY; Отслеживание той же программы
17 РУCCKИЙ Резервный прием PTY Резервный прием PTY позволяет приемнику временно переключаться на любимую программу с любого источника, кроме радиостанции AM.• Если подключен тюнер DAB, резервный прием используется также для поиска службы DAB. Активация и выбор предпочитаемого кода PTY в режиме резер...
Page 84 - Операции с дисками; Извлечение диска
18 РУCCKИЙ Перед выполнением любых операций выполните следующие действия... • Для выполнения операций, описанных на страницах 20 – 25, в основном используется пульт дистанционного управления. – отображает функции, которые также можно использовать с данным устройством. Если при нажатии кнопки на экра...
Page 86 - Операции; Останов воспроизведения; Покадровое воспроизведение
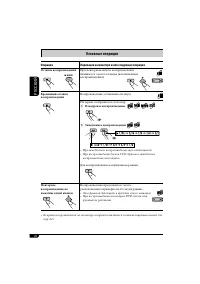
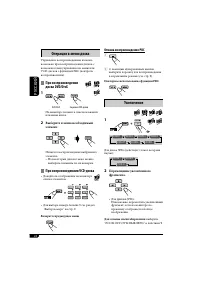
20 РУCCKИЙ Основные операции Операции Индикация на мониторе и/или следующая операция Останов воспроизведения При повторном запуске воспроизведение начинается с места останова (возобновление воспроизведения). Временный останов воспроизведения Воспроизведение установлено на паузу. На экране отображает...
Page 88 - Настройка формата экрана на устройстве
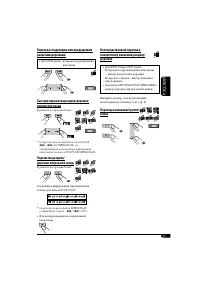
22 РУCCKИЙ A ASPECT MPEG MPEG Audio DVD ASPECT Переход к следующему или предыдущему кадру Можно пропустить кадр и перейти назад или вперед на 5 минут. Пример: во время воспроизведения 24- минутного файла MPEG, когда время от начала воспроизведения составляет 8 минут 24 секунды... • При первом нажати...
Page 89 - Выбор субтитров; Выбор режима просмотра под; Выбор языка звучания
23 РУCCKИЙ Выбор субтитров Можно выбрать язык отображаемых на мониторе субтитров.• Для выбора исходного языка субтитров можно использовать меню AV (см. стр. 37). Пример: если на диске доступны 3 языка • Для некоторых дисков DVD и VCD запрещено изменение языка субтитров и языка звучания (или звуковог...
Page 90 - Отмена воспроизведения PBC; Повторное использование функции PBC; Увеличение; Перемещение увеличенного; Для отмены масштабирования; Операции в меню диска; При воспроизведении; Выберите в меню необходимый; При вопроизведениии VCD-диска; Возврат в предыдущее меню
24 РУCCKИЙ Отмена воспроизведения PBC 1 2 С помощью нумерованных кнопок выберите дорожку для воспроизведения в нормальном режиме (см. стр. 9). Повторное использование функции PBC Увеличение 1 Для диска JPEG (действует только во время паузы): 2 Перемещение увеличенного фрагмента. • Для файлов JPEG: Н...
Page 91 - Введите ключевое число.
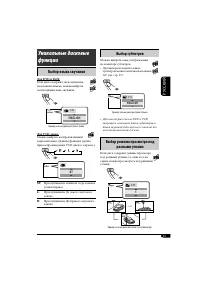
25 РУCCKИЙ Выбор просматриваемых фотоснимков При воспроизведении дорожки, связанной с просматриваемыми фотоснимками (B.S.P.), можно выбрать (перевернуть страницу) фотоснимок для отображения на мониторе.• Если дорожка связана с B.S.P., обычно фотоснимки автоматически поочередно отображаются во время ...
Page 92 - Выбор режима окружающего звучания; Выберите “Disc Surround”.; На пульте дистанционного управления:
26 РУCCKИЙ * 1 : Изготовлено по лицензии компании Dolby Laboratories. Долби, Pro Logic, MLP Lossless, и знак в виде двойной буквы D являются товарными знаками компании Dolby Laboratories. * 2 : “DTS” и “DTS Digital Surround” являются зарегистрированными товарными знаками Digital Theater Systems. Выб...
Page 93 - Операции с диском с помощью строки состояния; Операции с помощью строки состояния; Строки состояния
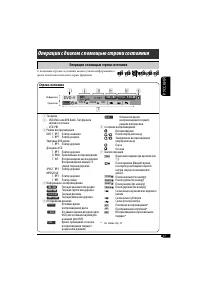
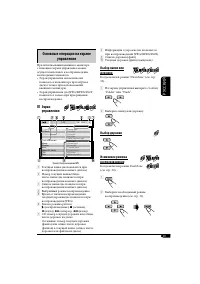
27 РУCCKИЙ Операции с диском с помощью строки состояния Операции с помощью строки состояния Информация Управление DVD -V T 02 -C 03 TOTAL 1:25:58 TIME TITLE CHAP RPT C. RPT Строки состояния 1 Тип диска 2 • DVD Video или DVD Audio: Тип формата звукового сигнала • VCD: PBC 3 Режим воспроизведения DVD:...
Page 94 - Основные операции со строкой; Отобразите строку состояния.; Скрытие строки состояния
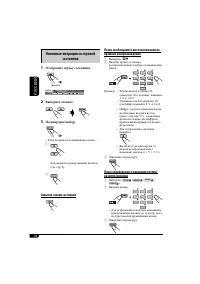
28 РУCCKИЙ Основные операции со строкой состояния 1 Отобразите строку состояния. 2 Выберите элемент. 3 Подтвердите выбор. • Если появилось всплывающее меню.... 1 или нажмите нумерованные кнопки (см. стр. 9). 2 Скрытие строки состояния (два раза) DVD -V T 02 -C 03 TOTAL 1:25:58 TIME TITLE CHAP RPT C....
Page 95 - Выбор дорожки; Основные операции на экране; Экран
29 РУCCKИЙ 8 Информация о дорожке (не появляется при воспроизведении JPEG/MPEG/DivX) 9 Список дорожек (файл) p Текущая дорожка (файл) (выделена) Выбор папки или дорожки Когда включен режим “Dual Zone” (см. стр. 33)... 1 На экране управления выберите столбец “Folder” или “Track”. 2 Выберите папку или...
Page 96 - Отобразите список папок.; Чтобы вернуться к списку папок; Выберите в списке дорожку.; Операции на экране списка; Экраны списков папок/; Список папок
30 РУCCKИЙ Если функция “Dual Zone” включена, а воспроизведение диска остановилось... 1 Отобразите список папок. При каждом нажатии кнопки экран списка попеременно включается и выключается. 2 Выберите в списке папку. Отображается список дороже из выбранной папки. Чтобы вернуться к списку папок 3 Выб...
Page 97 - Выбор режимов воспроизведения; Выберите “Mode”, затем необходимый; Другие операции с диском; Выбираемые режимы
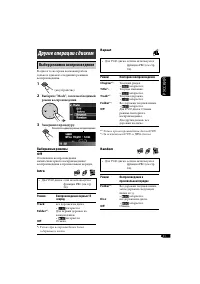
31 РУCCKИЙ Выбор режимов воспроизведения В одно и то же время возможна работа только в одном из следующих режимов воспроизведения. 1 2 Выберите “Mode”, затем необходимый режим воспроизведения. 3 Завершите процедуру. Другие операции с диском Появляется индикатор режима воспроизведения. Repeat • Для V...
Page 98 - Другие действия; Управление индикацией на; Для отмены запрещения; Выберите необходимую папку.
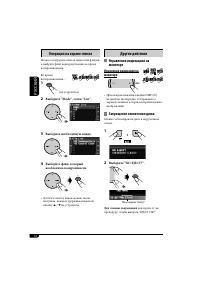
32 РУCCKИЙ Другие действия Управление индикацией на мониторе Изменение индикации на мониторе • При каждом нажатии кнопки DISP (D) на дисплее поочередно отображаются экран источника и экран воспроизведения изображений. Запрещение извлечения диска Можно заблокировать диск в загрузочном отсеке. 1 2 Выб...
Page 99 - Настройте громкость сигнала,; Одновременное воспроизведение; Выберите “Dual Zone”, затем “On”; О звуках, воспроизводимых
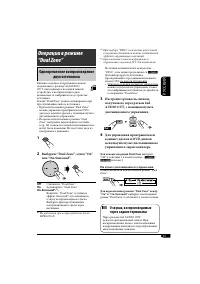
33 РУCCKИЙ * 2 При выборе “DISC” в качестве источника к звучанию динамиков также добавляется эффект окружающего звучания. * 3 Оригинальная система виртуального окружающего звучания JVC для наушников. Источник автоматически меняется на “DISC”, и на мониторе появляется . Для выбора другого источника п...
Page 100 - Настройки меню AV; Стандартная процедура; Выберите элемент меню для; Элементы меню AV
34 РУCCKИЙ List Setup Disc Surround Equalizer Sound Mode Dual Zone Input Display Clock Disc Setup 1 Disc Setup 2 Tuner Others Настройки меню AV Стандартная процедура В меню AV можно настраивать различные параметры устройства. Меню AV Menu содержит элементы меню и подменю, показанные на рисунке ниже....
Page 101 - Индикация
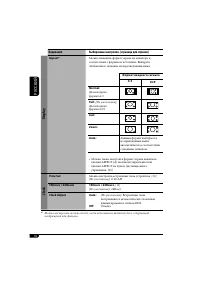
35 РУCCKИЙ Индикация Выбираемые настройки, [страница для справки] Display Demonstration Off : Отмена. On: [По умолчанию]; Включает демонстрационный фильм на мониторе. Wall Paper Можно выбрать фоновый рисунок на мониторе. Standard [По умолчанию] , Rose, Gold, Black, Metal, Metalic- Silver, Metalic-Gre...
Page 104 - Speaker Size
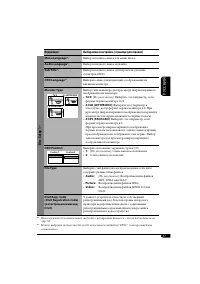
38 РУCCKИЙ Индикация Выбираемые настройки, [страница для справки] Disc Setup 2 * 2 D. (Dynamic) Range Compres.(Compression) * 1 Можно наслаждаться мощным звуком при низком и среднем уровне громкости во время воспроизведения программного обеспечения Dolby Digital.• AUTO: Выбирается, чтобы применить д...
Page 105 - Speaker Level; Speaker Distance
39 РУCCKИЙ Индикация Выбираемые настройки, [страница для справки] Disc Setup 2 * 3 Speaker Level * 1 Можно настроить выходной уровень каждого динамика, прослушивая пробный звук.Нажмите и удерживайте нажатой кнопку ENT для включения (или отмены) пробного звука. • Front Lch/Center ch/Front Rch/Rear Rc...
Page 107 - Others; Disc Surround
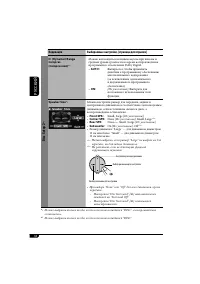
41 РУCCKИЙ Индикация Выбираемые настройки, [страница для справки] Input AV Input Можно определить использование гнездовых разъемов LINE IN и VIDEO IN. Off : Выберите, когда требуется вход AV в качестве источника (AV-IN удаляется из элементов источников). Audio&Video: [По умолчанию] Данный парамет...
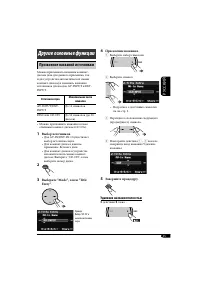
Page 111 - Присвоение названий источникам; Источники звука; Выберите “Mode”, затем “Title; Удаление названия полностью; Другие основные функции
45 РУCCKИЙ Присвоение названий источникам Можно присваивать названия компакт-дискам (как для данного приемника, так и для устройства автоматической смены компакт-дисков) и изменять названия источников для входов AV-INPUT и EXT-INPUT. Источники звука Максимальное число символов AV-INPUT/EXT-INPUT До ...
Page 113 - Выберите “Mode”, затем; Folder; Folder
47 РУCCKИЙ Переход к следующим или предыдущим папкам (только для диска MP3) При использовании пульта дистанционного управления.... Выбор режимов воспроизведения В одно и то же время возможна работа только в одном из следующих режимов воспроизведения. 1 2 Выберите “Mode”, затем необходимый режим восп...
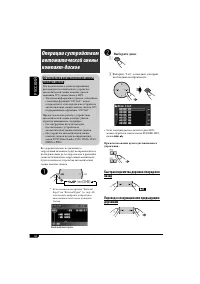
Page 114 - Прослушивание тюнера DAB; Запустите поиск блока трансляции.; Настройка на блок трансляции вручную; Операции с тюнером DAB; Что такое система “DAB”?
48 РУCCKИЙ Прослушивание тюнера DAB 1 2 3 Запустите поиск блока трансляции. При обнаружении нескольких служб поиск прекращается. Чтобы остановить поиск, нажмите эту же кнопку еще раз. 4 Выберите службу (основную или дополнительную) для прослушивания. SRC D DISP 7 / BACK BAND Настройка на блок трансл...
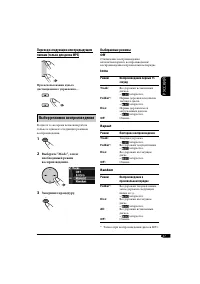
Page 115 - Шум при прослушивании; Выберите один из уровней сигнала; Поиск предпочитаемой службы
49 РУCCKИЙ Шум при прослушивании Некоторые службы передают сигналы динамического контроля диапазона (Dynamic Range Control—DRC) вместе с сигналами обычных программ. Система DRC усилит сигналы низкого уровня, чтобы улучшить качество звучания. 1 2 Выберите “MODE”, затем “D. Range Control”. 3 Выберите ...
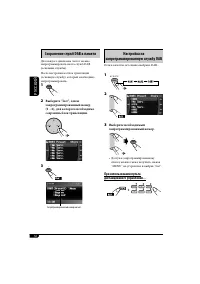
Page 116 - Настройка на; Сохранение служб DAB в памяти
50 РУCCKИЙ Настройка на запрограммированную службу DAB Если в качестве источника выбрано DAB... 1 2 3 Выберите необходимый запрограммированный номер. • Доступ к запрограммированному списку можно также получить, нажав “MENU” на устройстве и выбрав “List”. При использовании пульта дистанционного управ...
Page 117 - Выберите “Mode”, затем “Announce; Функция резервного приема TA
51 РУCCKИЙ 2 Выберите “Mode”, затем “Announce Standby”. 3 Выберите тип сообщения, который необходимо запрограммировать. • Если индикатор ANN загорается это означает, что функция резервного приема сообщений активирована. • Если индикатор ANN мигает, что функция резервного приема сообщений не активиро...
Page 118 - Отслеживание той же программы—; Во время приема службы DAB:; Во время приема радиостанции FM RDS:
52 РУCCKИЙ Отслеживание той же программы— Поиск альтернативной частоты Можно продолжать прослушивание одной и той же программы с помощью функции приема на альтернативных частотах.• Во время приема службы DAB: Если автомобиль находится в регионе, где прием службы DAB невозможен, приемник автоматическ...
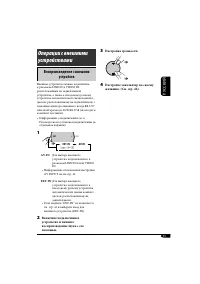
Page 119 - Воспроизведение с внешних; Настройка громкости.
53 РУCCKИЙ Воспроизведение с внешних устройств Внешнее устройство можно подключить к разъемам LINE IN и VIDEO IN, расположенным на задней панели устройства, а также к гнездовому разъему устройства автоматической смены компакт-дисков, расположенному на задней панели, с помощью адаптера линейного вход...
Page 121 - Выбор дорожки из меню; Войдите в главное меню iPod или; Режим
55 РУCCKИЙ Выбор дорожки из меню 1 Войдите в главное меню iPod или проигрывателя D. Теперь кнопки 5 / ∞ / 4 / ¢ функционируют как кнопки выбора меню * 1 . 2 Выберите необходимое меню. Для iPod: Для проигрывателя D.: 3 Подтвердите выбор. Для возврата в предыдущее меню нажмите 5 . • Если выбрана дорож...
Page 122 - Хранение дисков в чистом виде; Не используйте следующие диски:; Очистка разъемов; Как обращаться с дисками; Чтобы поместить диск в футляр,; Обслуживание
56 РУCCKИЙ Хранение дисков в чистом виде Воспроизведение грязного диска может быть некорректным. Если диск загрязнится, протрите его мягкой тканью по прямой линии от центра к краю.• Не используйте растворитель (например, обычное средство для чистки кассет, распыляемые средства, разбавитель, бензин и...
Page 123 - Коды Языков
57 РУCCKИЙ Код Язык Код Язык Код Язык AAABAFAMARASAYAZBABEBGBHBIBNBOBRCACOCSCYDZELEOETEUFAFIFJFOFYGAGDGLGNGUHAHIHRHUHYIAIE АфарскийАбхазскийАфрикаансАмхарскийАрабскийАссамскийАймараАзербайджанскийБашкирскийБелорусскийБолгарскийБихарийскийБисламийскийБенгальский, банглаТибетскийБретонскийКаталанскийК...
Page 124 - Дополнительная информация о приемнике
58 РУCCKИЙ Основные операции Включение питания • Для включения питания приемника также можно использовать кнопку SRC. Выбор источников • Когда в приемнике нет диска, а функция “Dual Zone” отключена, выбрать “DISC” невозможно. • Без подключения к устройству автоматической смены компакт-дисков или тюн...
Page 126 - Воспроизведение диска MPEG; Меню AV; Воспроизведение диска JPEG
60 РУCCKИЙ • При воспроизведении файлов JPEG прогрессивного формата или формата “без потерь” появляется черный экран. В этом случае следует остановить воспроизведение и выбрать файл JPEG основного формата. Имейте в виду, что для выбора другого файла может потребоваться продолжительное время. Воспрои...
Page 127 - Для пользователей iPod:
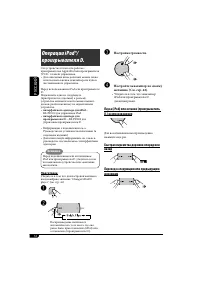
61 РУCCKИЙ Операции iPod®/проигрывателя D. • При включении этого устройства iPod или проигрыватель D. заряжается через него. • При подключении iPod или проигрывателя D. все операции из iPod или проигрывателя D. запрещаются. Все операции выполняйте с устройства. • Текстовая информация может отображат...
Page 128 - Режимы звучания (запрограммированные настройки уровня частоты)
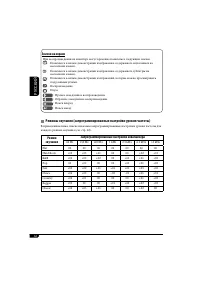
62 РУCCKИЙ Режимы звучания (запрограммированные настройки уровня частоты) В приведенном ниже списке показаны запрограммированные настройки уровня частоты для каждого режима звучания (см. стр. 42). Режим звучания Запрограммированные настройки эквалайзера 60 Hz 150 Hz 400 Hz 1 kHz 2.5 kHz 6.3 kHz 15 k...
Page 129 - Симптомы; Общие сведения; Устранение проблем
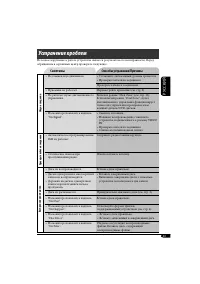
63 РУCCKИЙ Не всякое нарушение в работе устройства является результатом его неисправности. Перед обращением в сервисный центр проверьте следующее. Симптомы Способы устранения/Причины Общие сведения • Не слышен звук динамиков. • Установите оптимальный уровень громкости.• Проверьте кабели и соединения...
Page 130 - Воспроизведение диска
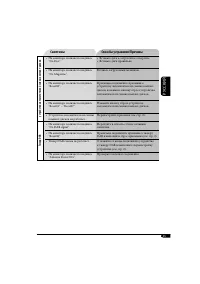
64 РУCCKИЙ Симптомы Способы устранения/Причины Воспроизведение диска • Иногда звук и изображение прерываются или искажаются. • Остановите воспроизведение на время езды по неровной дороге. • Проверьте кабели и соединения. • На мониторе не появляется изображение воспроизведения. Неправильно подключен ...
Page 131 - устройство автоматической смены компакт-дисков
65 РУCCKИЙ Симптомы Способы устранения/Причины устройство автоматической смены компакт-дисков • На мониторе появляется надпись “No Disc”. • Вставьте диск в загрузочное отверстие.• Вставьте диск правильно. • На мониторе появляется надпись “No Magazine”. Вставьте загрузочный механизм. • На мониторе по...
Page 133 - Технические характеристики; БЛОК УСИЛИТЕЛЕЙ ЗВУКА
67 РУCCKИЙ Технические характеристики БЛОК УСИЛИТЕЛЕЙ ЗВУКА Максимальная выходная мощность: Передние: 50 Вт на каждый канал Задние: 50 Вт на каждый канал Длительная выходная мощность (RMS): Передние: 20 Вт на канал в при 4 Ω , от 40 Гц до 20 000 Гц и не более чем 0,8% общего гармонического искажения...
Page 134 - Having TROUBLE with operation?; Please reset your unit; Refer to page of How to reset your unit; Затруднения при эксплуатации?; Пожалуйста, перезагрузите Ваше устройство; Для получения информации о перезагрузке Вашего
© 2006 Victor Company of Japan, Limited EN, RU 0206MNMMDWJEIN Having TROUBLE with operation? Please reset your unit Refer to page of How to reset your unit Затруднения при эксплуатации? Пожалуйста, перезагрузите Ваше устройство Для получения информации о перезагрузке Вашего устройства обратитесь на ...
Page 135 - Instructions