Page 4 - ENGLISH; Read carefully and keep for future; Safety Information
ENGLISH 4 Read carefully and keep for future reference. Do not heat, or use flammable materials in or near the oven. Fumes can create a fire hazard or explosion. Do not use your microwave oven for drying textiles, paper, spices, herbs, wood, flowers, fruit or other combustible materials. Fire could ...
Page 5 - Liquids
ENGLISH 5 not be operated until it has been repaired by a trained service technician. Important precautionsGeneral This appliance is designed for domestic use only! This appliance is intended to be used built- in. Do not use it freestanding. This appliance is intended for heating food and beverages....
Page 6 - Accessories; Control Panel
ENGLISH 6 Product description Accessories Turntable support 1x Baking plate 1x Glass turntable 1x Wire rack 1x 1 2 3 4 1 Control Panel 2 Grill element 3 Cavity Lamp 4 Door
Page 7 - General
ENGLISH 7 General There are a number of accessories available on the market. Before you buy, ensure they are suitable for microwave use. Ensure that the utensils you use are oven proof and allow microwaves to pass through them before cooking. When you put food and accessories in the microwave oven, ...
Page 8 - EXEMPLARISK
ENGLISH 8 Control panel 1 Multifunction knob 2 Stop button 3 Back button 4 Display 5 OK button 6 Start button 7 Adjust knob 7 6 5 4 3 2 1 EXEMPLARISK GENAST 7 6 5 4 3 2 1
Page 9 - Start protection / key lock; ask you to set the clock.; Clock; Daily use
ENGLISH 9 Start protection / key lock This automatic safety function is activated one minute after the oven has returned to “stand by mode“. (The oven is in “stand by” when the 24-hour clock is displayed or if the clock has not been set, when the display is blank). The door must be opened and closed...
Page 10 - Eco
ENGLISH 10 Eco 2 1 3 1. Press the OK button. 2. Turn the Adjust knob to turn the ECO setting ON or OFF. 3. Press the OK button again to confirm the change. When ECO is on, the display will automatically turn off after a while to save energy. It will automatically light up again when a button is pres...
Page 11 - Power level
ENGLISH 11 Power level Microwaves only Power Suggested use: 900 W Reheating of beverages, water, clear soups, coffee, tea or other food with a high water content. If the food contains egg or cream choose a lower power. 750 W Cooking of vegetables, meat etc. 650 W Cooking of fish.500 W More careful c...
Page 12 - Auto defrost; Meat
ENGLISH 12 Ensure that the utensils used are heat resistant and ovenproof before grilling with them. i IMPORTANT: Do not use plastic utensils when grilling. They will melt. Items of wood or paper are not suitable either. Auto defrost Use this function for defrosting Meat, Poultry, Fish, Vegetables a...
Page 13 - Manual defrost
ENGLISH 13 Separate pieces as they begin to defrost. Individual slices defrost more easily. Shield areas of food with small pieces of aluminum foil if they start to become warm (e.g. chicken legs and wing tips). Turn large joints halfway through the defrosting process. Boiled food, stews and meat sa...
Page 14 - Kitchen timer
ENGLISH 14 Always use the Wire rack to put food on to allow the air to circulate properly around the food. Use the Baking plate when baking small items like cookies or rolls. Once the heating process has been started the cooking time can easily be adjusted with the adjust knob. Use the back button t...
Page 15 - do not operate the; Dishwasher safe
ENGLISH 15 Cleaning and maintenance Cleaning is the only maintenance normally required. Failure to maintain the oven in a clean condition could lead to deterioration of the surface that could adversely affect the life of the appliance and possibly result in a hazardous situation. i IMPORTANT: do not...
Page 16 - Problem; Check your fuses and ensure
ENGLISH 16 Problem Possible cause Solution The appliance does not work. The mains power supply or the appliance is not connected. Check your fuses and ensure that there is power avaliable. The door isn’t closed. Open and then close the door before you try again. A message is displayed such as: F2, F...
Page 17 - Fuse
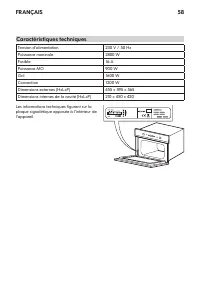
ENGLISH 17 Technical data Supply Voltage 230 V/50 Hz Rated Power Input 2800 W Fuse 16 A MW output power 900 W Grill 1600 W Convection 1200 W Outer dimensions (HxWxD) 455 x 595 x 565 Cavity inner dimensions (HxWxD) 210 x 450 x 420 The technical informations are situated in the rating plate inside the...
Page 18 - Baking plate
ENGLISH 18 Data for test heating performance in accordance with IEC 60705. The International Electrotechnical Commission has developed a standard for comparative testing of heating performance of different microwave ovens. We recommend the following for this oven: Test Amount Approx. time Power leve...
Page 19 - Mounting the appliance; Follow the supplied separate mounting; Installation
ENGLISH 19 Mounting the appliance Follow the supplied separate mounting instructions when installing the appliance. To release the door with the door safety device see Fig 1. Fig. 1 The door safety device can be removed by following the sequence of images (see Fig. 2). Fig. 2 Installation Door safet...
Page 20 - Prior to connecting; Electrical connection
ENGLISH 20 Prior to connecting Check that the voltage on the rating plate corresponds to the voltage in your home. Do not remove the microwave inlet protection plates located on the side of the oven cavity wall. They prevent grease and food particles from entering the microwave inlet channels. Ensur...
Page 21 - Declaration of conformity; on the product, or on the
ENGLISH 21 Environmental concerns The packing box may be fully recycled as confirmed by the recycling symbol ( ). Follow local disposal regulations. Keep potentially hazardous packaging (plastic bags, polystyrene etc.) out of the reach of children. This appliance is marked according to the European ...
Page 23 - of another EU country.; specific phone numbers listed on this
ENGLISH 23 another address, IKEA is not liable for any damage that may occur during transport. However, if IKEA delivers the product to the customer’s delivery address, then damage to the product that occurs during this delivery will be covered by IKEA. • Cost for carrying out the initial installati...
Page 24 - DEUTSCH; Reinigung und Pflege; Sicherheitshinweise
DEUTSCH 24 Aufmerksam lesen und zum Nachschlagen aufbewahren. Erhitzen oder verwenden Sie keine brennbaren Materialien im Gerät oder in seiner Nähe. Rauchentwicklung kann zu Brand oder Explosion führen. Das Mikrowellengerät nicht zum Trocknen von Textilien, Papier, Gewürzen, Kräutern, Holz, Blumen, ...
Page 25 - Frittieren
DEUTSCH 25 Reparaturen am Gerät dürfen nur von einem qualifizierten Kundendiensttechniker vorgenommen werden. Laien bringen sich durch Reparaturversuche in Gefahr, bei denen die zum Schutz vor Mikrowellenstrahlung am Gerät angebrachten Abdeckungen oder Gehäuseteile entfernt werden müssen. Keine Gehä...
Page 26 - Zubehör; Glasdrehteller
DEUTSCH 26 Produktbeschreibung Zubehör Drehtellerauflage 1x Backblech 1x Glasdrehteller 1x Grillrost 1x 1 2 3 4 1 Bedienfeld 2 Grillelement 3 Beleuchtung 4 Tür
Page 27 - Allgemeines; drehen kann; Drehtellerauflage
DEUTSCH 27 Allgemeines Eine Reihe von Zubehörteilen kann käuflich erworben werden. Prüfen Sie vor dem Kauf, ob sie für das Mikrowellengerät geeignet sind. Verwenden Sie bitte nur hitzebeständiges und mikrowellengeeignetes Kochgeschirr. Stellen Sie Speisen und Zubehör so in das Mikrowellengerät, dass...
Page 28 - Multifunktionsknopf
DEUTSCH 28 Bedienfeld 1 Multifunktionsknopf 2 Stopptaste 3 Zurück-Taste 4 Display 5 OK-Taste 6 Start -Taste 7 Einstellknopf 7 6 5 4 3 2 1 EXEMPLARISK GENAST 7 6 5 4 3 2 1
Page 29 - Startschutz / Kindersicherung; Täglicher Gebrauch
DEUTSCH 29 Startschutz / Kindersicherung Diese automatische Sicherheitsfunktion wird eine Minute, nachdem das Gerät in den „Bereitschaftsmodus" zurückgekehrt ist, aktiviert. (Das Gerät befindet sich im Bereitschaftsmodus, wenn die Uhrzeit im 24-Stunden-Format angezeigt wird oder, falls die Uhr n...
Page 30 - Ton
DEUTSCH 30 Ton 2 1 3 1. Drücken Sie die OK-Taste. 2. Drehen Sie den Einstellknopf, um den Signalton ein- oder auszuschalten. 3. Drücken Sie die OK-Taste erneut, um die Änderung zu bestätigen. Öko (Eco) 2 1 3 1. Drücken Sie die OK-Taste. 2. Drehen Sie den Einstellknopf, um die ÖKO- Funktion (ECO) an-...
Page 31 - Leistungsstufe
DEUTSCH 31 Die Garzeit können Sie auch durch Drehen des Einstellknopfes verlängern bzw. verkürzen. Sie können die Leistungsstufe während des Garens ändern, indem Sie die Zurück-Taste (BACK) drücken und dann den Einstellknopf entsprechend drehen. Leistungsstufe Nur Mikrowelle Leistungsstufe Gebrauchs...
Page 32 - Automatische Auftaufunktion; Brot
DEUTSCH 32 3. Drücken Sie die OK-Taste, um Ihre Auswahl zu bestätigen. Sie gelangen automatisch zur nächsten Einstellung. 4. Stellen Sie die Garzeit mit dem Einstellknopf ein. 5. Drücken Sie die Start-Taste. Legen Sie das Gargut auf den Grillrost. Wenden Sie die Speisen während des Garvorgangs. Nur ...
Page 33 - Manuelles Auftauen; Garen von Braten
DEUTSCH 33 i WICHTIG: Legen Sie niemals gefrorene Lebensmittel direkt auf einen heißen Drehteller. Stellen Sie einen Teller auf den Drehteller und legen Sie die Lebensmittel auf den Teller. Tiefkühlkost in Plastikbeuteln, Klarsichtfolie oder Kartons können Sie direkt mit der Verpackung auftauen, sol...
Page 34 - Heißluft
DEUTSCH 34 Heißluft Benutzen Sie diese Funktion zur Zubereitung von Meringuen, Gebäck, Biskuitkuchen, Aufläufen, Geflügel und Braten. 5 1 3 2 4 1. Drehen Sie den Multifunktionsknopf, bis Sie die Funktion Heißluftbetrieb (Forced Air) gefunden haben (die Standardtemperatur wird angezeigt). 2. Drehen S...
Page 35 - den Drehteller und den Drehtellerhalter und; Spülmaschinenfestes Zubehör
DEUTSCH 35 Reinigung und Pflege Im Normalfall müssen Sie das Gerät nur reinigen. Wird das Gerät nicht laufend sauber gehalten, kann dies zur Abnutzung der Oberfläche führen, was die Lebensdauer des Gerätes verringern und evtl. zu gefährlichen Situationen führen kann. i WICHTIG: Verwenden Sie keine T...
Page 39 - Montage des Geräts; Befolgen Sie zum Installieren des Geräts die; Aufstellung
DEUTSCH 39 Montage des Geräts Befolgen Sie zum Installieren des Geräts die mitgelieferte separate Montageanleitung. Näheres zum Öffnen der Tür mit dem Sicherheitselement siehe Abb. 1. Abb. 1 Das Türsicherheitselement kann durch Befolgen der Bildsequenzen abgebaut werden (siehe Abb. 2). Abb. 2 Aufste...
Page 40 - Vor dem Anschließen; Anschluss an das Stromnetz
DEUTSCH 40 Vor dem Anschließen Die Spannung auf dem Typenschild muss der Spannungsversorgung in Ihrem Haus entsprechen. Entfernen Sie nicht die Platten zum Schutz der Mikrowellenluftkanäle an der Seite des Garraums. Sie verhindern, dass Fett und Speiseteilchen in die Mikrowellenluftkanäle gelangen. ...
Page 41 - Konformitätserklärung
DEUTSCH 41 Hinweise zum Umweltschutz Die Verpackung besteht aus 100 % recyclingfähigem Material und ist daher mit dem Recycling-Symbol gekennzeichnet [ ]. Beachten Sie bei der Entsorgung die örtlichen Bestimmungen. Bewahren Sie Verpackungsmaterial, das eine potenzielle Gefahr darstellt (Kunststoffbe...
Page 42 - Wie lange ist die IKEA Garantie gültig?
DEUTSCH 42 IKEA GARANTIE Wie lange ist die IKEA Garantie gültig? Die Garantie gilt fünf (5) Jahre ab dem Kaufdatum von bei IKEA gekauften Geräten, es sei denn, es handelt sich um Geräte der Marke “LAGAN”. Bei diesen Geräten gilt eine Garantie von zwei (2) Jahren. Als Kaufnachweis ist das Original de...
Page 43 - Gültigkeit der länderspezifischen
DEUTSCH 43 Servicevertragspartner ausgeführt oder bei denen keine Originalteile verwendet wurden. • Durch fehlerhafte oder unvorschriftsmäßige Installation erforderliche Reparaturen. • Die reparatur von Schäden, die durch eine gewerbliche Nutzung des Gerätes entstanden sind. gewerbliche Nutzung des ...
Page 44 - BEWAHREN SIE DEN KAUFBELEG
DEUTSCH 44 12-stellige Servicenummer (auf dem Geräte-Typschild vermerkt) Ihres IKEA Gerätes bereit. BEWAHREN SIE DEN KAUFBELEG GUT AUF! Unser Service kann einen Garantieanspruch nur unter Vorlage dieses Beleges akzeptieren. Auf dem Kaufbeleg ist auch die IKEA Bezeichnung und Artikelnummer (8-stellig...
Page 46 - FRANÇAIS; les placer dans le four.; Fritures
FRANÇAIS 46 Si le cordon d'alimentation doit être remplacé, utilisez un cordon d'origine disponible auprès du service après-vente. Le remplacement du cordon d'alimentation doit uniquement être réalisé par un agent d'entretien spécialisé. L'entretien de l'appareil doit uniquement être effectué par un...
Page 47 - Accessoires; Support du plateau tournant
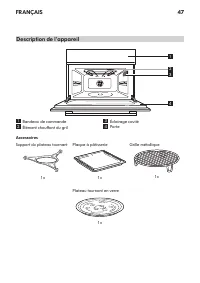
FRANÇAIS 47 Description de l'appareil Accessoires Support du plateau tournant 1x Plaque à pâtisserie 1x Plateau tournant en verre 1x Grille métallique 1x 1 2 3 4 1 Bandeau de commande 2 Élément chauffant du gril 3 Éclairage cavité 4 Porte
Page 48 - Généralités; Installez le support du plateau tournant; Plateau tournant en verre; Placez le plateau tournant en verre sur son; Grille métallique
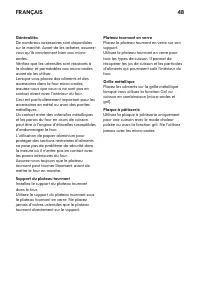
FRANÇAIS 48 Généralités De nombreux accessoires sont disponibles sur le marché. Avant de les acheter, assurez- vous qu'ils conviennent bien aux micro- ondes. Vérifiez que les ustensiles sont résistants à la chaleur et perméables aux micro-ondes avant de les utiliser. Lorsque vous placez des aliments...
Page 49 - Bouton Multifonction
FRANÇAIS 49 Bandeau de commande 1 Bouton Multifonction 2 Touche Stop (Arrêt) 3 Touche Précédent 4 Affichage 5 Touche OK 6 Touche Start (Démarrage) 7 Bouton de réglage 7 6 5 4 3 2 1 EXEMPLARISK GENAST 7 6 5 4 3 2 1
Page 52 - Niveau de puissance
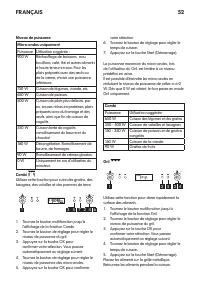
FRANÇAIS 52 Niveau de puissance Micro-ondes uniquement Puissance Utilisation suggérée : 900 W Réchauffage de boissons, eau, bouillons, café, thé et autres aliments à haute teneur en eau. Pour les plats préparés avec des œufs ou de la crème, choisir une puissance inférieure. 750 W Cuisson de légumes,...
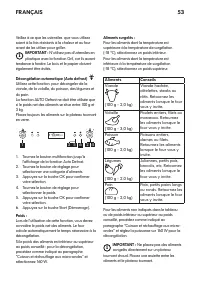
Page 53 - Décongélation automatique (Auto defrost); côtelettes, steaks ou
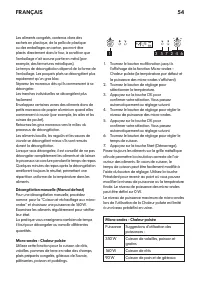
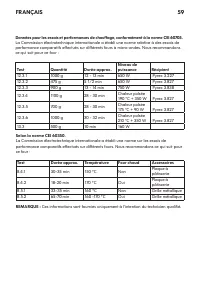
FRANÇAIS 53 Veillez à ce que les ustensiles que vous utilisez soient à la fois résistants à la chaleur et au four avant de les utiliser pour griller. i IMPORTANT : N'utilisez pas d'ustensiles en plastique avec la fonction Gril, car ils auront tendance à fondre. Le bois et le papier doivent également...
Page 55 - Chaleur pulsée
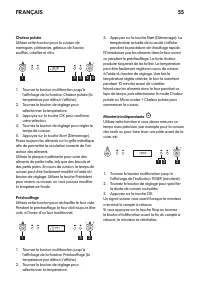
FRANÇAIS 55 Chaleur pulsée Utilisez cette fonction pour la cuisson de meringues, pâtisseries, gâteaux de Savoie, soufflés, volailles et rôtis. 5 1 3 2 4 1. Tournez le bouton multifonction jusqu'à l'affichage de la fonction Chaleur pulsée (la température par défaut s'affiche). 2. Tournez le bouton de...
Page 56 - le support du plateau tournant et essuyez la; Nettoyage au lave-vaisselle
FRANÇAIS 56 Nettoyage et entretien L'entretien de cet appareil se limite à son nettoyage. Si le four n'est pas maintenu propre, cela peut entraîner la détérioration de la surface : la durée de vie de l'appareil pourra en être affectée et provoquer des situations de danger. i IMPORTANT : N'utilisez e...
Page 57 - Problème; poulet, ne sont pas recouvertes
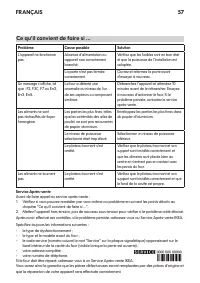
FRANÇAIS 57 Problème Cause possible Solution L'appareil ne fonctionne pas. Absence d'alimentation ou appareil non correctement branché. Vérifiez que les fusibles sont en bon état et que la puissance de l'installation est adaptée. La porte n'est pas fermée correctement. Ouvrez et refermez la porte av...
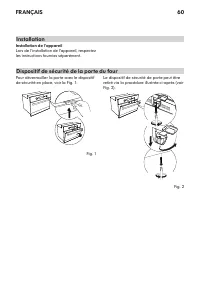
Page 60 - Installation de l'appareil; les instructions fournies séparément.
FRANÇAIS 60 Installation de l'appareil Lors de l'installation de l'appareil, respectez les instructions fournies séparément. Pour déverrouiller la porte avec le dispositif de sécurité en place, voir la Fig. 1. Fig. 1 Le dispositif de sécurité de porte peut être retiré via la procédure illustrée ci-a...
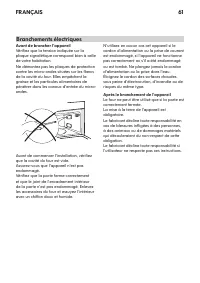
Page 61 - Avant de brancher l'appareil; Branchements électriques
FRANÇAIS 61 Avant de brancher l'appareil Vérifiez que la tension indiquée sur la plaque signalétique correspond bien à celle de votre habitation. Ne démontez pas les plaques de protection contre les micro-ondes situées sur les flancs de la cavité du four. Elles empêchent la graisse et les particules...
Page 62 - Déclaration de conformité
FRANÇAIS 62 Recommandations importantes pour la sauvegarde de l'environnement Les matériaux d'emballage sont entièrement recyclables comme l'indique le symbole de recyclage ( ). Suivez les réglementations locales en vigueur en matière d'élimination des déchets. Ne laissez pas les éléments d'emballag...
Page 63 - CONTRAT DE GARANTIE ET DE SERVICE
FRANÇAIS 63 GARANTIE IKEA (FRANCE) CONTRAT DE GARANTIE ET DE SERVICE APRES-VENTE IKEA Décret n° 87-1045 relatif à la présentation des écrits constatant les contrats de garantie et de service après-vente (J.O.R.F. du 29 décembre 1987). Préalablement à la signature du bon de commande, le vendeur indiq...
Page 64 - contractuelle
FRANÇAIS 64 pour réparation sur l’appareil (sauf cas de force majeure ou carence prolongée du vendeur). (*) Voir la notice d’emploi et d’entretien et les conditions d’application de la garantie contractuelle Garantie contractuelle IKEA PRIX : rien à payer en sus. DUREE : 5 (cinq) ans. POINT DE DEPAR...
Page 65 - Que couvre cette garantie ?
FRANÇAIS 65 Que couvre cette garantie ? La présente garantie IKEA couvre les défauts de construction et de fabrication susceptibles de nuire à une utilisation normale, à compter de la date d’achat chez IKEA par le client. Elle ne s’applique que dans le cadre d’un usage domestique. Les exclusions son...
Page 66 - Rappel des dispositions légales :
FRANÇAIS 66 • Les pièces d’usure normale dites pièces consommables, comme par exemple les piles, les ampoules, les filtres, les joints, tuyaux de vidange, etc. qui nécessitent un remplacement régulier pour le fonctionnement normal de l’appareil. • Les dommages aux éléments non fonctionnels et décora...
Page 67 - le vendeur, par le producteur ou par; numéro de téléphone spécifique à
FRANÇAIS 67 • Art. L. 211-5. « Pour être conforme au contrat, le bien doit : 1° Etre propre à l’usage habituellement attendu d’un bien semblable et, le cas échéant : - correspondre à la description donnée par le vendeur et posséder les qualités que celui-ci a présentées à l’acheteur sous forme d’éch...
Page 68 - DE CAISSE, FACTURE OU BON DE
FRANÇAIS 68 DE CAISSE, FACTURE OU BON DE LIVRAISON AVEC LE LIVRET DE GARANTIE ! Ils vous seront nécessaires comme preuve de l’achat pour vous permettre de bénéficier de la présente garantie. Vous y retrouverez notamment la désignation et la référence IKEA (code à 8 chiffres) de chaque appareil achet...
Page 70 - Loi nationale applicable
FRANÇAIS 70 • Les réparations qui ne sont pas effectuées par nos réparateurs désignés et/ou un partenaire contractuel autorisé ou lorsque des pièces qui ne sont pas d’origine ont été utilisées. • Les réparations consécutives à une installation inadéquate ou pas conforme aux spécifications. • L’utili...
Page 71 - Afin de mieux vous servir, nous vous; La preuve de votre achat est
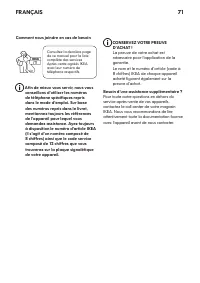
FRANÇAIS 71 Comment nous joindre en cas de besoin Afin de mieux vous servir, nous vous conseillons d’utiliser les numéros de téléphone spécifiques repris dans le mode d’emploi. Sur base des numéros repris dans le livret, mentionnez toujours les références de l’appareil pour lequel vous demandez assi...
Page 73 - ITALIANO; Frittura a bagno d'olio
ITALIANO 73 quanto tali pannelli forniscono la protezione necessaria contro l'energia delle microonde. Non rimuovere nessun pannello di copertura. Le guarnizioni dello sportello e le zone circostanti devono essere controllate periodicamente. In caso di danni, non utilizzare l'apparecchio finché non ...
Page 74 - Accessori; Luce del forno
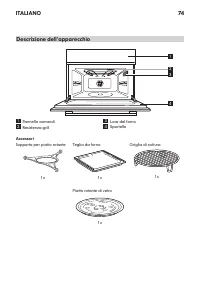
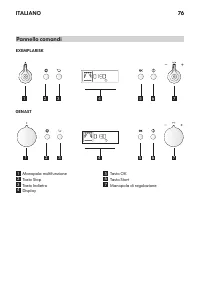
ITALIANO 74 Descrizione dell'apparecchio Accessori Supporto per piatto rotante 1x Teglia da forno 1x Piatto rotante di vetro 1x Griglia di cottura 1x 1 2 3 4 1 Pannello comandi 2 Resistenza grill 3 Luce del forno 4 Sportello
Page 75 - Istruzioni generali
ITALIANO 75 Istruzioni generali In commercio sono disponibili diversi accessori. Prima di acquistarli, accertarsi che siano idonei alla cottura a microonde. Assicurarsi che gli utensili usati siano resistenti al calore del forno e che permettano il passaggio delle microonde. Quando si introducono al...
Page 77 - Raffreddamento; Utilizzo quotidiano
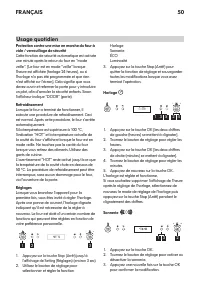
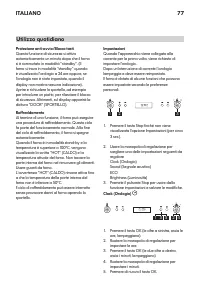
ITALIANO 77 Protezione anti-avvio/Blocco tasti Questa funzione di sicurezza si attiva automaticamente un minuto dopo che il forno si è commutato in modalità "standby". (Il forno si trova in modalità "standby" quando è visualizzato l'orologio a 24 ore oppure, se l'orologio non è stato...
Page 78 - Funzione Jet Start
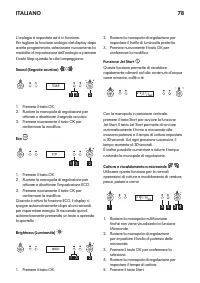
ITALIANO 78 L'orologio è impostato ed è in funzione. Per togliere la funzione orologio dal display dopo averla programmata, selezionare nuovamente la modalità di impostazione dell'orologio e premere il tasto Stop quando le cifre lampeggiano. Sound (Segnale acustico) 2 1 3 1. Premere il tasto OK. 2. ...
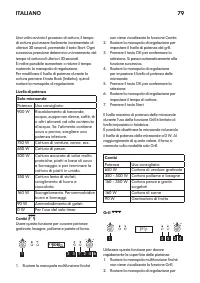
Page 79 - Livello di potenza; Combi; Potenza; Grill
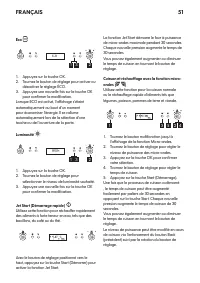
ITALIANO 79 Una volta avviato il processo di cottura, il tempo di cottura può essere facilmente incrementato di ulteriori 30 secondi, premendo il tasto Start. Ogni successiva pressione determina un incremento del tempo di cottura di ulteriori 30 secondi. È inoltre possibile aumentare o ridurre il te...
Page 80 - Alimento; Carne
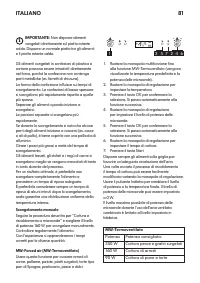
ITALIANO 80 impostare il livello di potenza del grill. 3. Premere il tasto OK per confermare la selezione. Si passa automaticamente alla funzione successiva. 4. Ruotare la manopola di regolazione per impostare il tempo di cottura. 5. Premere il tasto Start. Disporre il cibo sulla griglia. Girare gli...
Page 81 - Scongelamento manuale
ITALIANO 81 i IMPORTANTE: Non disporre alimenti congelati direttamente sul piatto rotante caldo. Disporre un normale piatto tra gli alimenti e il piatto rotante caldo. Gli alimenti congelati in confezioni di plastica o cartone possono essere introdotti direttamente nel forno, purché la confezione no...
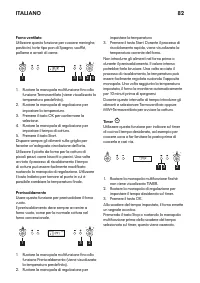
Page 82 - Forno ventilato
ITALIANO 82 Forno ventilato Utilizzare questa funzione per cuocere meringhe, pasticcini, torte tipo pan di Spagna, soufflé, pollame e arrosti di carne. 5 1 3 2 4 1. Ruotare la manopola multifunzione fino alla funzione Termoventilato (viene visualizzata la temperatura predefinita). 2. Ruotare la mano...
Page 83 - attorno allo sportello.; Componenti lavabili in lavastoviglie
ITALIANO 83 Pulizia e manutenzione La pulizia è la sola manutenzione normalmente richiesta. La mancata esecuzione delle operazioni di pulizia periodiche può provocare deterioramenti della superficie, che possono influenzare negativamente la durata dell'apparecchio e causare situazioni di pericolo. i...
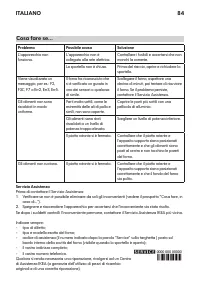
Page 84 - Problema; potenza troppo elevato.; Servizio Assistenza
ITALIANO 84 Problema Possibile causa Soluzione L'apparecchio non funziona. L'apparecchio non è collegato alla rete elettrica. Controllare i fusibili e accertarsi che non manchi la corrente. Lo sportello non è chiuso. Prima del riavvio, aprire e richiudere lo sportello. Viene visualizzato un messaggi...
Page 86 - Sì
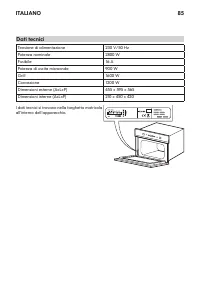
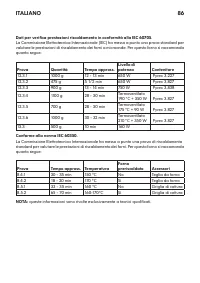
ITALIANO 86 Dati per verifica prestazioni riscaldamento in conformità alla IEC 60705. La Commissione Elettrotecnica Internazionale (IEC) ha messo a punto una prova standard per valutare le prestazioni di riscaldamento dei forni a microonde. Per questo forno si raccomanda quanto segue: Prova Quantità...
Page 87 - Montaggio dell'apparecchio; Durante l'installazione, seguire le istruzioni; Installazione
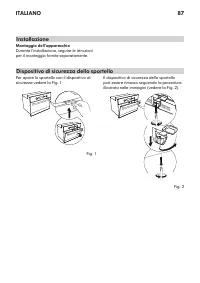
ITALIANO 87 Montaggio dell'apparecchio Durante l'installazione, seguire le istruzioni per il montaggio fornite separatamente. Per aprire lo sportello con il dispositivo di sicurezza vedere la Fig. 1. Fig. 1 Il dispositivo di sicurezza dello sportello può essere rimosso seguendo la procedura illustra...
Page 88 - Prima di collegare l'apparecchio; Collegamenti elettrici
ITALIANO 88 Prima di collegare l'apparecchio Controllare che la tensione indicata sulla targhetta matricola corrisponda a quella dell'impianto domestico. Non rimuovere le piastre di protezione del forno a microonde che si trovano ai lati della cavità del forno. Tali piastre evitano che i grassi e i ...
Page 89 - Dichiarazione di conformità
ITALIANO 89 Consigli per la salvaguardia dell'ambiente Il materiale di imballaggio è riciclabile al 100% ed è contrassegnato dal simbolo corrispondente ( ). Per lo smaltimento, seguire le normative locali. Il materiale di imballaggio (sacchetti di plastica, parti in polistirolo, ecc.) deve essere te...
Page 92 - Al fine di garantirvi un servizio più
ITALIANO 92 Al fine di garantirvi un servizio più veloce, vi suggeriamo di utilizzare i numeri di telefono riportati in questo manuale. Fate sempre riferimento ai numeri indicati nel manuale dell’apparecchiatura per la quale avete bisogno di assistenza. Vi suggeriamo di avere sempre a disposizione i...
Page 93 - ÍSLAND; MAGYARORSZÁG; РОССИЯ
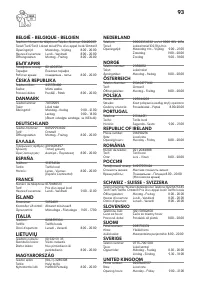
93 BELGIË - BELGIQUE - BELGIEN Telefoon/Numéro de téléphone/Telefon-Nummer: 026200311 Tarief/Tarif/Tarif: Lokaal tarief/Prix d’un appel local/Ortstarif Openingstijd: Maandag - Vrijdag 8.00 - 20.00 Heures d’ouverture: Lundi - Vendredi 8.00 - 20.00 Öffnungszeiten: Montag - Freitag 8.00 - 20.00 БЪЛГАРИ...