Page 2 - SAFETY RULES; II. GENERAL OPERATION
2 Look for this symbol to point out im- por tant safety precautions. It means CAUTION!!! BE COME ALERT!!! YOUR SAFE TY IS IN VOLVED. WARNING: In order to prevent ac ci den- tal starting when setting up, trans port- ing, ad just ing or making repairs, always dis con nect spark plug wire and place wir...
Page 3 - IV. SAFE HANDLING OF GASOLINE; FRANÇAIS; TABLE OF CONTENTS
3 • Never operate machine in wet grass. Always be sure of your footing: keep a firm hold on the handle; walk, never run. • Disengage the drive system, if so equipped, before starting the engine (motor). • If the equipment should start to vi brate abnormally, stop the engine (motor) and check immedia...
Page 4 - ASSEMBLY; TOOLS REQUIRED FOR AS SEM BLY; HOW TO SET UP YOUR LAWN MOW ER; CUSTOMER RESPONSIBILITIES
4 ASSEMBLY Read these instructions and this man u al in its entirety before you attempt to assemble or operate your new lawn mow er. IMPORTANT : THIS LAWN MOWER IS SHIPPED WITH OUT OIL OR GASOLINE IN THE ENGINE.Your new lawn mower has been as sem bled at the factory with the ex cep tion of those par...
Page 5 - TO ASSEMBLE GRASS CATCHER; TO INSTALL ATTACHMENTS
5 ASSEMBLY TO ASSEMBLE GRASS CATCHER (See Fig. 2) 1. Put grass catcher frame into grass bag with rigid part of bag on the bottom. Make sure the frame handle is outside of the bag top. 2. Slip vinyl bindings over frame. NOTE : If vinyl bindings are too stiff, hold them in warm water for a few minutes...
Page 6 - OPERATION
6 OPERATOR PRESENCE CONTROL BAR – must be held down to the handle to start the engine. Release to stop the engine. HOUSING GRASS CATCHER STARTER HANDLE – used for starting the engine. MULCHER DOOR – allows conversion to discharge or bagging operation. OPERATOR PRESENCE CON TROL BAR WHEEL ADJUSTER (O...
Page 7 - TO CONVERT MOWER; HOW TO USE YOUR LAWN MOWER; ENGINE SPEED
7 TO CONVERT MOWER Your lawn mower was shipped ready to be used as a mulcher. To convert to bagging or discharging:REAR BAGGING (See Fig. 5)• Lift rear door of the lawn mower and place the grass catcher frame hooks onto the door pivot pins. • To convert to mulching or dis charg ing operation, remove...
Page 8 - BEFORE STARTING ENGINE
8 SIMPLE STEPS TO REMEMBER WHEN CONVERTING YOUR LAWN MOWER: FOR MULCHING - 1. Rear door closed. 2. Mulcher door closed. FOR REAR BAGGING - 1. Grass catcher installed. 2. Mulcher door closed. FOR SIDE DISCHARGING - 1. Rear door closed. 2. Discharge deflector installed. CAUTION: Do not run your lawn m...
Page 9 - TO STOP ENGINE
9 OPERATION Alcohol blended fuels (called gasohol or using ethanol or methanol) can at- tract moisture which leads to separation and for ma tion of acids during storage. Acidic gas can damage the fuel sys- tem of an engine while in storage. To avoid engine problems, the fuel system should be emptied...
Page 10 - MAINTENANCE; LUBRICATION CHART; BEFORE EACH USE
10 MAINTENANCE LUBRICATION CHART GENERAL RECOMMENDATIONS The warranty on this lawn mower does not cover items that have been subjected to operator abuse or negligence. To receive full value from the warranty, operator must maintain mower as instructed in this manual.Some adjustments will need to be ...
Page 11 - LAWN MOWER; TIRES; GRASS CATCHER; ENGINE; LUBRICATION
11 LAWN MOWER Always observe safety rules when performing main te nance. TIRES • Keep tires free of gasoline, oil, or insect control chem i- cals which can harm rubber. • Avoid stumps, stones, deep ruts, sharp objects and other hazards that may cause tire damage. BLADE CARE For best results, mower b...
Page 12 - MUFFLER; CLEANING
12 MAINTENANCE Check the crankcase oil level before starting the engine and after each five (5) hours of continuous use. Tighten oil plug securely each time you check the oil level. TO CHANGE ENGINE OIL (See Fig. 13) NOTE : Before tipping lawn mower to drain oil, empty fuel tank by running engine un...
Page 13 - TO ADJUST CUTTING HEIGHT; SERVICE AND ADJUSTMENTS; STORAGE
13 LAWN MOWER TO ADJUST CUTTING HEIGHT See “TO ADJUST CUTTING HEIGHT” in the Operation section of this manual. REAR DEFLECTOR The rear deflector, attached between the rear wheels of your mower, is provided to minimize the possibility that objects will be thrown out of the rear of the mower into the ...
Page 14 - FUEL SYSTEM; CYLINDER; OTHER
14 STORAGE ENGINE FUEL SYSTEM IMPORTANT : IT IS IMPORTANT TO PREVENT GUM DEPOSITS FROM FORMING IN ESSENTIAL FUEL SYSTEM PARTS SUCH AS CARBURETOR, FUEL FILTER, FUEL HOSE, OR TANK DURING STORAGE. ALCOHOL BLENDED FUELS (CALLED GASOHOL OR USING ETHANOL OR METHANOL) CAN ATTRACT MOISTURE WHICH LEADS TO SE...
Page 15 - TROUBLESHOOTING POINTS
15 Does not start 1. Dirty air filter. 1. Clean/replace air filter. 2. Out of fuel. 2. Fill fuel tank. 3. Stale fuel. 3. Empty fuel tank and refill tank with fresh, clean gasoline. 4. Water in fuel. 4. Empty fuel tank and refill tank with fresh, clean gasoline. 5. Spark plug wire is disconnected. 5....
Page 16 - II. FONCTIONNEMENT GÉNÉRAL; RÈGLES DE SÉCURITÉ
16 Ce symbole signale les points importants en matière de sé cu ri té. Il signifie - AT TEN TION !!!, SOYEZ PRUDENT !!! VOTRE SÉ CU RI TÉ EST EN JEU. ATTENTION : Débranchez toujours le fil de bougie d’allumage et pour prévenir les dé mar ra ges accidentels, posez-le de telle fa çon qu’il ne puisse p...
Page 17 - SOMMAIRE
17 RÈGLES DE SÉCURITÉ ........................................ 16-17 SPÉCIFICATIONS DU PRODUIT ............................... 18 RESPONSABILITÉS DU CLIENT ............................... 18 ASSEMBLAGE ...................................................... 18-19 UTILISATION.............................
Page 18 - MONTAGE; LES OUTILS EXIGÉS POUR LE MONTAGE
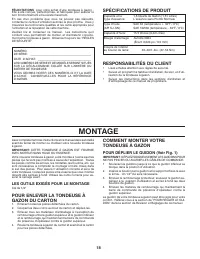
18 MONTAGE Lisez complètement ces instructions et ce manuel dans sa totalité avant de tenter de monter ou d’utiliser votre nouvelle tondeuse à gazon. IMPORTANT: CETTE TONDEUSE À GAZON EST FOURNIE AVEC MOTEUR SANS HUILE OU ESSENCE.Votre nouvelle tondeuse à gazon a été montée à l’usine sauf les pièces...
Page 19 - INSTALLER LES ACCESSOIRES; INSTALLER LE CÂBLE DE DÉMARREUR
19 FIG. 1 BARRE DE COMMANDE DE PRÉSENCE D’OPÉ RA TEUR BOULON DU GUIDON SOU L-E VEZ SOU LE VEZ GUIDON IN FÉ RIEUR ÉCROU SUPPORT POSITION DE TONTE GUIDON SU PÉ R- IEUR BOULON MONTAGE FIG. 2 CÔTÉ DU CADRE ÉTRIERS DE PRESSION DE VINYLE OUVERTURE DU CADRE INSTALLER LES ACCESSOIRES Votre tondeuse à gazon ...
Page 20 - UTILISATION
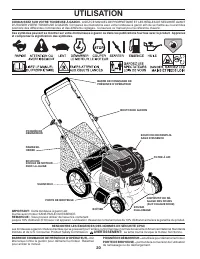
20 BARRE DE COMMANDE DE PRÉSENCE D’OPÉRATEUR – doit être tenue contre le guidon pour démarrer le moteur. Re lâ chez pour arrêter le moteur. POIGNÉE DE DÉMARREUR – est utilisée pour démarrer le moteur. PORTE DE BROYEUSE – permet de la conversion de l’utilisation de ramassage ou de déchargement. BARRE...
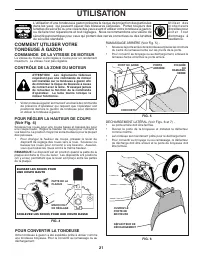
Page 21 - COMMENT UTILISER VOTRE; COMMANDE DE LA VITESSE DE MOTEUR
21 DECHARGEMENT LATÉRAL (Voir Figs. 6 et 7) - • Le porte arrière doit être fermée.• Ouvrez la porte de la broyeuse et installez le déflecteur comme montré. • La tondeuse est maintenant prête pour le déchargement.• Pour convertir au broyage ou au ramassage, le déflecteur de décharge doit être enlevé ...
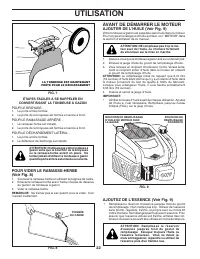
Page 22 - POUR VIDER LE RAMASSE-HERBE; AVANT DE DÉMARRER LE MOTEUR
22 UTILISATION POUR VIDER LE RAMASSE-HERBE (Voir Fig. 8) 1. Soulevez le ramasse-herbe en utilisant la poignée de cadre.2. Enlevez le ramasse-herbe avec l’herbe coupée du dessous du guidon de tondeuse à gazon. 3. Vider le ramasse-herbe. REMARQUE : Ne traînez pas le sac quand vous le videz. Ceci l’use...
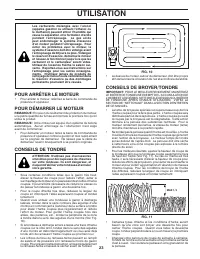
Page 23 - POUR ARRÊTER LE MOTEUR
23 UTILISATION Les carburants mélangés avec l’alcool (appelés gasohol ou utilisant l’éthanol ou le méthanol) peuvent attirer l’humidité qui cause la séparation et la formation d’acide pendant l’entreposage. Le gaz acide peut endommager le système d’essence d’un moteur pendant l’entreposage. Pour évi...
Page 24 - RECOMMANDATIONS GÉNÉRALES; AVANT CHAQUE UTILISATION; TABLEAU DE LUBRIFICATION; ENTRETIEN
24 ➀ LUBRIFIANT À VAPORISER ➁ RÉFÉREZ-VOUS Â “MOTEUR” DANS LA SECTION EN TRE TIEN RECOMMANDATIONS GÉNÉRALES La garantie pour cette tondeuse à gazon ne couvre pas les éléments qui ont été sujets à un abus ou à des négligences de la part de l’opérateur. Pour conserver une garantie complète, l’uti li s...
Page 25 - TONDEUSE À GAZON; PNEUS; MOTEUR; LUBRIFICATION DU MOTEUR
25 TONDEUSE À GAZON Observez toujours les règles de sécurité quand vous faites l’entretien. PNEUS • Assurez-vous que vos pneus ne soient pas en contact avec de l’essence, de l’huile ou des produits de chimique insec- ticide qui pourraient détruire le caoutchouc. • Évitez les souches, les pierres, le...
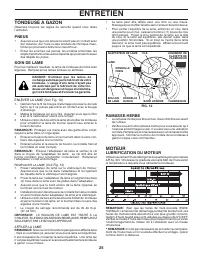
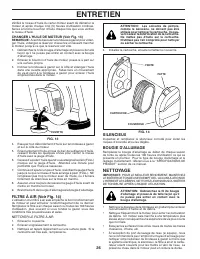
Page 26 - SILENCIEUX; NETTOYAGE
26 ENTRETIEN Vérifiez le niveau d’huile du carter-moteur avant de démarrer le moteur et après chaque cinq (5) heures d’utilisation continue. Serrez à fond le bouchon d’huile chaque fois que vous vérifiez le niveau d’huile. CHANGER L’HUILE DE MOTEUR (Voir Fig. 13) REMARQUE: Avant de basculer la tonde...
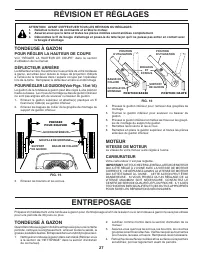
Page 27 - RÉVISION ET RÉGLAGES; POUR RÉGLER LA HAUTEUR DE COUPE; ENTREPOSAGE; VITESSE DE MOTEUR
27 ATTENTION: AVANT D’EFFECTUER TOUS LES RÉVISION OU RÉGLAGES: 1. Relâchez la barre de commande et arrêtez le moteur. 2. Assurez-vous que la lame et toutes les pièces mobiles soient arrêtées com plè te ment. 3. Débranchez le fil de bougie d’allumage et posez-le de telle façon qu’il ne puisse pas ent...
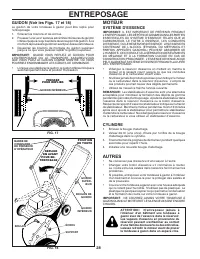
Page 28 - SYSTÈME D’ESSENCE; AUTRES
28 ENTREPOSAGE POSITION DE TONTE BARRE DE COMMANDE DE PRÉSENCE D’OPÉ RA TEUR REPLIER EN AVANT POUR EN-TREPOSAGE GUIDON INFÉRIEUR BOULON DE GUIDON GUIDON SUPÉR- IEUR FIG. 18 ÉCROU SUPPORT BOULON MOTEUR SYSTÈME D’ESSENCE IMPORTANT : IL EST IMPORTANT DE PRÉVENIR, PENDANT L’ENTREPOSAGE, LES DÉPÔTS DE GO...
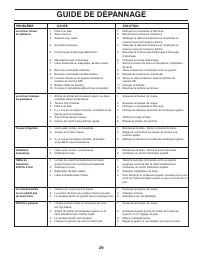
Page 29 - GUIDE DE DÉPANNAGE
29 Le moteur refuse 1. Filtre à air sale. 1. Nettoyez ou remplacez le filtre à air. de démarrer 2. Sans essence. 2. Remplissez le réservoir d’essence. 3. Essence trop vieille. 3. Vidangez le réservoir d'essence et remplissez le réservoir avec de l'essence fraîche. 4. Eau dans l’essence. 4. Vidangez ...
Page 30 - SERVICE NOTES


 Husqvarna LB 553S e User Manual
 Husqvarna LB 553SQe User Manual
 Husqvarna LB 246iS User Manual
 Husqvarna LC 18 Manual
 Husqvarna LC121FH-96148006100 User Manual
 Husqvarna LC 137i User Manual
 Husqvarna LC 140 User Manual
 Husqvarna LC 140P User Manual
 Husqvarna LC 140S User Manual
 Husqvarna LC 140SP User Manual
 Husqvarna LC 141C User Manual