Honeywell RPLS730B - Manual

Honeywell RPLS730B – Manual, read for free online in PDF format. We hope this helps you resolve any issues you may have. If you have further questions, please contact us through the contact form.


Table of Contents:
- Page 3 – Mode d’installation et d’emploi; Interrupteur mural programmable
- Page 4 – Problèmes et solutions; Fiche technique
- Page 5 – Guía de instalación y uso; Interruptor mural programable
- Page 6 – Solución de problemas; Especificaciones técnicas
RPLS730B/RPLS731B
1/6
RPLS730B/RPLS731B
Installation and User Guide
Programmable Wall Switch
The RPLS730B/RPLS731B programmable wall switch has been
designed to control lightings and motors:
NOTE
: This switch cannot be used if there are not at least 2 white
wires joined by a connector inside the electrical box.
Cut power at the circuit breaker to avoid electric shock.
Remove the existing switch.
Install the new switch as shown in the diagram below.
Apply power at the circuit breaker.
Pry the switch door open from the
bottom using a small screwdriver.
Ensure the
ON/OFF
selector is set
to ON.
Reset the switch using a paper clip.
0:00
and
MO
will flash.
If the display is blank:
•
Ensure the
ON/OFF
selector is properly engaged in the
ON
posi-
tion. Push it to the right using a small screwdriver.
NOTE
: The switch displays the time in 24-hour format by default or
following a reset.
To change to 12-hour format (or vice versa), proceed as follows:
a) Press one of the control buttons to ensure the
MAN
or
AUTO
indicator is displayed.
b) Press the
MIN
and
HOUR
buttons simultaneously and brief-
tly (
0:00
display = 24-hour,
12:00
display = 12-hour ).
Set the time using the
HOUR
and
MIN
buttons. If you have
selected the 12-hour format, ensure that
PM
appears on the
screen when an afternoon time is displayed.
Set the day by using the
DAY
button.
Press one of the control buttons or close the switch door to
return to normal operation.
The programmable switch has 2 operating modes: manual (
MAN
)
and automatic (
AUTO
). To switch mode, press the switch door for 3
seconds.
Manual Mode
The programmable switch operates as a regular
switch. Briefly press the switch door to turn the lights
On or Off. The mode (
MAN
)
and state (
ON
or
OFF
)
are displayed.
Automatic Mode
The programmable switch follows the programmed
schedule. The mode (
AUTO
), state (
ON
or
OFF
)
and current program number are displayed.
To temporarily override the programmed schedule,
briefly press the switch door. The new state
(
ON
or
OFF
)
will flash to
show that this state is temporary. The override remains in effect until
you press the switch door again or until the beginning of the next
program.
You can set up to 7 programs. To set a program, you need to enter its
start time (
ON
) and its end time (
OFF
).
Pry the switch door open using a small screwdriver.
Press the
PGM
button to display a program and
its On or Off time. For example, when you first
press
PGM,
program number 1 (
P1
) and its On
time (
ON
) will appear.
- : - -
will appear instead
of the time if the program is not set (inactive).
Press the
DAY
button to select the day to which
you want to apply the program.
NOTE
: If you want to apply the program to
every day of the week, press
DAY
until all the
days are displayed. (This still counts as 1 program, not 7)
Applications
1.
Load type
Maximum load Examples
Resistive load
2400 W
(20 A @ 120 V)
•
incandescent lights
•
halogen lights
•
block heater
Inductive load
2400 W
(20 A @ 120 V)
•
fluorescent lights
•
compact fluorescent lights (CFL)
•
sodium lamps
•
electronic ballasts
Motor
1 hp
•
pool filter pumps
•
fans
Installation
2.
Power-On
3.
120 VAC
(line)
white (neutral)
black (line)
blue (load)
Load
Control (4)
Reset
On/Off
selector
Setting the Clock
4.
Selecting the Operating Mode
5.
Programming
6.
69-2457EFS-01_400-033-005-A (TI033_RPLS730B) USA print at 90%.book Page 1 Tuesday, May 18, 2010 10:38 AM
"Loading the manual" means you need to wait until the file loads and becomes available for online reading. Some manuals are very large, and the time they take to appear depends on your internet speed.
Was this manual helpful?
About this manual
- Brand
- Honeywell
- Model
- RPLS730B
- Document type
- Manual
- Language(s)
- English, Spanish, French
- Pages
- 6
- File size
- 521.5 KB
- Format
Summary
RPLS730B/RPLS731B 3/6 RPLS730B/RPLS731B Mode d’installation et d’emploi Interrupteur mural programmable L’interrupteur mural programmable RPLS730B/RPLS731B a étéconçu pour commander des appareils d’éclairage et des moteurs. NOTA : Cet interrupteur ne peut être utilisé s’il n’y a pas au moins deux fi...
RPLS730B/RPLS731B 4/6 Appuyer sur la touche PGM pour afficher un programme et l’heure du début ( ON ) du programme ou l’heure de la fin ( OFF ) du programme. Par exemple, lorsque vous appuyez sur PGM pour la première fois, le programme 1 ( P1 ) et l’heure du début ( ON ) sont affichés. - : - - est...
RPLS730B/RPLS731B 5/6 RPLS730B/RPLS731B Guía de instalación y uso Interruptor mural programable El interruptor mural programable RPLS730B/RPLS731B se utilizapara controlar dispositivos de alumbrado y motores. NOTA : Este interruptor no puede utilizarse si no hay por lo menos dos cables unidos por un...
Ask a question
Related manuals
Popular Honeywell Other
More Honeywell Other models
 Honeywell RLV430 User Manual
 Honeywell RLV3120A1005 User Manual
 Honeywell RLV4300 Manual
 Honeywell RM7800E,G,L,M User Manual
 Honeywell RM7800E,G,L,M, RM7840E,G,L,M Manual
 Honeywell RM7895A Manual
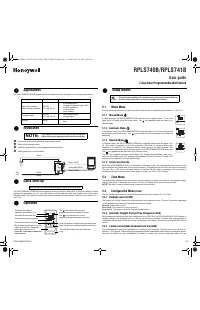 Honeywell RPLS740B Manual
 Honeywell RRTH9590WF Manual
 Honeywell RTA 44D User Manual
- Honeywell RTA 44DM2 User Manual
 Honeywell RTH110B Manual
 Honeywell RTH111 Manual