Page 3 - state speed control device.
2 DO NOT let children play with this appliance, packaging or included plastic bag.If the unit is damaged or it malfunctions, do not continue to operate it. Unplug the product from the electrical outlet. Refer to the troubleshooting section and contact the customer support center.Always place the deh...
Page 5 - UNPACKAGING THE DEHUMIDIFIER; DO NOT REMOVE THIS FLOAT.
4 SELECTING A LOCATION - IMPORTANT (CONTINUED) IMPORTANT: The effectiveness of the dehumidifier can be influenced by different factors. One factor is the rate at which new, moisture-laden air enters the room and the amount of air circulating in and out of the area to be dehumidified. For example, if...
Page 6 - PARTS DESCRIPTION; Water Tank Handle
5 PARTS DESCRIPTION 11 12 13 14 7 8 9 10 1 2 3 6 5 4 1) Control Panel 8) Louvers 2) Dehumidified Air Exhaust Vent 9) Water Tank 3) Handle 10) Water Level Indicator 4) Water Tank Handle 11) Power Cord & Plug 5) Float (without polyfoam) 12) Direct Drain Outlet 6) Casters 13) Rubber Stopper 7) Wash...
Page 7 - THIS IS ONLY FOR MODELS WITH BUILT-IN DRAIN PUMP
6 EN 7 8 9 10 1 2 3 6 5 16 15 11 11 DH45WGN / DH45WKN / DH50W / DH70W / DH70WKN / DH70WGN DH45PWKN /DH45PWGN / DH50PW / DH70PW / DH70PWKN / DH70PWGN 12 13 14 4 1) Control Panel 8) Louvers 2) Dehumidified Air Exhaust Vent 9) Water Tank 3) Handle 10) Water Level Indicator 4) Water Tank Handle 11) Powe...
Page 8 - Press; Water Tank Full Indicator Light; and to turn the dehumidifier on again.; Fan Speed Control; A higher fan speed results in faster moisture removal.
7 USE & OPERATION EN CONTROL PANEL Temperature / Timer Display Humidity Display (%) Power Control Fan Speed Control Timer Control Humidity / Timer Set Controls °C/ °F Set Controls Power Control Press to switch the dehumidifier ON or OFF. Water Tank Full Indicator Light This illuminates when the ...
Page 9 - Timer Control
8 USE & OPERATION (CONTINUED) EN CONTROL PANEL (CONTINUED) Timer Control The dehumidifier can be set to automatically switch ON or OFF after a selected period of time (between 1-24 hour intervals). The Timer hours selection is displayed on the Timer/ Temperature Display Screen. NOTE: Before sett...
Page 10 - Temperature / Timer Display; 0 seconds, before reverting back to the temperature display.; Humidity Control Setting
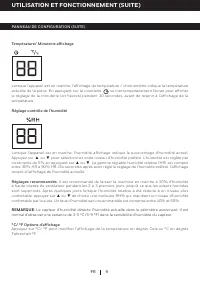
9 CONTROL PANEL (CONTINUED) USE & OPERATION (CONTINUED) EN Temperature / Timer Display When the unit is switched ON, the Temperature / Timer Display shows the current room temperature.Pressing the Timer temporarily switches the display to show the Timer setting (in hours) for 10 seconds, before ...
Page 13 - pulling the drain tube connector away from the drain pump hole.
12 EN DRAINING THE WATER (CONTINUED) USE & OPERATION (CONTINUED) Drain Tube Connector Drain Tube Drain Pump Hole Release Button 3.1 3.3 3.5 3.2 Unwrap the drain tube from the dehumidifier and locate the drain tube connector on one end of the drain tube. Insert the drain tube connector into the d...
Page 15 - TROUBLESHOOTING GUIDE; PROBLEM
14 EN TROUBLESHOOTING GUIDE The following troubleshooting guide addresses the most common problems. If problems persist, call customer service. PROBLEM POSSIBLE CAUSE SOLUTION Dehumidifier does not start No electricity. Check for power. The power cord is not properly plugged in. Remove and reconnect...
Page 18 - ERROR CODE GUIDE; ERROR
17 ERROR CODE GUIDE EN ERROR CODE POSSIBLE CAUSE DESCRIPTION “30” Humidity Sensor Failure (Below 30%RH) If “30” appears, it means the room’s relative humidity exceeds the lowest 30%RH level and the unit will pause operation. You can switch the unit ON again when the relative humidity reaches a level...
Page 19 - toujours être suivies:
1 MERCI RÈGLES DE SÉCURITÉ Merci d'avoir acheté un déshumidificateur Honeywell. Ce manuel d'utilisation est destiné à vous fournir des informations importantes nécessaires pour mettre en place, exploiter, entretenir et dépanner ce produit. ATTENTION -- LIRE ET CONSERVER CES INSTRUCTIONS AVANT D'UTIL...
Page 20 - appareil avec un dispositif de contrôle de vitesse à l'état solide.
2 NE PAS les enfants jouer avec cet appareil, l'emballage ou sac en plastique inclus.Si l'appareil est endommagé ou fonctionne mal, ne pas continuer à fonctionner. Débranchezl'appareil de la prise électrique. Reportez-vous à la section de dépannage et contacter le centre de support client.Toujours p...
Page 21 - COMMENT UN DÉSHUMIDIFICATEUR FONCTIONNE
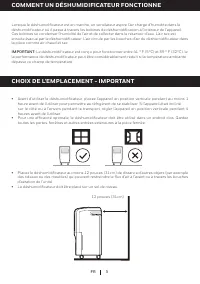
3 COMMENT UN DÉSHUMIDIFICATEUR FONCTIONNE Lorsque le déshumidificateur est en marche, un ventilateur aspire l'air chargé d'humidité dans ledéshumidificateur où il passe à travers les bobines de déshumidification à l'intérieur de l'appareil. Ces bobines se condenser l'humidité de l'air et de collecte...
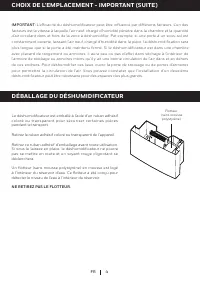
Page 22 - DÉBALLAGE DU DÉSHUMIDIFICATEUR; Retirez le ruban adhésif coloré ou transparent de l'appareil.; NE RETIREZ PAS LE FLOTTEUR.
4 CHOIX DE L'EMPLACEMENT - IMPORTANT (SUITE) IMPORTANT: L'efficacité du déshumidificateur peut être influencé par différents facteurs. L'un des facteurs est la vitesse à laquelle l'air neuf, chargé d'humidité pénètre dans la chambre et la quantité d'air circulant dans et hors de la zone à déshumidif...
Page 23 - DESCRIPTION DES PIÈCES
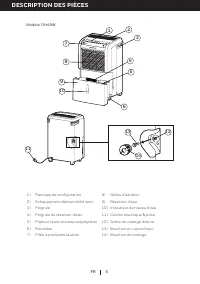
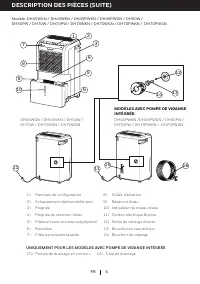
5 DESCRIPTION DES PIÈCES FR 1) Panneau de configuration 8) Grilles d'aération 2) Échappement déshumidifié vent 9) Réservoir d'eau 3) Poignée 10) Indicateur de niveau d'eau 4) Poignée du réservoir d'eau 11) Cordon electrique & prise 5) Flotteur (sans mousse polystyrène) 12) Sortie de vidange dire...
Page 25 - UTILISATION ET FONCTIONNEMENT; PANNEAU DE CONFIGURATION; Appuyez sur; Indicateur lumineux de réservoir d'eau plein; , vider le réservoir d'eau et assurez-vous que le réservoir est; Dégivrage lumière
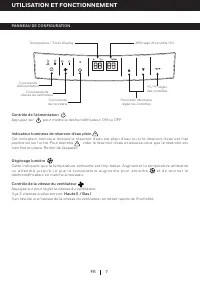
7 UTILISATION ET FONCTIONNEMENT FR PANNEAU DE CONFIGURATION Temperature / Timer Display Affichage d'humidité (%) Commande d'alimentation Commande de vitesse du ventilateur Commande de minuterie Humidité/ Minuterie régler les contrôles °C/ °F régler des contrôles Contrôle de l'alimentation Appuyez su...
Page 29 - vers le bas et sans pliure ou étranglement.
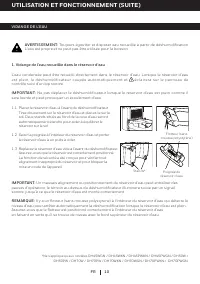
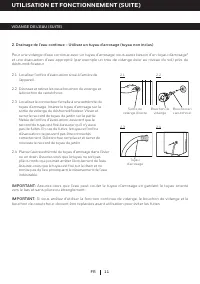
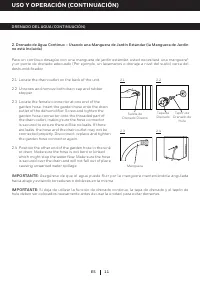
11 VIDANGE DE L'EAU (SUITE) UTILISATION ET FONCTIONNEMENT (SUITE) FR Sortie de vidange directe Tuyau d'arrosage Bouchon de vidange Bouchon en caoutchouc 2.1 2.3 2.4 2.2 Localiser l'orifice d'évacuation situé à l'arrière del'appareil. Dévissez et retirez les deux bouchon de vidange etle bouchon de ca...
Page 30 - UNIQUEMENT POUR LES MODÈLES AVEC POMPE DE VIDANGE INTÉGRÉE
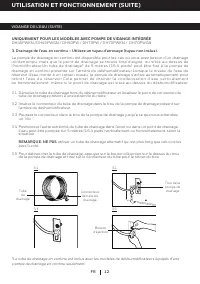
12 FR VIDANGE DE L'EAU (SUITE) UTILISATION ET FONCTIONNEMENT (SUITE) Connecteur de tube de drainage Tube de drainage Trou de la pompe de drainage Bouton d'éjection 3.1 3.3 3.5 3.2 Déroulez le tube de drainage hors du déshumidificateur et localisez le point de connexion du tube de drainage présent à ...
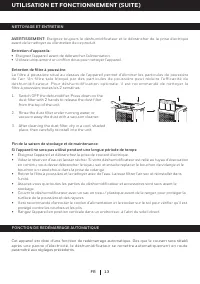
Page 31 - paramétré aux réglages précédents.; Entretien de filtre à poussière:
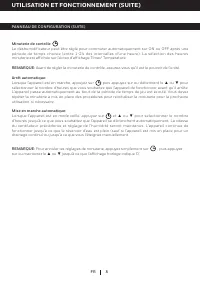
13 NETTOYAGE ET ENTRETIEN FONCTION DE REDÉMARRAGE AUTOMATIQUE UTILISATION ET FONCTIONNEMENT (SUITE) FR Switch OFF the dehumidifier. Press down on the dust filter with 2 hands to release the dust filter from the top of the unit. Rinse the dust filter under running water, or vacuum away the dust with ...
Page 32 - GUIDE DE DÉPANNAGE; PROBLÈME; Déshumidificateur
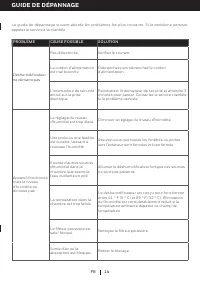
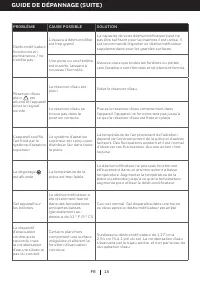
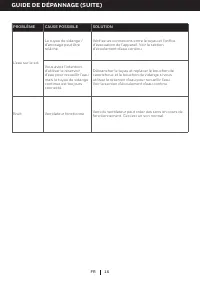
14 FR GUIDE DE DÉPANNAGE Le guide de dépannage suivant aborde les problèmes les plus courants. Si le problème persiste, appelez le service à la clientèle. PROBLÈME CAUSE POSSIBLE SOLUTION Déshumidificateur ne démarre pas Pas d'électricité. Vérifiez le courant. Le cordon d'alimentation est mal branch...
Page 35 - GUIDE DES CODES D’ERREUR; CODE
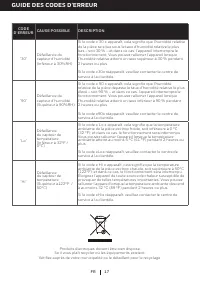
17 FR Produits électriques doivent être bien disposé. Se il vous plaît recycler où les équipements existent. Vérifiez auprès de votre municipalité ou le détaillant pour le recyclage. GUIDE DES CODES D’ERREUR CODE D’ERREUR CAUSE POSSIBLE DESCRIPTION “30” Défaillance du capteur d’humidité (Inférieur à...
Page 37 - con algún dispositivo de control de velocidad de estado sólido.
2 NO permita que los niños jueguen con la unidad, el empaque o la bolsa de plástico incluida.Si la unidad está dañada o tiene un mal funcionamiento, no continúe utilizándola. Desconecte elproducto del suministro eléctrico. Refiérase a la sección de solución de problemas y contacte alservicio de aten...
Page 39 - DESEMPACANDO EL DESHUMIDIFICADOR; NO QUITE ESTE FLOTADOR.
4 SELECCIONANDO UNA UBICACIÓN - IMPORTANTE (CONTINUACIÓN) IMPORTANTE: La eficiencia del deshumidificador puede ser influenciada por diversos factores. Un factor es el tiempo que tarde en entrar aire nuevo, lleno de humedad, a la habitación y la cantidad de aire circulando dentro y fuera del área a s...
Page 40 - DESCRIPCIÓN DE PARTES; Panel de Control
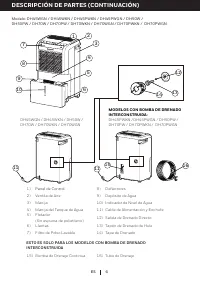
5 ES DESCRIPCIÓN DE PARTES 1) Panel de Control 8) Deflectores 2) Ventila de Aire 9) Depósito de Agua 3) Manija 10) Indicador de Nivel de Agua 4) Manija del Tanque de Agua 11) Cable de Alimentación y Enchufe 5) Flotador (Sin espuma de polietileno) 12) Salida de Drenado Directo 6) Llantas 13) Tapón de...
Page 41 - ESTO ES SOLO PARA LOS MODELOS CON BOMBA DE DRENADO
6 DESCRIPCIÓN DE PARTES (CONTINUACIÓN) ES 1) Panel de Control 8) Deflectores 2) Ventila de Aire 9) Depósito de Agua 3) Manija 10) Indicador de Nivel de Agua 4) Manija del Tanque de Agua 11) Cable de Alimentación y Enchufe 5) Flotador (Sin espuma de polietileno) 12) Salida de Drenado Directo 6) Llant...
Page 42 - USO Y OPERACIÓN; PANEL DE CONTROL; Presiona; Luz Indicadora de Depósito Lleno; , vacíe el depósito de agua y revise que el; Luz de Descongelamiento
7 USO Y OPERACIÓN ES PANEL DE CONTROL Temperatura / Display de Temporizador Display de Humedad (%) Control de Encendido Control de Velocidad de Ventilador Control de Temporizador Control de Humedad/ Temporizador Ajustes Control de Grados °C/ °F Control de Encendido Presiona para encender o apagar el...
Page 44 - incrementos de 5% presionando; Configuración Recomendada:; Es recomendable dejar la unidad corriendo al 30% de humedad con; Opciones de Display de °C/ °F
9 PANEL DE CONTROL (CONTINUACIÓN) USO Y OPERACIÓN (CONTINUACIÓN) ES Display de Temperatura / Temporizador Cuando la unidad es ENCENDIDA, el display de Temperatura /Temporizador muestra la temperaturaactual de la habitación. Presionando el botón de Temporizador , el display cambia temporalmente para ...
Page 49 - GUÍA DE SOLUCIÓN DE PROBLEMAS; PROBLEMA
14 ES GUÍA DE SOLUCIÓN DE PROBLEMAS La siguiente guía de solución de problemas comprende los problemas más comunes. Si los problemas persisten, llame al servicio de atención a clientes. PROBLEMA POSIBLE CAUSA SOLUCIÓN El deshumidificador no enciende No hay electricidad. Revise que haya energía eléct...
Page 50 - GUÍA DE SOLUCIÓN DE PROBLEMAS (CONTINUACIÓN)
15 GUÍA DE SOLUCIÓN DE PROBLEMAS (CONTINUACIÓN) ES PROBLEMA POSIBLE CAUSA SOLUCIÓN El deshumidificador trabaja constantemente/ no deja de trabajar El área a deshumidificar es demasiado grande. La capacidad de su deshumidificador podría no ser adecuada para el tamaño de la habitación en el que se est...
Page 52 - GUÍA DE CÓDIGOS DE ERROR; CÓDIGO DE; Falla en el sensor de
17 ES Los productos eléctricos deben ser desechados adecuadamente. Por favor reciclar en donde existan instalaciones para hacerlo. Consulte con sus autoridades locales o proveedor para mayor información sobre el reciclaje. GUÍA DE CÓDIGOS DE ERROR CÓDIGO DE ERROR CAUSA POSIBLE DESCRIPCIÓN “30” Falla...