Honeywell 8635302 - User Manual
Honeywell 8635302 – User Manual, read for free online in PDF format. We hope this helps you resolve any issues you may have. If you have further questions, please contact us through the contact form.


A
H
I
J
B
C
D
E
F
G
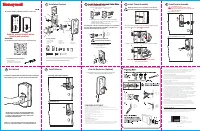
Package Includes:
1 - Exterior Faceplate
1 - Interior Faceplate
1 - User Guide
2 - Keys
1 - Strike Plate
1 - Dust Box
1 - Adjustable Latch
2 - 1 3/8” Screws
4 - 3/4” Screws
2 - Mounting Post
Read this manual carefully before installing and operating!
3/4” Screws
Mounting Post
1 3/8” Screws
Exterior Faceplate
Iinterior Faceplate
User Guide
Override Key
Adjustable Latch
Please carefully check the above list to confirm all items have been received. If any items are
missing, please contact Consumer Assistance. (See page for contact information)
Strike plate
Dust Box
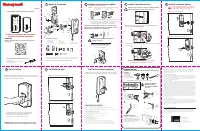
Install Interior Assembly
4
Work with the door open
Be careful not to pinch wire when installing
Make sure the thumb knob is in the vertical position
and latch is extended.
Remove battery cover
Secure with included 1 3/8” screws
H
B
Biometric Enabled Deadbolt with Touchscreen
6
Override Key Access (Optional)
5
Insert override access key into slot on the bottom of the lock.
Turn key to engage clutch. Rotate Knob to unlock.
Install Exterior Assembly
3
Make sure that the latch is
EXTENDED
. If it is retracted
insert the screw driver and rotate towards the door edge.
Insert the Exterior Assembly onto the door with the
Tailpiece
going
through the Latch in the
HORIZONTAL POSITION
.
Carefully connect
the control wires until they securely fit together.
Test the Lock
Install Batteries
Insert 4 high quality alkaline AA batteries
Replace battery cover
Insert 4 high quality alkaline AA batteries
Replace battery cover
This Electronic lock requires (4) High Quality AA Alkaline
batteries. When all 4 batteries are installed in the correct
position, you should hear and short tone sequence and
the keypad will illuminate blue.
Lock and unlock using the turn knob to make sure the latch is opening and
closing easily. If not, go back to step 4 and ensure you followed the steps
This Electronic lock requires (4) High Quality AA Alkaline
batteries. When all 4 batteries are installed in the correct
position, you should hear and short tone sequence and
the keypad will illuminate blue.
NOTE: Do not touch the Keypad until the white light turns off.
Do not use rechargeable batteries or non-alkaline batteries.
Lock and unlock using the turn knob to make sure the latch is opening and
closing easily. If not, go back to step 4 and ensure you followed the steps
Tailpiece
Control Wire
D
F
E
H
J
I
B
A
C
A
B
1
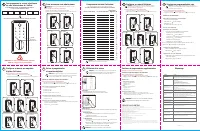
Installation Overview
Important
Use the QR code below for the most up to date instructions:
• Phillips Screwdriver
• It is helpful to have a person assist in
the installation of the lock on the door.
Tools Needed for Lock Installation:
A
B
NOTE: Make sure the connector dots line up with the
dots on the control wire
D
I
2-3/4” position
D
2-3/8” position
TO CONVERT FROM 2-3/8” (60mm) BACKSET TO 2-3/4” (70mm) BACKSET
1. Hold latch with “UP” facing forward and thumb pressing on the bolt.
2. Rotate the cylinder clockwise.
3. Twist the extension plate until it is all the way out.
NOTE: Do not extend Cylindrical Cover past 2-3/4” (70mm)
Install Enclosed Latch and Strike Plate.
Do not over-tighten latch screws.
2
Install Enclosed Latch and Strike Plate.
Do not over-tighten latch screws.
The latch plate on the door needs to be straight and not protruding
from door. Make adjustment before installing or this will cause
problems with bolt fitting into latch hole.
Deadbolt Latch Must Be
Extended During Installation.
Preparation for Interior Assembly.
CONSUMER ASSISTANCE
EMAIL: [email protected] WEBSITE: www.honeywellsafes.com
ADDRESS: Consumer Assistance Dept. LH Licensed Products, Inc., 860 East Sandhill Avenue Carson, CA 90746 USA
TELEPHONE: US/Canada 1-800-860-1677 Ext. 1801 (Toll Free)
Mexico 01-800-288-2872 After English voice recording stops you must then enter 800-860-1677 to complete your call. (Toll Free)
Australia 0011-800-5325-7000 (Toll Free)
Germany/New Zealand 00-800-5325-7000 (Toll Free)
Other Countries XX*-310-323-5722 (Toll Charges Apply)
XX*- Dial U.S. Country Code first
CALL CENTER HOURS: US/Canada 8am – 5pm (Pacific**) Mon – Fri
(Subject to change)
CALL BACK HOURS: Other Countries 8am – 5pm (Pacific**) Mon – Fri
(Subject to change)
Pacific**- Local time in Los Angeles, CA, USA
* Insert correct Country Code
** Local Time based on Los Angeles California USA
INTERNATIONAL CALL BACK HOURS:
If you need to speak with a consumer assistant and cannot contact us during the Call Center hours above, please send an email
or leave a telephone message, including your Name, Telephone Number and the best time for us to contact you during the Call
Back hours above and we will make our every effort to contact you and help answer any of your questions or concerns.
AUSTRALIAN CONSUMER LAW
The Honeywell Trademark is used under license from Honeywell International Inc. Honeywell
International Inc. makes no representations or warranties with respect to this product.
Manufactured by:
LH Licensed Products, Inc.
860 East Sandhill Avenue
Carson, CA 90746
www.honeywellsafes.com
Limited Lifetime Mechanical and Finish Warranty / 1 Year Limited Electronics Warranty
This product comes with a limited lifetime mechanical and finish warranty and a one year limited
electronics warranty to the original residential consumer against defects in material and
workmanship under normal use as long as the original residential purchaser occupies the
residential premises upon which the product was originally installed.
ORIGINAL RESIDENTIAL CONSUMER
This warranty is not transferable, and applies to the original purchaser only, as long as the original
purchaser occupies the residential premises upon which the product(s) was originally installed. Proof
of purchase (original sales receipt) and ownership must accompany all warranty claims.
All non-homeowner purchasers (including purchasers for industrial, commercial and business use) are
not covered under the terms of this warranty.
WHAT IS NOT COVERED
This warranty is null and void if the product was used for purposes for which it was not designed. This
warranty DOES NOT COVER normal wear and tear of parts or damage resulting from any of the
following: negligent use, misuse or abuse of the product, or use contrary to or in violation of written
instructions provided by LH Licensed Products, Inc. Further, this warranty does not cover Acts of God,
such as fire, flood, hurricanes and tornadoes. This warranty DOES NOT COVER scratches,
abrasions, deterioration due to the use of paints, solvents or use of cleaners containing abrasives,
alcohol or other solvents, whether performed by a contractor, service company, or yourself. This
warranty DOES NOT COVER product(s) used in commercial
applications, used in common area applications, disassembly, repair or alteration by anyone other than
LH Licensed Products, Inc., improper installation or exposure to extremes of heat or humidity. This
warranty DOES NOT COVER any losses, injuries to persons or loss of property, general damages or
costs, and shipping and freight expenses required to return product(s) to
LH Licensed Products, Inc. LH Licensed Products, Inc. shall not be liable for any indirect, incidental or
consequential damages of any nature relating to this lock. LH Licensed Products, Inc. is also not
responsible for costs associated with removing or reinstalling the product.
ADDITIONAL TERMS
LH Licensed Products, Inc. does not authorize any person to create for it any obligation or
liability in connection with the Product. LH Licensed Products, Inc.’s maximum liability here
under is limited to the original purchase price of the Product. No action arising out of any claimed
breach of this warranty by LH Licensed Products, Inc. may be brought by the original residential
purchaser more than one (1) year after the cause of action has arisen.
Our goods come with guarantees that cannot be excluded under the Australian Consumer Law. You are
entitled to a replacement or refund for a major failure and for compensation for any other reasonably
foreseeable loss or damage. You are also entitled to have the goods repaired or replaced if the goods
fail to be of acceptable quality and the failure does not amount to a major failure.
M8635302 E V2
Read this manual carefully before
installing and operating!
J
C
Screw Mounting Post (J)
into holes on Mounting Plate (C).
"Loading the manual" means you need to wait until the file loads and becomes available for online reading. Some manuals are very large, and the time they take to appear depends on your internet speed.