Page 2 - Contents
EN 2 Contents 1. Important Safety Instruction .......................................................................................................... 3 1.1 Safety .........................................................................................................................................
Page 4 - Identifying the Parts; Wireless Subwoofer
EN 6 3 4 5 TOP BACK 3. Identifying the Parts 3.1 Soundbar 1 Remote Control Sensor Receive signal from the remote control. 2 Display Window Show the current status. 3 (ON/OFF) button S w i t c h t h e s o u n d b a r b e t w e e n O N a n d Standby mode. 4 (SOURCE) button Select the play function. 5 ...
Page 5 - SURR; Prepare the Remote Control
EN 6 3 4 5 TOP BACK 3. Identifying the Parts 3.1 Soundbar 1 Remote Control Sensor Receive signal from the remote control. 2 Display Window Show the current status. 3 (ON/OFF) button S w i t c h t h e s o u n d b a r b e t w e e n O N a n d Standby mode. 4 (SOURCE) button Select the play function. 5 ...
Page 6 - Placement and Mounting; WARNING
EN 8 1 2 3 670 mm / 26.4” 5. Placement and Mounting 5.1 Placement A If your TV is placed on a table, you can place the soundbar on the table directly in front of the TV stand, centered with the TV screen. B I f your T V is attached to a wall, you can mount the soundbar on the wall directly below the...
Page 7 - Use the HDMI ARC Socket; HDMI ARC socket to the HDMI ARC socket; Use the Hisense EzPlay Function
EN 8 1 2 3 670 mm / 26.4” 5. Placement and Mounting 5.1 Placement A If your TV is placed on a table, you can place the soundbar on the table directly in front of the TV stand, centered with the TV screen. B I f your T V is attached to a wall, you can mount the soundbar on the wall directly below the...
Page 8 - Use the OPTICAL Socket; PCM or Dolby Digital (Refer to the user manual; Use the AUX Socket; Soundbar; Pair up with the Subwoofer; Automatic pairing; LED State
EN 10 6.4 Use the OPTICAL Socket - Use the OPTICAL cable to connect the TV’s O P T I C A L O U T s o c k e t a n d t h e O P T I C A L socket on the soundbar. 56:/)'2 .*3/'8) 56:/)'2 .*3/ '8) .KGJVNUTK B A Tip:The Soundbar may not be able to decode all digital audio formats from the input source. In...
Page 10 - Adjust the Volume; VOL; Adjust the Brightness; Operation; Tip: The Soundbar may not be able to decode all
EN 12 8.3 Select Modes Press the (SOURCE) button repeatedly on the soundbar or on the remote control to select the AUX, , OPTICAL, HDMI ARC and USB mode. The selected mode will show on the display.• The selected mode will show on the display. Display Mode arc HDMI ARC Opt OPTICAL BT INNO BT Bluetoot...
Page 11 - First time pairing; Listen to music from Bluetooth Device
EN 12 8.3 Select Modes Press the (SOURCE) button repeatedly on the soundbar or on the remote control to select the AUX, , OPTICAL, HDMI ARC and USB mode. The selected mode will show on the display.• The selected mode will show on the display. Display Mode arc HDMI ARC Opt OPTICAL BT INNO BT Bluetoot...
Page 12 - Use the DEMO mode
EN 14 12. Setup Menu 1. During ON mode, press and hold the button for 3 seconds to open the menu. 2. Select the content with the / buttons. 3. Change the initial values for each of the settings with VOL + / - buttons. 4. Press the button to confirm your selection and exit the settings. • If no butto...
Page 13 - Problem
EN 14 12. Setup Menu 1. During ON mode, press and hold the button for 3 seconds to open the menu. 2. Select the content with the / buttons. 3. Change the initial values for each of the settings with VOL + / - buttons. 4. Press the button to confirm your selection and exit the settings. • If no butto...
Page 14 - Remote Control
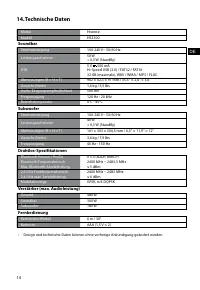
EN 16 15. Specifications Brand Hisense Model HS3100 Soundbar Power Supply 100-240V~ 50/60Hz Power Consumption 50 W < 0.5 W (StandBy) USB 5V 500mA Hi-Speed USB (2.0) / FAT32 / FAT16 32G (max) , WAV / WMA / MP3 / FLAC. Dimension (WxHxD) 902 x 62.3 x 91 mm / 35.5" x 2.4" x 3.6" Net weigh...
Page 15 - conserver pour référence ultérieure.; Barre de son 3.1CH avec caisson de basse sans fil
Avant d'utiliser la barre de son, veuillez lire attentivement ce manuel et le conserver pour référence ultérieure. MANUEL D'UTILISATION Barre de son 3.1CH avec caisson de basse sans fil Modèle : HS3100 FR
Page 16 - Table des matières
2 FR Table des matières 1. Consignes de sécurité ...................................................................................................................... 3 1.1 Sécurité ........................................................................................................................
Page 17 - AVIS; Consignes de sécurité
3 FR AVIS RISQUE DE CHOC ÉLECTRIQUE NE PAS OUVRIR Le symbole éclair avec une flèche dans un triangle équilatéral est destiné à alerter l’utilisateur de la présence d’une tension dangereuse non isolée dans le capot du produit qui peut être d’une ampleur suffisante pour constituer un risque de décharg...
Page 18 - MISE EN GARDE relative aux piles
4 FR pour une ventilation suffisante est de 5 cm. 18 Ne pas entraver la ventilation en recouvrant les ouvertures de ventilation avec des objets tels que journaux, nappes de table, rideaux, etc. 19 Ne pas placer de sources de flammes nues, comme des chandelles, sur le produit. 20 Les piles doivent êt...
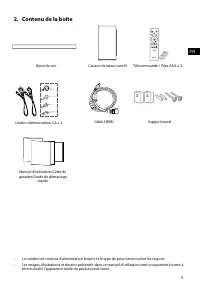
Page 19 - Contenu de la boîte
5 FR 2. Contenu de la boîte • Le nombre de cordons d’alimentation fournis et le type de prise varient selon les régions. • Les images, illustrations et dessins présentés dans ce manuel d'utilisation sont uniquement fournis à titre indicatif, l'apparence réelle du produit peut varier. Câble HDMI Barr...
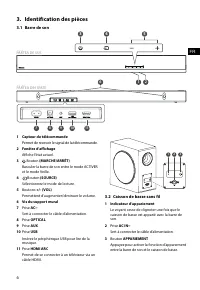
Page 20 - Identification des pièces; Caisson de basse sans fil
6 FR 3 4 5 TOP BACK 3. Identification des pièces 3.1 Barre de son 1 Capteur de télécommande Permet de recevoir le signal de la télécommande. 2 Fenêtre d’affichage Affiche l’état actuel. 3 Bouton (MARCHE/ARRÊT) Basculer la barre de son entre le mode ACTIVER et le mode Veille. 4 Bouton (SOURCE) Sélect...
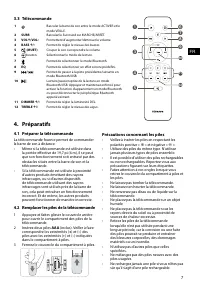
Page 21 - Préparer la télécommande; AAA; Précautions concernant les piles
7 FR 11 10 12 3.3 Télécommande 1 Basculer la barre de son entre le mode ACTIVER et le mode VEILLE. 2 SURR Basculez le Surround sur MARCHE/ARRÊT. 3 VOL + /VOL - Permettent d’augmenter/diminuer le volume. 4 BASS + / - Permet de régler le niveau des basses. 5 (MUET) Couper le son ou reprendre le volume...
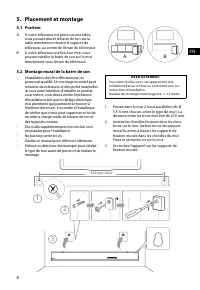
Page 22 - Placement et montage; Montage mural de la barre de son; AVERTISSEMENT
8 FR 5. Placement et montage 5.1 Position A Si votre téléviseur est placé sur une table, vous pouvez placer la barre de son sur la table directement devant le support de téléviseur, au centre de l’écran du téléviseur. B Si votre téléviseur est fixé à un mur, vous pouvez installer la barre de son sur...
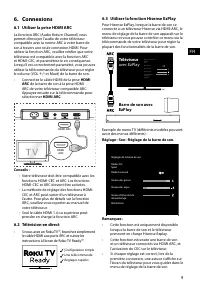
Page 23 - Utiliser la prise HDMI ARC; HDMI; Télévision en direct; Téléviseur; avec EzPlay
9 FR 6. Connexions 6.1 Utiliser la prise HDMI ARC La fonction ARC (Audio Return Channel) vous permet d’envoyer l’audio de votre téléviseur compatible avec la norme ARC à votre barre de son à travers une seule connexion HDMI. Pour utiliser la fonction ARC, veuillez vérifier que votre téléviseur est c...
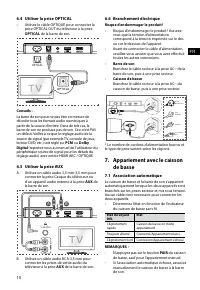
Page 24 - Branchement électrique; Appariement avec le caisson; Association automatique; Utiliser la prise OPTICAL
10 FR 6.6 Branchement électrique Risque d'endommager le produit ! • Risque d'endommager le produit ! Assurez- vous que la tension d’alimentation correspond à la tension imprimée sur le dos ou sur le dessous de l’appareil. • Avant de connecter le câble d’alimentation, veuillez-vous assurer que vous a...
Page 25 - Association manuelle; Fonctionnement de base; Fonction de mise en veille
11 FR 7.2 Association manuelle 1. Assurez-vous que tous les câbles sont bien connectés et que la barre de son est en mode veille. 2. Appuyez et maintenez enfoncé le bouton PAIR au dos du caisson de basse pendant quelques secondes. Le caisson de basse passera en mode appariement et l’indicateur d’app...
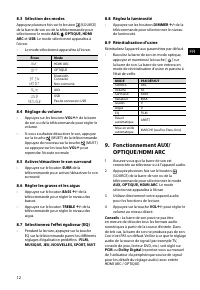
Page 26 - Sélection des modes; Réglage du volume
12 FR 8.3 Sélection des modes Appuyez plusieurs fois sur le bouton (SOURCE) de la barre de son ou de la télécommande pour sélectionner le mode AUX, , OPTIQUE, HDMI ARC et USB . Le mode sélectionné apparaîtra à l’écran.• Le mode sélectionné apparaîtra à l’écran. Écran Mode HDMI ARC OPTIQUEBluetooth C...
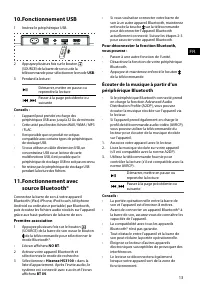
Page 27 - Fonctionnement USB; USB; Fonctionnement avec; Première association; NO BT; Pour déconnecter la fonction Bluetooth,; Écouter de la musique à partir d’un
13 FR 10. Fonctionnement USB 1 Insérez le périphérique USB. 2 Appuyez plusieurs fois sur le bouton (SOURCE) de la barre de son ou de la télécommande pour sélectionner le mode USB . 3 Pendant la lecture : Démarrer, mettre en pause ou reprendre la lecture , Passer à la page précédente ou suivante Cons...
Page 28 - Utilisation du mode DÉMO
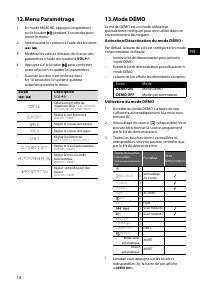
14 FR 12. Menu Paramétrage 1. En mode MARCHE, appuyez longuement sur le bouton pendant 3 secondes pour ouvrir le menu. 2. Sélectionnez le contenu à l’aide des boutons / . 3. Modifiez les valeurs initiales de chacun des paramètres à l’aide des boutons VOL + / - . 4. Appuyez sur le bouton pour confirm...
Page 30 - Barre de son; Télécommande
16 FR 15. Spécifications Marque Hisense Modèle HS3100 Barre de son Alimentation électrique 100-240 V~ 50/60 Hz Consommation d’énergie 50 W < 0,5 W (Veille) USB 5 V 500 mA USB haute vitesse (2.0) / FAT32 / FAT16 32 Go (max) , WAV / WMA / MP3 / FLAC. Dimensions (L × H × P) 902 × 62,3 × 91 mm / 35,5...
Page 31 - MANUAL DE USUARIO; Barra de sonido de 3.1 canales con subwoofer inalámbrico
Antes de usar la barra de sonido, lea completamente este manual y consérvelo para futuras referencias. MANUAL DE USUARIO Barra de sonido de 3.1 canales con subwoofer inalámbrico Modelo: HS3100 ES
Page 32 - Contenido
2 ES Contenido 1. Instrucciones importantes de seguridad ....................................................................................... 3 1.1 Seguridad ..............................................................................................................................................
Page 33 - PRECAUCIÓN; Instrucciones importantes de seguridad
3 ES PRECAUCIÓN RIESGO DE DESCARGAS ELÉCTRICAS NO ABRIR El símbolo de relámpago con cabeza de flecha, dentro de un triángulo equilátero tiene como propósito alertar al usuario sobre la presencia de "tensión peligrosa" no aislada dentro del recinto del producto que podría ser de la magnitud s...
Page 34 - Uso de la batería PRECAUCIÓN
4 ES 17 La distancia mínima alrededor del aparato para tener la suficiente ventilación es de 5 cm. 18 La ventilación no debe estar bloqueada cubriendo las aberturas de ventilación con objetos tales como periódicos, manteles, cortinas, etc. 19 No deben colocarse fuentes de flamas abiertas, tales como...
Page 35 - Contenido de la caja
5 ES 2. Contenido de la caja • La cantidad de cable de alimentación y el tipo de enchufe varían según la región. • Las imágenes, ilustraciones y dibujos que se muestran en este manual del usuario son solo para referencia, el producto real puede variar en apariencia. Cable HDMI Barra de sonido Soport...
Page 36 - Identificación de las piezas; Barra de sonido
6 ES 3 4 5 TOP BACK 3. Identificación de las piezas 3.1 Barra de sonido 1 Sensor del mando a distancia Recibir la señal del mando a distancia. 2 Ventana de visualización Mostrar estado actual. 3 Botón (ENCENDIDO/APAGADO) Cambie la barra de sonido entre el modo Encendido y En espera. 4 Botón (FUENTE)...
Page 37 - Mando a distancia; Preparar el mando a distancia; Precauciones relacionadas con las baterías
7 ES 11 10 12 3.3 Mando a distancia 1 Cambie la barra de sonido entre el modo Encendido y EN ESPERA. 2 SURR Alternar el modo envolvente entre ACTIVAR / DESACTIVAR. 3 VOL + /VOL - Aumentar/disminuir el nivel de volumen. 4 BASS + / - Ajustar el nivel de graves. 5 (SILENCIAR) Silenciar o reactivar el s...
Page 38 - Colocación y montaje; Montaje en pared de la barra de sonido; ADVERTENCIA
8 ES 5. Colocación y montaje 5.1 Colocación A Si su TV está colocado sobre una mesa, puede colocar la barra de sonido en la mesa directamente frente al soporte del TV, centrada con la pantalla del TV. B Si su TV está fijado a una pared, puede montar la barra de sonido en la pared directamente debajo...
Page 39 - Utilice la toma HDMI ARC; HDMI ARC; Use la función Hisense EzPlay; TV; con
9 ES 6. Conexiones 6.1 Utilice la toma HDMI ARC La función ARC (Canal de retorno de audio) le permite enviar audio desde su TV compatible con ARC a su barra de sonido a través de una sola conexión HDMI. Para disfrutar de la función ARC, asegúrese de que su TV es compatible tanto con HDMI-CEC y ARC y...
Page 40 - Conexión de alimentación; Emparejar el Subwoofer; Emparejamiento automático; Estado del; Uso de la toma OPTICAL
10 ES 6.6 Conexión de alimentación ¡Riesgo de daños al producto! • ¡Riesgo de daños al producto! Asegúrese de que el voltaje de la fuente de alimentación corresponda al voltaje impreso en la parte posterior o inferior de la barra de sonido. • Antes de conectar el cable de alimentación de CA, asegúre...
Page 41 - Emparejamiento manual; PAIR; reactivación automática; Para desactivar esta función, siga estos pasos:
11 ES 7.2 Emparejamiento manual 1. Asegúrese de que todos los cables estén bien conectados y que la barra de sonido esté en el modo de espera. 2. Mantenga pulsado el botón PAIR situado en la parte posterior del subwoofer durante unos segundos. El subwoofer entrará en el modo de emparejamiento y el i...
Page 43 - Funcionamiento Bluetooth®; Emparejamiento por primera vez; Para desconectar la función Bluetooth,; Escuchar música de un dispositivo
13 ES 10. Operación de USB 1 Inserte el dispositivo USB. 2 Presione el botón (FUENTE) repetidamente en la barra de sonido o en el mando a distancia para seleccionar el modo USB . 3 Durante la reproducción: Inicie, pause o reanude la reproducción , Salta a la pista anterior o siguiente Consejos: • La...
Page 44 - Menú de configuración; Usar el modo DEMO
14 ES 12. Menú de configuración 1. Durante el modo de ENCENDIDO, mantenga pulsado el botón durante 3 segundos para abrir el menú. 2. Seleccione el contenido con los botones / . 3. Cambie los valores iniciales de cada uno de los ajustes con los botones VOL + / - . 4. Presione el botón para confirmar ...
Page 45 - Solución de problemas; Problema
15 ES 14. Solución de problemas Para mantener la garantía válida, nunca intente reparar el sistema usted mismo. Si tiene problemas al utilizar esta barra de sonido, verifique los siguientes puntos antes de solicitar servicio. Problema Solución No hay alimentación • Asegúrese de que el cable de CA es...
Page 46 - Barra de sonido; Mando a distancia
16 ES 15. Especificaciones Marca Hisense Modelo HS3100 Barra de sonido Suministro de energía 100-240 V~ 50/60 Hz Consumo de energía 50 W < 0,5 W (En espera) USB 5 V 500 mA USB de alta velocidad (2.0) / FAT32 / FAT16 32 GB (máx), WAV / WMA / MP3 / FLAC. Dimensión (An × Al × P) 902 × 62,3 × 91 mm /...
Page 47 - MANUAL DO UTILIZADOR; Barra de som 3.1 Canais com subwoofer sem fios
Antes de utilizar a barra de som, leia cuidadosamente este manual e guarde para futuras consultas. MANUAL DO UTILIZADOR Barra de som 3.1 Canais com subwoofer sem fios Modelo: HS3100 PT
Page 48 - Conteúdo
2 PT Conteúdo 1. Instruções de segurança importantes ............................................................................................ 3 1.1 Segurança .............................................................................................................................................
Page 49 - CUIDADO; Instruções de segurança importantes
3 PT CUIDADO RISCO DE CHOQUE ELÉTRICO NÃO ABRIR O relâmpago com uma seta, dentro de um triângulo, destina-se a alertar o utilizador da presença de “tensão perigosa” não isolada dentro da estrutura do produto e pode ser de magnitude suficiente para constituir um risco de choque elétrico para as pesso...
Page 50 - CUIDADO com a bateria
4 PT as aberturas de ventilação com itens como jornais, toalhas, cortinados, etc. 19 Não deve colocar fontes de chama viva, como velas acesas em cima do equipamento. 20 As pilhas devem ser recicladas ou eliminadas de acordo com as orientações estatais e locais. 21 Utilização do aparelho em climas mo...
Page 51 - Conteúdos da embalagem
5 PT 2. Conteúdos da embalagem • A quantidade de cabo de alimentação e o tipo de ficha variam de acordo com a região. • As imagens, ilustrações e esquemas apresentados neste Manual do Utilizador servem apenas como referência. O aspeto do produto real pode ser diferente. Barra de som Subwoofer sem fi...
Page 52 - Identificar as peças; Subwoofer sem fios
6 PT 3 4 5 TOP BACK 3. Identificar as peças 3.1 Barra de som 1 Sensor do controlo remoto Sinal de receção do controlo remoto. 2 Janela de visualização Mostra o estado atual. 3 Tecla (LIGAR/DESLIGAR) Colocar a barra de som no modo LIGADO e modo Standby. 4 Tecla (ENTRADA) Seleciona o modo de reproduçã...
Page 53 - Prepare o Controlo remoto; Precauções referentes a pilhas
7 PT 11 10 12 3.3 Controlo remoto 1 Colocar a barra de som no modo LIGADO e modo STANDBY. 2 SURR Colocar o Surround em LIGAR / DESLIGAR. 3 VOL + /VOL - Aumentar/reduzir o nível do volume. 4 BASS + / - Ajustar o nível de baixos. 5 (MUDO) Ligar e desligar o som. 6 tecla Seleciona o modo de reprodução....
Page 54 - Colocação e montagem; Montagem da barra de som na parede; AVISO
8 PT 5. Colocação e montagem 5.1 Colocação A Se a sua TV estiver colocada numa mesa, pode colocar a barra de som diretamente na mesa, em frente do suporte da TV, centrada com o ecrã da TV. B Se a sua TV estiver presa na parede, pode montar a barra de som na parede, diretamente por baixo do ecrã da T...
Page 55 - Utilizar a tomada HDMI ARC; Utilizar Roku TV; com
9 PT 6. Ligações 6.1 Utilizar a tomada HDMI ARC A função ARC (Canal de retorno de áudio) permite-lhe enviar o áudio da sua TV compatível com ARC para a barra de som através de apenas uma ligação HDMI. Para desfrutar da função ARC, certifique-se de que a sua TV é conforme HDMI- CEC e ARC e que está d...
Page 56 - Ligar à alimentação; Emparelhar com o Subwoofer; Emparelhamento automático; Utilizar a tomada OPTICAL
10 PT 6.6 Ligar à alimentação Risco de danos ao produto! • Risco de danos ao produto! Certifique-se de que a tensão da fonte de alimentação corresponde à tensão impressa na traseira ou na parte inferior da barra de som. • Antes de ligar o cabo elétrico, certifique-se de que concluiu todas as outras ...
Page 57 - Emparelhar manual; Funcionamento básico; Wake; Para desativar esta funcionalidade, siga os
11 PT 7.2 Emparelhar manual 1. Certifique-se de que todos os cabos estão bem ligados e que a Barra de som está em modo Standby. 2. Mantenha premida a tecla PAIR na traseira do subwoofer durante alguns segundos. O subwoofer entra em modo emparelhar e o indicador Emparelhar pisca rapidamente. 3. Prima...
Page 59 - Funcionamento USB; Funcionamento Bluetooth®; Emparelhar pela primeira vez; Ouvir música a partir do dispositivo
13 PT 10. Funcionamento USB 1 Insira um dispositivo USB. 2 Prima repetidamente o botão (ENTRADA) na barra de som ou no controlo remoto para selecionar o modo USB . 3 Durante a reprodução: Iniciar, pausar ou retomar a reprodução , Saltar para a faixa anterior ou seguinte Dicas: • O equipamento suport...
Page 60 - Menu Configuração; Utilizar o modo DEMO
14 PT 12. Menu Configuração 1. Durante o modo LIGADO, mantenha premida a tecla durante 3 segundos para abrir o menu. 2. Selecione o conteúdo com os botões / .3. Altere os valores iniciais para cada definição com as teclas VOL + / - . 4. Prima a tecla para confirmar a sua seleção e sair das definiçõe...
Page 61 - Resolução de problemas
15 PT 14. Resolução de problemas Para manter a garantia válida, nunca tente reparar você mesmo o sistema. Se encontrar problemas durante a utilização desta barra de som, verifique os seguintes pontos antes de solicitar a reparação. Problema Solução Sem corrente • Certifique-se de que o cabo CA do eq...
Page 62 - Barra de som; Controlo remoto
16 PT 15. Especificações Marca Hisense Modelo HS3100 Barra de som Fonte de alimentação 100 - 240 V~ 50/60 Hz Consumo elétrico 50 W < 0,5 W (StandBy) USB 5 V 500 mA Hi-Speed USB (2.0) / FAT32 / FAT16 32 G (máx.), WAV / WMA / MP3 / FLAC. Dimensões (L × A × P) 902 × 62,3 × 91 mm / 35,5" × 2,4�...
Page 63 - Bevor Sie die Soundbar verwenden, lesen Sie bitte dieses Handbuch; BENUTZERHANDBUCH
Bevor Sie die Soundbar verwenden, lesen Sie bitte dieses Handbuch gründlich durch und bewahren Sie es zum späteren Nachschlagen auf. BENUTZERHANDBUCH 3.1-Kanal Soundbar mit Drahtlos-Subwoofer Modell: HS3100 DE
Page 64 - Inhalt
2 DE Inhalt 1. Lieferumfang .................................................................................................................................... 32. Bedienelemente und Funktionen ................................................................................................... 4 2.1...
Page 66 - Bedienelemente und Funktionen
4 DE 3 4 5 TOP BACK 2. Bedienelemente und Funktionen 2.1 Soundbar 1 Sensor für die Fernbedienung Empfängt Signale von der Fernbedienung. 2 Display Hier wird der aktuelle Status angezeigt. 3 (EIN/AUS) Schaltet die Soundbar ein und in den Standby-Modus aus. 4 (QUELLE) Wählt die Wiedergabefunktion. 5 +...
Page 67 - Fernbedienung vorbereiten; Sicherheitshinweise zu Akkus/Batterien
5 DE 11 10 12 2.3 Fernbedienung 1 Schaltet die Soundbar ein und in den Standby-Modus aus. 2 SURR Surround EIN/AUS umschalten. 3 VOL + /VOL - Hier erhöhen/verringern Sie den Lautstärkepegel. 4 BASS + / - Hier stellen Sie die Bässe ein. 5 (STUMM) Hier schalten Sie den Ton stumm oder heben Sie die Stum...
Page 68 - Aufstellung und Montage; Wandmontage der Soundbar; WARNUNG
6 DE 4. Aufstellung und Montage 4.1 Aufstellung A Wenn Ihr Fernseher auf einem Tisch steht, können Sie die Soundbar direkt mittig vor dem Fernseher auf den Tisch stellen. B Wenn Ihr Fernseher an der Wand befestigt ist, können Sie die Soundbar direkt unter dem Fernseher an der Wand montieren. 4.2 Wan...
Page 69 - Soundbar mit EzPlay; mit EzPlay
7 DE 5. Anschlüsse 5.1 HDMI ARC-Eingang verwenden Die ARC-Funktion (Audio Return Channel) ermöglicht es Ihnen, Audiosignale von Ihrem ARC-kompatiblen Fernseher über einen einzigen HDMI-Anschluss an Ihre Soundbar zu senden. Um die ARC-Funktion nutzen zu können, muss Ihr Fernseher sowohl HDMI-CEC- als...
Page 70 - Subwoofer koppeln; Automatische Kopplung
8 DE 5.6 Stromanschluss Gefahr von Produktschäden! • Gefahr von Produktschäden! Achten Sie darauf, dass die Netzspannung mit der Spannung übereinstimmt, die auf dem Typenschild auf der Unter- oder Rückseite des Geräts angegeben ist. • Bevor Sie das Netzkabel anschließen, vergewissern Sie sich, dass ...
Page 71 - Manuelle Kopplung; Bedienungshinweise
9 DE koppeln Sie den Subwoofer manuell mit der Soundbar. 6.2 Manuelle Kopplung 1. Vergewissern Sie sich, dass alle Kabel ordnungsgemäß angeschlossen sind und dass sich die Soundbar im Standby-Modus befindet. 2. Halten Sie die Kopplungstaste PAIR auf der Rückseite des Subwoofers für einige Sekunden g...
Page 73 - Erste Kopplung; Um die Bluetooth-Funktion zu deaktivieren,
11 DE 9. USB-Wiedergabe 1 Schließen Sie ein USB-Speichermedium an. 2 Drücken Sie mehrmals (QUELLE) auf der Soundbar oder auf der Fernbedienung, um den USB -Modus zu wählen. 3 Während der Wiedergabe gehen Sie wie folgt vor: Wiedergabe starten, unterbrechen oder fortsetzen. , Zum vorherigen oder nächs...
Page 76 - Fernbedienung
14 DE 14. Technische Daten Marke Hisense Modell HS3100 Soundbar Stromversorgung 100-240 V~ 50/60 Hz Leistungsaufnahme 50 W < 0,5 W (StandBy) USB 5 V 500 mA Hi-Speed USB (2.0) / FAT32 / FAT16 32 GB (maximale), WAV / WMA / MP3 / FLAC. Abmessungen (B × H × T) 902 × 62,3 × 91 mm / 35,5'' × 2,4'' × 3,...
Page 77 - conservarlo per future consultazioni.; Soundbar con Subwoofer wireless da 3.1 canali
Prima di utilizzare la soundbar, leggere attentamente questo manuale e conservarlo per future consultazioni. MANUALE DELL'UTENTE Soundbar con Subwoofer wireless da 3.1 canali Modello: HS3100 IT
Page 78 - Contenuti
2 IT Contenuti 1. Cosa c’è nella confezione ................................................................................................................. 32. Identificare le parti .......................................................................................................................
Page 79 - Cosa c’è nella confezione
3 IT 1. Cosa c’è nella confezione • La lunghezza del cavo di alimentazione ed il tipo di spina variano in base alla regione. • Le immagini, le illustrazioni, e i disegni mostrati su questo Manuale dell'utente sono solo per riferimento, il prodotto effettivo potrebbe variare nell'aspetto. Cavo HDMI S...
Page 80 - Identificare le parti; Subwoofer wireless
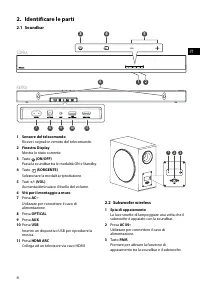
4 IT 3 4 5 TOP BACK 2. Identificare le parti 2.1 Soundbar 1 Sensore del telecomando Riceve i segnali in remoto del telecomando. 2 Finestra Display Mostra lo stato corrente. 3 Tasto (ON/OFF) Passa la soundbar tra le modalità ON e Standby. 4 Tasto (SORGENTE) Selezionare la modalità riproduzione. 5 Tas...
Page 81 - Preparare il telecomando; Precauzioni riguardo le batterie
5 IT 11 10 12 2.3 Telecomando 1 Passa la soundbar tra le modalità ON e STANDBY. 2 SURR Passa il surround tra ON/OFF. 3 VOL+/VOL- Aumenta/diminuisce il livello del volume. 4 BASSI +/- Controllo del livello di bassi. 5 (MUTO) Mette in muto o riattiva l’audio. 6 Tasto Selezionare la modalità riproduzio...
Page 82 - Posizionamento e montaggio; Montaggio a muro della soundbar; AVVISO
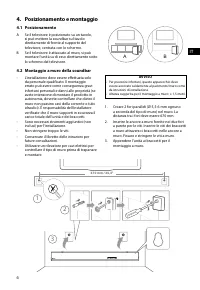
6 IT 4. Posizionamento e montaggio 4.1 Posizionamento A Se il televisore è posizionato su un tavolo, si può mettere la soundbar sul tavolo direttamente di fronte al supporto del televisore, centrata con lo schermo. B Se il televisore è attaccato al muro, si può montare l’unità su di esso direttament...
Page 83 - Utilizzare la presa HDMI ARC; Utilizzare Roku TV; Utilizzare la funzione Hisense EzPlay; Impostazioni – audio – Impostazioni Soundbar.
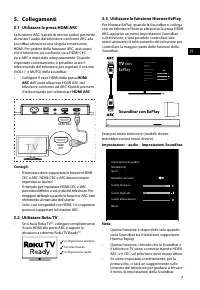
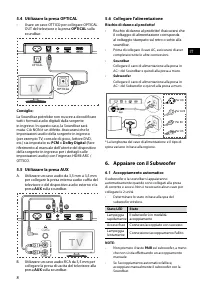
7 IT 5. Collegamenti 5.1 Utilizzare la presa HDMI ARC La funzione ARC (canale di ritorno audio) permette di inviare l’audio dal televisore conforme ARC alla soundbar attraverso una singola connessione HDMI. Per godere della funzione ARC, assicurarsi che il televisore sia conforme sia a HDMI-CEC sia ...
Page 84 - Appaiare con il Subwoofer; Utilizzare la presa OPTICAL
8 IT 5.6 Collegare l'alimentazione Rischio di danno al prodotto! • Rischio di danno al prodotto! Assicurarsi che il voltaggio di alimentazione corrisponda al voltaggio stampato sul retro o sotto alla soundbar. • Prima di collegare il cavo AC, assicurarsi di aver completato tutte le altre connessioni...
Page 85 - Accoppiamento manuale; Operazioni di base; accensione automatica; MENU
9 IT 6.2 Accoppiamento manuale 1. Assicurarsi che tutti i cavi siano ben connessi e che la Soundbar sia in modalità Standby. 2. Tenere premuto il tasto PAIR sul retro del subwoofer per alcuni secondi. Il subwoofer entrerà in modalità accoppiamento e la spia di accoppiamento sul subwoofer lampeggerà ...
Page 86 - ARC
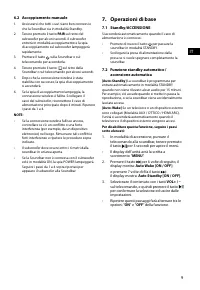
10 IT 7.3 Selezionare Modalità Premere ripetutamente il tasto (SORGENTE) sulla soundbar o sul telecomando per selezionare le modalità AUX, , OTTICA, HDMI ARC e USB . La modalità selezionata apparirà sul display.• La modalità selezionata apparirà sul display. Display Modalità HDMI ARC OTTICABluetooth...
Page 87 - Utilizzo Bluetooth®; Primo appaiamento; Per scollegare la funzione Bluetooth, si può:; Ascoltare la musica da dispositivi
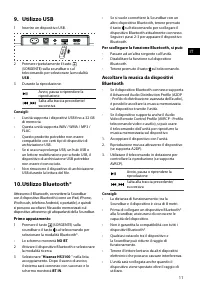
11 IT 9. Utilizzo USB 1 Inserire un dispositivo USB. 2 Premere ripetutamente il tasto (SORGENTE) sulla soundbar o sul telecomando per selezionare la modalità USB . 3 Durante la riproduzione: Avvio, pausa o riprendere la riproduzione , Salta alla traccia precedente/ successiva Consigli: • L’unità sup...
Page 88 - Menù configurazione; Utilizzare la modalità DEMO
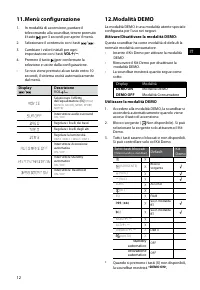
12 IT 11. Menù configurazione 1. In modalità di accensione, puntare il telecomando alla soundbar, tenere premuto il tasto per 3 secondi per aprire il menù. 2. Selezionare il contenuto con i tasti / .3. Cambiare i valori iniziali per ogni impostazione con i tasti VOL + / - . 4. Premere il tasto per c...
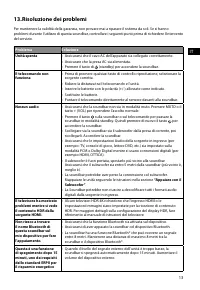
Page 89 - Risoluzione dei problemi
13 IT 13. Risoluzione dei problemi Per mantenere la validità della garanzia, non provare mai a riparare il sistema da soli. Se si hanno problemi durante l’utilizzo di questa soundbar, controllare i seguenti punti prima di richiedere l’intervento del servizio. Problema Soluzione Unità spenta • Assicu...
Page 90 - Telecomando
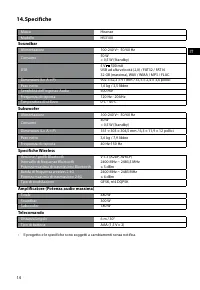
14 IT 14. Specifiche Marca Hisense Modello HS3100 Soundbar Alimentazione 100-240 V~ 50/60 Hz Consumo 50 W < 0,5 W (Standby) USB 5 V 500 mA USB ad alta velocità (2,0) / FAT32 / FAT16 32 GB (massima), WAV / WMA / MP3 / FLAC. Dimensioni (L× A × P) 902 × 62,3 × 91 mm / 35,5 × 2,4 × 3,6 pollici Peso n...
Page 91 - UŽIVATELSKÁ PŘÍRUČKA; kanálový soundbar s bezdrátovým subwooferem
Před tím, než začnete soundbar používat, si pozorně přečtěte tuto příručku a ponechte si ji, abyste do ní mohli znovu nahlédnout. UŽIVATELSKÁ PŘÍRUČKA 3.1 kanálový soundbar s bezdrátovým subwooferem Model: HS3100 CZ
Page 92 - Obsah
2 CZ Obsah 1. Co je v krabici .................................................................................................................................... 32. Identifikace součástí ..................................................................................................................
Page 94 - Identifikace součástí; Bezdrátový subwoofer
4 CZ 3 4 5 TOP BACK 2. Identifikace součástí 2.1 Soundbar 1 Snímač pro dálkový ovladač Přijímá signály z dálkového ovladače. 2 Okénko displeje Zobrazuje aktuální stav. 3 Tlačítko (ZAP./VYP.) Přepínání soundbaru mezi ZAPNUTÝM a pohotovostním režimem. 4 Tlačítko (ZDROJ) Výběr funkce přehrávání. 5 +/- ...
Page 95 - Příprava dálkového ovladače; Opatření týkající se baterií
5 CZ 11 10 12 2.3 Dálkový ovladač 1 Přepínání soundbaru mezi ZAPNUTÝM a POHOTOVOSTNÍM režimem. 2 SURR Přepínání prostorového zvuku na ZAP./VYP.. 3 VOL + /VOL - Zvýšení nebo snížení úrovně hlasitosti. 4 BASS + / - Úprava úrovně basů. 5 (ZTLUMIT) Ztlumení nebo opětovné zapnutí zvuku. 6 tlačítko Výběr ...
Page 96 - Umístění a montáž; Montáž soundbaru na stěnu; UPOZORNĚNÍ
6 CZ 4. Umístění a montáž 4.1 Umístění A Pokud máte televizor položený na stole, můžete soundbar umístit na stůl přímo před stojan televizoru tak, aby byl vzhledem k obrazovce uprostřed. B Pokud máte televizor upevněný na stěně, můžete soundbar uchytit na stěnu přímo pod obrazovku televizoru. 4.2 Mo...
Page 97 - Použití zdířky HDMI ARC; Používání Roku TV; Používání funkce Hisense EzPlay; EzPlay
7 CZ 5. Připojení 5.1 Použití zdířky HDMI ARC Funkce ARC (Audio Return Channel, zpětný zvukový kanál) umožňuje posílat zvuk z televizoru podporujícího ARC do soundbaru pomocí jediného propojení HDMI. Abyste mohli používat funkci ARC, ujistěte se, že váš televizor podporuje funkce HDMI-CEC i ARC a ob...
Page 98 - Připojení napájení; Spárování se subwooferem; Automatické párování; Použití zdířky OPTICAL
8 CZ 5.6 Připojení napájení Nebezpečí poškození výrobku! • Nebezpečí poškození výrobku! Přesvědčte se, že napájecí napětí odpovídá napětí uvedenému na zadní nebo spodní straně soundbaru. • Před připojením napájecího kabelu se přesvědčte, že jste dokončili všechna ostatní propojení. • Soundbar Zapojt...
Page 99 - Základní ovládání; Funkce automatického; Pokud chcete tuto funkci deaktivovat,
9 CZ 6.2 Ruční párování 1. Přesvědčte se, že jsou všechny kabely dobře připojené a že je soundbar v pohotovostním režimu. 2. Stiskněte a několik sekund podržte stisknuté tlačítko PAIR na zadní části subwooferu. Vstoupí do režimu párování a indikátor spárování začne rychle blikat. 3. Stisknutím tlačí...
Page 101 - Používání Bluetooth®; První spárování; Pro odpojení funkce Bluetooth můžete:; Poslech hudby ze zařízení s Bluetooth
11 CZ 9. Ovládání USB 1 Připojte USB zařízení. 2 Opakovaným stisknutím tlačítka (ZDROJ) na soundbaru nebo na dálkovém ovladači vyberte režim USB . 3 Během přehrávání: Spuštění, pozastavení nebo pokračování v přehrávání , Přeskočení na předcházející nebo následující skladbu Tipy: • Přístroj podporuje...
Page 102 - Nabídka Nastavení; Používání PŘEDVÁDĚCÍHO režimu
12 CZ 11. Nabídka Nastavení 1. V ZAPNUTÉM režimu stiskněte a podržte tlačítko po dobu 3 sekund, aby se otevřela nabídka. 2. Vyberte obsah pomocí tlačítek / .3. Změňte výchozí hodnoty jednotlivých nastavení pomocí tlačítek VOL + / - . 4. Stiskněte tlačítko , abyste potvrdili svůj výběr a opustili nas...
Page 104 - Dálkový ovladač
14 CZ 14. Specifikace Značka Hisense Model HS3100 Soundbar Napájení 100 - 240 V~ 50/60 Hz Příkon 50 W < 0,5 W (pohotovostní režim) USB 5 V 500 mA Vysokorychlostní USB (2.0) / FAT32 / FAT16 32 GB (max.), WAV / WMA / MP3 / FLAC. Rozměry (Š × V × H) 902 × 62,3 × 91 mm / 35,5" × 2,4" × 3,6�...
Page 105 - és őrizze meg későbbi felhasználás céljából.; KEZELÉSI UTASÍTÁS; csatornás hangprojektor vezeték nélküli mélysugárzóval
A hangprojektor használata előtt figyelmesen olvassa el ezt a kézikönyvet, és őrizze meg későbbi felhasználás céljából. KEZELÉSI UTASÍTÁS 3.1 csatornás hangprojektor vezeték nélküli mélysugárzóval Modell: HS3100 HU
Page 106 - Tartalomjegyzék
2 HU Tartalomjegyzék 1. Ami a dobozban van ........................................................................................................................ 32. Részek azonosítása ....................................................................................................................
Page 107 - Ami a dobozban van
3 HU 1. Ami a dobozban van • Az áramkábel mennyisége és a dugvilla régiónként eltérő. • A felhasználói kézikönyvben látható képek, illusztrációk és rajzok csak tájékoztató jellegűek, a tényleges termék megjelenése eltérhet. HDMI kábel Hangprojektor Fali konzol Távirányító / 2 db AAA elem Vezeték nél...
Page 108 - Részek azonosítása; Vezeték nélküli mélysugárzó
4 HU 3 4 5 TOP BACK 2. Részek azonosítása 2.1 Hangprojektor 1 Távirányító érzékelő A távirányítótól érkező jeleket fogadja. 2 Kijelző ablak Az aktuális státuszt mutatja. 3 (BE/KI) gomb A hangprojektort a BE és a Készenléti mód között kapcsolja át. 4 (FORRÁS) gomb A lejátszási funkció kiválasztása. 5...
Page 109 - A távirányító előkészítése; Az elemekkel kapcsolatos óvintézkedések
5 HU 11 10 12 2.3 Távirányító 1 A hangprojektort a BEKAPCSOLT és a KÉSZENLÉTI módok között kapcsolja át. 2 SURR A térhatású hangot a BE/KI között kapcsolja át. 3 VOL + /VOL - A hangerő szintjét növeli/csökkenti. 4 BASS + / - A mély hangok szintjének beállítása. 5 (NÉMÍTÁS) A hang némítása vagy a ném...
Page 110 - Elhelyezés és felszerelés; A hangprojektor falra szerelése; FIGYELMEZTETÉS
6 HU 4. Elhelyezés és felszerelés 4.1 Elhelyezés A Ha a TV-t egy asztalra helyezte, az egységet közvetlenül a TV állványa elé teheti, a TV képernyőjével központosítva. B Ha a TV falra van szerelve, a hangprojektort is falra szerelheti közvetlenül a TV képernyője alá. 4.2 A hangprojektor falra szerel...
Page 111 - A HDMI ARC aljzat használata; Roku TV használata
7 HU 5. Csatlakoztatások 5.1 A HDMI ARC aljzat használata Az ARC (Audio Return Channel - hang visszaadási csatorna) funkció azt teszi lehetővé, hogy ARC kompatibilis TV-jéről hangot egyetlen HDMI csatlakozással küldjön a hangprojektorra. Az ARC funkció kihasználásához gondoskodjon arról, hogy a TV k...
Page 112 - Áram csatlakoztatása; Párosítás a mélysugárzóval; Automatikus párosítás; Használja az OPTICAL aljzatot
8 HU 5.6 Áram csatlakoztatása A termék károsodásának a kockázata! • A termék károsodásának a kockázata! Győződjön meg arról, hogy a tápfeszültség megegyezik a hangprojektor hátulján vagy alján feltüntetett feszültséggel. • A hálózati áramkábel csatlakoztatása előtt győződjön meg arról, hogy az össze...
Page 113 - Automatikus készenlét / Automatikus; A funkció letiltásához kövesse az alábbi
9 HU 6.2 Kézi párosítás 1. Győződjön meg arról, hogy az összes kábel megfelelően van csatlakoztatva, és a hangprojektor készenléti módban van. 2. Nyomja meg és tartsa lenyomva néhány másodpercig a PAIR gombot a mélysugárzó hátulján. A mélysugárzó párosítási módba lép, és a párosítás jelzőfénye gyors...
Page 114 - kezelés
10 HU 7.3 Üzemmódok kiválasztása Nyomja meg a (FORRÁS) gombot ismétlődően a hangprojektoron vagy a távirányítón, hogy válasszon az AUX, , OPTIKAI, HDMI ARC és USB üzemmódok közül. A kiválasztott üzemmód a kijelzőn megjelenik.• A kiválasztott üzemmód a kijelzőn megjelenik. Kijelzés Mód HDMI ARC OPTIK...
Page 115 - Bluetooth® működtetés; Első párosítás; A Bluetooth funkció leválasztásához a; Zenehallgatás Bluetooth készülékről
11 HU 9. USB kezelés 1 Dugjon be egy USB eszközt. 2 Nyomja meg a (FORRÁS) gombot ismétlődően a hangprojektoron vagy a távirányítón, hogy kiválassza az USB módot. 3 Lejátszás közben: A lejátszás elindítása, szüneteltetése vagy újrakezdése , Az előző vagy a következő sávra lépés Tippek: • Az egység le...
Page 116 - A DEMÓ mód használata
12 HU 11. Beállítás menü 1. BE üzemmódban nyomja meg és tartsa lenyomva a gombot 3 másodpercig a menü megnyitásához. 2. Tartalom kiválasztása a / gombokkal.3. Módosítsa az egyes beállítások kezdeti értékeit a VOL +/- gombokkal. 4. Nyomja meg a gombot a választás megerősítéséhez és a beállításokból v...
Page 118 - Hangprojektor; Távirányító
14 HU 14. Műszaki adatok Márka Hisense Modell HS3100 Hangprojektor Áramellátás 100-240 V~ 50/60 Hz Energiafogyasztás 50 W < 0,5 W (Készenlét) USB 5 V 500 mA Nagysebességű USB (2.0) / FAT32 / FAT16 32 GB (max), WAV / WMA / MP3 / FLAC. Méretek (szélesség × magasság × mélység) 902 × 62,3 × 91 mm / 3...