Hamilton Beach 70740 - User Manual
Hamilton Beach 70740 Food Processor – User Manual, read for free online in PDF format. We hope this helps you resolve any issues you may have. If you have further questions, please contact us through the contact form.
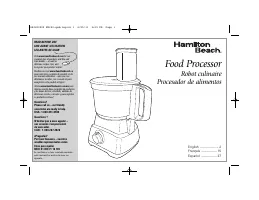


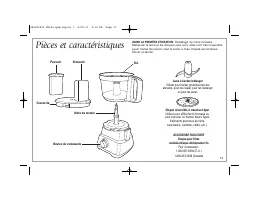
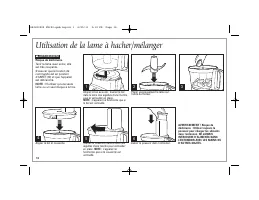
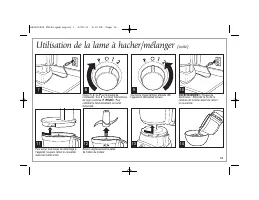
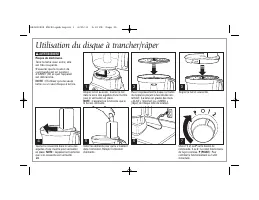
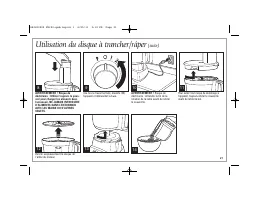
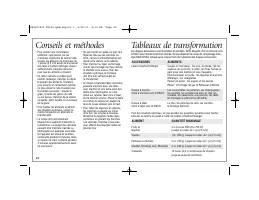
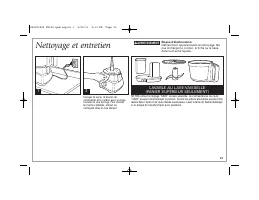


Table of Contents:
- Page 3 – OTHER CONSUMER SAFETY INFORMATION
- Page 4 – Parts and Features
- Page 5 – How to Use Chopping/Mixing Blade
- Page 7 – How to Use Slicing/Shredding Disc
- Page 10 – Cleaning and Care
- Page 12 – Troubleshooting
- Page 13 – Notes
- Page 14 – Limited Warranty
- Page 16 – AUTRES CONSIGNES DE SÉCURITÉ POUR LE CONSOMMATEUR
- Page 17 – Pièces et caractéristiques
- Page 18 – Utilisation de la lame à hacher/mélanger
- Page 20 – Utilisation du disque à trancher/râper
- Page 23 – Nettoyage et entretien
- Page 24 – Rangement compact
- Page 25 – Dépannage
- Page 26 – Garantie limitée
- Page 28 – OTRA INFORMACIÓN DE SEGURIDAD PARA EL CLIENTE
- Page 29 – Partes y Características
- Page 30 – Cómo Usar la Cuchilla Picadora/Mezcladora
- Page 32 – Cómo Usar el Disco para Rebanar/Rallar
- Page 35 – Limpieza y Cuidado
- Page 36 – Almacenamiento con Economía de Espacio
- Page 37 – Resolviendo Problemas
Food Processor
Robot culinaire
Procesador de alimentos
English ...................... 2
Français .................. 15
Español .................. 27
READ BEFORE USE
LIRE AVANT UTILISATION
LEA ANTES DE USAR
Questions?
Please call us – our friendly
associates are ready to help.
USA: 1.800.851.8900
¿Preguntas?
Por favor llámenos – nuestros
amables representantes están
listos para ayudar.
MEX: 01 800 71 16 100
Le invitamos a leer cuidadosamente
este instructivo antes de usar su
aparato.
Visit
www.hamiltonbeach.com
for our
complete line of products and Use and
Care Guides – as well as
delicious recipes, tips, and
to register your product online!
Rendez-vous sur
www.hamiltonbeach.ca
pour notre liste complète de produits et de
nos manuels utilisateur – ainsi que nos
délicieuses recettes, nos conseils et pour
enregistrer votre produit en ligne !
¡Visite
www.hamiltonbeach.com.mx
para
obtener nuestra línea completa de productos
y las Guías de Uso y Cuidado, además de
deliciosas recetas, consejos y para registrar
su producto en línea!
Questions ?
N’hésitez pas à nous appeler –
nos associés s’empresseront
de vous aider.
CAN : 1.800.267.2826
840203900 ENv02.qxd:Layout 1 4/25/11 2:09 PM Page 1
"Loading the manual" means you need to wait until the file loads and becomes available for online reading. Some manuals are very large, and the time they take to appear depends on your internet speed.
Summary
3 OTHER CONSUMER SAFETY INFORMATION This product is intended for household use only. WARNING! Shock Hazard: This appliance has a polarized plug (one wide blade) that reduces the risk of electric shock. The plug fits only one way into a polarized outlet. Do not defeat the safety purpose of the plug b...
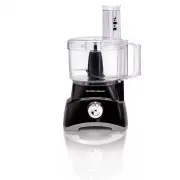
Parts and Features Lid Control Knob Food Chute Reversible Slicing/Shredding Disc Use to shred cheese or to slice or shred a variety of foods (such as potatoes, pepperoni, carrots, celery). Chopping/Mixing Blade Use to coarsely chop, mince, mix, or puree food. Bowl Motor Shaft BEFORE FIRST USE: Unpac...
How to Use Chopping/Mixing Blade 1 2 3 Align bowl and base. Turn bowlclockwise to lock into place. NOTE: Unit will not work unless bowl is locked. Carefully place blade onto motorshaft. 4 Align lid and bowl. 5 6 Turn lid clockwise to lock intoplace. NOTE: Unit will not work unless lid is locked. Lac...