Page 3 - Other Consumer Safety Information; SAVE THESE INSTRUCTIONS
3 Other Consumer Safety Information This appliance is intended for household use only. w WARNING Electrical Shock Hazard: This appliance is provided with a polarized plug (one wide blade) to reduce the risk of electric shock. The plug fits only one way into a polarized outlet. Do not defeat the safe...
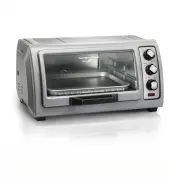
Page 4 - Parts and Features
4 Parts and Features HIGH RACK POSITION: toasting and broiling LOW RACK POSITION:baking To order parts: US: 1.800.851.8900 www.hamiltonbeach.com Canada: 1.800.267.2826 Mexico: 01 800 71 16 100 Slide-Out Crumb Tray Toasting/Baking/Broiling Oven Rack Oven Door Baking/Broiling Pan Temperature Dial Func...
Page 5 - How to Toast
5 How to Toast 2 4 1 Plug in toaster oven. Place oven rack in HIGH RACK POSITION (shown) for toast, English muffins, bagels, and waffles. Turn Temperature Dial to maximum temperature. Place food in oven. • When toasting only two slices of bread, place bread in middle of oven rack to get even toastin...
Page 6 - How to Bake
6 How to Bake 2 4 1 7 6 Rotate Timer past 10 and let oven preheat for 5 minutes prior to placing food in oven. Place the baking pan on oven rack. Set Timer to desired time by rotating Timer past 10 and then to desired baking time or rotate Timer to s Tay o n while pressing in and holding the buttons...
Page 8 - Convection Bake
8 Convection Bake (on select models) Plug in toaster oven. Place oven rack on LOW RACK POSITION. Turn Temperature Dial to desired temperature. TIPS FOR USING CONVECTION BAKE NOTE: Convection Bake forces more air to circulate in the oven, so food will cook faster than the conventional B ake setting. ...
Page 9 - How to Broil
9 How to Broil 2 4 1 5 Plug in toaster oven. Slide oven rack into HIGH RACK POSITION. Insert baking/broiling pan in slots under the oven rack and add food to rack. DO NOT PREHEAT OVEN. Turn Temperature Dial to B roil /T oasT . When finished, turn Timer dial to o ff ( ) and unplug. w WARNING Fire Haz...
Page 10 - Care and Cleaning
10 Care and Cleaning To clean inside of oven, wipe oven walls, bottom of oven, and glass door with a damp, soapy cloth. Repeat with a damp, clean cloth. For stubborn stains, use a plastic scouring pad. Wipe outside of oven with a damp cloth. Do not use abrasive cleansers or metal scouring pads. 2 4 ...
Page 11 - Troubleshooting
11 Troubleshooting Visit www.hamiltonbeach.com for our complete line of products and Use and Care Guides – as well as delicious recipes, tips, and to register your product online! PROBLEM PROBABLE CAUSE/SOLUTION Oven will not heat. • Check to make sure electrical outlet is working and the oven is pl...
Page 12 - Limited Warranty
12 This warranty applies to products purchased and used in the U.S. and Canada. This is the only express warranty for this product and is in lieu of any other warranty or condition.This product is warranted to be free from defects in material and workmanship for a period of five (5) years from the d...
Page 14 - CONSERVER CES INSTRUCTIONS; Renseignements de sécurité aux consommateurs
14 CONSERVER CES INSTRUCTIONS Renseignements de sécurité aux consommateurs Cet appareil est destiné à un usage domestique uniquement. w AVERTISSEMENT Risque de choc électrique : Cet appareil est fourni avec une fiche polarisée (une broche large) pour réduire le risque d’électrocution. Cette fiche n’...
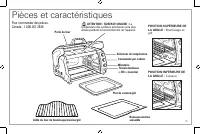
Page 15 - Pièces et caractéristiques
15 Pièces et caractéristiques POSITION SUPÉRIEURE DE LA GRILLE : Brunissage et gril POSITION INFÉRIEURE DE LA GRILLE : Cuisson Ramasse-miettes amovible Grille du four de brunissage/cussion/gril Porte du four Plat de cuisson/gril Sélecteur de température Commande par cadran Minuterie Témoin lumineux ...
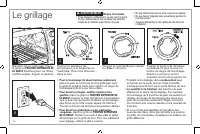
Page 16 - Le grillage
16 Le grillage w AVERTISSEMENT Risque d’incendie. • Si les aliments s’enflamment, ne pas ouvrir la porte du four. Débrancher le four et laisser les aliments s’éteindre et refroidir avant d’ouvrir la porte. • Ne pas fonctionner avec la porte ouverte ou enlevée. • Ne pas laisser l’appareil sans survei...
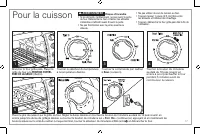
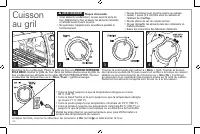
Page 17 - Pour la cuisson
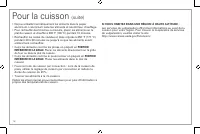
17 Pour la cuisson w AVERTISSEMENT Risque d’incendie. • Si les aliments s’enflamment, ne pas ouvrir la porte du four. Débrancher le four et laisser les aliments s’éteindre et refroidir avant d’ouvrir la porte. • Ne pas fonctionner avec la porte ouverte ou enlevée. • Ne pas utiliser de sac de cuisson...
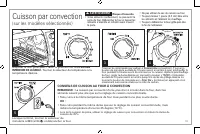
Page 19 - Cuisson par convection
19 w AVERTISSEMENT Risque d’incendie. • Si les aliments s’enflamment, ne pas ouvrir la porte du four. Débrancher le four et laisser les aliments s’éteindre et refroidir avant d’ouvrir la porte. • Ne pas utiliser de sac de cuisson au four. • Toujours laisser 1 pouce (2,5 cm) libre entre les aliments ...
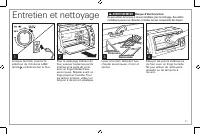
Page 21 - Entretien et nettoyage
21 Entretien et nettoyage w AVERTISSEMENT Risque d’électrocution. Ne pas utiliser de tampon à récurer métallique pour le nettoyage. Des débris métalliques peuvent se détacher et tomber sur des composants électriques. Pour le nettoyage intérieur du four, essuyer toutes les parois internes et la porte...
Page 22 - Dépannage
22 Dépannage Rendez-vous sur www.hamiltonbeach.ca pour notre liste complète de produits et de nos manuels utilisateur – ainsi que nos délicieuses recettes et nos conseils ! PROBLÈME CAUSE POSSIBLE/SOLUTION Le four ne chauffe pas. • Assurer le fonctionnement de la prise murale et le branchement du fo...
Page 23 - Garantie limitée
23 Garantie limitée Cette garantie s’applique aux produits achetés et utilisées aux É.-U. et au Canada. C’est la seule garantie expresse pour ce produit et est en lieu et place de tout autre garantie ou condition.Ce produit est garanti contre tout défaut de matériaux et de main-d’oeuvre pour une pér...
Page 25 - Otra Información de Seguridad para el Cliente; GUARDE ESTAS INSTRUCCIONES
25 25 Otra Información de Seguridad para el Cliente GUARDE ESTAS INSTRUCCIONES Este aparato ha sido diseñado solamente para uso doméstico. w ADVERTENCIA Peligro de Descarga Eléctrica: Este aparato es provisto con un enchufe polarizado (una pata más ancha) para reducir el riesgo de una descarga eléct...
Page 26 - Partes y Características
26 Partes y Características POSICIÓN ALTA DE LA REJILLA: Tostar y Asar POSICIÓN BAJA DE LA REJILLA: Hornear Charola de Migajas Deslizante Rejilla del Horno para Tostar/Hornear/Asar Puerta del Horno Bandeja para Hornear/Asar Selector de Temperatura Marcador de Función Temporizador Luz Indicadora de E...
Page 27 - Como Tostar
27 Como Tostar w ADVERTENCIA Riesgo de Fuego. • Si el contenido prende fuego, no abra la puerta del horno. Desconecte el horno y deje que el contenido deje de quemarse y se enfríe antes de abrir la puerta. • No opere con la puerta abierta o removida. • No deje el aparato desatendido cuando esté func...
Page 28 - Como Cocinar
28 Como Cocinar w ADVERTENCIA Riesgo de Fuego. • Si el contenido prende fuego, no abra la puerta del horno. Desconecte el horno y deje que el contenido deje de quemarse y se enfríe antes de abrir la puerta. • No use bolsas para cocinar en el horno. • No opere con la puerta abierta o removida. • Siem...
Page 30 - Horneado por Convección
30 Enchufe el horno tostador. Coloque la rejilla del horno en la POSICIÓN BAJA DE LA REJILLA. Gire la perilla de temperatura hasta alcanzar la temperatura deseada. CONSEJOS PARA UTILIZAR EL HORNEADO POR CONVECCIÓN NOTA: El horneado por convección hace circular el aire dentro del horno, por lo que lo...
Page 31 - Como Asar
31 Como Asar w ADVERTENCIA Riesgo de Fuego. • Si el contenido prende fuego no abra la puerta del horno. Desconecte el horno y deje que el contenido deje de quemarse y se enfríe antes de abrir la puerta. • No deje el horno desatendido mientras está en operación. • No opere con la puerta abierta o rem...
Page 32 - Cuidado y Limpieza
32 w ADVERTENCIA Peligro de Descarga Eléctrica. No limpie con estropajos metálicos. Las piezas pueden romper la almohadilla y tocar partes eléctricas. Cuidado y Limpieza Para limpiar el interior del horno, limpie las paredes, parte inferior del horno y puerta de vidrio con un trapo húmedo y jabonoso...
Page 33 - Resolviendo Problemas
33 Resolviendo Problemas ¡Visite www.hamiltonbeach.com.mx para ver otros productos de Hamilton Beach o para contactarnos! PROBLEMA CAUSA PROBABLE/SOLUCIÓN El horno no calienta. • Revise para asegurarse que la toma eléctrica esté funcionando y el horno esté conectado. Gire el Selector de Temperatura ...
Page 35 - CENTROS DE SERVICIO AUTORIZADOS
35 PROCEDIMIENTO PARA HACER EFECTIVA LA GARANTÍA • Para hacer efectiva la garantía, lleve su aparato al Centro de Servicio Autorizado más cercano a su domicilio (consulte la lista anexa). • Si no existe Centro de Servicio Autorizado en su localidad llame a nuestro Centro de Atención al Consumidor pa...