Page 3 - Table of Contents
Table of Contents INTRODUCTION ............................................... 2 Manual Accuracy ........................................... 2Contact Info.................................................... 2Machine Description ...................................... 2Identification ....................
Page 4 - INTRODUCTION; Machine Description; Contact Info; Manual Accuracy
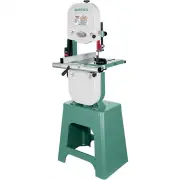
-2- Model G0555/G0555P (Mfd. Since 5/11) INTRODUCTION The bandsaw is a versatile woodworking tool that is used to perform a wide variety of cuts in wood stock, such as rip cuts, cross cuts, bevel cuts, miter cuts, circular cuts, contour cuts, stacked pattern cuts, etc. The bandsaw blade is a continu...
Page 5 - Identification
Model G0555/G0555P (Mfd. Since 5/11) -3- Identification To reduce the risk of serious injury when using this machine, read and understand this entire manual before beginning any operations. A. Upper Wheel Cover B. ON/OFF Switch w/Disabling Padlock C. Fence D. Blade Guard E. Upper Blade Guide Assembl...
Page 6 - maCHiNe data
-4- Model G0555/G0555P (Mfd. Since 5/11) model G0555/G0555P ultimate 14" BaNdSaW Product Dimensions: Weight ........................................................................................................................................................................... 167 lbs.Length/W...
Page 8 - NOTICE; Safety Instructions for Machinery
-6- Model G0555/G0555P (Mfd. Since 5/11) ELECTRICAL EQUIPMENT INJURY RISKS. You can be shocked, burned, or killed by touching live electrical components or improperly grounded machinery. To reduce this risk, only allow qualified service personnel to do electrical installation or repair work, and alw...
Page 10 - Additional Safety for Bandsaws
-8- Model G0555/G0555P (Mfd. Since 5/11) Additional Safety for Bandsaws BLADE CONDITION. Do not operate with dull, cracked or badly worn blade. Dull blades require more effort to perform the cut and increase the risk of kickback. Inspect blades for cracks and missing teeth before each use. HAND PLAC...
Page 11 - SECTION 2: POWER SUPPLY; Full-Load Current Rating
Model G0555/G0555P (Mfd. Since 5/11) -9- SECTION 2: POWER SUPPLY Full-Load Current Rating The full-load current rating is the amperage a machine draws at 100% of the rated output power. On machines with multiple motors, this is the amperage drawn by the largest motor or sum of all motors and electri...
Page 12 - Grounding Requirements
-10- Model G0555/G0555P (Mfd. Since 5/11) Improper connection of the equipment-grounding wire can result in a risk of electric shock. The wire with green insulation (with or without yellow stripes) is the equipment-grounding wire. If repair or replacement of the power cord or plug is nec-essary, do ...
Page 13 - Voltage Conversion; Extension Cords
Model G0555/G0555P (Mfd. Since 5/11) -11- Voltage Conversion The voltage conversion MUST be performed by a electrician or qualified service personnel. To perform the voltage conversion, install the cor-rect plug and rewire the motor to the new volt-age, according to the provided wiring diagram on Pa...
Page 15 - Hardware Recognition Chart
Model G0555/G0555P (Mfd. Since 5/11) -13- 5mm Hardware Recognition Chart
Page 16 - Inventory
-14- Model G0555/G0555P (Mfd. Since 5/11) Inventory The following is a list of items shipped with your machine. Before beginning setup, lay these items out and inventory them. If any non-proprietary parts are missing (e.g. a nut or a washer), we will gladly replace them; or for the sake of expedienc...
Page 17 - Cleanup
Model G0555/G0555P (Mfd. Since 5/11) -15- T23692—Orange Power DegreaserA great product for removing the waxy ship-ping grease from the non-painted parts of the machine during clean up. The unpainted surfaces of your machine are coated with a heavy-duty rust preventative that prevents corrosion durin...
Page 18 - Site Considerations; Weight Load; Space Allocation
-16- Model G0555/G0555P (Mfd. Since 5/11) Site Considerations Figure 7. Minimum working clearances. Dust Hose 30 1 ⁄ 4 " 28" Weight Load Refer to the Machine Data Sheet for the weight of your machine. Make sure that the surface upon which the machine is placed will bear the weight of the mac...
Page 19 - Assembly
Model G0555/G0555P (Mfd. Since 5/11) -17- Assembly Some metal parts may have sharp edges that can cause minor injury. Please exam- ine the edges of all metal parts BEFORE handling them and be careful WHILE handling them. To assemble the bandsaw: 1. Lay one stand side flat on a protective sur- face, ...
Page 24 - Dust Collection
-22- Model G0555/G0555P (Mfd. Since 5/11) Figure 24. 4" dust hose attached to dust port. Dust Collection DO NOT operate this bandsaw without an ade- quate dust collection system. This bandsaw creates substantial amounts of wood dust while operating. Failure to use a dust collec- tion system can ...
Page 25 - Power Connection; Connecting Power; Test Run
Model G0555/G0555P (Mfd. Since 5/11) -23- Power Connection After you have completed all previous setup instructions and circuit requirements, the machine is ready to be connected to the power supply. To avoid unexpected startups or property dam-age, use the following steps whenever connect-ing or di...
Page 26 - Tensioning Blade
-24- Model G0555/G0555P (Mfd. Since 5/11) 4. Turn the machine OFF. 5. Insert a switch disabling padlock (sold sepa- rately) through the green ON button, as shown in Figure 27. 6. Press the green ON button to test the dis- abling feature on the switch. —If the machine does not start, the switch disab...
Page 27 - Adjusting Blade
Model G0555/G0555P (Mfd. Since 5/11) -25- 5. Look at what the tension gauge reads and use that as a guide for tensioning that blade in the future. Note: Do not rely on this setting for long periods of time because the blade will stretch with use. Additionally, with extended use, the blade tensioning...
Page 30 - Table Tilt Calibration
-28- Model G0555/G0555P (Mfd. Since 5/11) Table Tilt Calibration When properly adjusted, the positive stop bolt enables the table to be quickly returned perpen-dicular with the blade. To tilt the table to the left, the positive stop bolt must be lowered from its correct height, then re-adjusted afte...
Page 31 - Aligning Table
Model G0555/G0555P (Mfd. Since 5/11) -29- Aligning Table To ensure cutting accuracy when the table is first installed, the table should be aligned so the miter slot is parallel to the bandsaw blade. Tools Needed Qty Straightedge 2' ...................................................1Fine Ruler ........
Page 32 - Aligning Fence
-30- Model G0555/G0555P (Mfd. Since 5/11) Aligning Fence To ensure accurate cutting when using the fence, the face of the fence must be parallel to the table miter slot and, thus, to the side of the blade. Tools Needed Qty Hex Wrench 5mm ...............................................1 To align the ...
Page 33 - SECTION 4: OPERATIONS; Operation Overview
Model G0555/G0555P (Mfd. Since 5/11) -31- SECTION 4: OPERATIONS Operation Overview The purpose of this overview is to provide the nov-ice machine operator with a basic understanding of how the machine is used during operation, so the machine controls/components discussed later in this manual are eas...
Page 34 - Switch; Workpiece
-32- Model G0555/G0555P (Mfd. Since 5/11) Disabling & Locking Switch Figure 42. Switch disabled by a padlock (sold separately). The ON/OFF switch can be disabled and locked by inserting a padlock through the ON button, as shown. Locking the switch in this manner can prevent unauthorized operatio...
Page 35 - Table Tilt; Guide Post
Model G0555/G0555P (Mfd. Since 5/11) -33- Table Tilt The table can be tilted when making angle or bevel cuts. Note: When tilting the table to the left, the positive stop bolt must be lowered. Be sure to re-adjust it when returning the table to be perpendicular with the blade. To tilt the table: 1. D...
Page 36 - Blade Speed
-34- Model G0555/G0555P (Mfd. Since 5/11) Blade Speed The Model G0555/G0555P offers blade speeds of 1500 and 3200 FPM. For general woodwork-ing and most cutting operations, we recommend using the 3200 FPM speed. Keep in mind, the results from different speeds are related to the type of workpiece, th...
Page 37 - Blade Information; Blade Length; Blade Dimensions
Model G0555/G0555P (Mfd. Since 5/11) -35- Blade Information Selecting the right blade requires a knowledge of the various blade characteristics to match the blade with the particular cutting operation. Blade Length Measured by the circumference, blade lengths are usually unique to the brand of your ...
Page 39 - Blade Change; Blade Removal; Blade Installation
Model G0555/G0555P (Mfd. Since 5/11) -37- Blade Change Always disconnect power to the machine when changing blades. Failure to do this may result in serious personal injury. Bandsaw blades are sharp and can quickly cut fingers and hands. To reduce the risk of this type of injury, ALWAYS wear heavy l...
Page 40 - Ripping
-38- Model G0555/G0555P (Mfd. Since 5/11) Cutting Options The bandsaw is capable of performing the follow-ing cuts: • Miters • Compound Angles • Angles • Complex Curves • Resaw • Duplicate Parts • Ripping • Circles • Crosscutting • Beveled Curves Basic Cutting Tips Here are some basic tips to follow...
Page 41 - Crosscutting; Resawing
Model G0555/G0555P (Mfd. Since 5/11) -39- Crosscutting is the process of cutting across the grain of wood. For plywood and other processed wood, crosscutting simply means cutting across the width of the material. To make a 90˚ crosscut: 1. Mark the workpiece on the edge where you want to begin the c...
Page 42 - Cutting Curves; Stacked Cuts
-40- Model G0555/G0555P (Mfd. Since 5/11) Cutting Curves When cutting curves, simultaneously feed and turn the stock carefully so that the blade follows the layout line without twisting. Use either a nar-rower blade or a blade with more TPI (teeth per inch), or make more relief cuts, to avoid having...
Page 43 - SECTION 5: ACCESSORIES; Order Online at grizzly.com
Model G0555/G0555P (Mfd. Since 5/11) -41- SECTION 5: ACCESSORIES ACCESSORIES Some aftermarket accessories can be installed on this machine that could cause it to function improperly, increasing the risk of serious personal injury. To minimize this risk, only install accessories recommended for this ...
Page 45 - SECTION 6: MAINTENANCE; Daily; Monthly; Schedule
Model G0555/G0555P (Mfd. Since 5/11) -43- SECTION 6: MAINTENANCE For optimum performance from your machine, follow this maintenance schedule and refer to any specific instructions given in this section. Daily • Check/correct loose mounting bolts. • Check/correct damaged or worn saw blade. • Check/co...
Page 46 - Lubrication; Redressing Rubber
-44- Model G0555/G0555P (Mfd. Since 5/11) The bearings on this bandsaw are pre-lubricated and sealed at the factory, and require no lubrica-tion for the life of the bearings. All bearings are standard sizes, and replacements can be pur-chased from our parts department or a bearing supply store. As f...
Page 47 - Troubleshooting
Model G0555/G0555P (Mfd. Since 5/11) -45- Review the troubleshooting procedures in this section if a problem develops with your machine. If you need replacement parts or additional help with a procedure, call our Technical Support. Note: Please gather the serial number and manufacture date of your m...
Page 49 - Checking V-Belt Tension
Model G0555/G0555P (Mfd. Since 5/11) -47- V-Belt Tension To ensure optimum power transmission from the motor to the blade, the V-belt must be in good condition and operate under proper tension. V-belt tension should be checked at least every month—more often if the bandsaw is used daily. If the belt...
Page 50 - Shimming Table
-48- Model G0555/G0555P (Mfd. Since 5/11) Replacing V-Belt Tools Needed Qty Hex Wrench 6mm ...............................................1Wrench or Socket 13mm ....................................1Replacement V-Belt (Part No. P0555068) .........1 To replace the V-belt: 1. DISCONNECT BANDSAW FROM PO...
Page 51 - Wheel Alignment; Checking Wheel Alignment
Model G0555/G0555P (Mfd. Since 5/11) -49- Wheel Alignment Wheel alignment is one of the most critical fac-tors for optimal performance from your bandsaw. Wheels are properly aligned when they are par-allel with each other and in the same plane or “coplanar” (see the illustration in the figure to the...
Page 52 - Shimming a Wheel
-50- Model G0555/G0555P (Mfd. Since 5/11) Figure 64. Measuring the distance to shim the wheel to be coplanar. 4. Remove the wheel to be shimmed, then place shimming washers in the amount mea-sured in Step 3 onto the wheel shaft. 5. Re-install the wheel and secure it in place. 6. Re-install the blade...
Page 53 - Upper Wheel Lateral Adjustment
Model G0555/G0555P (Mfd. Since 5/11) -51- Upper Wheel Lateral Adjustment If the upper wheel is tilted laterally (side to side), perform the following procedure to make it copla-nar with the lower wheel. There are two set screws in the upper wheel bracket, shown in Figures 65–66, that adjust the whee...
Page 54 - Blade Lead
-52- Model G0555/G0555P (Mfd. Since 5/11) Blade Lead Bandsaw blades may wander off the cut line when sawing, as shown in the figure below. This is called blade lead. Blade lead is usually caused by too fast of a feed rate, a dull or abused blade, or improper blade tension. If your blade is sharp/und...
Page 55 - Blade Tensioner
Model G0555/G0555P (Mfd. Since 5/11) -53- Blade Tensioner The blade tensioner may need to be reset for one of the following reasons: • The blade tension quick release lever will not move down into the horizontal position when the tension scale is correctly adjusted for the installed blade. • You hav...
Page 57 - Wiring Safety Instructions
Model G0555/G0555P (Mfd. Since 5/11) -55- SHOCK HAZARD. Working on wiring that is con-nected to a power source is extremely dangerous. Touching electrified parts will result in personal injury including but not limited to severe burns, electrocution, or death. Disconnect the power from the machine b...
Page 58 - Wiring Diagram
-56- Model G0555/G0555P (Mfd. Since 5/11) READ ELECTRICAL SAFETY ON PAGE 55! ON OFF Neutral Hot Ground 110 VAC 220 VAC 5-15 Plug (Pre-wired) Motor Pre-wired for 110V Motor Rewired for 220V Start/Stop Switch Ground Ground 4 2 1 3 Hot Hot Ground 6-15 Plug (As Recommended) 220 VAC G Rewired for 220V Gr...
Page 59 - Main
Model G0555/G0555P (Mfd. Since 5/11) -57- Main SECTION 9: PARTS 1 2 3 4 5 6 7 7 8 8 9 10 11V2 12 13 14V2 15 16 17 18 19 20 21 23 24 26 25 27 28 29 30A 30A-1 31 32 33A 34 35 35-1 35-2 35-3 38 39 40 41 41 42 43 44 45 46 47 48 49 49 50 50 51 51 55 55 56 56 57 57 58 58 58 59 61A 61 62 63 64 64 65 66 66 ...
Page 60 - Main Parts List
-58- Model G0555/G0555P (Mfd. Since 5/11) Main Parts List REF PART # DESCRIPTION REF PART # DESCRIPTION 1 P0555001 BASE (G555) 45 P0555045 LOWER WHEEL ASSY W/TIRE 1 P0555P001 BASE (G0555P) 46 P0555046 SHAFT WASHER 30 X 8 X 3MM 2 P0555002 HEX BOLT M16-2 X 55 47 P0555047 HEX BOLT M8-1.25 X 20 LH 3 P05...
Page 62 - Stand
-60- Model G0555/G0555P (Mfd. Since 5/11) Stand REF PART # DESCRIPTION REF PART # DESCRIPTION 201 P0555201 STAND TOP (G0555) 208 P0555208 FLANGE NUT M6-1 201 P0555P201 STAND TOP (G0555P) 209 P0555209 UPPER STAND BRACE (G0555) 202 P0555202 CARRIAGE BOLT M8-1.25 X 16 209 P0555P209 UPPER STAND BRACE (G...
Page 63 - Fence
Model G0555/G0555P (Mfd. Since 5/11) -61- Fence REF PART # DESCRIPTION REF PART # DESCRIPTION 300 P0555300 FENCE KIT ASSEMBLY W/RAILS 314 P0555314 REAR FENCE RAIL 301 P0555301 FRONT FENCE RAIL 315 P0555315 HEX NUT M6-1 302 P0555302 FENCE BASE 316 P0555316 FLANGE SCREW M4-.7 X 6 303 P0555303 FENCE MO...
Page 64 - Labels
-62- Model G0555/G0555P (Mfd. Since 5/11) Labels Safety labels help reduce the risk of serious injury caused by machine hazards. If any label comes off or becomes unreadable, the owner of this machine MUST replace it in the original location before resuming operations. For replacements, contact (800...
Page 65 - WARRANTY CARD
C U T A LO N G D O T T E D LI N E Name _____________________________________________________________________________ Street _____________________________________________________________________________City _______________________ State _________________________ Zip _____________________Phone # _____...
Page 67 - WARRANTY AND RETURNS
WARRANTY AND RETURNS Grizzly Industrial, Inc. warrants every product it sells for a period of 1 year to the original purchaser from the date of purchase. This warranty does not apply to defects due directly or indirectly to misuse, abuse, negligence, accidents, repairs or alterations or lack of main...