Epson WorkForce 546 - Installation Manual

Epson WorkForce 546 – Installation Manual, read for free online in PDF format. We hope this helps you resolve any issues you may have. If you have further questions, please contact us through the contact form.


Table of Contents:
- Page 2 – Contents
- Page 3 – Before You Begin; Start Here
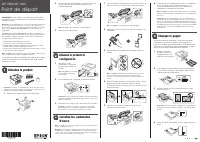
- Page 4 – Choose Your Connection Type; Wireless; To connect the printer wirelessly, see page 5.; Wired; To connect the printer using an Ethernet cable, see page 23.
- Page 5 – Wireless Network Installation; Connect Wirelessly Using the Setup Wizard; Follow the steps below to connect to your printer wirelessly.; on the printer’s control panel, then press; or
- Page 9 – Connect Wirelessly Using Advanced Setup
- Page 13 – Select WPA Security Settings
- Page 14 – Select WEP Security Settings
- Page 15 – Confirm Your Network Settings
- Page 16 – Once it’s connected, you see the; Create an Ad-Hoc Wireless Connection
- Page 20 – Choose Security Settings
- Page 22 – Confirm Your Settings and Connect to the Network
- Page 23 – Continue with the next section to install software.
- Page 24 – Install Software; Windows Vista; If you see the AutoPlay window, click; Windows; When you see the Software Installation screen, go to step 3.; Mac OS; and
- Page 25 – to start network setup.
- Page 27 – and click
- Page 28 – Finish the Installation; Follow the steps for your operating system:; Epson Information Center
- Page 29 – Macintosh; to install an application that allows you to access the printer’s
- Page 30 – and finish the installation.; Troubleshooting; “Setup Problems” below
- Page 31 – Setup Problems
- Page 33 – Printing Problems
- Page 34 – WiFi icon on the; Scanning Problems; in
- Page 35 – Print a Network Status Sheet; on the printer’s control panel to enter the Setup; button to print a network status sheet.; Copyright Notice; Software License Agreements; Trademarks
Network Installation Guide
WorkForce
®
610 Series
Artisan
®
710 Series
"Loading the manual" means you need to wait until the file loads and becomes available for online reading. Some manuals are very large, and the time they take to appear depends on your internet speed.
Was this manual helpful?
About this manual
- Brand
- Epson
- Model
- WorkForce 546
- Document type
- Installation Manual
- Language(s)
- English
- Pages
- 36
- File size
- 1.7 MB
- Format
Summary
2 Contents Before You Begin . . . . . . . . . . . . . . . . . . . . . . . . . . . . . . . . . . . . . . . . . . 3 Choose Your Connection Type . . . . . . . . . . . . . . . . . . . . . . . . . . . . . . . . 4 Wireless . . . . . . . . . . . . . . . . . . . . . . . . . . . . . . . . . . . . . . . . . ....
Before You Begin 3 Before You Begin Make sure you installed ink cartridges and loaded paper as described on the Start Here sheet. Then follow the instructions in this guide to set up the printer for use on a network. Tip: For a video tutorial and other information about setting up a wireless network...
4 Choose Your Connection Type Choose Your Connection Type Wireless To connect the printer wirelessly, see page 5. Note: If you want to print wirelessly but do not have an access point or router, see “Create an Ad-Hoc Wireless Connection” on page 16. Wired To connect the printer using an Ethernet cab...
Ask a question
Related manuals
Popular Epson Other
 Epson PictureMate Flash - PM 280 - PictureMate Flash Compact Photo Printer User Manual
 Epson TM-T70II Troubleshooting Guide
 Epson U925 - TM B/W Dot-matrix Printer User Manual
 Epson RR 70W User Manual
 Epson 9890 Manual
 Epson 206636 - PocketJet 3 Plus User Manual
 Epson Printer TM-H5000II User Manual
 Epson TM-T88V User Manual
More Epson Other models
 Epson WF 7820 User Manual
 Epson WF 7840 Manual
 Epson WorkForce 30 Manual
 Epson WorkForce 320 User Manual
 Epson WorkForce 435 User Manual
 Epson WorkForce 520 User Manual
 Epson WorkForce 630 User Manual
 Epson WorkForce 633 User Manual
 Epson WorkForce 635 User Manual
 Epson WorkForce 840 User Manual
 Epson WorkForce 845 User Manual
 Epson WorkForce 2650 Manual