Page 2 - DVD
2 ............................................................3 ............................................................3 ................................................................4 ................................................................4 .............................................
Page 8 - AV
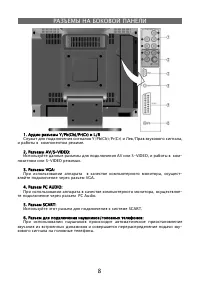
8 1. Y/Pb(Cb)/Pr(Cr) L/R 1. Y/Pb(Cb)/Pr(Cr) L/R Y/Pb(Cb)/Pr(Cr) / , . 2. AV/S-VIDEO: 2. AV/S-VIDEO: AV S-VIDEO, - S-VIDEO . 3. VGA: 3. VGA: , - VGA. 4. PC AUDIO: 4. PC AUDIO: , - PC Audio. 5. SCART: 5. SCART: SCART. 6. / : 6. / : - .
Page 13 - SOURCE
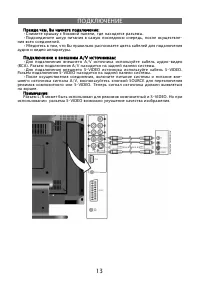
13 , : , : • , . • , - . • , . A/V : A/V : • A/V - (RCA). A/V . • S-VIDEO S-VIDEO. S-VIDEO . • , - A/V, SOURCE S-VIDEO. . :: L/R S-VIDEO. S-VIDEO .
Page 15 - SCART
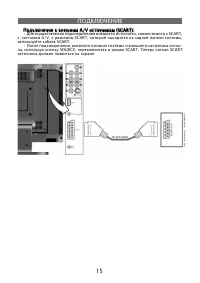
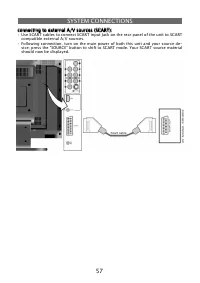
15 A/V (SCART): A/V (SCART): • , SCART, A/V, SCART, , SCART. • , - , SOURCE, SCART. SCART .
Page 28 - “ENTER”
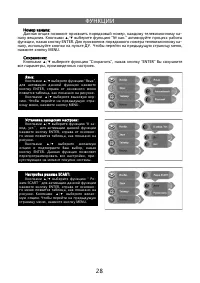
28 : : , - . ▲ / ▼ “ № .” , ENTER. - , . , MENU. :: ▲ / ▼ “ ”, “ENTER” , . : : ▲ / ▼ “ ”, ENTER, , . ▲ / ▼ - . - , MENU. : : ▲ / ▼ “ - . .”, ENTER, - , . ▲ / ▼ , ENTER. , - . SCART: SCART: ▲ / ▼ “ - SCART ” ENTER, - , . ▲ / ▼ - . , MENU.
Page 29 - NICAM
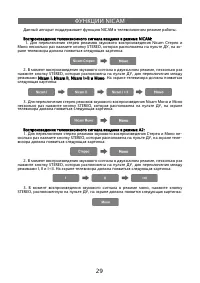
29 NICAM NICAM . NICAM: NICAM: 1. Nicam STEREO, , - : 2. , STEREO, , Nicam I, Nicam II, Nicam I+II Nicam I, Nicam II, Nicam I+II . : 3. Nicam STEREO, , : A2: A2: 1. - STEREO, , - : 2. , STEREO, , I, II I+II. : 3. , STEREO, , :
Page 34 - SETUP
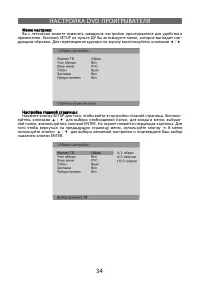
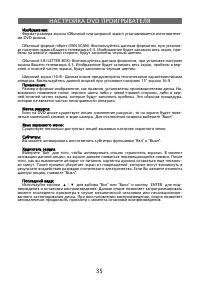
34 DVD : : . SETUP , - . ◀ / ▶ : : SETUP , . - ▲ / ▼ , , - , ENTER. . , ◄ . ▲ / ▼ ENTER.
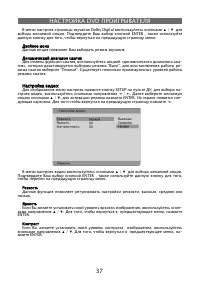
Page 37 - Dolby Digital
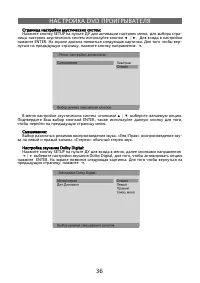
37 DVD Dolby Digital ▲ / ▼ . ENTER , , . . , « - », “ ”, - “ ”. . : : SETUP , - , ◄ / ► . ▲ / ▼ , ENTER. - . ◄ . ▲ / ▼ . ENTER , , . : , . , - ▲ / ▼ . , , ENTER. , ▲ / ▼ . , , - ENTER.
Page 43 - USER’S MANUAL
Page 44 - CONTENT; speci
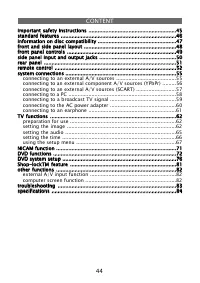
44 CONTENT important safety instructions .........................................................45 important safety instructions .........................................................45standard features ...........................................................................46 standard featu...
Page 45 - IMPORTANT SAFETY INSTRUCTIONS; NOTES; IMPORTANT FOR LASER PRODUCTS
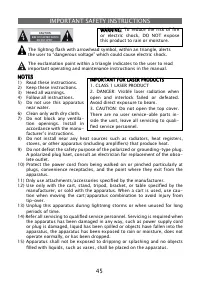
45 IMPORTANT SAFETY INSTRUCTIONS NOTES NOTES 1) Read these instructions. 2) Keep these instructions. 3) Heed all warnings. 4) Follow all instructions. 5) Do not use this apparatus near water. 6) Clean only with dry cloth. 7) Do not block any ventila- tion openings. Install in accordance with the man...
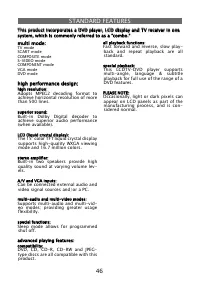
Page 46 - STANDARD FEATURES; high performance design:; stereo ampli
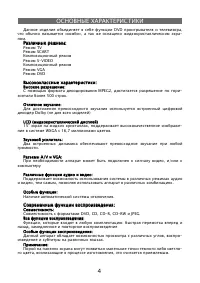
46 STANDARD FEATURES multi mode: multi mode: TV modeSCART modeCOMPOSITE modeS-VIDEO modeCOMPONENT modeVGA modeDVD mode high performance design: high performance design: high resolution: high resolution: Adopts MPEG2 decoding format to achieve horizontal resolution of more than 500 lines. superior so...
Page 47 - INFORMATION ON DISC COMPATIBILITY; The operating characteristics of some DVD discs are speci; Disc formats supported by this DVD player:
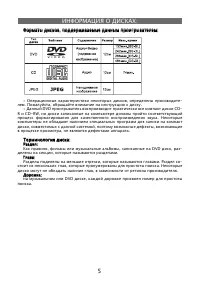
47 INFORMATION ON DISC COMPATIBILITY ∙ The operating characteristics of some DVD discs are speci fi ed by the software maker. Please refer to the instruction manual of the disc for further instructions. ∙ This DVD Player will play most recordable (CD-R) or erasable (CD-RW) CDs, but play- back of CD-R...
Page 48 - FRONT & SIDE PANEL CONTROL LAYOUT; Press to enter or exit standby mode.
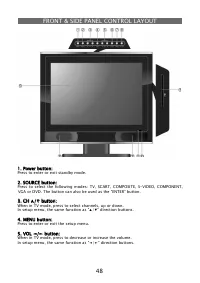
48 FRONT & SIDE PANEL CONTROL LAYOUT 1. Power button: 1. Power button: Press to enter or exit standby mode. 2. SOURCE button: 2. SOURCE button: Press to select the following modes: TV, SCART, COMPOSITE, S-VIDEO, COMPONENT, VGA or DVD. The button can also be used as the “ENTER” button. 3. CH ▲ / ...
Page 49 - Press to play a disc when in DVD mode.
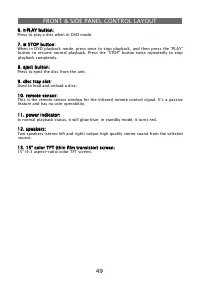
49 FRONT & SIDE PANEL CONTROL LAYOUT 6. ▶ PLAY button: 6. ▶ PLAY button: Press to play a disc when in DVD mode. 7. ■ STOP button: 7. ■ STOP button: When in DVD playback mode, press once to stop playback, and then press the “PLAY” button to resume normal playback. Press the “STOP” button twice re...
Page 50 - SIDE-PANEL INPUTS AND OUTPUT JACKS; computer to display VGA graphics.
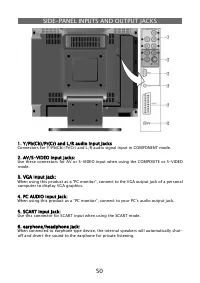
50 SIDE-PANEL INPUTS AND OUTPUT JACKS 1. Y/Pb(Cb)/Pr(Cr) and L/R audio Input Jacks 1. Y/Pb(Cb)/Pr(Cr) and L/R audio Input Jacks Connectors for Y/Pb(Cb)/Pr(Cr) and L/R audio signal input in COMPONENT mode. 2. AV/S-VIDEO input jacks: 2. AV/S-VIDEO input jacks: Use these connectors for AV or S-VIDEO in...
Page 51 - REAR PANEL CONNECTIONS; Connect to the wall AC outlet.
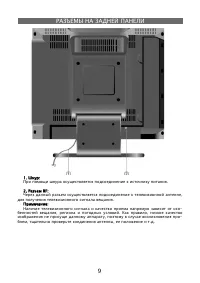
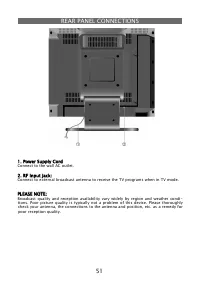
51 REAR PANEL CONNECTIONS 1. Power Supply Cord 1. Power Supply Cord Connect to the wall AC outlet. 2. RF input jack: 2. RF input jack: Connect to external broadcast antenna to receive the TV programs when in TV mode. PLEASE NOTE: PLEASE NOTE: Broadcast quality and reception availability vary widely ...
Page 52 - REMOTE CONTROL
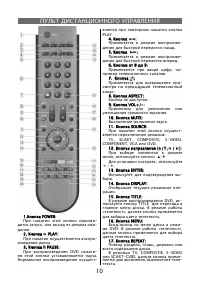
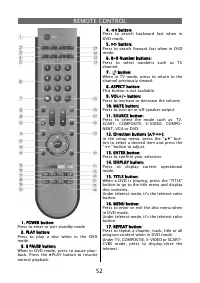
52 REMOTE CONTROL 1. POWER button: 1. POWER button: Press to enter or exit standby mode 2. PLAY button: 2. PLAY button: Press to play a disc when in the DVD mode. 3. II PAUSE button: 3. II PAUSE button: When in DVD mode, press to pause play-back. Press the ▶ PLAY button to resume normal playback. 4....
Page 54 - start using your remote:
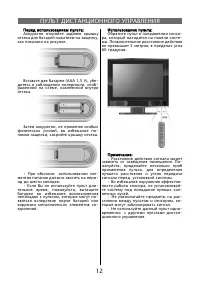
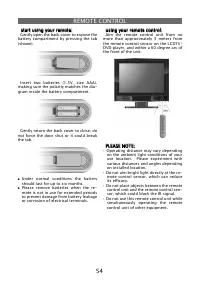
54 REMOTE CONTROL start using your remote: start using your remote: Gently open the back cover to expose the battery compartment by pressing the tab (shown). Insert two batteries (1.5V, size AAA), making sure the polarity matches the dia-gram inside the battery compartment. Gently return the back co...
Page 55 - SYSTEM CONNECTIONS; panel of the unit to an external AV signal source.
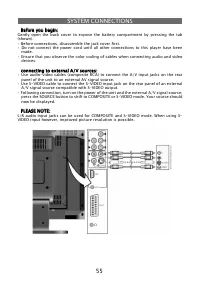
55 SYSTEM CONNECTIONS Before you begin: Before you begin: Gently open the back cover to expose the battery compartment by pressing the tab (shown).• Before connections, disassemble the jack cover fi rst. • Do not connect the power cord until all other connections to this player have been made. • Ensu...
Page 56 - of the unit to component VIDEO compatible external A/V sources.
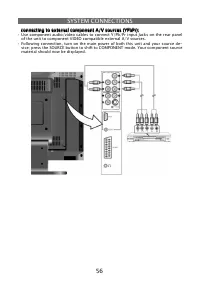
56 SYSTEM CONNECTIONS connecting to external component A/V sources (YPbPr): connecting to external component A/V sources (YPbPr): • Use component audio/video cables to connect Y/Pb/Pr input Jacks on the rear panel of the unit to component VIDEO compatible external A/V sources. • Following connection...
Page 58 - cable. Follow the steps using the
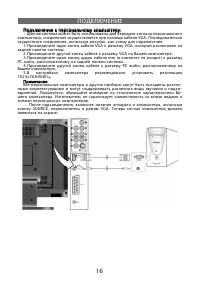
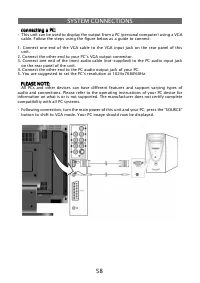
58 SYSTEM CONNECTIONS connecting a PC: connecting a PC: • This unit can be used to display the output from a PC (personal computer) using a VGA cable. Follow the steps using the fi gure below as a guide to connect: 1. Connect one end of the VGA cable to the VGA input jack on the rear panel of this un...
Page 59 - connecting to a broadcast TV signal:
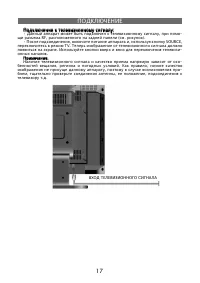
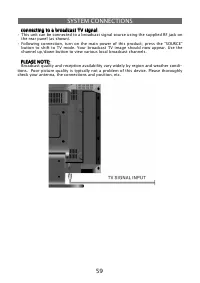
59 SYSTEM CONNECTIONS connecting to a broadcast TV signal: connecting to a broadcast TV signal: • This unit can be connected to a broadcast signal source using the supplied RF jack on the rear panel (as shown). • Following connection, turn on the main power of this product; press the “SOURCE” button...
Page 60 - Connecting to AC Power Supply; Plug the power supply cord to the wall AC outlet.
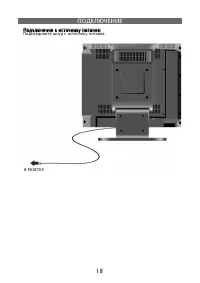
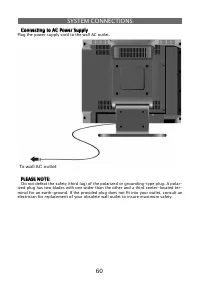
60 SYSTEM CONNECTIONS Connecting to AC Power Supply Connecting to AC Power Supply Plug the power supply cord to the wall AC outlet. PLEASE NOTE: PLEASE NOTE: Do not defeat the safety (third lug) of the polarized or grounding-type plug. A polar- ized plug has two blades with one wider than the other ...
Page 61 - • See the below
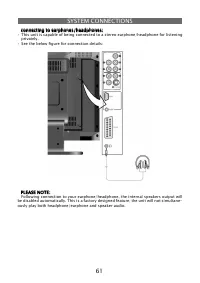
61 SYSTEM CONNECTIONS connecting to earphones/headphones: connecting to earphones/headphones: • This unit is capable of being connected to a stereo earphone/headphone for listening privately. • See the below fi gure for connection details: PLEASE NOTE: PLEASE NOTE: Following connection to your earpho...
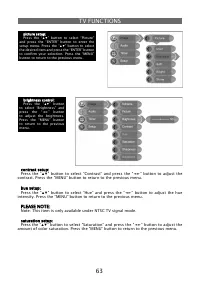
Page 62 - TV FUNCTIONS; These features will only operate if there is signal input.
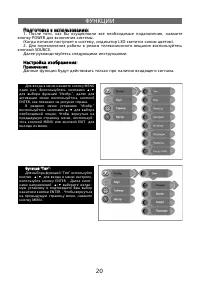
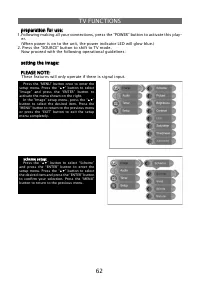
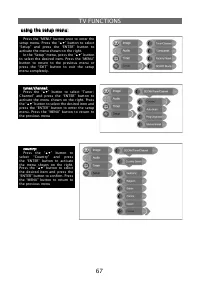
62 TV FUNCTIONS preparation for use: preparation for use: 1. Following making all your connections, press the “POWER” button to activate this play- er. (When power is on to the unit, the power indicator LED will glow blue.)2. Press the “SOURCE” button to shift to TV mode. Now proceed with the follow...
Page 70 - ” button to select “CH NO” and press the “ENTER” button to activate.
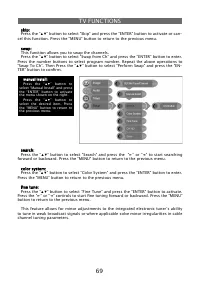
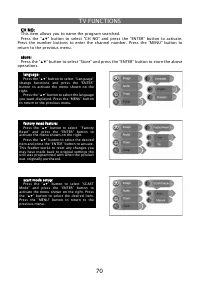
70 CH NO: CH NO:This item allows you to name the program searched.Press the “ ▲▼ ” button to select “CH NO” and press the “ENTER” button to activate. Press the number buttons to enter the channel number. Press the “MENU” button to return to the previous menu. store: store:Press the “ ▲▼ ” button to ...
Page 71 - NICAM FUNCTION
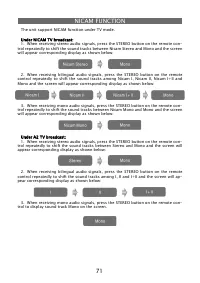
71 The unit support NICAM function under TV mode. Under NICAM TV broadcast: Under NICAM TV broadcast:1. When receiving stereo audio signals, press the STEREO button on the remote con- trol repeatedly to shift the sound tracks between Nicam Stereo and Mono and the screen will appear corresponding dis...
Page 72 - USING THIS PRODUCT TO PLAY DVDS/CDS
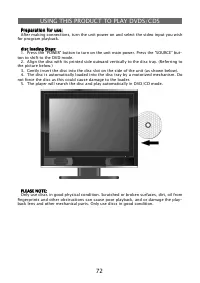
72 Preparation for use: Preparation for use: After making connections, turn the unit power on and select the video input you wish for program playback. disc loading Steps: disc loading Steps:1. Press the “POWER” button to turn on the unit main power. Press the “SOURCE” but- ton to shift to the DVD m...
Page 76 - SETTING UP YOUR DVD PLAYER
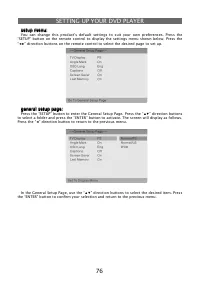
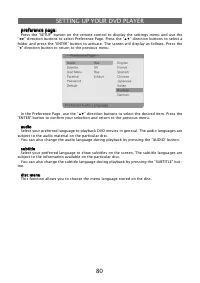
76 setup menu: setup menu: You can change this product’s default settings to suit your own preferences. Press the “SETUP” button on the remote control to display the settings menu shown below. Press the “ ◀▶ ” direction buttons on the remote control to select the desired page to set up. general setu...
Page 81 - USING SHOP-LOCKTM FEATURE
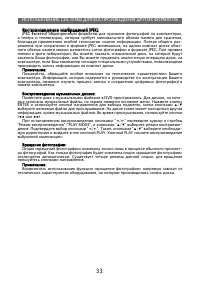
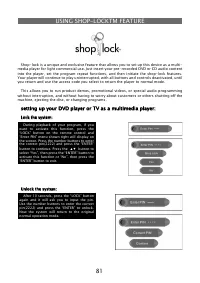
81 Shop-lock is a unique and exclusive feature that allows you to set up this device as a multi- media player for light commercial use. Just insert your pre-recorded DVD or CD audio content into the player, set the program repeat functions, and then initiate the shop-lock features. Your player will ...
Page 82 - computer screen function:; OTHER FEATURES
82 external A/V input function: external A/V input function: This unit has an external A/V (audio/video) input feature. It supports SCART, COMPOSITE, S-VIDEO and COMPONENT modes. Use any audio, video, SCART cable and S-VIDEO cable to connect the unit to the external A/V signal source such as a DVD r...
Page 84 - PRODUCT TECHNICAL SPECIFICATIONS; Service life of the given product - 3 years from the moment of sale
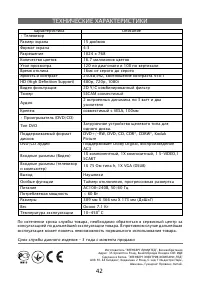
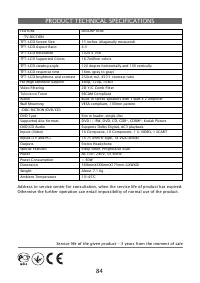
84 PRODUCT TECHNICAL SPECIFICATIONS FEATURE DESCRIPTION •TV SECTION TFT-LCD Screen Size 15 inches (diagonally measured) TFT-LCD Aspect Ratio 4:3 TFT-LCD Resolution 1024 x 768 TFT-LCD Supported Colors 16.7million colors TFT-LCD viewing angle 120 degree horizontally and 100 vertically TFT-LCD response...