Page 5 - INPUT
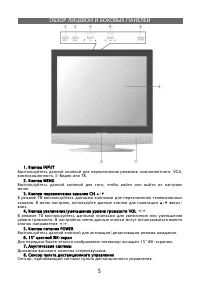
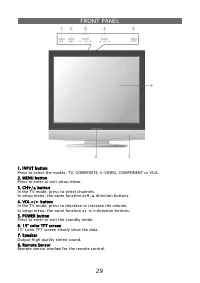
5 1. INPUT 1. INPUT : , VGA, , S- . 2. MENU 2. MENU , . 3. CH 3. CH ▲ / ▼ . , ▲ / ▼ / . 4. / VOL 4. / VOL ◄ / ► . ◄ / ► . 5. POWER 5. POWER / . 6. 15” - 6. 15” - 15” - . 7. 7. . 8. 8. , .
Page 8 - POWER
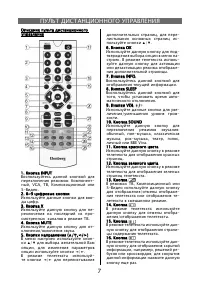
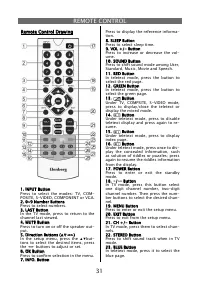
8 17. POWER 17. POWER / . 18. -/-- 18. -/-- , , , - ; . 19. MENU 19. MENU - . 20. EXIT 20. EXIT - . 21. +/- 21. +/- . 22. STEREO 22. STEREO . . 23. 23. . 24. 24. . 25. 25. - / - . 26. 26. , - ; , - ; , - . 27. 27. , , - . , , , , . , , - . 28. 28. - .
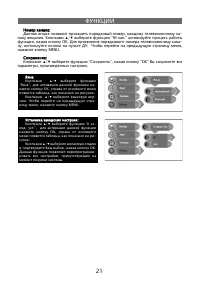
Page 21 - “OK”
21 : : , - . ▲ / ▼ “ № .” , OK. - , . , MENU. :: ▲ / ▼ “ ”, “OK” , . : : ▲ / ▼ “ ”, - OK, , . ▲ / ▼ - . - , MENU. : : ▲ / ▼ “ - . .”, OK, , - . ▲ / ▼ , OK. - , .
Page 22 - NICAM
22 NICAM NICAM . NICAM: NICAM: 1. Nicam STEREO, , - : 2. , STEREO, , Nicam I, Nicam II, Nicam I+II Nicam I, Nicam II, Nicam I+II . : 3. Nicam STEREO, , : A2: A2: 1. - STEREO, , - : 2. , STEREO, , I, II I+II. : 3. , STEREO, , :
Page 25 - USER’S MANUAL
Page 26 - CONTENT; Speci
26 CONTENT Important Safety Instructions-------------------------------26 Important Safety Instructions-------------------------------26Characteristic Features ------------------------------------27 Characteristic Features ------------------------------------27Front Panel----------------------------...
Page 27 - IMPORTANT SAFETY INSTRUCTIONS; NOTES
27 IMPORTANT SAFETY INSTRUCTIONS NOTES NOTES 1) Read these instructions. 2) Keep these instructions. 3) Heed all warnings. 4) Follow all instructions. 5) Do not use this apparatus near water. 6) Clean only with dry cloth. 7) Do not block any ventilation openings. Install in accordance with the man- ...
Page 28 - CHARACTERISTICX FEATURES; high performance design:
28 CHARACTERISTICX FEATURES This product incorporates LCD display and TV receiver in one system. This product incorporates LCD display and TV receiver in one system.multi mode: multi mode: TV mode COMPOSITE modeS-VIDEO mode COMPONENT modeVGA mode high performance design: high performance design: LCD...
Page 29 - FRONT PANEL; button
29 FRONT PANEL 1. INPUT button 1. INPUT buttonPress to select the modes: TV, COMPOSITE, S-VIDEO, COMPONENT or VGA. 2. MENU button 2. MENU buttonPress to enter or exit setup menu.3. CH ▼ / ▲ button 3. CH ▼ / ▲ button In the TV mode, press to select channels. In setup menu, the same function as ▼ / ▲ ...
Page 30 - REAR PANEL
30 REAR PANEL 1. Y/Pb/Pr Input Jacks 1. Y/Pb/Pr Input JacksConnected to the Y/Pb/Pr input and L/R audio input in COMPONENT mode.2. S-VIDEO Input Jack 2. S-VIDEO Input JackConnected to the S-VIDEO input in S-VIDEO mode3. VIDEO/L/R Audio Input Jack 3. VIDEO/L/R Audio Input Jack Connected to the VIDEO ...
Page 31 - REMOTE CONTROL; Button; Remote Control Drawing
31 REMOTE CONTROL 1. INPUT Button 1. INPUT ButtonPress to select the modes: TV, COM-POSITE, S-VIDEO, COMPONENT or VGA.2. 0~9 Number Buttons 2. 0~9 Number Buttons Press to select numbers.3. LAST Button 3. LAST ButtonIn the TV mode, press to return to the channel last viewed.4. MUTE Button 4. MUTE But...
Page 33 - Using of Remote control
33 REMOTE CONTROL Using of Remote control Using of Remote control Point the remote control unit from no more than about 7m from the remote control sensor and within about 60 de-grees of the front of the unit. •The operating distance may vary de- pending to the brightness around. Notes:•Do not point ...
Page 34 - SYSTEM CONNECTIONS; Connecting to External AV Signal Source; then press the INPUT button to shift to COMPOSITE or S-VIDEO mode.; Connecting to External AV Signal Source (COMPONENT); of the unit to the external AV signal source.
34 SYSTEM CONNECTIONS • Do not connect the power cord until all other connections have been made.• Before connections, disassemble the jack cover fi rst. • Ensure that you observe the color cord when connecting audio and video cables. Connecting to External AV Signal Source Connecting to External AV ...
Page 35 - Connecting to PC; gure below to connect:; Connecting to Power Cable; culty inserting the
35 SYSTEM CONNECTIONS Connecting to PC Connecting to PC The unit can be connected to PC (person computer) via the VGA cable. Follow the steps and the fi gure below to connect: 1. Connect one end of the VGA cable to the VGA input jack on the rear panel of the unit.2. Connect the other end to the PC. 3...
Page 36 - Connecting to TV Signal
36 SYSTEM CONNECTIONS Connecting to TV Signal Connecting to TV Signal This unit can be connected to the TV signal input source via the TV jack on the rear panel.After connection, turn on the power of the unit; press the INPUT button to shift to TV mode. After connecting to the antenna, turn on the u...
Page 37 - TV FUNCTION; Preparations
37 TV FUNCTION Preparations Preparations 1. After connection, press the POWER button to turn on the power. 2. Press the INPUT button to shift to TV mode. You can go on with the following opera- tions: Image Setting Image SettingNote: This item is only available when there is signal input. Press the ...
Page 38 - TV FUNCTIONS; Contrast Setup
38 TV FUNCTIONS Contrast Setup Contrast SetupPress the ▲▼ button to select Contrast and press the ◄► button to adjust the value. Press the MENU button to return to the previous menu. Hue Setup Hue SetupPress the ▲▼ button to select Hue and press the ◄► button to adjust the value. Press the MENU butt...
Page 42 - Search
42 TV FUNCTIONS Search SearchPress the ▲▼ button to select Search and press the ► or ◄ to start searching forward or backward. Press the MENU button to return to the previous menu. Color System Color SystemPress the ▲▼ button to select Color System and press the OK button to enter. Press the MENU bu...
Page 44 - NICAM FUNCTION
44 The unit support NICAM function under TV mode. Under NICAM TV broadcast: Under NICAM TV broadcast:1. When receiving stereo audio signals, press the STEREO button on the remote con- trol repeatedly to shift the sound tracks between Nicam Stereo and Mono and the screen will appear corresponding dis...
Page 45 - OTHER FUNCTION
45 External AV Input Function External AV Input Function The unit has external AV input function. It supports COMPOSITE, S-VIDEO and COMPONENT modes. Use the audio, video and S-Video cable to connect the unit to the external AV signal source such as recorder, vidicon, satellite receiver or game play...
Page 46 - TROUBLESHOOTING
46 TROUBLESHOOTING SYMPTOM CHECK ITEM There is no sound. Make sure system connections are correct. Make sure the sound setup of DVD disc is correct. Make sure disc is not dirty, warped or scratched severely. Clean or replace the disc. Make sure the speaker mute is not on. In the TV mode, set the cor...
Page 47 - PRODUCT TECHNICAL SPECIFICATIONS; DESIGN AND SPECIFICATIONS ARE SUBJECT TO CHANGE WITHOUT NOTICE
47 PRODUCT TECHNICAL SPECIFICATIONS FEATURE DESCRIPTION TFT-LCD Resolution 1024 x 768 TFT-LCD Screen Size 15 inches Power AC100~ 240V, 50/60Hz DC 12V Power Consumption < 40W Dimension 345 × 84 × 390mm(LXWXD) Weight About 5.8 Kg Ambient Temperature 10~45 ℃ Address to service center for consultatio...