Page 2 - CUSTOMER CARE AND SERVICE
CONTENTS 1. SAFETY INFORMATION....................................................................................3 2. SAFETY INSTRUCTIONS.................................................................................. 5 3. PRODUCT DESCRIPTION..........................................................
Page 5 - SAFETY INSTRUCTIONS; Electrical connection
• The appliance is intended for heating food and beverages. Drying of food or clothing and heating of warming pads, slippers, sponges, damp cloth and similar may lead to risk of injury, ignition or fire. • If smoke is emitted, switch off or unplug the appliance and keep the door closed in order to s...
Page 7 - Care and cleaning
closed furniture panel and cause subsequent damage to the appliance, the housing unit or the floor. Do not close the furniture panel until the appliance has cooled down completely after use. 2.4 Care and cleaning WARNING! Risk of injury, fire, or damage to the appliance. • Before maintenance, deacti...
Page 8 - PRODUCT DESCRIPTION; Electronic programmer; If they are not visible touch to activate them.
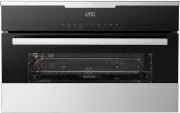
3. PRODUCT DESCRIPTION 3.1 General overview 1 2 8 3 9 7 4 3 2 1 5 6 1 Control panel 2 Electronic programmer 3 Heating element 4 Microwave generator 5 Lamp 6 Fan 7 Glass base, removable 8 Shelf support, removable 9 Shelf positions 3.2 Accessories Wire shelf For cookware, cake tins, roasts. Baking tra...
Page 10 - Navigating the menus
Other indicators of the display: Symbol Function Minute Minder The function operates. Time of day The display shows the current time. Duration The display shows the necessary time for cooking. End Time The display shows when the cook‐ ing time is complete. Temperature The display shows the temperatu...
Page 11 - The menus in overview
At each point you can go back to the main menu with . 6.2 The menus in overview Main menu Sym‐ bol Menu item Application Heating Functions Contains a list of heating functions. Recipes Contains a list of automatic programmes. Favourites Contains a list of favourite cooking pro‐ grammes created by th...
Page 12 - Heating Functions
Sym‐ bol Submenu Description Service Shows the software version and configuration. Factory Settings Resets all settings to factory settings. 6.3 Heating Functions Heating function Application True Fan Cooking To bake on one shelf position and to dry food. Slow Cooking To prepare tender, succulent ro...
Page 13 - Activating a heating; function
6.5 Activating a heating function 1. Activate the appliance. 2. Select the menu: Heating Functions.3. Press to confirm. 4. Select a heating function.5. Press to confirm. 6. Set the temperature.7. Press to confirm. 6.6 Heat-up indicator When you activate a heating function, the bar on the display com...
Page 14 - Suitable cookware and materials
microwave. Only cook food without a cover if you want to keep a crust. • Do not overcook the dishes by setting the power and time too high. The food can dry out, burn or catch fire in some places. • Do not use the appliance to cook eggs in their shells and snails, because they can burst. With fried ...
Page 15 - Tips for the microwave
Cookware / Material Microwave Grilling Defrost‐ ing Heating Cooking Ceramic 2) , earthenware 2) X Heat-resistant plastic up to 200°C 3) X Cardboard, paper X X X Clingfilm X X X Roasting film with microwave safeclosure 3) X Roasting dishes made of metal, e.g. enamel, cast iron X X X Baking tins, blac...
Page 16 - Microwave functions; Setting the Microwave
Result Remedy After the end of cooking time the food is overheated at the edges but is still not ready in the middle. Next time select a lower power and a longer time. Stir liquids, such as soup, halfway through. Other things to think about… • Food items have different shapes and qualities. They are...
Page 17 - Setting the Combi function; Setting the Quick Start; Examples of cooking; applications for power settings
The maximum setting of the time for the function: Duration is 90 minutes. You can change themicrowave power (touch and then or ) and the function: Duration any time when the Microwave function operates. 5. When the set time ends, an acoustic signal sounds for 2 minutes. The Microwave function deacti...
Page 18 - Clock functions table; Setting the clock functions
Power setting Use • 100 Watt Defrosting meat, fish, bread Defrosting cheese, cream, butter Defrosting fruit and cakes (gateaux) Raising yeast dough Heating up cold dishes and drinks 8. CLOCK FUNCTIONS 8.1 Clock functions table Clock function Application Minute Minder To set a countdown (max. 2 h 30 ...
Page 19 - AUTOMATIC PROGRAMMES; Recipes with Recipe; Recipes with Weight; Automatic
8.3 Heat + Hold Conditions for the function:• The set temperature is more than 80 °C. • The function: Duration is set.The function: Heat + Hold keeps prepared food warm at 80 °C for 30 minutes. It activates after the baking or roasting procedure ends.You can activate or deactivate the function in th...
Page 20 - USING THE ACCESSORIES; Inserting the accessories
6. When the time ends, an acoustic signal sounds. Press any symbol to deactivate the signal. With some programmes turn over the food after 30 minutes. The display shows a reminder. 10. USING THE ACCESSORIES WARNING! Refer to Safety chapters. 10.1 Inserting the accessories Use only suitable cookware ...
Page 21 - ADDITIONAL FUNCTIONS; Saving a programme; Activating the programme; Using the Child Lock
11. ADDITIONAL FUNCTIONS 11.1 Favourites You can save your favourite settings, such as duration, temperature or heating function. They are available in the menu: Favourites. You can save 20 programmes. You cannot save Microwave and microwave combi functions as favourite programmes. Saving a programm...
Page 22 - functions of the oven
Press any symbol (except for ) to start the function: Set + Go. The set heating function starts.When the heating function ends, an acoustic signal sounds. • Function Lock is on when the heating function operates. • The menu: Basic Settings lets you activate and deactivate the function: Set + Go. 11....
Page 24 - Baking on one oven level
Baking results Possible cause Remedy The cake browns uneven‐ ly. The mixture is unevenly distributed. Spread the mixture evenly on the baking tray. The cake is not ready in the baking time given. The oven temperature is too low. The next time you bake, set a slightly higher oven temperature. 12.4 Ba...
Page 25 - Soufflés and au gratin
Food Temperature (°C) Time (min) Shelf posi‐ tion Butter / sugar cake 1) 180 - 200 15 - 30 2 Fruit flan (made with yeast dough/sponge mixture) 160 - 180 25 - 50 2 Fruit flan made with short‐ crust pastry 170 - 190 40 - 80 2 Yeast cakes with delicate toppings (e. g. quark, cream, almond slice) 150 - ...
Page 26 - Multilevel Baking
Food Temperature (°C) Time (min) Shelf position Pasta bake 180 - 200 30 - 50 1 Lasagne 180 - 200 25 - 40 1 Vegetables au gratin 1) 160 - 170 15 - 30 1 Baguettes au gratin 1) 160 - 170 15 - 30 1 Sweet bakes 180 - 200 40 - 60 1 Fish bakes 180 - 200 30 - 60 1 Stuffed vegetables 160 - 170 30 - 60 1 Pota...
Page 30 - Ready made frozen food table
Food Time (min) Shelf position 1st side 2nd side Toast with topping 8 - 10 - 2 1) Use the wire shelf without a tray. 12.11 Turbo Grilling Food Tempera‐ ture (°C) Time (min) Turn after (min) Shelf posi‐ tion Tray posi‐ tion Chicken (900 - 1000 g) 180 - 200 50 - 60 25 - 30 2 1 Stuffed rol‐ led pork ro...
Page 33 - tables
Food Temperature (°C) Time (min) Shelf position Ciabatta 200 - 220 35 - 45 2 Rye Bread 190 - 210 50 - 70 2 Dark Bread 180 - 200 50 - 70 2 All Grain bread 170 - 190 60 - 90 2 12.17 Microwave cooking tables Place your food on the plate or in a container on the cavity bottom if not specified differentl...
Page 39 - CARE AND CLEANING; Notes on cleaning; supports
Food Ovenware Pow‐ er (Watt s) Tem‐ pera‐ ture (°C) Time (min) Shelf posi‐ tion Comments Cheese cake, frozen (2 x 70 g) Crostino plate on bot‐ tom glass. Max. 4 min / preheat at 700 Watt, turn 1 x 200 230 25 - Turn in be‐ tween. Ham and cheese toast, frozen (2 x 0.1 kg) Crostino plate on bot‐ tom gl...
Page 40 - Replacing the lamp; The side lamp
13.3 Replacing the lamp Put a cloth on the bottom of the interior of the appliance. It prevents damage to the lamp glass cover and the cavity. WARNING! Danger of electrocution! Disconnect the fuse before you replace the lamp. The lamp and the lamp glass cover can be hot. CAUTION! Always hold the hal...
Page 46 - ENVIRONMENTAL CONCERNS
replaced if the Appliance fails to be of acceptable quality and the failure does not amount to a major failure. The benefits to you given by this warranty are in addition to your other rights and remedies under a law in relation to the Appliances or services to which the warranty relates. 11. At all...