Electrolux ERCE9025SA - User Manual
Electrolux ERCE9025SA Range Hood – User Manual, read for free online in PDF format. We hope this helps you resolve any issues you may have. If you have further questions, please contact us through the contact form.


Table of Contents:
- Page 2 – CONTENTS; other working environments
- Page 3 – IMPORTANT SAFETY INSTRUCTIONS; This symbol indicates never to do this
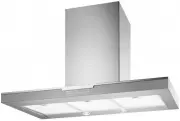
- Page 4 – PRODUCT DESCRIPTION; Additional items required for installation
- Page 5 – DIMENSIONS
- Page 6 – Install flue cover wall mounting brackets with suitable; RANGEHOOD INSTALLATION
- Page 7 – Electrical connection
- Page 8 – FLUE COVER INSTALLATION
- Page 9 – USING THE RANGEHOOD; – light frying/boiling; MAINTENANCE AND CLEANING
- Page 10 – OPTIONAL DUCTING ACCESSORIES; Part Numbers; 50mm G/Bond roof cowl
- Page 11 – Important Notice; Warranty
User manual
Canopy rangehood
ERCE9025BK
ERCE9025SA
ERCE9025BA
"Loading the manual" means you need to wait until the file loads and becomes available for online reading. Some manuals are very large, and the time they take to appear depends on your internet speed.
Summary
2 CONTENTS 3 Important safety instructions 4 Product description 5 Dimensions 6 Rangehood installation 9 Using the rangehood 9 Maintenance and cleaning 9 Changing the halogen lamps 10 Optional ducting accessories 11 Warranty LEGEND The symbols you will see in this booklet have these meanings: WARNIN...
3 Electrical connection Check that the mains voltage matches with the voltage on the data plate inside the rangehood. Check that the installation complies with standards of local building, gas and electrical authorities. Before connecting to the mains supply ensure that the mains voltage corresponds...
4 PRODUCT DESCRIPTION Additional items required for installation • Fixings required to attach rangehood body and anti-tilt points. • Fixings required to attach flue cover mounting brackets to the wall. • Duct tape or cable ties. Technical specification Power supply: 220-240 Volts 50Hz. Connects to 7...