Page 2 - Children and vulnerable people safety
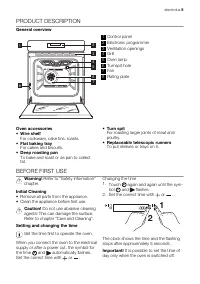
Electrolux. Thinking of you. Share more of our thinking at www.electrolux.com CONTENTS Safety information 2 Product description 5 Before first use 5 Daily use 6 Clock functions 8 Using the accessories 8 Additional functions 10 Helpful hints and tips 11 Care and cleaning 15 What to do if… 19 Technica...
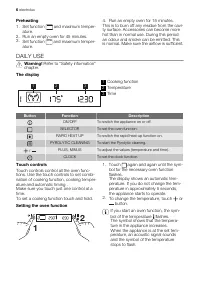
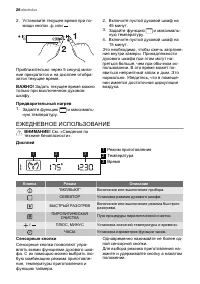
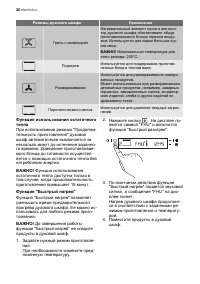
Page 6 - Preheating; DAILY USE; The display; Cooking function; Touch controls; again and again until the sym-
Preheating 1. Set function and maximum temper- ature. 2. Run an empty oven for 45 minutes.3. Set function and maximum temper- ature. 4. Run an empty oven for 15 minutes.This is to burn off any residue from the cavi-ty surface. Accessories can become morehot than in normal use. During this periodan o...
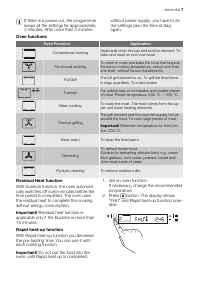
Page 7 - Oven functions; Residual Heat function; Residual heat function is; Rapid heat-up function; Do not put the food into the
If there is a power cut, the programmerkeeps all the settings for approximately3 minutes. After more than 3 minutes without power supply, you have to dothe settings (also the time of day)again. Oven functions Oven Function Application Conventional cooking Heats both from the top and bottom element. ...
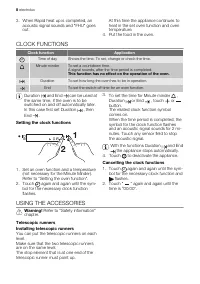
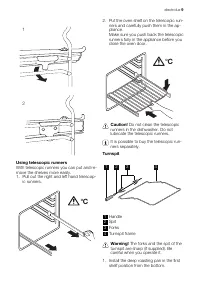
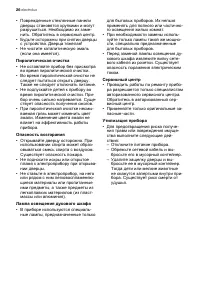
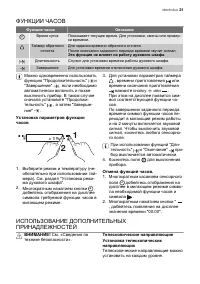
Page 8 - CLOCK FUNCTIONS; Setting the clock functions; USING THE ACCESSORIES; Telescopic runners
3. When Rapid heat up is completed, an acoustic signal sounds and "FHU" goesout. At this time the appliance continues toheat in the set oven function and oventemperature. 4. Put the food in the oven. CLOCK FUNCTIONS Clock function Application Time of day Shows the time. To set, change or che...
Page 10 - ADDITIONAL FUNCTIONS
2. Install the turnspit frame on the second shelf position from the bottom. 3. Install the first fork in the spit.4. Put the food to be grilled.5. Install the second fork. Use the screws to tighten the forks. 6. Install the point of the spit in the turnspit hole (refer to "Product description�...
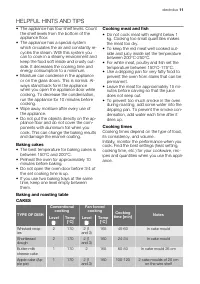
Page 11 - HELPFUL HINTS AND TIPS; Baking cakes
HELPFUL HINTS AND TIPS • The appliance has four shelf levels. Count the shelf levels from the bottom of theappliance floor. • The appliance has a special system which circulates the air and constantly re-cycles the steam. With this system youcan to cook in a steamy environment andkeep the food soft ...
Page 12 - BREAD AND PIZZA
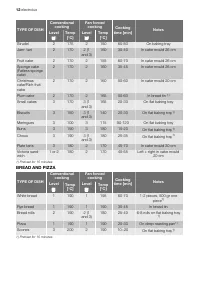
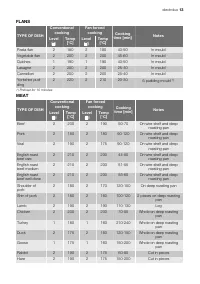
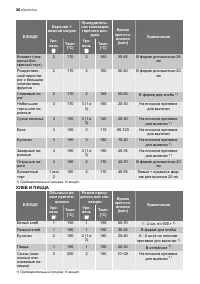
TYPE OF DISH Conventional cooking Fan forced cooking Cooking time [min] Notes Level Temp [°C] Level Temp [°C] Strudel 2 175 2 150 60-80 On baking tray Jam- tart 2 170 2 (1 and 3) 160 30-40 In cake mould 26 cm Fruit cake 2 170 2 155 60-70 In cake mould 26 cm Sponge cake(Fatless spongecake) 2 170 2 16...
Page 14 - Use this function with a
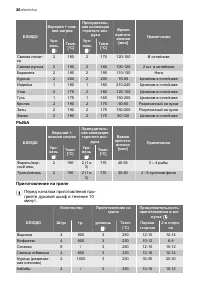
TYPE OF DISH Conventional cooking Fan forced cooking Cooking time [min] Notes Level Temp [°C] Level Temp [°C] Pheasant 2 190 2 175 90-120 Whole on deep roasting pan FISH TYPE OF DISH Conventional cooking Fan forced cooking Cooking time [min] Notes Level Temp [°C] Level Temp [°C] Trout/Seabream 2 190...
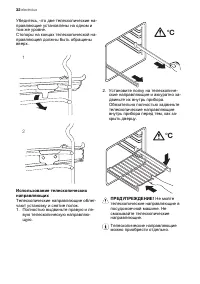
Page 15 - Turnspit; CARE AND CLEANING; Pyrolytic cleaning
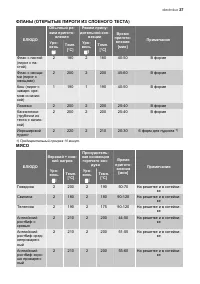
Quantity Grilling Cooking time in mi- nutes TYPE OF DISH Pieces g level Temp. (°C) 1st side 2nd side Quail 4 500 3 200 25-30 20-25 Vegetable gratin - - 3 200 20-25 - pieces. Scallops - - 3 200 15-20 - Mackerel 2-4 - 3 200 15-20 10-15 Fish slices 4-6 800 3 200 12-15 8-10 Turnspit Preheat the empty ov...
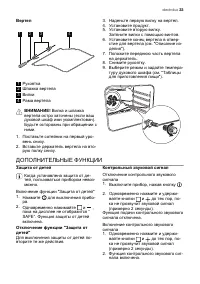
Page 17 - Replace the oven light bulb with appli-; Cleaning the oven door; Turn the lever on the hinge.
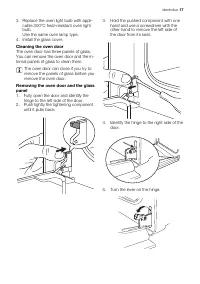
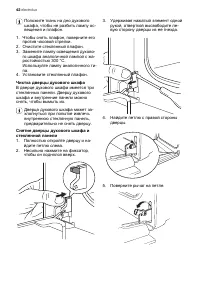
3. Replace the oven light bulb with appli- cable 300°C heat-resistant oven lightbulb.Use the same oven lamp type. 4. Install the glass cover. Cleaning the oven door The oven door has three panels of glass.You can remove the oven door and the in-ternal panels of glass to clean them. The oven door can...
Page 18 - Installing the door and the glass panels
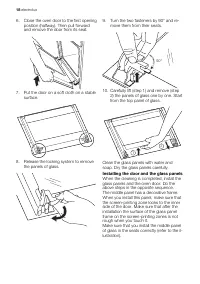
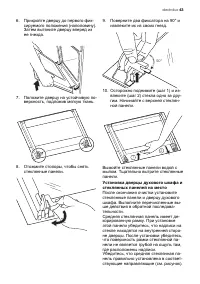
6. Close the oven door to the first openingposition (halfway). Then pull forwardand remove the door from its seat. 7. Put the door on a soft cloth on a stablesurface. 8. Release the locking system to removethe panels of glass. 9. Turn the two fasteners by 90° and re-move them from their seats. 90° 1...
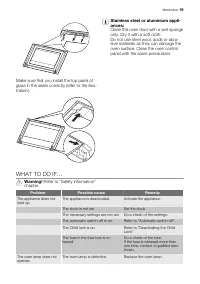
Page 19 - WHAT TO DO IF...
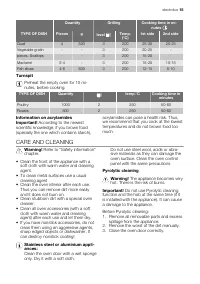
Make sure that you install the top panel ofglass in the seats correctly (refer to the illus-tration). Stainless steel or aluminium appli-ances: Clean the oven door with a wet spongeonly. Dry it with a soft cloth.Do not use steel wool, acids or abra-sive materials as they can damage theoven surface. ...
Page 20 - We recommend that you write the data here:; TECHNICAL DATA; Building In
Problem Possible cause Remedy The oven fan makesnoise. Shelves or trays are in contact withthe oven back panel. Put shelves or trays correctly. Steam and condensationcollect on the food and inthe appliance. You left the dish in the appliancefor too long. Do not let the dishes stay in theappliance fo...
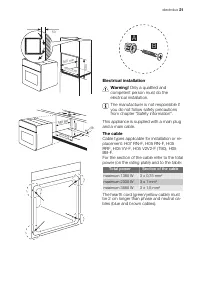
Page 21 - Electrical installation; Only a qualified and; The cable
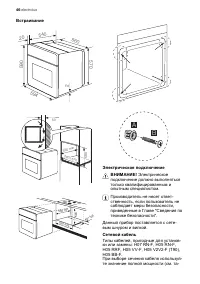
50 580 550 min 560÷570 550 min 593 560-5 70 80÷100 A B Electrical installation Warning! Only a qualified and competent person must do theelectrical installation. The manufacturer is not responsible ifyou do not follow safety precautionsfrom chapter "Safety information". This appliance is sup...
Page 22 - ENVIRONMENT CONCERNS; The symbol
ENVIRONMENT CONCERNS The symbol on the product or on its packaging indicates that this product maynot be treated as household waste. Insteadit should be taken to the appropriatecollection point for the recycling of electricaland electronic equipment. By ensuring thisproduct is disposed of correctly,...
Page 37 - Ы Ы
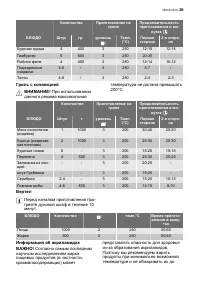
Ы ( Ы Ы ) - - - - - [ ] - . [°C] - . [°C] ( - ) 2 180 2 180 40-50 - ( ) 2 200 2 200 45-60 ( . - - ) 1 190 1 190 40-50 2 200 2 200 25-40 ( - ) 2 200 2 200 25-40 2 220 2 210 20-30 6 1) 1) П а 10 . + - - - - [ ] - . [°C] - . [°C] 2 200 2 190 50-70 - 2 180 2 180 90-120 - 2 190 2 175 90-120 - 2 2...
Page 40 - PYRO 1
. ! . « ». • - , - . • - - . • - . - - . • - . • - ( , ) - . • - - , - . - ! : , . . - , , . - , ! . . ! ( ). . : 1. - . 2. . 3. . 1. (" "). – PYRO 1 PYRO 2. – 3 - - - . 2. , - - . – P2:00 - – P2 2:30 - 3. ...
Page 41 - Pyro
- , - . " - " . 1. 1, 2 3 . 2. . 3. . - - . 4. - - - . - - . , - 15 - " Pyro ". . , - . 1. - , . 2. - , . , - . ! ! ! ! : • . • - . electrolux 41
Page 48 - Varnost otrok in ranljivih oseb
Electrolux. Thinking of you. Sodelujte pri naših razmišljanjih na spletni strani: www.electrolux.com VSEBINA Varnostna navodila 48 Opis izdelka 51 Pred prvo uporabo 51 Vsakodnevna uporaba 52 Č asovne funkcije 54 Uporaba dodatne opreme 54 Dodatne funkcije 56 Koristni namigi in nasveti 56 Vzdrževanje ...
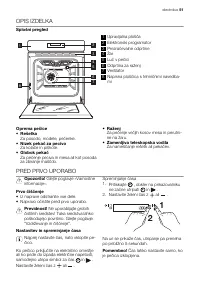
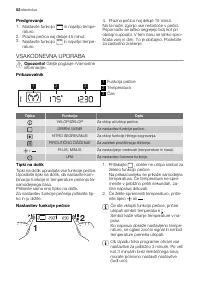
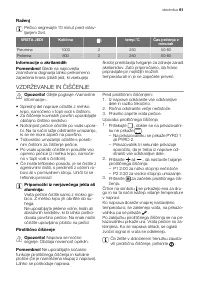
Page 52 - Predgrevanje; VSAKODNEVNA UPORABA; Prikazovalnik; Tipki na dotik
Predgrevanje 1. Nastavite funkcijo in najvišjo tempe- raturo. 2. Prazna pe č ica naj deluje 45 minut. 3. Nastavite funkcijo in najvišjo tempe- raturo. 4. Prazna pe č ica naj deluje 15 minut. Na ta na č in zgorijo vse ne č isto č e v pe č ici. Pripomo č ki se lahko segrejejo bolj kot pri obi č ajni u...
Page 53 - Funkcija akumulirane toplote
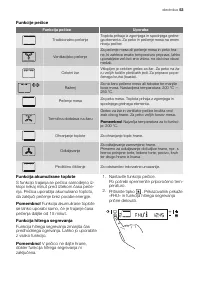
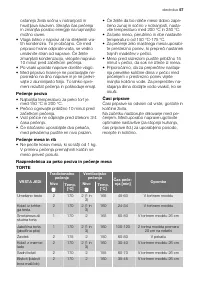
Funkcije pe č ice Funkcija pe č ice Uporaba Tradicionalno pe č enje Toplota prihaja iz zgornjega in spodnjega grelne-ga elementa. Za peko in pe č enje mesa na enem nivoju pe č ice. Ventilacijsko pe č enje Za pe č enje mesa ali pe č enje mesa in peko hra- ne, ki zahteva enako temperaturo priprave, la...
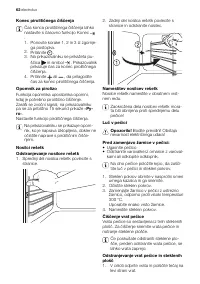
Page 54 - ASOVNE FUNKCIJE; UPORABA DODATNE OPREME
3. Ko je hitro segrevanje zaklju č eno, se za- sliši zvo č ni signal in »FHU« se izklopi. Pe č ica nadaljuje z ogrevanjem v nastav- ljeni funkciji in temperaturi pe č ice. 4. Postavite hrano v pe č ico. Č ASOVNE FUNKCIJE Č asovne funkcije Uporaba Č as Prikazuje to č en č as. Za nastavitev, spreminja...
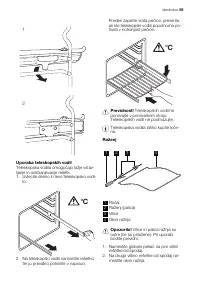
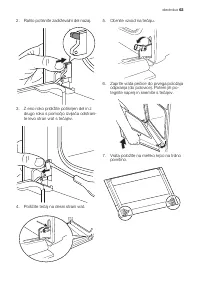
Page 60 - Priprava na žaru; Pe; Termi; To funkcijo uporabljajte z
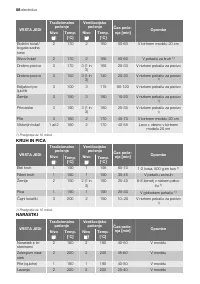
VRSTA JEDI Tradicionalno pe č enje Ventilacijsko pe č enje Č as pe č e- nja [min] Opombe Nivo Temp. [°C] Nivo Temp. [°C] Tuna/losos 2 190 2 (1 in 3) 175 35-60 4-6 filejev Priprava na žaru Pe č ico segrevajte 10 minut pred vstav- ljanjem živil. Koli č ina Žar Č as pe č enja v minutah VRSTA JEDI Kosov...
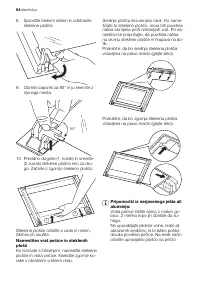
Page 61 - VZDRŽEVANJE IN
Raženj Pe č ico segrevajte 10 minut pred vstav- ljanjem živil. VRSTA JEDI Koli č ina temp.°C Č as pe č enja v minutah Perutnina 1000 2 250 50-60 Pe č enka 800 2 250 50-60 Informacije o akrilamidihPomembno! Glede na najnovejša znanstvena dognanja lahko prekomernozape č ena hrana (zlasti jedi, ki vseb...
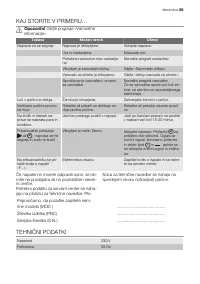
Page 65 - KAJ STORITE V PRIMERU...; TEHNI
KAJ STORITE V PRIMERU… Opozorilo! Glejte poglavje »Varnostne informacije«. Težava Možen vzrok Ukrep Naprava se ne segreje. Naprava je izklopljena. Vklopite napravo. Ura ni nastavljena. Nastavite uro. Potrebne nastavitve niso nastavlje-ne. Naredite pregled nastavitev. Vklopljen je samodejni izklop. G...
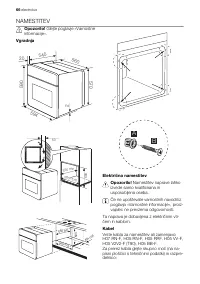
Page 66 - NAMESTITEV; Vgradnja
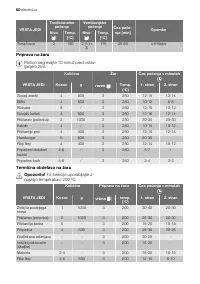
NAMESTITEV Opozorilo! Glejte poglavje »Varnostne informacije«. Vgradnja 594 2 20 570 590 540 560 50 580 550 min 560÷570 550 min 593 560-5 70 80÷100 A B Elektri č na namestitev Opozorilo! Namestitev naprave lahko izvede samo kvalificirana inusposobljena oseba. Č e ne upoštevate varnostnih navodil iz ...
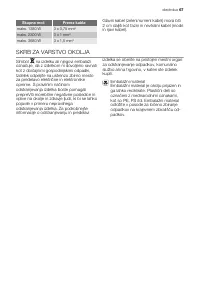
Page 67 - SKRB ZA VARSTVO OKOLJA
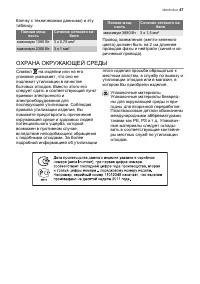
Skupna mo č Prerez kabla maks. 1380 W 3 x 0,75 mm² maks. 2300 W 3 x 1 mm² maks. 3680 W 3 x 1,5 mm² Glavni kabel (zeleni/rumeni kabel) mora biti2 cm daljši kot fazni in nevtralni kabel (modriin rjavi kabel). SKRB ZA VARSTVO OKOLJA Simbol na izdelku ali njegovi embalaži ozna č uje, da z izdelkom ni do...