Page 2 - assembling and using this appliance.; Leave these instructions with the consumer.; WARNING
2 Assembler/Installer: This manual contains important information necessary for the proper assembly and safe use of this appliance. Read and follow all warnings and instructions before assembling and using this appliance. Leave these instructions with the consumer. Consumer/User: Follow all warnings...
Page 3 - materials, gasoline and other flammable vapors and liquids.; SAFETY INFORMATION
3 DANGER CAUTION • Do not use in an explosive atmosphere. Keep grill area clear and free from combustible materials, gasoline and other flammable vapors and liquids. Please read and understand this entire manual before attempting to assemble, operate or install the product. If you have any questions...
Page 4 - CAUTION
4 SAFETY INFORMATION • Do not place the grill under overhead combustible construction or awnings. Minimum clearance from sides and back of unit to combustible construction, 36 inches (914.4mm) from sides and back. NOTE: The installation must conform with local codes or, in the absence of local codes...
Page 5 - PACKAGE CONTENTS
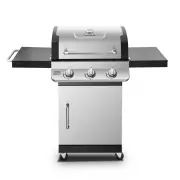
5 D AB C E F G H I N O P Q R M K J L T S U V W X PACKAGE CONTENTS B C D A G E I J L N O M P R V T S U W X Q F H K PART DESCRIPTION QUANTITY A Hood Handle 1 B Temp Gauge 1 C Grill Body Assembly 1 D Side Shelf Bracket A 2 E Right Side Shelf Assembly 1 F Side Shelf Bracket B 2 G Cart Right Side Panel A...
Page 6 - 0 minutes with 2 people.; THIS UNIT IS HEAVY. Two people required for safe assembly.; use and care instructions before attempting to assemble and use.
6 AA BB DD CC M6 Spring Qty. 2 M6 Qty. 2 M6x16 Bolt Qty. 18 Washer EE M6x35 Bolt Qty. 4 Washer FF M6 Wing Nut Qty. 2 GG M3x10 Bolt Qty. 4 HH M6x12 Flat Bolt Qty. 8 Shoulder Bolt Qty.4 II Qty. 1 Wrench AA BB DD CC M6 Spring Qty. 2 M6 Qty. 2 M6x16 Bolt Qty. 18 Washer EE M6x35 Bolt Qty. 4 Washer FF M6 ...
Page 7 - AA; ASSEMBLY INSTRUCTIONS; Wrench; Hardware Used
7 L G I H II AA BB DD CC M6 Spring Qty . 2 M6 Qty . 2 M6x16 Bolt Qty . 18 Washer EE M6x35 Bolt Qty . 4 Washer FF M6 Wing Nut Qty . 2 GG M3x10 Bolt Qty . 4 HH M6x12 Flat Bolt Qty . 8 Shoulder Bolt Qty .4 II Qty . 1 Wrench J AA G L ASSEMBLY INSTRUCTIONS 1. Attach the two locking swivel casters (H) and...
Page 9 - EE; Attach the upper front door brace (V) to the
9 X FF G L V EE G L ASSEMBLY INSTRUCTIONS 5. Attach the upper front door brace (V) to the cart left side panel assembly (L) and the cart right side panel assembly (G) with four M6x35 bolts (EE). 6. Attach the door magnet (X) to the cart left side assembly (L) with four M3x10 bolts (FF). 5 6 Hardware...
Page 10 - Insert the bottom hinge pin of the cart bottom
10 V M K M N AA AA M6x16 Bolt x2 AA Hardware Used ASSEMBLY INSTRUCTIONS 8. Insert the bottom hinge pin of the cart bottom panel skirt (K) into the lower hole on the door assembly (M), then press the upper door spring hinge pin into the hole on the upper front door brace (V) as shown. 7. Attach the d...
Page 11 - M6 Plain Washer; M6 Spring Washer; DD; M6 Wing Nut
11 B AA BB DD CC M6 Spring Qty. 2 M6 Qty. 2 M6x16 Bolt Qty. 18 Washer EE M6x35 Bolt Qty. 4 Washer FF M6 Wing Nut Qty. 2 GG M3x10 Bolt Qty. 4 HH M6x12 Flat Bolt Qty. 8 Shoulder Bolt Qty.4 II Qty. 1 Wrench AA BB DD CC M6 Spring Qty. 2 M6 Qty. 2 M6x16 Bolt Qty. 18 Washer EE M6x35 Bolt Qty. 4 Washer FF ...
Page 13 - shelf bracket B (F) to the grill body assembly; GG
13 F D F D GG C C 13 ASSEMBLY INSTRUCTIONS 13. Attach the side shelf bracket A (D) and side shelf bracket B (F) to the grill body assembly (C) with eight M6x12 flat bolts (GG). Hardware Used GG M6x12 Flat Bolt x 8 F D C F D F D GG C C AA BB DD CC M6 Spring Qty . 2 M6 Qty . 2 M6x16 Bolt Qty . 18 Wash...
Page 14 - Shoulder Bolt
14 O E HH HH O E HH HH ASSEMBLY INSTRUCTIONS 14 Hardware Used HH Shoulder Bolt x 4 14. Attach the left side shelf assembly (O) to the brackets installed at step 13 with two shoulder bolts (HH). Repeat it for right side shelf assembly (E). E HH HH O AA BB DD CC M6 Spring Qty . 2 M6 Qty . 2 M6x16 Bolt...
Page 17 - Front View
17 J M J M ASSEMBLY INSTRUCTIONS 19. Open the door assembly (M). Place LP gas cylinder (sold separately) into the nesting hole located on the cart bottom shelf (J). Rotate the LP gas cylinder until the hose/ regulator coupling aligns with the threaded valve of the cylinder. Hand tighten the hose/ re...
Page 18 - PERFORM LEAK TEST; ALL INSTRUCTIONS AND SAFEGUARDS ON THIS PAGE MUST BE FOLLOWED TO; Only use the regulator and hose assembly provided!
18 OPERATION INSTRUCTIONSCHECKING FOR LEAKS After all connections are made, check all connections and fittings on the LP gas tank valve, gas hose and regulator for leaks with a water and soap solution. To prevent fire or explosion while testing for a leak: • Always perform leak test prior to lightin...
Page 19 - plugs may result in leakage of propane.; a. Do not store a spare LP-gas cylinder under or near this appliance.
19 OPERATION INSTRUCTIONS CONNECTING GAS CYLINDER The propane gas supply cylinder to be used must be constructed and marked in accordance with the Specifications for LP Gas Cylinders of the U.S. Department of Transportation (D.O.T.) or the National Standard of Canada, CAN/CSA-B339, Cylinders, Sphere...
Page 20 - OPERATION INSTRUCTIONS; CONNECTING THE LP TANK
20 OPERATION INSTRUCTIONS NOTE: Other cylinders may be acceptable for use with this appliance provided they are compatible with the appliance nesting hole and retention means. Refer to Step 19 of the Assembly Instructions for correct cylinder to cylinder holder connection. WARNING ALL INSTRUCTIONS A...
Page 21 - cylinder valve and then TURN OFF the control knob.
21 OPERATION INSTRUCTIONS Lighting The Grill Before first use: Remove all hangings or plastic straps, if present. Before you cook on your new gas grill, it is important to clean your grill with heat. To do this, operate the grill for approximately 15 minutes with the lid closed and the control knob ...
Page 22 - burners that have been lit.
22 OPERATION INSTRUCTIONS LIGHTING THE GRILL WITH A MATCH 1. Open the lid. 2. Insert a match in the end of the match holder that is installed on the inside of the cabinet door. 3. Light the match. 4. Immediately place the lit match through the spaces in the grill gates near the ports of the burner b...
Page 23 - Hole for viewing the flame
23 CARE AND MAINTENANCE Cooking Grates The best time to ‘burn-off’ the cooking grates is after every use (approx. 15 minutes). The grill is already hot from cooking thus requiring less fuel to obtain necessary temperature for ‘burn-off’.To ‘burn off’ or heat clean your grill, turn the burners to hig...
Page 24 - CARE AND MAINTENANCE; Figure 2
24 Figure 2 Figure 1 Figure 2 CARE AND MAINTENANCE Burner Assembly Removing The Burner Assembly 1. Make sure all control knobs are in the OFF position, gas supply valve is closed, and the gas hose is disconnected from the gas supply. 2. Open lid and remove warming rack, cooking grates, and heat tent...
Page 25 - causing serious bodily injury or death.
25 CARE AND MAINTENANCE Cleaning the Burner Assembly – Make sure the grill is cool 1. Ensure all burner ports are clear of clogs. Use of a pin or paper clip works well.2. Ensure burner is free of any damage. If damage is found, replace with new burner.3. Ensure the end of the burner and primary air ...
Page 28 - which may vary from state to state.
28 LIMITED WARRANTY 1-Year Limited Warranty This LP gas grill is warranted for 1 year (5 years on the Stainless Steel burners) against broken or damaged parts at the time of purchase. It is warranted to be free of defects. Paint is warranted to be free of defects except for rust, which may appear af...
Page 29 - REPLACEMENT PARTS LIST
29 21 22 23 25 24 19 20 47 18 26 27 1 2 46 28 29 30 313233 3 4 5 6 7 89 10 11 12 13 14 15 16 17 44 35 36 37 38 39 34 40 41 45 43 42 REPLACEMENT PARTS LIST 1 2 3 4 5 6 7 8 9 10 11 12 13 15 16 18 19 20 21 22 23 25 14 17 24 36 37 38 39 40 41 42 43 47 46 44 45 26 28 30 31 32 33 34 35 29 27 For replaceme...
Page 31 - Printed in China
31 REPLACEMENT PARTS LIST Printed in China PART DESCRIPTION PART # 35 Cart right rear leg tube 70-01-958 36 Match holder with chain 70-01-846 37 Cart Bottom Panel Shelf 70-01-895 38 Cart rear panel 70-01-896 39 Regulator assembly bracket 70-01-897 40 Upper front door brace 70-01-898 41 Cart left rea...
Page 32 - Avant de retourner l’article au détaillant,
32 BARBECUE AU PROPANE DE PREMIÈRE QUALITÉ À TROIS BRÛLEURS Nᵒ de modèle DGP397SNP / DGP397SNP-D / DGP397CNP / DGP397CNP-D / DGP397GNP / DGP397GNP-D/DGP397MNP / DGP397MNP-D AGRAFEZ VOTRE FACTURE ICINuméro de série _____________________________ Date d’achat ______________________ Questions, problèmes...
Page 33 - TABLE DES MATIÈRES; AVERTISSEMENT; Laissez ces instructions au; en utilisant cet appareil.; Veuillez conserver ces instructions pour consultation future.
33 TABLE DES MATIÈRES Informations relatives à la sécurité ............................................................................................. 34Contenu de l’emballage .............................................................................................................. 36Quincaill...
Page 34 - DANGER; ou d’autres liquides ou vapeurs inflammables.; MISE EN GARDE; INFORMATIONS RELATIVES À LA SÉCURITÉ; le cancer et des problèmes de reproduction.
34 DANGER • N’utilisez pas cet appareil dans une atmosphère explosive. Assurez-vous que l’espace autour du barbecue est dégagé et ne contient pas de matières inflammables, d’essence ou d’autres liquides ou vapeurs inflammables. Veuillez lire et comprendre le présent guide avant de tenter d’assembler...
Page 35 - enfants et les animaux domestiques loin du barbecue en tout temps.
35 INFORMATIONS RELATIVES À LA SÉCURITÉ • Ne placez pas le barbecue sous des constructions inflammables ou des auvents. Le dégagement minimum entre l’appareil, sur les côtés et à l’arrière, et les constructions inflammables est de 36 po (914,4 mm). R EMARQUE : L’installation doit être conforme aux c...
Page 36 - CONTENU DE L’EMBALLAGE
36 CONTENU DE L’EMBALLAGE PIÈCE DESCRIPTION QUANTITÉ A Poignée du couvercle 1 B Jauge de température 1 C Bâti du barbecue 1 D Support de tablette latérale A 2 E Tablette latérale droite 1 F Support de tablette latérale B 2 G Panneau droit du chariot 1 H Roulette à blocage 2 I Roulette sans blocage 2...
Page 37 - le service à la clientèle afin d’obtenir des pièces de rechange.; Estimation du temps d’assemblage :; Tournevis
37 AA BB DD CC M6 Spring Qty. 2 M6 Qty. 2 M6x16 Bolt Qty. 18 Washer EE M6x35 Bolt Qty. 4 Washer FF M6 Wing Nut Qty. 2 GG M3x10 Bolt Qty. 4 HH M6x12 Flat Bolt Qty. 8 Shoulder Bolt Qty.4 II Qty. 1 Wrench AA BB DD CC M6 Spring Qty. 2 M6 Qty. 2 M6x16 Bolt Qty. 18 Washer EE M6x35 Bolt Qty. 4 Washer FF M6...
Page 38 - INSTRUCTIONS D’ASSEMBLAGE; Clé; Matériel utilisé
38 L G I H II AA BB DD CC M6 Spring Qty . 2 M6 Qty . 2 M6x16 Bolt Qty . 18 Washer EE M6x35 Bolt Qty . 4 Washer FF M6 Wing Nut Qty . 2 GG M3x10 Bolt Qty . 4 HH M6x12 Flat Bolt Qty . 8 Shoulder Bolt Qty .4 II Qty . 1 Wrench J AA G L INSTRUCTIONS D’ASSEMBLAGE 1. Fixez les deux roulettes à blocage (H) e...
Page 40 - Fixez le support supérieur de porte (V) au
40 X FF G L V EE G L INSTRUCTIONS D’ASSEMBLAGE 5. Fixez le support supérieur de porte (V) au panneau gauche (L) et au panneau droit (G) du chariot avec quatre boulons M6 x 35 mm (EE). 6. Fixez l’aimant de porte (X) au panneau gauche du chariot (L) avec quatre boulons M3 x 10 mm (FF). 5 6 Matériel ut...
Page 41 - Insérez l’axe de charnière inférieur de la jupe
41 V M K M N AA AA M6x16 Bolt x2 AA Hardware Used INSTRUCTIONS D’ASSEMBLAGE 8. Insérez l’axe de charnière inférieur de la jupe du panneau inférieur (K) du chariot dans le trou inférieur de la porte (M), puis insérez l’axe de charnière supérieur à ressort de la porte dans le trou du support supérieur...
Page 42 - Rondelle plate M6; Rondelle élastique M6; Écrou à oreilles M6
42 B AA BB DD CC M6 Spring Qty. 2 M6 Qty. 2 M6x16 Bolt Qty. 18 Washer EE M6x35 Bolt Qty. 4 Washer FF M6 Wing Nut Qty. 2 GG M3x10 Bolt Qty. 4 HH M6x12 Flat Bolt Qty. 8 Shoulder Bolt Qty.4 II Qty. 1 Wrench AA BB DD CC M6 Spring Qty. 2 M6 Qty. 2 M6x16 Bolt Qty. 18 Washer EE M6x35 Bolt Qty. 4 Washer FF ...
Page 44 - le support de tablette latérale B (F) au bâti; Boulon plat M6 x 12 mm
44 F D F D GG C C 13 INSTRUCTIONS D’ASSEMBLAGE 13. Fixez le support de tablette latérale A (D) et le support de tablette latérale B (F) au bâti du barbecue (C) avec huit boulons plats M6 x 12 mm (GG). Matériel utilisé GG Boulon plat M6 x 12 mm x 8 F D C F D F D GG C C AA BB DD CC M6 Spring Qty . 2 M...
Page 45 - Boulon à épaulement
45 O E HH HH O E HH HH INSTRUCTIONS D’ASSEMBLAGE 14 Matériel utilisé HH Boulon à épaulement x 4 14. Fixez la tablette latérale gauche (O) aux supports installés à l’étape 13 avec deux boulons à épaulement (HH). Répétez cette étape pour la tablette latérale droite (E). E HH HH O AA BB DD CC M6 Spring...
Page 47 - aux tiges de la vanne.
47 S T U INSTRUCTIONS D’ASSEMBLAGE 17. Placez le plateau à graisse (T) ainsi que le récupérateur de graisse (U). 17 18. Assemblez les trois boutons de commande (S) aux tiges de la vanne. 18 T U S
Page 50 - seulement à la vapeur de s’échapper.; b) Ne remplissez jamais la bouteille à plus de 80 % de sa capacité.
50 Vapeur Vapeur Correct Incorrect Incorrect Liquide Liquide Liquide Vapeur INSTRUCTIONS DE FONCTIONNEMENTBRANCHER LA BOUTEILLE DE PROPANE La bouteille de propane doit être fabriquée et identifiée selon les spécifications sur les bouteilles à gaz du département des Transports des États-Unis (DOT) ou...
Page 51 - INSTRUCTIONS DE FONCTIONNEMENT
51 Droit INSTRUCTIONS DE FONCTIONNEMENT REMARQUE : D’autres bouteilles peuvent être utilisées avec cet appareil, pourvu qu’elles soient compatibles avec le range-bouteille et le système de retenue. Consultez l’étape 19 des instructions d’assemblage pour savoir comment connecter correctement une bout...
Page 52 - résidus et les odeurs générés par le processus de fabrication.
52 INSTRUCTIONS DE FONCTIONNEMENT Allumer le barbecue Avant la première utilisation : Retirez tous les emballages et toutes les attaches de plastique, le cas échéant. Avant de cuisiner sur votre nouveau barbecue au propane, il est important de le nettoyer avec de la chaleur. Pour ce faire, faites fo...
Page 55 - ENTRETIEN ET MAINTENANCE
55 Figure 2 Figure 1 Figure 2 ENTRETIEN ET MAINTENANCE Brûleur Retirer le brûleur 1. Assurez-vous que tous les boutons de commande sont en position d’arrêt, que la vanne d’alimentation en propane est fermée et que le tuyau de propane est déconnecté de l’alimentation. 2. Retirez la grille d’attente, ...
Page 59 - rouille, qui pourrait apparaître après une utilisation répétée.
59 GARANTIE LIMITÉE Garantie limitée d’un an Ce barbecue au propane est garanti pendant un an (les brûleurs en acier inoxydable sont garantis pendant cinq ans) contre les pièces brisées ou endommagées au moment de l’achat. Il est garanti contre les défauts. La peinture est garantie contre les défaut...
Page 60 - LISTE DES PIÈCES DE RECHANGE
60 LISTE DES PIÈCES DE RECHANGE Pour des pièces de rechange, veuillez appeler le service à la clientèle au 1 877 447-4768, de 8 h à 16 h 30 (HNC), du lundi au vendredi. 21 22 23 25 24 19 20 47 18 26 27 1 2 46 28 29 30 313233 3 4 5 6 7 89 10 11 12 13 14 15 16 17 44 35 36 37 38 39 34 40 41 45 43 42 1 ...
Page 62 - Imprimé en Chine
62 LISTE DES PIÈCES DE RECHANGE Imprimé en Chine PIÈCE DESCRIPTION Nᵒ DE PIÈCE 35 Tube du pied arrière droit du chariot 70-01-958 36 Porte-allumettes avec chaîne 70-01-846 37 Tablette du panneau inférieur du chariot 70-01-895 38 Panneau arrière du chariot 70-01-896 39 Support du régulateur 70-01-897...
Page 63 - PARRILLA PREMIER CON; Antes de hacer una devolución a la tienda,
63 Français p. XX Español p. XX PARRILLA PREMIER CON 3 QUEMADORES PARA GAS N.° de modelo DGP397SNP / DGP397SNP-D / DGP397CNP / DGP397CNP-D / DGP397GNP / DGP397GNP-D / DGP397MNP / DGP397MNP-D ADJUNTE SU RECIBO AQUÍNúmero de serie _________________________ Fecha de compra ______________________ ¿Pregu...
Page 64 - CONTENIDO; ADVERTENCIA; Deje estas
64 CONTENIDO Información de seguridad ............................................................................................................ 65Contenido del paquete ................................................................................................................ 67Paquete de tor...
Page 65 - encuentra la parrilla.; INFORMACIÓN DE SEGURIDAD; California puede provocar cáncer y daños reproductivos.
65 PELIGRO PRECAUCIÓN • No se puede utilizar en una atmósfera explosiva. Asegúrese de que no haya material combustible, gasolina ni otros vapores y líquidos inflamables en el lugar donde se encuentra la parrilla. Lea y comprenda este manual por completo antes de intentar ensamblar, poner en funciona...
Page 66 - ni mascotas cerca de la parrilla en ningún momento.; PRECAUCIÓN
66 INFORMACIÓN DE SEGURIDAD • No coloque la parrilla debajo de toldos o estructuras combustibles. La distancia mínima desde los laterales y la parte trasera de la unidad hasta una estructura combustible debe ser de 36" (914,4 mm). N OTA: la instalación debe cumplir con los códigos locales o, en ...
Page 67 - CONTENIDO DEL PAQUETE
67 CONTENIDO DEL PAQUETE PIEZA DESCRIPCIÓN CANTIDAD A Manija de la tapa 1 B Indicador de temperatura 1 C Conjunto del cuerpo de la parrilla 1 D Abrazadera A de la repisa lateral 2 E Conjunto de la repisa lateral derecha 1 F Abrazadera B de la repisa lateral 2 G Conjunto del panel del lateral derecho...
Page 68 - 0 minutos entre 2 personas.
68 AA BB DD CC M6 Spring Qty. 2 M6 Qty. 2 M6x16 Bolt Qty. 18 Washer EE M6x35 Bolt Qty. 4 Washer FF M6 Wing Nut Qty. 2 GG M3x10 Bolt Qty. 4 HH M6x12 Flat Bolt Qty. 8 Shoulder Bolt Qty.4 II Qty. 1 Wrench AA BB DD CC M6 Spring Qty. 2 M6 Qty. 2 M6x16 Bolt Qty. 18 Washer EE M6x35 Bolt Qty. 4 Washer FF M6...
Page 69 - INSTRUCCIONES DE ENSAMBLAJE; Llave; Tornillería utilizada
69 L G I H II AA BB DD CC M6 Spring Qty . 2 M6 Qty . 2 M6x16 Bolt Qty . 18 Washer EE M6x35 Bolt Qty . 4 Washer FF M6 Wing Nut Qty . 2 GG M3x10 Bolt Qty . 4 HH M6x12 Flat Bolt Qty . 8 Shoulder Bolt Qty .4 II Qty . 1 Wrench J AA G L INSTRUCCIONES DE ENSAMBLAJE 1. Fije las dos ruedecillas giratorias co...
Page 73 - Arandela plana M6; Arandela de resorte M6; Tuerca mariposa M6
73 B AA BB DD CC M6 Spring Qty. 2 M6 Qty. 2 M6x16 Bolt Qty. 18 Washer EE M6x35 Bolt Qty. 4 Washer FF M6 Wing Nut Qty. 2 GG M3x10 Bolt Qty. 4 HH M6x12 Flat Bolt Qty. 8 Shoulder Bolt Qty.4 II Qty. 1 Wrench AA BB DD CC M6 Spring Qty. 2 M6 Qty. 2 M6x16 Bolt Qty. 18 Washer EE M6x35 Bolt Qty. 4 Washer FF ...
Page 75 - y la abrazadera B de la repisa lateral (F) al; Pernos planos M6 x 12
75 F D F D GG C C 13 INSTRUCCIONES DE ENSAMBLAJE 13. Fije la abrazadera A de la repisa lateral (D) y la abrazadera B de la repisa lateral (F) al conjunto del cuerpo de la parrilla (C) con ocho pernos planos M6 x 12 (GG). Tornillería utilizada GG Pernos planos M6 x 12 × 8 F D C F D F D GG C C AA BB D...
Page 76 - Perno de tope
76 O E HH HH O E HH HH INSTRUCCIONES DE ENSAMBLAJE 14 Tornillería utilizada HH Perno de tope × 4 14. Fije el conjunto de la repisa lateral izquierda (O) a los soportes instalados en el paso 13 con dos pernos de tope (HH). Repita el proceso para el conjunto de la repisa lateral derecha (E). E HH HH O...
Page 77 - lugar sobre cada quemador.
77 Q R P INSTRUCCIONES DE ENSAMBLAJE 15 16 15. Coloque tres protectores térmicos (P) en su lugar sobre cada quemador. 16. Coloque dos rejillas para cocinar (Q) y una rejilla para calentar (R) en su lugar. P R Q
Page 78 - vástagos de la válvula.
78 S T U INSTRUCCIONES DE ENSAMBLAJE 17. Ponga la grasera grande (T) y la grasera pequeña (U) en su lugar. 17 18. Inserte las tres perillas de control (S) en los vástagos de la válvula. 18 T U S
Page 81 - INSTRUCCIONES DE FUNCIONAMIENTO; posición vertical para que el tanque libere únicamente vapor.; b. Nunca llene el tanque por encima del 80 % de su capacidad.
81 Vapor Vapor Correcto Incorrecto Incorrecto Líquido Líquido Líquido Vapor INSTRUCCIONES DE FUNCIONAMIENTO CONECTAR EL TANQUE DE GAS El tanque para el suministro de gas propano que se vaya a utilizar debe estar fabricado y marcado de acuerdo con las especificaciones para los tanques de gas propano ...
Page 86 - CUIDADO Y MANTENIMIENTO
86 Figure 2 Figure 1 Figura 2 CUIDADO Y MANTENIMIENTO Conjunto del quemador Retirar el conjunto del quemador 1. Asegúrese de que todas las perillas de control estén en la posición de APAGADO, la válvula de suministro de gas esté cerrada y la manguera de gas esté desconectada del suministro de gas. 2...
Page 90 - aparecer después de varios usos.
90 GARANTÍA LIMITADA Garantía limitada por 1 año Esta parrilla de gas propano líquido tiene garantía por 1 año (5 años en los quemadores de acero inoxidable) contra piezas rotas o dañadas en el momento de la compra. Se garantiza que está libre de defectos. La pintura tiene una garantía contra defect...
Page 91 - LISTA DE PIEZAS DE REPUESTO
91 LISTA DE PIEZAS DE REPUESTO Para obtener las piezas de repuesto, llame a nuestro Departamento de Atención al Cliente al 1-877-447-4768, de lunes a viernes de 8:00 a. m. 4:30 p. m. (hora central estándar). 21 22 23 25 24 19 20 47 18 26 27 1 2 46 28 29 30 313233 3 4 5 6 7 89 10 11 12 13 14 15 16 17...
Page 93 - Impreso en China
93 LISTA DE PIEZAS DE REPUESTO Impreso en China PIEZA DESCRIPCIÓN N.º DE PIEZA 35 Tubo de la pata trasera derecha del carro 70-01-958 36 Portafósforo con cadena 70-01-846 37 Repisa del panel inferior del carro 70-01-895 38 Panel de la parte trasera del carro 70-01-896 39 Soporte del conjunto del reg...