Page 2 - table Of Contents; assembling and using this appliance.; Leave these instructions with the consumer.; retain these instructions for future reference.; DanGer
2 table Of Contents Assembler/Installer: This manual contains important information necessary for the proper assembly and safe use of this appliance. Read and follow all warnings and instructions before assembling and using this appliance. Leave these instructions with the consumer. Consumer/user: F...
Page 3 - safety information; materials, gasoline and other flammable vapors and liquids.; WARNING: FUELS USED IN LIQUEFIED PROPANE GAS
3 Please read and understand this entire manual before attempting to assemble, operate or install the product. If you have any questions regarding the product, please call customer service at: 1-877-447- 4768, 8:00 a.m. – 4:30 p.m., CST, Monday – Friday. DanGer CautiOn safety information • Do not us...
Page 4 - • Do not place the grill under overhead; warninG; CautiOn
4 • Do not place the grill under overhead combustible construction or awnings. Minimum clearance from sides and back of unit to combustible construction, 36 inches (914.4mm) from sides and back. NOTE: The installation must conform with local codes or, in the absence of local codes, with either the N...
Page 5 - Package Contents
55 Package Contents Part DesCriPtiOn QtY. A Lid Handle Assembly 1 B Temperature Gauge 1 C Temperature Gauge Bezel 1 D Grill Body Assembly 1 E Control Knob 3 F Grease Pan 1 G Grease Cup 1 H Warming Rack 1 I Cooking Grate For Main Burner 2 J Heat Tent For Main Burner 3 K Left Side Table 1 L Cooking Gr...
Page 6 - this unit is heaVY. two people required for safe assembly.; hardware Contents; estimated assembly time:
6 this unit is heaVY. two people required for safe assembly. Two people required for safe assembly. Some parts may contain sharp edges. Wear protective gloves if necessary. Read and follow all safety statements, warnings, assembly instructions and use and care instructions before attempting to assem...
Page 7 - aa
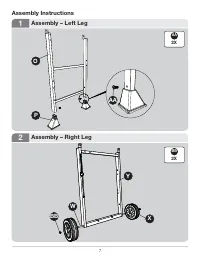
7 1 2 assembly – Left Leg assembly – right Leg assembly instructions aa 2X BB 2X O P aa w BB Y X
Page 8 - DD; threads
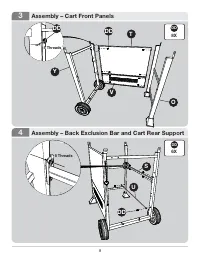
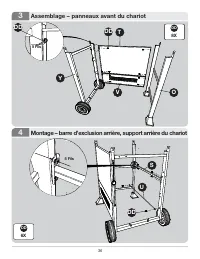
8 3 4 assembly – Cart Front Panels assembly – Back exclusion Bar and Cart rear support DD 8X DD 6X Y DD V O t DD DD 5 threads u s 5 threads
Page 10 - assembly – Grill Body to Base
10 7 assembly – Grill Body to Base DD 4X nOte: Fully tighten all nuts from front panel and back brace screws at this time. CautiOn: 2 people required for safe assembly. O DD Y D DD
Page 11 - assembly – Left side table
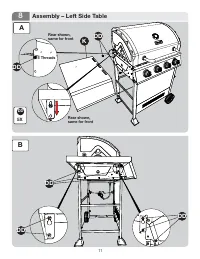
11 8 a B assembly – Left side table DD 5X DD DD DD DD DD 5 threads rear shown, same for front rear shown, same for front K
Page 13 - hh; hh
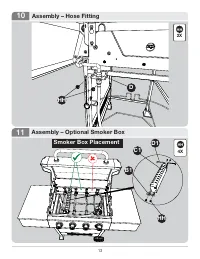
13 hh D 10 assembly – hose Fitting 11 assembly – Optional smoker Box D1 hh 4X hh C1 B1 smoker Box Placement hh 2X
Page 16 - Operation instructions; CheCKinG FOr LeaKs; To prevent fire or explosion while testing for a leak:; PerFOrM LeaK test; WARNING; Only use the regulator and hose assembly provided!
16 Operation instructions CheCKinG FOr LeaKs After all connections are made, check all connections and fittings on the LP gas tank valve, gas hose and regulator for leaks with a water and soap solution. To prevent fire or explosion while testing for a leak: • Always perform leak test prior to lighti...
Page 17 - COnneCtinG Gas CYLinDer; result in leakage of propane.; CAUTION; a. Do not store a spare LP-gas cylinder under or near this appliance.
17 Operation instructions COnneCtinG Gas CYLinDer The propane gas supply cylinder to be used must be constructed and marked in accordance with the Specifications for LP Gas Cylinders of the U.S. Department of Transportation (D.O.T.) or the National Standard of Canada, CAN/CSA-B339, Cylinders, Sphere...
Page 18 - COnneCtinG the LP tanK
18 Operation instructions nOte: Other cylinders may be acceptable for use with this appliance provided they are compatible with the appliance nesting hole and retention means. Refer to Step 16 of the Assembly Instructions for correct cylinder to cylinder holder connection. WARNING aLL instruCtiOns a...
Page 19 - Lighting the Grill; Check that the control knobs are in the; searing Food with the searPLusTM Burner:
19 Operation instructions Lighting the Grill Before first use: Remove all hangings or plastic straps, if present. Before you cook on your new gas grill, it is important to clean your grill with heat. To do this, operate the grill for approximately 15 minutes with the lid closed and the control knobs...
Page 20 - LiGhtinG the GriLL with a MatCh; and repeat the lighting procedure.; SHUTDOWN INSTRUCTIONS
20 Operation instructions LiGhtinG the GriLL with a MatCh 1. Open the lid.2. Insert a match in the end of the match holder that is installed on the inside of the cabinet door.3. Light the match.4. Immediately place the lit match through the spaces in the grill grates near the ports of the burner bet...
Page 21 - Care and Maintenance; Cooking Grates; Recommended Cleaning Supplies; Rinse with warm water.; inside Bottom Pan of Grill Body; Clean residue with wire brush and wash with mild dish soap; Grease Cup; Empty the grease cup and clean with mild dish soap and warm; Checking The Flame; For maximum fuel efficiency and cooking performance, flame
21 Care and Maintenance Cooking Grates The best time to “burn-off” the cooking grates is after every use (approx. 15 minutes). The grill is already hot from cooking, thus requiring less fuel to reach the necessary temperature for “burn-off.” To “burn off” or heat-clean your grill, turn the burners t...
Page 22 - Burner assembly; burner out of firebox.
22 Figure 2 Care and Maintenance Burner assembly removing the Burner assembly 1. Make sure all control knobs are in the OFF position, gas supply valve is closed, and the gas hose is disconnected from the gas supply. 2. Open lid and remove warming rack, cooking grates, and heat tents. 3. Remove hinge...
Page 23 - Cleaning the Burner assembly; – Make sure the grill is cool.; re-installing the Burner; Other Care and Maintenance; and clear from debris.
23 Care and Maintenance Cleaning the Burner assembly – Make sure the grill is cool. 1. Ensure all burner ports are clear of clogs. Use of a pin or paper clip works well. 2. Ensure burner is free of any damage. If damage is found, replace with new burner. 3. Ensure the end of the burner and primary a...
Page 24 - troubleshooting; PrOBLeM; on heat tents or in firebox.; the burner will not
24 troubleshooting If you have any questions regarding the product, please call customer service at 1-877-447-4768, 8:00 a.m. – 4:30 p.m., CST, Monday – Friday. PrOBLeM POssiBLe Cause COrreCtiVe aCtiOn the burner will not light using the igniter procedure (weak or no spark being generated). 1. The i...
Page 25 - Limited warranty; -Year Limited warranty; of defects except for rust, which may appear after repeated use.
25 Limited warranty 1-Year Limited warranty This LP gas grill is warranted for 1 year (5 years on the Stainless Steel burners) against broken or damaged parts at the time of purchase. It is warranted to be free of defects. Paint is warranted to be free of defects except for rust, which may appear af...
Page 26 - replacement Parts List
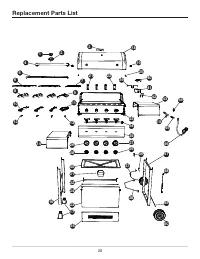
26 replacement Parts List 1 2 3 4 5 6 7 8 9 10 11 12 13 14 15 18 19 16 20 21 22 37 35 45 49 36 40 46 50 48 44 47 42 41 44 43 44 44 39 23 24 252729 17 26 28 30 34 32 33 31 38
Page 27 - Description; Firebox assembly with heat shield
27 For replacement parts, call our customer service department at 1-877-447-4768, 8:00 a.m. – 4:30 p.m., CST, Monday – Friday. Part Description Part # 1 Temperature gauge assembly 70-02-264 2 Temperature gauge bezel 70-01-906 3 Badge 104-22006 4 Lid handle assembly 70-01-907 5 Warming rack 70-02-613...
Page 28 - rePLaCeMent Parts List – COntinueD
28 38 Side exclusion bar 70-02-435 39 Smoker box back support with hardware 70-02-564 40 Smoker box lid with hardware 70-01-929 41 Smoker box body with hardware 70-01-930 42 Smoker box front support with hardware 70-01-932 43 Right side table assembly 70-02-436 44 Connector 70-02-110 45 Connector fi...
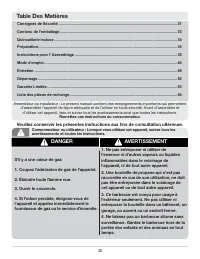
Page 30 - table Des Matières; remettez ces instructions au consommateur.; s’il y a une odeur de gaz:; aVertisseMent
30 DanGer table Des Matières Assembleur ou installateur : Le présent manuel contient des renseignements importants qui permettent d’assembler l’appareil de façon adéquate et de l’utiliser en toute sécurité. Avant d’assembler et d’utiliser cet appareil, lisez et suivez tous les avertissements ainsi q...
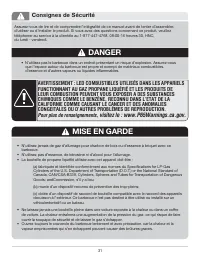
Page 31 - Consignes de sécurité; d’essence et d’autres vapeurs ou liquides inflammables.; Mise en GarDe; véhiculerécréatif ou un bateau.
31 DanGer Consignes de sécurité Assurez-vous de lire et de comprendre l’intégralité de ce manuel avant de tenter d’assembler, d’utiliser ou d’installer le produit. Si vous avez des questions concernant ce produit, veuillez téléphoner au service à la clientèle au 1-877-447-4768, 08:00-16 heures 30, H...
Page 32 - dans le voisinage de cet appareil ou de tout autre appareil.
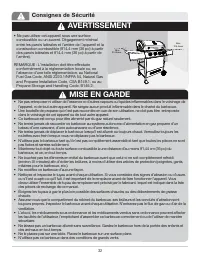
32 36in 914.4mm 36in 914.4mm 36in 914.4mm Mise en GarDe aVertisseMent • Ne pas utiliser cet appareil sous une surface combustible ou un auvent. Dégagement minimal entre les parois latérales et l’arrière de l’appareil et la construction combustible (914,4 mm (36 po) à partir des parois latérales et 9...
Page 33 - Contenu de l’emballage
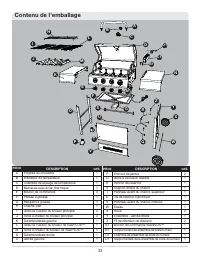
33 PiÈCe DesCriPtiOn QtÉ . P Embout de jambe 2 Q Barre d’exclusion latérale 1 R Renfort de réservoir 1 S Support arrière du chariot 1 T Panneau avant du chariot, supérieur 1 U Vis de retenue cylindrique 1 V Panneau avant du chariot, inférieur 1 W Essieu 1 X Roue 2 Y Ensemble - Jambe droite 1 Z Fil d...
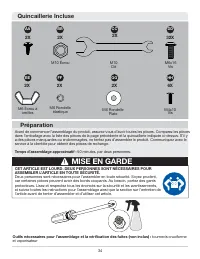
Page 34 - Préparation; Clé; Quincaillerie incluse; élastique; temps d’assemblage approximatif :; l’article avant de tenter d’assembler et d’utiliser cet article.
34 Préparation CC aa BB DD M6x16 Vis M10 Écrou 2X 32X 2X 2X 2X 2X M6 Rondelle Plate FF GG ee M10 Clé M4x10 Vis 6X hh 2X Mise en GarDe Quincaillerie incluse M6 Écrou à oreilles M6 Rondelle élastique Avant de commencer l’assemblage du produit, assurez-vous d’avoir toutes les pièces. Comparez les pièce...
Page 35 - instructions pour l’ assemblage
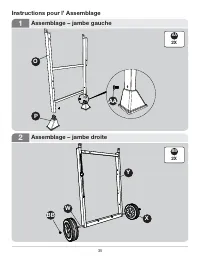
35 1 2 assemblage – jambe gauche assemblage – jambe droite aa 2X BB 2X instructions pour l’ assemblage w BB Y X O P aa
Page 38 - assemblage – corps du gril à la base
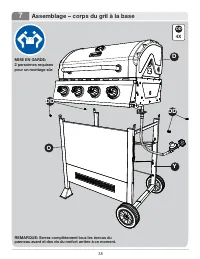
38 7 assemblage – corps du gril à la base DD 4X Mise en GarDe: 2 personnes requises pour un montage sûr. reMarQue: serrez complètement tous les écrous du panneau avant et des vis du renfort arrière à ce moment. O DD Y D DD
Page 39 - assemblage – étagère latérale gauche
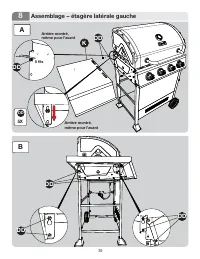
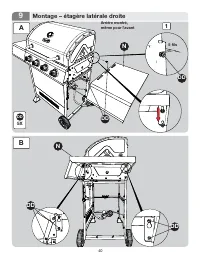
39 8 assemblage – étagère latérale gauche arrière montré, même pour l’avant arrière montré, même pour l’avant a B DD 5X DD DD DD DD DD K 5 fils
Page 41 - Placement de ensemble de boîte fumeur
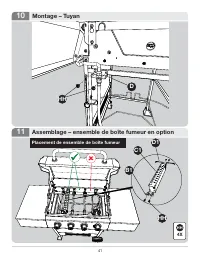
41 10 Montage – tuyan hh D 11 assemblage – ensemble de boîte fumeur en option D1 hh 4X hh C1 B1 Placement de ensemble de boîte fumeur
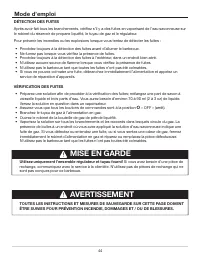
Page 44 - Mode d’emploi; utilisez uniquement l’ensemble régulateur et tuyau fourni!; Si vous avez besoin d’une pièce de; DÉteCtiOn Des Fuites; sur; VÉriFiCatiOn Des Fuites; Versez la solution en question dans un vaporisateur.
44 Mise en GarDe aVertisseMent Mode d’emploi tOutes Les instruCtiOns et Mesures De sauVeGarDe sur Cette PaGe DOiVent Être suiVies POur PrÉVentiOn inCenDie, DOMMaGes et / Ou De BLessures. utilisez uniquement l’ensemble régulateur et tuyau fourni! Si vous avez besoin d’une pièce de rechange, communiqu...
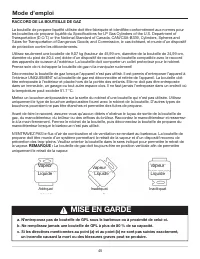
Page 45 - raCCOrD De La BOuteiLLe De GaZ; de protection contre les débordements.; Adéquat
45 Mise en GarDe raCCOrD De La BOuteiLLe De GaZ La bouteille de propane liquéfié utilisée doit être fabriquée et identifiée conformément aux normes pour les bouteilles de propane liquéfié du Specifications for LP Gas Cylinders of the U.S. Department of Transportation (D.O.T.) or the National Standar...
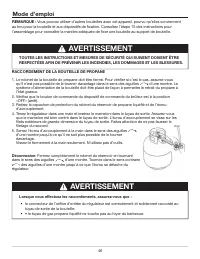
Page 46 - raCCOrDeMent De La BOuteiLLe De PrOPane; dans le sens des aiguilles
46 aVertisseMent aVertisseMent Mode d’emploi raCCOrDeMent De La BOuteiLLe De PrOPane 1. Le robinet de la bouteille de propane doit être fermé. Pour vérifier si c’est le cas, assurez-vous qu’il n’est pas possible de le tourner davantage dans le sens des aiguilles d’une montre. Le système d’alimentati...
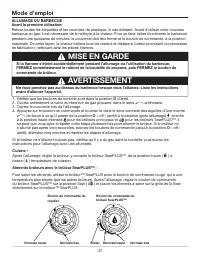
Page 47 - « off »; aliments brûleurs avec le brûleur searPLusTM :; ) et placer les aliments à saisir sur la grille de la Sear; aLLuMaGe Du BarBeCue; de fabrication, nettoyant ainsi les pièces internes.
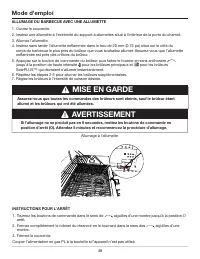
47 1. Vérifiez que les boutons de contrôle sont dans la position O d’arrêt. 2. Ouvrez entièrement la valve du réservoir de gaz propane, dans le sens antihoraire. 3. Ouvrez le couvercle lors de l’allumage. 4. Appuyez sur le bouton de commande et tournez-le dans le sens contraire des aiguilles d’une m...
Page 48 - aLLuMaGe Du BarBeCue aVeC une aLLuMette; SearPLUSTM; INSTRUCTIONS POUR L’ARRÊT; Tournez les boutons de commande dans le sens de
48 Mode d’emploi Allumage à l’allumette lighting with match Mise en GarDe aVertisseMent aLLuMaGe Du BarBeCue aVeC une aLLuMette 1. Ouvrez le couvercle.2. Insérez une allumette à l’extrémité du support à allumettes situé à l’intérieur de la porte du charriot. 3. Allumez l’allumette. 4. Insérez sans t...
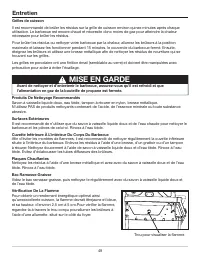
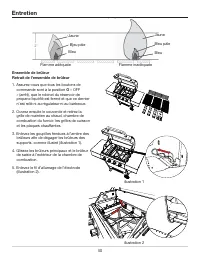
Page 49 - entretien; Grilles de cuisson; nécessaire pour brûler les résidus.; Produits De Nettoyage Recommandés; tiède. Évitez d’éclabousser les tubes diffuseurs des brûleurs.; Plaques Chauffantes; Trou pour visualiser la flamme
49 entretien Grilles de cuisson Il est recommandé de brûler les résidus sur la grille de cuisson environ quinze minutes après chaque utilisation. Le barbecue est encore chaud et nécessite donc moins de gaz pour atteindre la chaleur nécessaire pour brûler les résidus. Pour brûler les résidus ou netto...
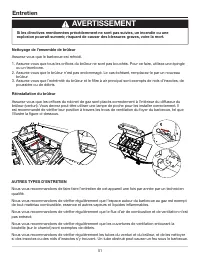
Page 51 - nettoyage de l’ensemble de brûleur; Assurez-vous que le barbecue est refroidi.; réinstallation du brûleur
51 entretien si les directives mentionnées précédemment ne sont pas suivies, un incendie ou une explosion pourrait survenir, risquant de causer des blessures graves, voire la mort. aVertisseMent nettoyage de l’ensemble de brûleur Assurez-vous que le barbecue est refroidi. 1. Assurez-vous que tous le...
Page 52 - Dépannage; PrOBLÈMe
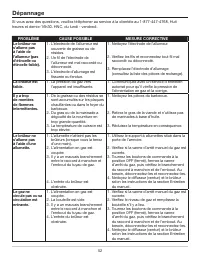
52 Dépannage Si vous avez des questions, veuillez téléphoner au service à la clientèle au 1-877-447-4768, Huit heures et demie-16h30, HNC, du lundi - vendredi. PrOBLÈMe Cause POssiBLe Mesure COrreCtiVe Le brûleur ne s’allume pas à l’aide de l’allumeur (pas d’étincelle ou étincelle faible). 1. L’élec...
Page 53 - Limitée Garantie de 1 an; Nom de l’article : Gril à gaz LP 4 brûleurs avec brûleur SearPLUSTM; Garantie Limitée
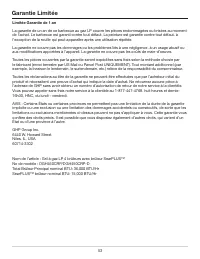
53 Limitée Garantie de 1 an La garantie de un an de ce barbecue au gaz LP couvre les pièces endommagées ou brisées au moment de l’achat. Le barbecue est garanti contre tout défaut. La peinture est garantie contre tout défaut, à l’exception de la rouille qui peut apparaître après une utilisation répé...
Page 54 - Liste des pièces de rechange
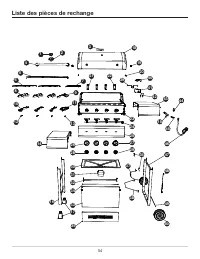
54 Liste des pièces de rechange 1 2 3 4 5 6 7 8 9 10 11 12 13 14 15 18 19 16 20 21 22 37 35 45 49 36 40 46 50 48 44 47 42 41 44 43 44 44 39 23 24 252729 17 26 28 30 34 32 33 31 38
Page 55 - Liste Des PiÈCes De reChanGe
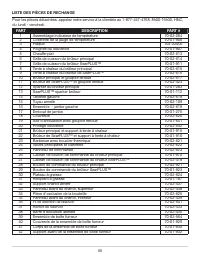
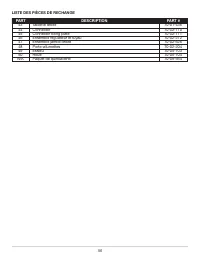
55 Part DesCriPtiOn Part # 1 Assemblage indicateur de température 70-02-264 2 Collerette de la jauge de température 70-01-906 3 Plaque 104-22006 4 Poignée du couvercle 70-01-907 5 Chauffe-plat 70-02-613 6 Grille de cuisson du brûleur principal 70-02-614 7 Grille de cuisson du brûleur SearPLUS™ 70-01...
Page 56 - Connector fixing plate
56 Part DesCriPtiOn Part # 43 Tablette droite 70-01-436 44 Connector 70-02-110 45 Connector fixing plate 70-02-111 46 Ensemble régulateur et tuyau 70-02-272 47 Ensemble jambe droite 70-02-626 48 Porte-allumettes 70-02-204 49 Essieu 70-05-103 50 Roue 70-05-104 N/A Paquet de quincaillerie 70-09-564 Li...
Page 58 - indice; Guarde estas instrucciones para referencia futura.; PeLiGrO; de ensamblar y utilizar este electrodoméstico.; entregue estas instrucciones al consumidor.; si percibe olor a gas:
58 indice Guarde estas instrucciones para referencia futura. PeLiGrO aVertenCia Informacion de seguridad ................................................................................................................ 59Contenido del paquete .............................................................
Page 59 - informacion de seguridad
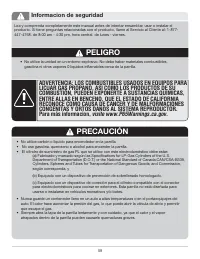
59 • No utilice la unidad en un entorno explosivo. No debe haber materiales combustibles, gasolina ni otros vapores 0 Iiquidos inflamables cerca de la parrilla. • No utilice carbón o líquido para encendedor en la parrilla. • No use gasolina, queroseno o alcohol para encender la parrilla. • El cilind...
Page 60 - información de seguridad; PreCauCiÓn; • No coloque la parrilla debajo de construcciones o
60 • NO almacene ni utilice gasolina ni otros vapores o líquidos inflamables dentro de 8 metros (25 pies) de distancia de éste ni de ningún otro electrodoméstico. • Cualquier tanque de gas propano líquido que no esté conectado y en uso debe almacenarse a una distancia mínima de 3 metros de éste o cu...
Page 61 - Contenido del paquete
61 PieZa DesCriPCiÓn Cant. P Tapa de extremo de pierna 2 Q Barra de exclusión lateral 1 R Refuerzo del tanque 1 S Carrito soporte trasero 1 T Panel delantero del carrito-parte superior 1 U Exclusión del cilindro 1 V Panel delantero del carrito-inferior 1 W Eje 1 X Rueda 2 Y Montaje de pierna derecha...
Page 62 - Preparacion; aditamentos; tiempo estimado de ensamblaje:
62 Preparacion CC aa BB DD M6x16 Tornillo M10 Tuerca 2X 32X 2X 2X 2X 2X M6 Arandela Plana FF GG M6 Arandela de Resorte ee M10 Llave M4x10 Tornillo 6X hh 2X PreCauCiÓn aditamentos M6 Tuerca mariposa Antes de comenzar a ensamblar el praducto, asegurese de tener todas las piezas. Compare las piezas con...
Page 63 - instrucciones de ensamblaje
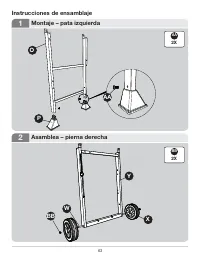
63 1 2 Montaje – pata izquierda asamblea – pierna derecha aa 2X BB 2X instrucciones de ensamblaje O P aa w BB Y X
Page 64 - hilos
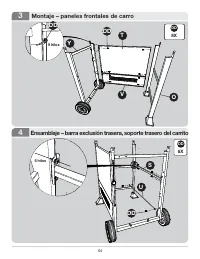
64 3 4 Montaje – paneles frontales de carro ensamblaje – barra exclusión trasera, soporte trasero del carrito DD 8X DD 6X Y DD V O t DD 5 hilos DD u s 5 hilos
Page 65 - GG
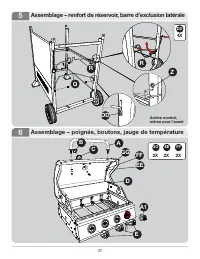
65 5 6 ensamblaje – mango, perillas y medidor de temperatura ensamblaje – refuerzo de tanque y barra de exclusión lateral DD 4X ee 2X FF 2X GG 2X se muestra en la parte trasera, igual para D GG a1 ee FF C B a e DD r Q r Z
Page 66 - asamblea – el cuerpo de la parrilla a la base
66 7 asamblea – el cuerpo de la parrilla a la base DD 4X PreCauCiÓn: se requieren 2 personas para un montaje seguro nOta: apriete completamente todas las tuercas del panel delantero y los tornillos de la abrazadera trasera en este momento. O DD Y D DD
Page 67 - ensamblaje – mesa lateral izquierda
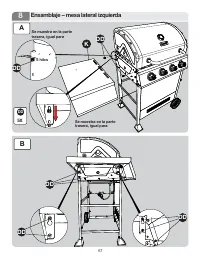
67 8 B ensamblaje – mesa lateral izquierda se muestra en la parte trasera, igual para 5 hilos se muestra en la parte trasera, igual para a DD 5X DD DD DD DD DD K
Page 68 - ensamblaje – estante del lado derecho
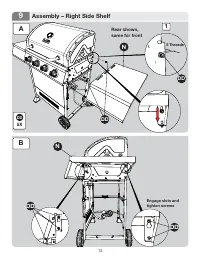
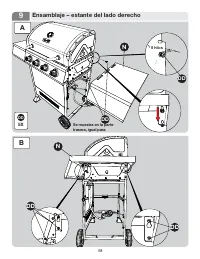
68 a B se muestra en la parte trasera, igual para 5 hilos 9 ensamblaje – estante del lado derecho DD 5X DD n n DD DD DD
Page 69 - Colocación de la caja de fumador
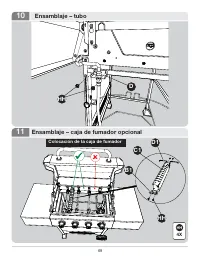
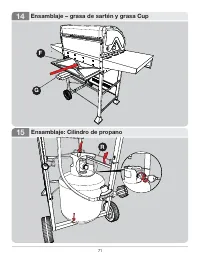
69 10 ensamblaje – tubo hh D 11 ensamblaje – caja de fumador opcional D1 hh 4X hh C1 B1 Colocación de la caja de fumador
Page 72 - instrucciones de funcionamiento; Búsqueda de fugas; Para evitar incendios o explosiones al revisar una fuga:; realización de una prueba de fugas; Conecte la manguera de gas al suministro de gas.
72 PreCauCiÓn aDVertenCia instrucciones de funcionamiento Búsqueda de fugas Después de hacer todas las conexiones, verifique que ninguna de las conexiones y los conectores de la válvula del tanque de gas PL, la manguera de gas ni el regulador tenga fugas con una solución de agua y jabón. Para evitar...
Page 73 - Conexión del cilindro de gas; sobrellenado homologado.; Liquido
73 PreCauCiÓn instrucciones de funcionamiento Conexión del cilindro de gas El cilindro de suministro de gas propano que se utilizará debe estar fabricado y marcado según las Specifications for LP-Gas Cylinders of the U.S. Department of Transportation (D.O.T.) or the National Standard of Canada, CAN/...
Page 74 - COneXiÓn DeL tanQue De Gas PrOPanO; suministro del cilindro para la extracción de vapores.; En el proceso de conexión, asegúrese de que:
74 aDVertenCia aDVertenCia instrucciones de funcionamiento COneXiÓn DeL tanQue De Gas PrOPanO 1. La perilla del tanque de gas propano debe estar cerrada. Asegúrese de girar la perilla en sentido de las manecillas del reloj propano debe estar cerrada. Asegúrese de girar la perilla en sentido de las m...
Page 75 - Verifique que las perillas de control están en la posición; alimentación abrasador con el quemador searPLusTM:; encender la parrilla
75 1. Verifique que las perillas de control están en la posición O de apagado. 2. Abra completamente la válvula del tanque girándola en el sentido inverso a las manecillas del reloj. 3. Abra la tapa durante el encendido. 4. Presione y gire la perilla de control en dirección contraria a las manecilla...
Page 76 - encendido de la parrilla con un fósforo; elfósforo encendido esté cerca de los orificios del quemador.; Instrucciones de Apagado; Cierre la válvula del tanque completamente girándola en la
76 cerillos/fósforos lighting with match PreCauCiÓn aDVertenCia instrucciones de funcionamiento encendido de la parrilla con un fósforo 1. Abra la tapa.2. Coloque un fósforo en el extremo del contenedor de fósforos instalado en el interior de la puerta del gabinete. 3. Encienda el fósforo.4. Inmedia...
Page 77 - Cuidado y mantenimiento; rejillas de cocción; PreCauCiOn; Artículos De Limpieza Recomendados
77 Cuidado y mantenimiento rejillas de cocción El mejor momento para “quemar” la suciedad las rejillas de cocción es después de cada uso (aproximadamente 15 minutos). La parrilla ya está caliente desde la cocción, por lo tanto, requiere menos combustible para obtener la temperatura necesaria para “q...
Page 78 - de OFF, que la válvula del tanque de
78 Figura 2 Figura 1 ensamble del quemador extracción Del ensamble Del Quemador 1. Asegúrese de que todas las perillas de control se encuentran en la posición de OFF, que la válvula del tanque de PL está cerrada y que el tanque está desconectado del regulador y alejado de la parrilla. 2. Abra la tap...
Page 79 - aDVertenCia; o sujetapapeles funciona bien.; reinstalación del quemador; se ilustra a continuación.; Otros cuidados y mantenimiento
79 aDVertenCia Cuidado y mantenimiento si no siguen las instrucciones que aparecen anteriormente, podría producirse unincendio o una explosión y causar lesiones graves o la muerte. Limpieza del ensamble del quemador – asegúrese de que la parrilla esté fría. 1. Asegúrese de que todos los orificios de...
Page 80 - solución de Problemas; PrOBLeMa
80 solución de Problemas Si tiene preguntas relacionadas con el producto, llame al Servicio al Cliente al 1-877-447-4768, 8:00 a.m. - 4:30 p.m. CST, de lunes - viernes. PrOBLeMa Causa POsiBLe COrreCtiVa aCCiÓn el quemador no se enciende con el procedimiento del encendedor (se genera una chispa débil...
Page 81 - Garantía limitada; -año de garantía limitada; electrodoméstico. Los gastos de reparación no están cubiertos.
81 Garantía limitada 1-año de garantía limitada Esta parrilla a gas PL está garantizada por 1 año contra piezas rotas o dañadas desde la fecha de compra. Se garantiza que está libre de defectos. La pintura está garantizada contra defectos, salvo la oxidación, la cual puede aparecer después del uso r...
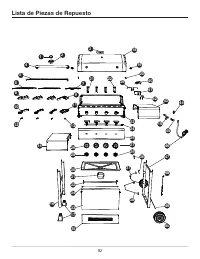
Page 82 - Lista de Piezas de repuesto
82 Lista de Piezas de repuesto 1 2 3 4 5 6 7 8 9 10 11 12 13 14 15 18 19 16 20 21 22 37 35 45 49 36 40 46 50 48 44 47 42 41 44 43 44 44 39 23 24 252729 17 26 28 30 34 32 33 31 38


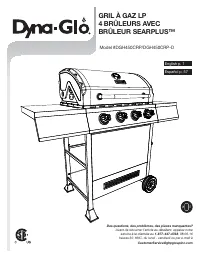


 Dyna-Glo DG250T-D User Manual
 Dyna-Glo DGF371CRP-D User Manual
 Dyna-Glo DGH474CRP User Manual
 Dyna-Glo DGL260SNP-D User Manual
 Dyna-Glo DGN486DNC-D User Manual
 Dyna-Glo DGN576DNC-D User Manual
 Dyna-Glo DGN576SNC-D User Manual
 Dyna-Glo DGP552SSN-D User Manual
 Dyna-Glo DGP552SSP-D User Manual
 Dyna-Glo DGSS287CB-D User Manual
 Dyna-Glo BF20NMDG-4 User Manual
 Dyna-Glo EG5000DGP User Manual
 Dyna-Glo EG7500DGP User Manual
 Dyna-Glo IR12DTL-2 User Manual
 Dyna-Glo IR30PMDG-1 User Manual
 Dyna-Glo KFA220DGD User Manual
 Dyna-Glo RA18LPDG User Manual
 Dyna-Glo RMC-FA60DGD User Manual
 Dyna-Glo RMC-FA125DGD User Manual
 Dyna-Glo RMC-LPC25DG User Manual