Dewalt DW734 - User Manual
Dewalt DW734 Electric Planer – User Manual, read for free online in PDF format. We hope this helps you resolve any issues you may have. If you have further questions, please contact us through the contact form.


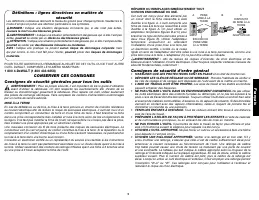

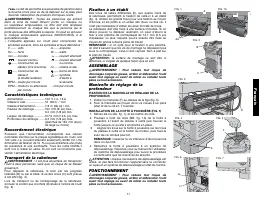
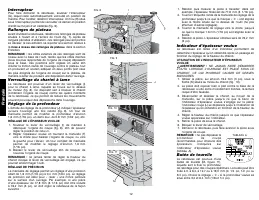
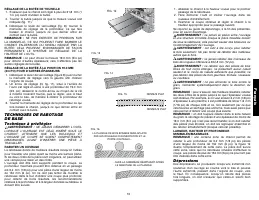
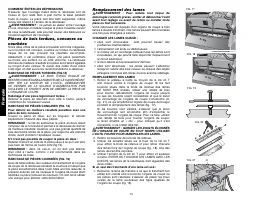
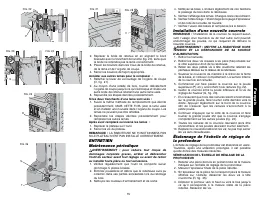


Table of Contents:
- Page 3 – IF YOU HAVE ANY QUESTIONS OR COMMENTS ABOUT THIS OR ANY D; SAVE THESE INSTRUCTIONS; Not Recommended
- Page 4 – English; Bench Mounting; Specifications; WALT tools are; Transporting the Planer; If you elect to mount your planer to a piece; ASSEMBLY
- Page 5 – When using the dust collection attachment do; Leveling; Maintenance; TO SET THE FINISHED THICKNESS; DO NOT SWITCH THE UNIT ON WITH
- Page 6 – Turret Stop; TO SET A PLANING DEPTH; Snipe; TO AVOID SNIPE
- Page 7 – Do not place your body between the; Twisted, Cupped and Bowed Wood; TWISTED WOOD MAY JAM YOUR; To plane only slightly twisted material:; Ripping the material reduces the severity of the; If ripping the material is not an option:; Do not flip the board back and forth between each; CHANGING THE PLANER KNIVES; WARNING: To reduce the risk of serious personal injury,
- Page 8 – are dull and result in frequent breaker trips.; TO CHANGE PLANER KNIVES; WARNING: KEEP YOUR FINGERS AWAY FROM; If only one edge of the knife is worn:; MAINTENANCE; Periodic Maintenance; Installing a New Belt
- Page 9 – TO CHECK THE DEPTH ADJUSTMENT SCALE; YEAR FREE SERVICE
- Page 10 – Troubleshooting Guide
- Page 11 – causera la mort ou des blessures graves.; CONSERVER CES CONSIGNES
- Page 12 – Français; Non recommandé; Fixation à un établi
- Page 13 – WALT
- Page 14 – mise à niveau des rallonges de plateau; NE JAMAIS FAIRE DÉMARRER
- Page 15 – RÉGLAGE DE LA BUTÉE DE TOURELLE; AVERTISSEMENT; Dépressions
- Page 16 – Remplacement des lames; AVERTISSEMENT : Pour réduire tout risque de
- Page 17 – Accéder aux autres lames pour le remplacer :; AVERTISSEMENT : pour réduire tout risque de; Installation d’une nouvelle courroie; AVERTISSEMENT : METTRE LA RABOTEUSE HORS
- Page 18 – PLATEAU; afin d’éviter les démarrages; Balais; Nettoyage et lubrification; Ne jamais laisser de liquide s’infiltrer à; Accessoires; l’utilisation d’accessoires autres que ceux; Réparation; CONTRAT D’ENTRETIEN GRATUIT D’UN AN
- Page 19 – Guide de dépannage
- Page 20 – No recomendado
- Page 21 – Montaje sobre la mesa de trabajo
- Page 22 – Español; ADVERTENCIA; Cómo nivelar las
- Page 23 – NO ENCIENDA LA UNIDAD CON EL; Tope tipo torreta; PARA FIJAR UNA PROFUNDIDAD DE CEPILLADO; NO ENCIENDA LA UNIDAD SI EL; PARA CEPILLAR SU MATERIAL; Guía de Resolución de Problemas
- Page 24 – Para los mejores resultados, cepille ambos lados; PARA EVITAR SNIPE; El aserrar el material reduce la gravedad del arco y; Si no puede aserrar el material:; No dé vuelta la tabla entre cada pasada.; CAMBIE LAS HOJAS CUANDO:
- Page 25 – PARA CAMBIAR LAS CUCHILLAS DEL CEPILLO; Use la llave en T para sacar la bandeja de herramientas.; Si sólo un canto de la cuchilla está gastado:; Voltee la cuchilla para que el canto afilado y sin uso
- Page 26 – Si las cuchillas tienen ambos cantos romos:; MANTENIMIENTO; Mantenimiento periódico; ADVERTENCIA: Para reducir el riesgo de lesiones; Cómo instalar una nueva correa; ADVERTENCIA: APAGUE Y DESENCHUFE EL
- Page 27 – MESA; Escobillas; Limpieza y lubricación; PARA REPARACIÓN Y SERVICIO DE SUS; PARA OTRAS LOCALIDADES:; Póliza de Garantía
- Page 28 – EXCEPCIONES; Garantía limitada por tres años; AÑO DE SERVICIO GRATUITO
- Page 29 – Guía de resolución de problemas; Cómo cambiar las cuchillas del cepillo.
DW734
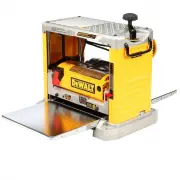
12-1/2" (318 mm) Heavy-Duty Portable Thickness Planer
Raboteuse portative de service intensif de 318 mm (12-1/2 po)
Cepillo portátil de 318 mm (12-1/2") para trabajo pesado
INSTRUCTION MANUAL
GUIDE D'UTILISATION
MANUAL DE INSTRUCCIONES
INSTRUCTIVO DE OPERACIÓN, CENTROS DE SERVICIO Y PÓLIZA
DE GARANTÍA.
ADVERTENCIA:
LÉASE ESTE INSTRUCTIVO
ANTES DE USAR EL PRODUCTO.
Questions? See us on the World Wide Web at www.dewalt.com
Before returning this product call
1-800-4-D
E
WALT
IF YOU SHOULD EXPERIENCE A PROBLEM WITH YOUR D
E
WALT PURCHASE,
CALL 1-800-4 D
E
WALT
IN MOST CASES, A D
E
WALT REPRESENTATIVE CAN RESOLVE
YOUR PROBLEM OVER THE PHONE.
IF YOU HAVE A SUGGESTION OR COMMENT, GIVE US A CALL.
YOUR FEEDBACK IS VITAL TO THE SUCCESS OF D
E
WALT'S
QUALITY IMPROVEMENT PROGRAM.
"Loading the manual" means you need to wait until the file loads and becomes available for online reading. Some manuals are very large, and the time they take to appear depends on your internet speed.
Other Manuals for Dewalt DW734
Summary
English 1 Definitions: Safety Guidelines The definitions below describe the level of severity for each signal word. Please read the manual and pay attention to these symbols. DANGER: Indicates an imminently hazardous situation which, if not avoided, will result in death or serious injury . WARNING: ...
English 2 • DISCONNECT TOOLS before servicing; when changing accessories, such as blades, bits, cutters, and the like. • REDUCE THE RISK OF UNINTENTIONAL STARTING. Make sure switch is in off position before plugging in. • USE RECOMMENDED ACCESSORIES. Consult the instruction manual for recommended ac...
English 3 Depth Adjustment Crank Handle TO ATTACH THE DEPTH ADJUSTMENT CRANK HANDLE 1. Insert the crank handle (F) over the shaft (Fig. 5). 2. Secure the crank handle in place with the star screw and T-wrench provided. DUST HOOD INSTALLATION (FIG. 1) 1. Remove screws (AA, fig. 1), save these screws....