Page 3 - A Tour of Your Computer; Front View
A Tour of Your Computer: Dell Inspiron 4100 Back to Contents Page A Tour of Your Computer Dell™ Inspiron™ 4100 Front View Left Side View Right Side View Back View Bottom View Front View CAUTION: Do not block, push objects into, or allow dust to accumulate in the air vents. Doing so can damage the co...
Page 5 - Display Latch; Display
A Tour of Your Computer: Dell Inspiron 4100 7 module bay 14 AccessDirect button Display Latch This latch keeps the display closed. Display The computer has a color LCD. Keyboard Status Lights The green lights located above the keyboard indicate the following: Keyboard Status Lights Turns on when the...
Page 6 - Microphone
A Tour of Your Computer: Dell Inspiron 4100 Turns on when the uppercase letter function is enabled Turns on when the scroll lock function is enabled Microphone Record audio with the internal microphone. Device Status Lights ● The light turns on when the computer is turned on. ● The light turns on wh...
Page 7 - Touch Pad; Display Latch Button
A Tour of Your Computer: Dell Inspiron 4100 ❍ Flashing green: The battery is fully charged. ❍ Solid green: The battery is charging. If the computer is running on a battery, the light operates as follows: ❍ Off: The battery is adequately charged. ❍ Flashing orange: The battery charge is low. ❍ Solid ...
Page 8 - Keyboard; Power Button; DellTM AccessDirectTM Button; Left Side View
A Tour of Your Computer: Dell Inspiron 4100 These buttons correspond to the left and right buttons on a standard mouse. Keyboard The keyboard includes a numeric keypad as well as the Microsoft® Windows® logo key, . Track Stick Use the track stick and track stick buttons as you would use a mouse. Pow...
Page 9 - PC Card Slot; Security Cable Slot
A Tour of Your Computer: Dell Inspiron 4100 1 PC Card slot 3 security cable slot 2 hard drive 4 speaker (one of two) PC Card Slot The PC Card slot has two connectors that support various types of PC Cards (also referred to as PCMCIA cards), including modems and network adapters. Hard Drive The hard ...
Page 10 - Speakers; Right Side View
A Tour of Your Computer: Dell Inspiron 4100 This slot allows you to attach a commercially available antitheft device to the computer. Instructions for installing antitheft devices are usually included with the device. NOTICE: Before you buy an antitheft device, ensure that it will work with the secu...
Page 11 - Infrared Sensor
A Tour of Your Computer: Dell Inspiron 4100 1 speaker (one of two) 5 network connector 2 infrared sensor 6 S-video TV-out connector 3 audio connectors 7 air vent 4 modem connector Infrared Sensor file:///F|/Service%20Manuals/Dell/Inspiron/4100/tour.htm (9 of 17) [2/28/2004 7:03:49 AM]
Page 12 - Audio Connectors
A Tour of Your Computer: Dell Inspiron 4100 The infrared sensor lets you transfer files from your computer to another infrared- compatible device without using cable connections. Audio Connectors Attach headphones or speakers to the connector. file:///F|/Service%20Manuals/Dell/Inspiron/4100/tour.htm...
Page 13 - Modem Connector
A Tour of Your Computer: Dell Inspiron 4100 Attach a microphone to the connector. Modem Connector To use your computer's internal modem, connect the telephone cable to the modem connector. For information on using the modem, see the online modem documentation supplied with your computer. Network Con...
Page 14 - Air Vent; Back View
A Tour of Your Computer: Dell Inspiron 4100 S-Video TV-Out Connector Use this connector to attach your computer to a television. Air Vent HINT: The computer turns on the fans only when the computer gets hot. They may run most of the time or very seldom, depending on your use of the computer. Because...
Page 15 - Serial Connector
A Tour of Your Computer: Dell Inspiron 4100 CAUTION: Do not block, push objects into, or allow dust to accumulate in the air vents. Doing so can damage the computer or cause a fire. 1 air intake 6 PS/2 connector 2 serial connector 7 USB connector 3 parallel connector 8 video monitor connector 4 dock...
Page 16 - USB Connector
A Tour of Your Computer: Dell Inspiron 4100 HINT: Docking devices may not be available in all countries. Use this connector to attach the optional docking device, also called an advanced port replicator (APR). A docking device, or APR, allows you to easily use external devices with your computer, su...
Page 17 - Video Monitor Connector; AC Adapter Connector
A Tour of Your Computer: Dell Inspiron 4100 Use this connector to attach USB devices, such as a mouse, keyboard, or printer. Video Monitor Connector Use this connector to attach an external monitor. AC Adapter Connector This connector attaches an AC adapter to the computer. The AC adapter converts A...
Page 18 - Bottom View
A Tour of Your Computer: Dell Inspiron 4100 CAUTION: The AC adapter works with electrical outlets worldwide. However, power connectors and power strips vary among countries. Using an incompatible cable or improperly connecting the cable to the power strip or electrical outlet may cause fire or equip...
Page 19 - Module Release Latch; Battery Release Latch
A Tour of Your Computer: Dell Inspiron 4100 1 air intake 4 memory module and Mini PCI card 2 module release latch 5 battery release latch 3 docking device latch Module Release Latch Press the latch to remove a device in the module bay. Docking Device Latch This latch connects the computer to an opti...
Page 20 - Conserving Power; Conservation Tips; Power Conservation Modes; Standby Mode
Conserving Power: Dell Inspiron 4100 Back to Contents Page Conserving Power Dell™ Inspiron™ 4100 Conservation Tips Power Conservation Modes Power Options Properties Conservation Tips ● You automatically conserve battery power each time you attach your computer to an electrical outlet. When the AC ad...
Page 21 - Hibernate Mode
Conserving Power: Dell Inspiron 4100 standby mode. To activate standby mode: ● Click the Start button, click Shut down ( Turn Off Computer in the Microsoft® Windows® XP Home Edition operating system), click Stand by , and then click OK . or ● Press the power button or the power conservation key comb...
Page 22 - Power Options Properties; Power Schemes Tab
Conserving Power: Dell Inspiron 4100 To exit hibernate mode, press the power button. The computer may take a short time to exit hibernate mode. Pressing a key or touching the touch pad or track stick does not bring the computer out of hibernate mode. Hibernate mode requires a special file on your ha...
Page 24 - Alarms Tab
Conserving Power: Dell Inspiron 4100 Alarms Tab HINT: To enable audible alarms, click each Alarm Action button and select Sound alarm . The Low battery alarm and Critical battery alarm settings alert you with a message when the battery charge falls below a certain percentage. When you receive your c...
Page 25 - Power Meter Tab; Advanced Tab
Conserving Power: Dell Inspiron 4100 Power Meter Tab The Power Meter tab displays the current power source and amount of battery charge remaining. Advanced Tab The Advanced tab allows you to: ● Set icon and standby password options. file:///F|/Service%20Manuals/Dell/Inspiron/4100/power.htm (6 of 10)...
Page 27 - Hibernate Tab
Conserving Power: Dell Inspiron 4100 HINT: If you are going to connect your computer to a docking device, click None when you program the display-close option. This setting ensures that your computer does not enter standby mode or hibernate mode when you close (lower) the display. To program these f...
Page 28 - Intel® SpeedStepTM Tab
Conserving Power: Dell Inspiron 4100 HINT: Windows XP automatically handles fluctuations in microprocessor performance during power source changes. Therefore, Intel SpeedStep technology is not included with computers running Windows XP. Intel® SpeedStep™ Tab If your computer has a Mobile Intel Penti...
Page 30 - System Specifications
System Specifications: Dell Inspiron 4100 Back to Contents Page System Specifications Dell™ Inspiron™ 4100 Microprocessor System Information PC Card Memory Ports and Connectors Communications Video Audio Display Keyboard Touch Pad Track Stick Battery AC Adapter Physical Environmental Microprocessor ...
Page 39 - Solving Problems; Accessing Help Files
Solving Problems: Dell Inspiron 4100 Back to Contents Page Solving Problems Dell™ Inspiron™ 4100 Accessing Help Files Power Problems Error Messages Video and Display Problems Sound and Speaker Problems Printer Problems Modem and Internet Connection Problems Scanner Problems Touch Pad or Mouse Proble...
Page 41 - Power Problems
Solving Problems: Dell Inspiron 4100 Power Problems HINT: See the Tell Me How help file for information on standby mode. See " Accessing Help Files ." Check the power light— When the power light is lit or blinking, the computer has power. If the power light is blinking, the computer is in st...
Page 42 - Error Messages
Solving Problems: Dell Inspiron 4100 Reseat the memory modules— If your computer power light turns on but the display remains blank, reseat the memory modules. See " Memory Module ." Error Messages HINT: If the message is not listed, see the documentation for the operating system or the prog...
Page 43 - Video and Display Problems; If the display is blank
Solving Problems: Dell Inspiron 4100 Windows Me and Windows 2000 1. Click the Start button, point to Settings , and then click Control Panel . 2. Double-click the Add/Remove Programs icon. 3. Click the program that you want to remove. 4. Click Add/Remove (click Change/Remove in Windows 2000) and fol...
Page 44 - If the display is difficult to read
Solving Problems: Dell Inspiron 4100 Test the electrical outlet— Ensure that the electrical outlet is working by testing it with another device, such as a lamp. If the device is plugged into a surge protector, try plugging it directly into an electrical outlet. Check the AC adapter— Check the AC ada...
Page 45 - If only part of the display is readable; Sound and Speaker Problems; If you have a problem with integrated speakers
Solving Problems: Dell Inspiron 4100 Adjust the Windows display settings Windows XP 1. Click the Start button, and then click Control Panel . 2. Click Appearance and Themes . 3. Click Display , and then click the Settings tab. 4. Try different settings for Screen resolution and Color quality . Windo...
Page 46 - If you have a problem with external speakers
Solving Problems: Dell Inspiron 4100 Adjust the Windows® volume control— Double-click the yellow speaker icon in the lower-right corner of your screen. Be sure that the volume is turned up and that the sound is not muted. Adjust the volume, bass, or treble controls to eliminate distortion. Adjust th...
Page 47 - Printer Problems; Modem and Internet Connection Problems
Solving Problems: Dell Inspiron 4100 Eliminate possible interference— Turn off nearby fans, fluorescent lights, or halogen lamps to check for interference. Reinstall the Sound (audio) driver— See " Reinstalling Drivers and Utilities ." Printer Problems Check the printer cable connections— En...
Page 50 - Scanner Problems
Solving Problems: Dell Inspiron 4100 Scanner Problems Check the power cable connection— Ensure that the scanner power cable is firmly connected to a working electrical power source and that the scanner is turned on. If the device is plugged into a surge protector, try plugging it directly into an el...
Page 51 - External Keyboard Problems
Solving Problems: Dell Inspiron 4100 Reinstall the touch pad driver— See " Reinstalling Drivers and Utilities ." External Keyboard Problems Check the keyboard cable— Shut down the computer. Disconnect the keyboard cable and check it for damage. For PS/2 cables, check the cable connector for ...
Page 52 - Unexpected Characters; Drive Problems; If you cannot save a file to a floppy drive
Solving Problems: Dell Inspiron 4100 Unexpected Characters HINT: When you attach an external keyboard, the integrated keyboard remains fully functional. Disable the numeric keypad— Press to disable the numeric keypad if numbers are displayed instead of letters. Verify that the numbers lock light is ...
Page 54 - tray
Solving Problems: Dell Inspiron 4100 Ensure that Windows recognizes the drive— In Windows XP, click the Start button, and then click My Computer . In Windows Me and Windows 2000 , double-click the My Computer icon on the Windows desktop. If the floppy drive is not listed, perform a full scan with yo...
Page 55 - If you hear an unfamiliar scraping or grinding; If you have problems with a hard drive
Solving Problems: Dell Inspiron 4100 1. Ensure that the computer is off. 2. Straighten a paper clip and insert one end into the eject hole at the front of the drive; push firmly until the tray is partially ejected. 3. Gently pull out the tray until it stops. If you hear an unfamiliar scraping or gri...
Page 56 - Network Problems; General Program Problems
Solving Problems: Dell Inspiron 4100 Run ScanDisk Windows XP and Windows 2000 1. In Windows XP, click the Start button, and then click My Computer . In Windows 2000, double-click the My Computer icon on the Windows desktop. 2. Right-click the drive letter (local disk) that you want to scan for error...
Page 57 - A program crashes; A program stops responding; A solid blue screen appears; Error messages appear
Solving Problems: Dell Inspiron 4100 A program crashes HINT: Software usually includes installation instructions in its documentation or on a floppy disk or CD. See the software documentation— Many software manufacturers maintain websites with information that may help you solve the problem. Ensure ...
Page 58 - If Your Computer Gets Wet
Solving Problems: Dell Inspiron 4100 Review "Error Messages"— Look up the message and take the appropriate action. See the software documentation. E-Mail Problems Ensure that you are connected to the Internet— With the Outlook Express e-mail program open, click File . If Work Offline has a c...
Page 59 - If You Drop or Damage Your Computer
Solving Problems: Dell Inspiron 4100 8. Remove the memory modules (see " Memory Module "). 9. Open the display and place the computer right-side up across two books or similar props to let air circulate all around it. Let the computer dry for 24–48 hours in a dry area at room temperature. NO...
Page 60 - Resolving Other Technical Problems
Solving Problems: Dell Inspiron 4100 1. Save and close any open files, exit any open programs, and shut down the computer. 2. Disconnect the AC adapter from the computer and from the electrical outlet. 3. Remove and reinstall the battery. 4. Turn off any attached external devices, and disconnect the...
Page 62 - Using the Windows XP Device Driver Rollback; Manually Reinstalling Drivers; Reinstalling the Modem or Network Adapter
Solving Problems: Dell Inspiron 4100 If no Install button is present, automatic installation is not an option. For installation instructions, either see the appropriate instructions in the following subsections, or click the Extract button, follow the extracting instructions, and read the readme fil...
Page 65 - Resolving Software and Hardware
Solving Problems: Dell Inspiron 4100 selected, and then click Next . 8. Click Finish , and then click Yes to restart the computer. Resolving Software and Hardware Incompatibilities Windows XP, Windows Me, and Windows 2000 IRQ conflicts occur if a device either is not detected during the operating sy...
Page 66 - Windows Me
Solving Problems: Dell Inspiron 4100 If an IRQ conflict exists, the Device status area in the Properties window reports what other devices are sharing the device's IRQ. 9. Resolve any IRQ conflicts. You can also use the Windows XP Hardware Troubleshooter. To use the troubleshooter, click the Start b...
Page 69 - Creating a Restore Point; Using the System Restore Wizard
Solving Problems: Dell Inspiron 4100 Windows XP 1. Click the Start button and then click Control Panel . 2. Click Performance and Maintenance . 3. Click System . 4. Click the System Restore tab. 5. Make sure that Turn off System Restore is not checked. Windows Me 1. Click the Start button, point to ...
Page 70 - Manually Creating a Restore Point; Restoring the Computer to an Earlier Operating
Solving Problems: Dell Inspiron 4100 restore point. To use the System Restore Wizard, click the Start button, click Help and Support , click System Restore , and then follow the instructions on the System Restore Wizard screen. You can also create and name a restore point if you are logged on as the...
Page 71 - Undoing the Last System Restore
Solving Problems: Dell Inspiron 4100 3. Click the calendar date to which you want to restore your computer. The Select a Restore Point ( Choose a Restore Point in Windows Me) screen provides a calendar that allows you to see and select restore points. All calendar dates with available restore points...
Page 72 - Reinstalling Windows®; Reinstalling Windows XP
Solving Problems: Dell Inspiron 4100 2. Click Undo my last restoration and click Next . NOTICE: Save and close all open files and exit all open programs. Do not alter, open, or delete any files or programs until the system restoration is complete. 3. Click Next (click OK in Windows Me). 4. The Syste...
Page 74 - Reinstalling Windows Me
Solving Problems: Dell Inspiron 4100 settings. If your computer does not have a network adapter , this option does not appear. Windows XP installs its components and configures the computer. The computer automatically restarts. 15. When the Welcome to Microsoft screen appears, click the green arrow ...
Page 78 - Enabling Hibernate Support
Solving Problems: Dell Inspiron 4100 13. When the Completing the Windows 2000 Setup Wizard window appears, remove the CD from the drive, and then click Finish . The computer automatically restarts. Enabling Hibernate Support 1. Click the Start button, point to Settings , and click Control Panel . 2....
Page 79 - Using the DellTM Diagnostics; When to Use the Dell Diagnostics; Features of the Dell Diagnostics
file:///F|/Service%20Manuals/Dell/Inspiron/4100/diag.htm Back to Contents Page Using the Dell™ Diagnostics Dell™ Inspiron™ 4100 When to Use the Dell Diagnostics Features of the Dell Diagnostics Starting the Dell Diagnostics Advanced Testing Confirming the System Configuration Information When to Use...
Page 80 - Starting the Dell Diagnostics
file:///F|/Service%20Manuals/Dell/Inspiron/4100/diag.htm by yourself, the diagnostic tests can provide you with important information you will need when talking to Dell's service and support personnel. If you are experiencing a problem with your computer, Dell recommends that you perform the checks ...
Page 82 - Diagnostics Menu
file:///F|/Service%20Manuals/Dell/Inspiron/4100/diag.htm Diagnostics Menu appears. To select an option from this menu, highlight the option and press , or press the key that corresponds to the highlighted letter in the option you choose. Diagnostics Menu Option Function Test All Devices Performs ext...
Page 83 - Advanced Testing; Advanced Testing Main Screen; Advanced Testing Help Menu
file:///F|/Service%20Manuals/Dell/Inspiron/4100/diag.htm Advanced Testing When you select Advanced Testing from the Diagnostics Menu , the following screen appears, listing the diagnostic test device groups and devices of the selected device group, and it allows you to select categories from a menu....
Page 84 - Advanced Testing Help Categories
file:///F|/Service%20Manuals/Dell/Inspiron/4100/diag.htm Advanced Testing Help Categories Help Category Description Menu Provides descriptions of the main menu screen area, the device groups, and the different diagnostic menus and commands and instructions on how to use them. Keys Explains the funct...
Page 85 - Confirming the System Configuration
file:///F|/Service%20Manuals/Dell/Inspiron/4100/diag.htm inclusively, and second, seeking alternately from the beginning to ending cylinders with convergence towards the middle. Versions Lists the version numbers of the subtests that are used by the Dell Diagnostics. Confirming the System Configurat...
Page 87 - System Setup Program; Overview
System Setup Program: Dell Inspiron 4100 Back to Contents Page System Setup Program Dell™ Inspiron™ 4100 Overview Viewing the System Setup Screens System Setup Screens Commonly Used Options Overview HINT: Your operating system may automatically configure most of the options available in the system s...
Page 88 - Viewing the System Setup Screens
System Setup Program: Dell Inspiron 4100 Viewing the System Setup Screens 1. Turn on (or restart) your computer. 2. When the Dell™ logo appears, press immediately. If you wait too long and the Windows® logo appears, continue to wait until you see the Windows desktop. Then shut down your computer and...
Page 89 - Commonly Used Options; Changing the Boot Sequence; Changing Printer Modes
System Setup Program: Dell Inspiron 4100 ● Battery charge status ● Power management settings ● System security and hard drive password settings HINT: Certain options require that you reboot the computer for new settings to take effect. Commonly Used Options Changing the Boot Sequence The boot sequen...
Page 90 - Changing COM Ports
System Setup Program: Dell Inspiron 4100 came with the device. Setting Parallel Mode to Disabled disables the parallel port and its assigned LPT address, freeing its interrupt for another device to use. Changing COM Ports Serial Port allows you to map the address of the serial port, or to disable th...
Page 92 - Ports and Connector Pin-Outs; Port Locations
Ports and Connector Pin-Outs: Dell Inspiron 4100 Back to Contents Page Ports and Connector Pin-Outs Dell™ Inspiron™ 4100 Port Locations Serial Connector Parallel Connector Docking Connector PS/2 Connector USB Connector Video Connector S-Video TV-Out Connector Port Locations 1 air intake 6 PS/2 conne...
Page 94 - Parallel Connector
Ports and Connector Pin-Outs: Dell Inspiron 4100 Parallel Connector Use the 25-hole parallel connector to attach a parallel device to the computer. The parallel connector is used primarily for printers. The parallel connector transmits data in parallel format, where 8 data bits (one byte) are sent s...
Page 95 - Docking Connector
Ports and Connector Pin-Outs: Dell Inspiron 4100 8 PD6 I/O Printer data bit 6 9 PD7 I/O Printer data bit 7 10 ACK# I Acknowledge 11 BUSY I Busy 12 PE I Paper end 13 SLCT I Select 14 AFD# O Automatic feed 15 ERR# I Error 16 INIT# O Initialize printer 17 SLIN# O Select in 18-25 N/A N/A Ground signal S...
Page 99 - Video Connector
Ports and Connector Pin-Outs: Dell Inspiron 4100 Pin Signal Definition 1 VCC Cable power 2 – Data N/A 3 +Data N/A 4 Ground Cable ground Video Connector Use the 15-pin video connector to attach an external monitor to the computer. If the image does not appear on the monitor immediately, press . file:...
Page 102 - Removing and Replacing Parts; Preparing to Work Inside the Computer
Removing and Replacing Parts: Dell Inspiron 4100 Back to Contents Page Removing and Replacing Parts Dell™ Inspiron™ 4100 Preparing to Work Inside the Computer Recommended Tools Screw Identification System Components Palm Rest Inserts Display Cover Hard Drive Assembly Adding a Daughter Card Modem Mod...
Page 103 - Recommended Tools
Removing and Replacing Parts: Dell Inspiron 4100 3. Turn off the computer and all attached devices. HINT: Make sure the computer is turned off and not in suspend mode or hibernate mode. If you cannot shut down the computer using the computer operating system, press and hold the power button for 4 se...
Page 105 - Screw Identification
Removing and Replacing Parts: Dell Inspiron 4100 Screw Identification When you are removing and replacing components, photocopy the placemat as a tool to lay out and keep track of the screws. The placemat provides the number of screws and their sizes. NOTICE: When reinstalling a screw, you must use ...
Page 107 - System Components; Exploded View
Removing and Replacing Parts: Dell Inspiron 4100 System Board to Bottom Case: (10 each) Modem to System Board: (2 each) Display Latch: (2 each) (2 each) System Components Exploded View NOTICE: Only a certified service technician should perform repairs on your computer. Damage due to servicing that i...
Page 109 - Palm Rest Inserts
Removing and Replacing Parts: Dell Inspiron 4100 7 right speaker/antenna assembly 15 palm rest assembly 8 fan guard 16 keyboard Palm Rest Inserts 1. Save and close any open files, exit any open programs, and shut down the computer. 2. If the computer is connected (docked) to a docking device, undock...
Page 111 - Display Cover
Removing and Replacing Parts: Dell Inspiron 4100 Display Cover 1. Slide your index fingers under the straight edge of the display cover until the cover pops out. 2. Slide the display cover towards the back of the computer. 3. Use your fingers to release the cover completely, and remove it. 4. To rep...
Page 112 - Hard Drive Assembly; Removing the Hard Drive
Removing and Replacing Parts: Dell Inspiron 4100 Hard Drive Assembly Removing the Hard Drive 1. Save and close any open files, exit any open programs, and shut down the computer. NOTICE: Disconnect the computer and any attached devices from electrical outlets, and remove any installed batteries. NOT...
Page 113 - Replacing the Hard Drive
Removing and Replacing Parts: Dell Inspiron 4100 1 bottom of computer 2 M3 x 5-mm screw 3 hard drive door 4. Lift up the hard drive door until you hear a click. 5. Slide the hard drive out of the computer. Replacing the Hard Drive NOTICE: Use firm and even pressure to slide the hard drive into place...
Page 114 - Adding a Daughter Card Modem
Removing and Replacing Parts: Dell Inspiron 4100 3. Replace the M3 x 5-mm screw in the hard drive door. Adding a Daughter Card Modem If you ordered the optional modem at the same time that you ordered your computer, Dell has already installed the modem for you. 1. Make sure that the work surface is ...
Page 116 - Removing the Memory Module Cover
Removing and Replacing Parts: Dell Inspiron 4100 Module Bay Devices 1. Save and close any open files, exit any open programs, and shut down the computer. 2. If the computer is connected (docked) to a docking device, undock it. 3. Close the display and turn the computer over. 4. Slide and hold the la...
Page 117 - Removing the Memory Modules
Removing and Replacing Parts: Dell Inspiron 4100 open. 1 M2.5 x 12-mm screw (1) 2 captive screws (2) Removing the Memory Modules NOTICE: Disconnect the computer and any attached devices from electrical outlets, and remove any installed batteries. NOTICE: To avoid ESD, ground yourself by using a wris...
Page 119 - Replacing the Memory Modules; Mini PCI Card Assembly; Removing the Mini PCI Card
Removing and Replacing Parts: Dell Inspiron 4100 Replacing the Memory Modules 1. If you only have one memory module, install it in the connector labeled "JDIM1" on the system board. Install a second memory module in the connector labeled "JDIM2." HINT: Memory modules are keyed, or de...
Page 120 - Replacing the Mini PCI Card
Removing and Replacing Parts: Dell Inspiron 4100 1. Remove the memory module cover. 2. Disconnect the Mini PCI card from the antenna cables. 3. To release a Mini PCI card from its socket, spread apart the metal securing tabs until the card pops up slightly. 4. Lift the Mini PCI card out of its conne...
Page 121 - Keyboard Assembly; Removing the Keyboard
Removing and Replacing Parts: Dell Inspiron 4100 NOTICE: The connectors are keyed for correct insertion; do not force the connections. 2. Lower the Mini PCI card toward the inner tabs to approximately a 20-degree angle. 3. Continue lowering the Mini PCI card until it snaps into the inner tabs of the...
Page 125 - Replacing the Keyboard
Removing and Replacing Parts: Dell Inspiron 4100 1 boss support (5) 2 track stick cable 3 keyboard flex cable 4 keyboard connector 5 orientation label 10. Remove the keyboard from the bottom case. Replacing the Keyboard 1. Place the keyboard on the palm rest at the front of the computer with the key...
Page 126 - Display Assembly
Removing and Replacing Parts: Dell Inspiron 4100 6. Reinstall the five M2.5 x 12-mm screws in the holes labeled "circle K." Display Assembly NOTICE: You must remove the display assembly before you remove the palm rest. NOTICE: Disconnect the computer and any attached devices from electrical ...
Page 134 - Removing the Display Latch
Removing and Replacing Parts: Dell Inspiron 4100 Replacing the 14.1-Inch Display Panel 1. Reconnect the top flex-cable connector to the display panel connector. 2. Reconnect the bottom flex-cable connector to the inverter connector. 3. Replace the tape that secures the display panel connector and th...
Page 135 - Replacing the Display Latch
Removing and Replacing Parts: Dell Inspiron 4100 1 M1.7 x 3.5-mm screws (2) 2 M2.5 x 5-mm screws (2) 3 display latch 4 bracket Replacing the Display Latch 1. On 14.1-inch XGA panels , place the display latch on top of its screw holes, and then place the bracket on top of the display latch, aligning ...
Page 136 - Hinge Covers; Removing the Hinge Covers; Replacing the Hinge Covers
Removing and Replacing Parts: Dell Inspiron 4100 Hinge Covers Removing the Hinge Covers 1. Remove the display assembly . 2. Rotate the hinges forward at an angle of approximately 90 degrees to the front of the display assembly. 3. To remove the hinge covers, slide them off the hinges. Replacing the ...
Page 138 - Palm Rest
Removing and Replacing Parts: Dell Inspiron 4100 1 right hinge cover 2 left hinge cover Palm Rest NOTICE: Disconnect the computer and any attached devices from electrical outlets, and remove any installed batteries. NOTICE: To avoid ESD, ground yourself by using a wrist grounding strap or by touchin...
Page 141 - Microprocessor Thermal Cooling Assembly
Removing and Replacing Parts: Dell Inspiron 4100 5 back center of the palm rest 6 touch pad connector NOTICE: Carefully separate the palm rest from the bottom case to avoid damage to the palm rest. 8. Starting at the back center of the palm rest, use your fingers to separate the palm rest from the b...
Page 143 - Replacing the Microprocessor Thermal Cooling; Microprocessor Module; Removing the Microprocessor Module
Removing and Replacing Parts: Dell Inspiron 4100 1 microprocessor thermal cooling assembly 2 captive screws (4) 3 right side 4. Lift the microprocessor thermal cooling assembly up and out of the system board. Replacing the Microprocessor Thermal Cooling Assembly 1. Place the right side of the microp...
Page 145 - Replacing the Microprocessor Module
Removing and Replacing Parts: Dell Inspiron 4100 NOTICE: When removing the microprocessor module, pull the module straight up. Be careful not to bend the pins on the microprocessor module. 4. To loosen the ZIF socket, use a small, flat-blade screwdriver and rotate the ZIF- socket cam screw counter-c...
Page 146 - Flashing the BIOS
Removing and Replacing Parts: Dell Inspiron 4100 2. Tighten the ZIF socket by turning the cam screw clockwise to secure the microprocessor module to the system board. 3. Update the BIOS using a flash BIOS update program floppy disk or CD. For instructions on how to flash the BIOS, see " Flashing...
Page 147 - Reserve Battery; Removing the Reserve Battery
Removing and Replacing Parts: Dell Inspiron 4100 6. Press to exit the system setup program. 7. Remove the flash BIOS update floppy disk or CD from the drive and restart the computer. Reserve Battery Removing the Reserve Battery NOTICE: The reserve battery provides power to the computer's RTC and NVR...
Page 148 - Replacing the Reserve Battery
Removing and Replacing Parts: Dell Inspiron 4100 1 reserve battery 2 speaker connector 3 system board connector 4 reserve battery cable Replacing the Reserve Battery 1. Connect the reserve battery cable to the system board connector. 2. Position the reserve battery above the speaker connector on the...
Page 149 - System Speaker Assembly; Removing the Speaker Assemblies
Removing and Replacing Parts: Dell Inspiron 4100 System Speaker Assembly Removing the Speaker Assemblies NOTICE: Disconnect the computer and any attached devices from electrical outlets, and remove any installed batteries. NOTICE: To avoid ESD, ground yourself by using a wrist grounding strap or by ...
Page 152 - Replacing the Speaker Assemblies
Removing and Replacing Parts: Dell Inspiron 4100 1 antenna cable 6 antenna cable 2 in-line connector 7 right speaker holder 3 left speaker 8 mounting ring 4 mounting ring 9 right speaker 5 left speaker holder 1. Remove the hard drive . 2. Remove the keyboard . 3. Remove the display assembly . 4. Rem...
Page 153 - System Board Assembly; Removing the System Board
Removing and Replacing Parts: Dell Inspiron 4100 HINT: Speakers face out in the bottom case holders. System Board Assembly Removing the System Board The system board's BIOS chip contains the service tag sequence, which is also visible on a barcode label on the bottom of the computer. The replacement...
Page 155 - Replacing the System Board
Removing and Replacing Parts: Dell Inspiron 4100 1 M2.5 x. 5-mm screw (1) 11. Remove the speakers from the bottom case. 12. Pull the right side of the bottom case, next to the external headphone and microphone connectors, away from the system board as you simultaneously lift the front of the system ...
Page 156 - Module Latch Assemblies
Removing and Replacing Parts: Dell Inspiron 4100 a. Insert the external microphone and headphone connectors through the bottom case. b. Replace the six M2.5 x 5-mm screws, starting on the right side of the bottom case. c. Replace the fan guard, inserting the tab into the bottom case, and replace the...
Page 158 - Replacing the Battery and Module Bay Latches
Removing and Replacing Parts: Dell Inspiron 4100 1 bumps (2 per latch) 5 latch buttons (2) 2 slider 6 snap tabs (2 per latch button) 3 spring 7 wear rib 4 bottom case Replacing the Battery and Module Bay Latches 1. Snap in the new latch button from behind the bottom case, making certain that the sna...


 Dell Inspiron 3500 User Manual
 Dell Inspiron 3537 User Manual
 Dell Inspiron 3646 User Manual
 Dell Inspiron 3700 User Manual
 Dell Inspiron 3800 User Manual
 Dell Inspiron 4000 User Manual
 Dell Inspiron 4150 User Manual
 Dell Inspiron 5000 User Manual
 Dell Inspiron 5000e Quick Guide
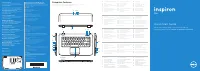 Dell Inspiron 5523 User Manual
 Dell Inspiron 5721 User Manual